light DODGE DART 2014 PF / 1.G Owners Manual
[x] Cancel search | Manufacturer: DODGE, Model Year: 2014, Model line: DART, Model: DODGE DART 2014 PF / 1.GPages: 656, PDF Size: 4.73 MB
Page 382 of 656
CD Player Operating Instructions
Loading
To insert disc into the player, follow the instructions
shown:
1. Gently insert the disc with the label facing the rear ofthe vehicle while the light below the loading slot is
illuminated. The disc will automatically be pulled into
the CD player.
2. Upon insertion, the disc will begin to play, and the light below the loading slot will turn off.
EJECT (EJT) Button
If there is a disc in the CD player, press the EJT button
and the disc will eject. If you do not remove the disc
within 10 seconds, it will be reloaded.
Uconnect® — If Equipped
If equipped with Uconnect® 8.4, refer to the Uconnect®
8.4 manual for further information.
iPod®/USB/MP3 CONTROL WITH Uconnect®
VOICE COMMAND — IF EQUIPPED
This feature allows an iPod® or external USB device to be
plugged into the USB port.
iPod® control supports Mini, 4G, Photo, Nano, 5G iPod®
and iPhone® devices. Some iPod® software versions
may not fully support the iPod® control features. Please
visit Apple’s website for software updates.
If equipped with Uconnect® 8.4, refer to the Uconnect®
User ’s Manual for further details on iPod®, USB, and
MP3 usage.
380 UNDERSTANDING YOUR INSTRUMENT PANEL
Page 391 of 656
CD Player
Pressing the top of the switch once will go to the next
track on the CD. Pressing the bottom of the switch once
will go to the beginning of the current track, or to the
beginning of the previous track if it is within eight
seconds after the current track begins to play.
If you press the switch up or down twice, it plays the
second track; three times, it will play the third, etc.
The center button on the left side rocker switch has no
function for a single-disc CD player. However, when a
multiple-disc CD player is equipped on the vehicle, the
center button will select the next available CD in the
player.
CD/DVD DISC MAINTENANCE
To keep a CD/DVD in good condition, take the following
precautions:
1. Handle the disc by its edge; avoid touching thesurface.
2. If the disc is stained, clean the surface with a soft cloth, wiping from center to edge.
3. Do not apply paper or tape to the disc; avoid scratch- ing the disc.
4. Do not use solvents such as benzene, thinner, cleaners, or anti-static sprays.
5. Store the disc in its case after playing.
6. Do not expose the disc to direct sunlight.
7. Do not store the disc where temperatures may become too high.
4
UNDERSTANDING YOUR INSTRUMENT PANEL 389
Page 394 of 656
•Recirculated air is not allowed in Defrost modes. If
the Recirculation button is pressed while in this
mode, the LED indicator will flash several times then
go out. Recirculation will be disabled automatically
is this mode is selected.
• The A/C can be deselected manually without dis-
turbing the mode control selection.
• When the ignition switch is turned to the LOCK
position, the recirculation feature will be cancelled.
3. Temperature Control
Rotate this control to regulate the temperature of the air
inside the passenger compartment. Rotating the dial left
into the blue area of the scale indicates cooler tempera-
tures, while rotating right into the red area indicates
warmer temperatures. NOTE:
If your air conditioning performance seems lower
than expected, check the front of the A/C condenser
located in front of the radiator for an accumulation of dirt
or insects. Clean with a gentle water spray from behind
the radiator and through the condenser. Fabric front
fascia protectors may reduce airflow to the condenser,
reducing air conditioning performance.
4. Air Conditioning Control
Press this button to engage the Air Conditioning. A light
will illuminate when the Air Conditioning system is
engaged. Rotating the dial left into the blue area of the
scale indicates cooler temperatures, while rotating right
into the red area indicates warmer temperatures.
NOTE: The air conditioning compressor will not engage
until the engine has been running for about 10 seconds.
392 UNDERSTANDING YOUR INSTRUMENT PANEL
Page 395 of 656
•MAX A/C
For maximum cooling use the A/C and recirculation
buttons at the same time.
• ECONOMY MODE
If economy mode is desired, press the A/C button to
turn OFF the indicator light and the A/C compressor.
Then, move the temperature control to the desired
temperature and select only Panel, Bi-Level or Floor
modes.
5. Mode Control (Air Direction)
Rotate this control to choose from several patterns of air
distribution. You can select either a primary mode as
identified by the symbols on the control, or a blend of
two of these modes. The closer the setting is to a
particular symbol, the more air distribution you receive
from that mode. •
Panel
Air is directed through the outlets in the instru-
ment panel. These outlets can be adjusted to direct
airflow.
NOTE: The center instrument panel outlets can be aimed
so that they are directed toward the rear seat passengers
for maximum airflow to the rear.
• Bi-Level
Air is directed through the panel and floor outlets.
NOTE: For all settings, except full cold or full hot, there
is a difference in temperature between the upper and
lower outlets. The warmer air flows to the floor outlets.
This feature gives improved comfort during sunny but
cool conditions.
4
UNDERSTANDING YOUR INSTRUMENT PANEL 393
Page 401 of 656
10. Driver Temperature Control Down Button
Provides the driver with independent temperature con-
trol. Push the button for cooler temperature settings.
NOTE:In Sync mode, this button will also automatically
adjust the passenger temperature setting at the same
time.
11. Driver Temperature Control Up Button
Provides the driver with independent temperature con-
trol. Push the button for warmer temperature settings.
NOTE: In Sync mode, this button will also automatically
adjust the passenger temperature setting at the same
time. 12. Modes
The airflow distribution mode can be adjusted so air
comes from the instrument panel outlets, floor outlets,
demist outlets and defrost outlets. The Mode settings are
as follows:
•
Panel Mode
Air comes from the outlets in the instrument panel.
Each of these outlets can be individually adjusted to
direct the flow of air. The air vanes of the center
outlets and outboard outlets can be moved up and down or
side to side to regulate airflow direction. There is a shut off
wheel located below the air vanes to shut off or adjust the
amount of airflow from these outlets.
• Bi-Level Mode
Air comes from the instrument panel outlets and
floor outlets. A slight amount of air is directed
through the defrost and side window demister
outlets.
4
UNDERSTANDING YOUR INSTRUMENT PANEL 399
Page 402 of 656
NOTE:BI-LEVEL mode is designed under comfort con-
ditions to provide cooler air out of the panel outlets and
warmer air from the floor outlets.
• Floor Mode
Air comes from the floor outlets. A slight amount
of air is directed through the defrost and side
window demister outlets.
• Mix Mode
Air comes from the floor, defrost and side window
demist outlets. This mode works best in cold or
snowy conditions.
• Defrost Mode
Air comes from the windshield and side window demist
outlets. Use Defrost mode with maximum temperature
settings for best windshield and side window defrosting
and defogging. When the defrost mode is selected, the
blower level may increase. 13. SYNC
Press the Sync soft-key to toggle the Sync feature On/Off.
The Sync indicator is illuminated when this feature is
enabled. Sync is used to synchronize the passenger
temperature setting with the driver temperature setting.
Changing the passenger temperature setting while in
Sync will automatically exit this feature.
Climate Control Functions
A/C (Air Conditioning)
The Air Conditioning (A/C) button allows the operator
to manually activate or deactivate the air conditioning
system. When the air conditioning system is turned on,
cool dehumidified air will flow through the outlets into
the cabin. For improved fuel economy, press the A/C
button to turn off the air conditioning and manually
adjust the blower and airflow mode settings.
400 UNDERSTANDING YOUR INSTRUMENT PANEL
Page 417 of 656
Shifting
Fully press the clutch pedal before shifting gears. As you
release the clutch pedal, lightly press the accelerator
pedal.
You should always use first gear when starting from a
standing position.
Recommended Vehicle Shift Speeds
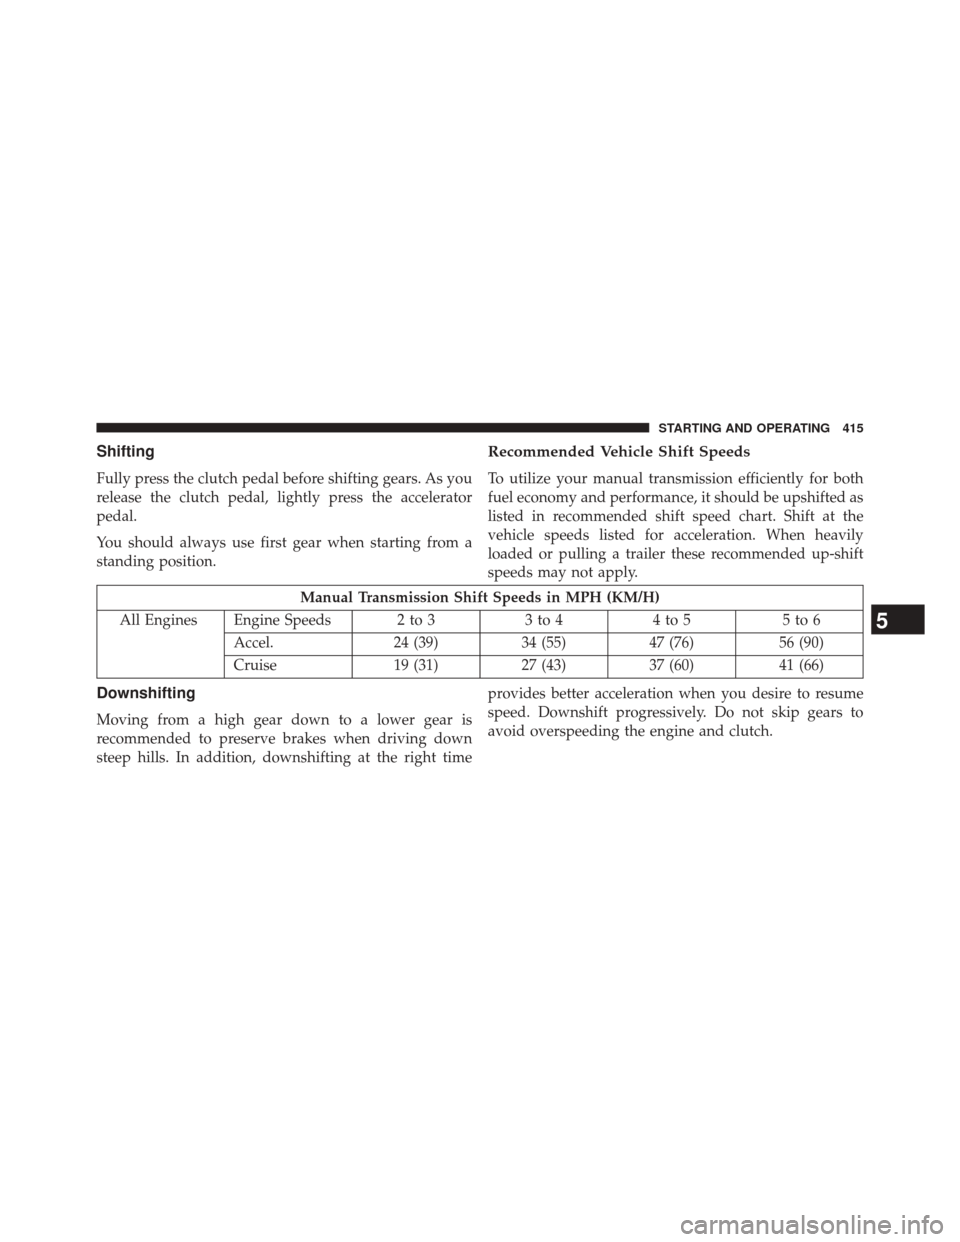
To utilize your manual transmission efficiently for both
fuel economy and performance, it should be upshifted as
listed in recommended shift speed chart. Shift at the
vehicle speeds listed for acceleration. When heavily
loaded or pulling a trailer these recommended up-shift
speeds may not apply.
Manual Transmission Shift Speeds in MPH (KM/H)
All Engines Engine Speeds 2 to 3 3 to 44 to 5 5 to 6
Accel. 24 (39)34 (55)47 (76) 56 (90)
Cruise 19 (31)27 (43)37 (60) 41 (66)
Downshifting
Moving from a high gear down to a lower gear is
recommended to preserve brakes when driving down
steep hills. In addition, downshifting at the right time provides better acceleration when you desire to resume
speed. Downshift progressively. Do not skip gears to
avoid overspeeding the engine and clutch.
5
STARTING AND OPERATING 415
Page 431 of 656
Transmission Limp Home Mode
Transmission function is monitored electronically for
abnormal conditions. If a condition is detected that could
result in transmission damage, Transmission Limp Home
Mode is activated. In this mode, some gears will be
unavailable. The transmission will operate only in a
certain select set of gears (such as 1st, 2nd, 3rd, and
Reverse, or 1st, 3rd, 5th, and Reverse, or 2nd, 4th, and 6th
[with no Reverse]). PARK and NEUTRAL will continue
to be available. The Malfunction Indicator Light (MIL)
may be illuminated. Limp Home Mode allows the vehicle
to be driven to an authorized dealer for service without
damaging the transmission.
In the event of a momentary problem, the transmission
can be reset to regain all forward gears by performing the
following steps:
1. Stop the vehicle.
2. Shift the transmission into PARK.3. Turn the ignition switch to the OFF position.
4. Wait approximately 10 seconds.
5. Restart the engine.
6. Shift into the desired gear range. If the problem is no
longer detected, the transmission will return to normal
operation.
NOTE: Even if the transmission can be reset, we recom-
mend that you visit your authorized dealer at your
earliest possible convenience. Your authorized dealer has
diagnostic equipment to determine if the problem could
recur.
If the transmission cannot be reset, authorized dealer
service is required.
5
STARTING AND OPERATING 429
Page 437 of 656
If the transmission temperature exceeds normal operat-
ing limits, the transmission controller will modify the
transmission shift schedule and expand the range of
torque converter clutch engagement. This is done to
prevent transmission damage due to overheating. If the
transmission becomes extremely hot, the “Transmission
Temperature Warning Light” may illuminate and the
transmission may operate differently until the transmis-
sion cools down.
During very cold temperatures (-4°F [-20°C] or below),
transmission operation may be modified depending on
engine and transmission temperature as well as vehicle
speed. Normal operation will resume once the transmis-
sion temperature has risen to a suitable level.Transmission Limp Home Mode
Transmission function is monitored electronically for
abnormal conditions. If a condition is detected that could
result in transmission damage, Transmission Limp Home
Mode is activated. In this mode, the transmission remains
in fourth gear regardless of which forward gear is
selected. PARK, REVERSE, and NEUTRAL will continue
to operate. The Malfunction Indicator Light (MIL) may be
illuminated. Limp Home Mode allows the vehicle to be
driven to an authorized dealer for service without dam-
aging the transmission.
5
STARTING AND OPERATING 435
Page 439 of 656
Torque Converter Clutch
A feature designed to improve fuel economy has been
included in the automatic transmission on your vehicle.
A clutch within the torque converter engages automati-
cally at calibrated speeds. This may result in a slightly
different feeling or response during normal operation in
the upper gears. When the vehicle speed drops or during
some accelerations, the clutch automatically disengages.
NOTE:Engagement of the torque converter clutch is
inhibited at very cold temperatures. Because the engine
speed is higher when the torque converter clutch is not
engaged, it may seem as if the transmission is not shifting
into Overdrive when cold. This is normal. The torque
converter clutch will function normally once the trans-
mission is sufficiently warm.AUTOSTICK®
AutoStick® is a driver-interactive transmission feature
providing manual shift control, giving you more control
of the vehicle. AutoStick® allows you to maximize en-
gine braking, eliminate undesirable upshifts and down-
shifts, and improve overall vehicle performance. This
system can also provide you with more control during
passing, city driving, cold slippery conditions, mountain
driving, and many other situations.
Operation
When the shift lever is in the AutoStick® position (beside
the DRIVE position), it can be moved forward and
rearward. This allows the driver to manually select the
transmission gear being used. Moving the shift lever
forward (-) triggers a downshift and rearward (+) an
upshift. The current gear is displayed in the instrument
cluster. In AutoStick® mode, the transmission will shift
up or down when the driver moves the shift lever
5
STARTING AND OPERATING 437