lock DODGE DART 2014 PF / 1.G Owners Manual
[x] Cancel search | Manufacturer: DODGE, Model Year: 2014, Model line: DART, Model: DODGE DART 2014 PF / 1.GPages: 656, PDF Size: 4.73 MB
Page 542 of 656
9. Lower the vehicle to the ground by turning the jackhandle counterclockwise.
10. Finish tightening the wheel bolts. Push down on the wrench while at the end of the handle for increased
leverage. Tighten the wheel bolts in a star pattern
until each wheel bolt has been tightened twice. Refer
to “Torque Specifications” in this section for proper
lug bolt torque. If in doubt about the correct tight-
ness, have them checked with a torque wrench by
your authorized dealer or at a service station.
11. Lower the jack until it is free. Remove the wheel blocks. Reassemble the lug wrench to the jack assem-
bly and stow it in the spare tire area. Secure the
assembly using the means provided. Release the
parking brake before driving the vehicle.
12. Stow the jack, tools and flat tire.WARNING!
A loose tire or jack thrown forward in a collision or
hard stop could endanger the occupants of the ve-
hicle. Always stow the jack parts and the spare tire in
the places provided. Have the deflated (flat) tire
repaired or replaced immediately.
Road Tire Installation
Vehicles Equipped With Wheel Covers
1. Mount the road tire on the axle.
2. To ease the installation process for steel wheels with wheel covers, install two wheel bolts on the wheel
which are on each side of the valve stem. Install the
wheel bolts with the threaded end of the bolt toward
the wheel. Lightly tighten the wheel bolts.
540 WHAT TO DO IN EMERGENCIES
Page 543 of 656
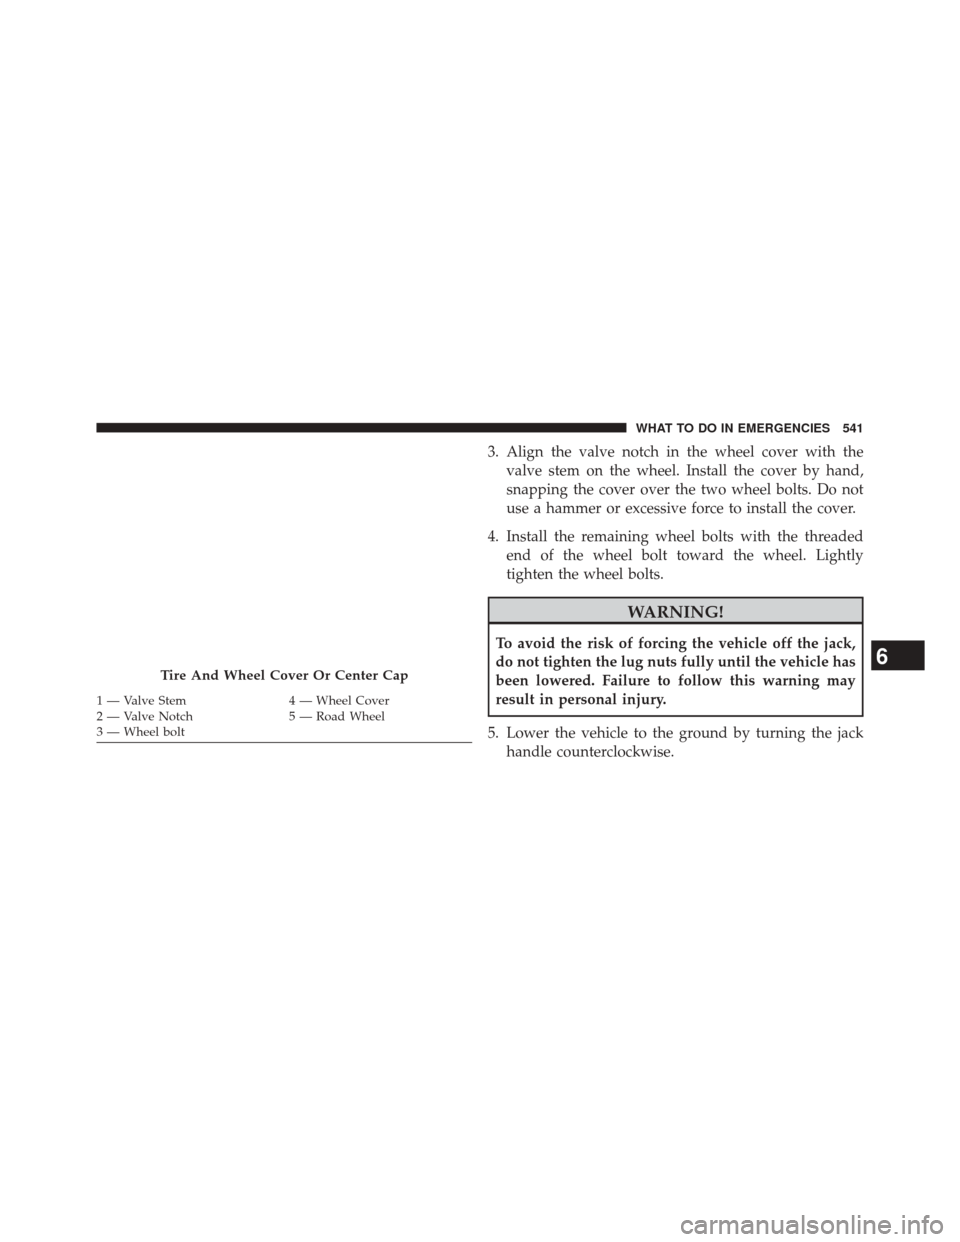
3. Align the valve notch in the wheel cover with thevalve stem on the wheel. Install the cover by hand,
snapping the cover over the two wheel bolts. Do not
use a hammer or excessive force to install the cover.
4. Install the remaining wheel bolts with the threaded end of the wheel bolt toward the wheel. Lightly
tighten the wheel bolts.
WARNING!
To avoid the risk of forcing the vehicle off the jack,
do not tighten the lug nuts fully until the vehicle has
been lowered. Failure to follow this warning may
result in personal injury.
5. Lower the vehicle to the ground by turning the jack handle counterclockwise.
Tire And Wheel Cover Or Center Cap
1 — Valve Stem 4 — Wheel Cover
2 — Valve Notch 5 — Road Wheel
3 — Wheel bolt
6
WHAT TO DO IN EMERGENCIES 541
Page 544 of 656
6. Finish tightening the wheel bolts. Push down on thewrench while at the end of the handle for increased
leverage. Tighten the wheel bolts in a star pattern until
each wheel bolt has been tightened twice. Refer to
“Torque Specifications” in this section for proper lug
bolt torque. If in doubt about the correct tightness,
have them checked with a torque wrench by your
authorized dealer or service station.
7. Lower the jack until it is free. Remove the wheel blocks. Reassemble the lug wrench to the jack assem-
bly and stow it in the spare tire area. Secure the
assembly using the means provided. Release the park-
ing brake before driving the vehicle.
8. After 25 miles (40 km) check the wheel bolt torque with a torque wrench to ensure that all wheel bolts are
properly seated against the wheel.Road Tire Installation
1. Mount the road tire on the axle.
2. Install the remaining wheel bolts with the threadedend of the wheel bolt toward the wheel. Lightly
tighten the wheel bolts.
WARNING!
To avoid the risk of forcing the vehicle off the jack,
do not tighten the lug nuts fully until the vehicle has
been lowered. Failure to follow this warning may
result in personal injury.
3. Lower the vehicle to the ground by turning the jack handle counterclockwise.
542 WHAT TO DO IN EMERGENCIES
Page 545 of 656
4. Finish tightening the wheel bolts. Push down on thewrench while at the end of the handle for increased
leverage. Tighten the wheel bolts in a star pattern until
each wheel bolt has been tightened twice. Refer to
“Torque Specifications” in this section for the proper
lug bolt torque. If in doubt about the correct tightness,
have them checked with a torque wrench by your
authorized dealer or service station.
5. Lower the jack until it is free. Remove the wheel blocks. Reassemble the lug wrench to the jack assem-
bly and stow it in the spare tire area. Secure the
assembly using the means provided. Release the park-
ing brake before driving the vehicle.
6. After 25 miles (40 km) check the wheel bolt torque with a torque wrench to ensure that all wheel bolts are
properly seated against the wheel.JUMP-STARTING PROCEDURES
If your vehicle has a discharged battery it can be jump-
started using a set of jumper cables and a battery in
another vehicle or by using a portable battery booster
pack. Jump-starting can be dangerous if done improperly
so please follow the procedures in this section carefully.
NOTE: When using a portable battery booster pack
follow the manufacturer ’s operating instructions and
precautions.
CAUTION!
Do not use a portable battery booster pack or any
other booster source with a system voltage greater
than 12 Volts or damage to the battery, starter motor,
alternator or electrical system may occur.
6
WHAT TO DO IN EMERGENCIES 543
Page 547 of 656
WARNING!
•Take care to avoid the radiator cooling fan when-
ever the hood is raised. It can start anytime the
ignition switch is ON. You can be injured by
moving fan blades.
• Remove any metal jewelry such as rings, watch
bands and bracelets that could make an inadvertent
electrical contact. You could be seriously injured.
• Batteries contain sulfuric acid that can burn your
skin or eyes and generate hydrogen gas which is
flammable and explosive. Keep open flames or
sparks away from the battery.
1. Set the parking brake, shift the automatic transmission into PARK (manual transmission in NEUTRAL) and
turn the ignition to LOCK.
2. Turn off the heater, radio, and all unnecessary electri- cal accessories. 3. If using another vehicle to jump-start the battery, park
the vehicle within the jumper cables reach, set the
parking brake and make sure the ignition is OFF.
WARNING!
Do not allow vehicles to touch each other as this
could establish a ground connection and personal
injury could result.
Jump-Starting Procedure
WARNING!
Failure to follow this jump-starting procedure could
result in personal injury or property damage due to
battery explosion.
6
WHAT TO DO IN EMERGENCIES 545
Page 576 of 656
Body Lubrication
Locks and all body pivot points, including such items as
seat tracks, door hinge pivot points and rollers, liftgate,
tailgate, decklid, sliding doors and hood hinges, should
be lubricated periodically with a lithium based grease,
such as MOPAR® Spray White Lube to assure quiet, easy
operation and to protect against rust and wear. Prior to
the application of any lubricant, the parts concerned
should be wiped clean to remove dust and grit; after
lubricating excess oil and grease should be removed.
Particular attention should also be given to hood latching
components to ensure proper function. When performing
other underhood services, the hood latch, release mecha-
nism and safety catch should be cleaned and lubricated.
The external lock cylinders should be lubricated twice a
year, preferably in the Fall and Spring. Apply a small
amount of a high quality lubricant, such as MOPAR®
Lock Cylinder Lubricant directly into the lock cylinder.
Windshield Wiper Blades
Clean the rubber edges of the wiper blades and the
windshield periodically with a sponge or soft cloth and a
mild nonabrasive cleaner. This will remove accumula-
tions of salt or road film.
Operation of the wipers on dry glass for long periods
may cause deterioration of the wiper blades. Always use
washer fluid when using the wipers to remove salt or dirt
from a dry windshield.
Avoid using the wiper blades to remove frost or ice from
the windshield. Keep the blade rubber out of contact with
petroleum products such as engine oil, gasoline, etc.
NOTE:Life expectancy of wiper blades varies depend-
ing on geographical area and frequency of use. Poor
performance of blades may be present with chattering,
marks, water lines or wet spots. If any of these conditions
are present, clean the wiper blades or replace as neces-
sary.
574 MAINTAINING YOUR VEHICLE
Page 603 of 656
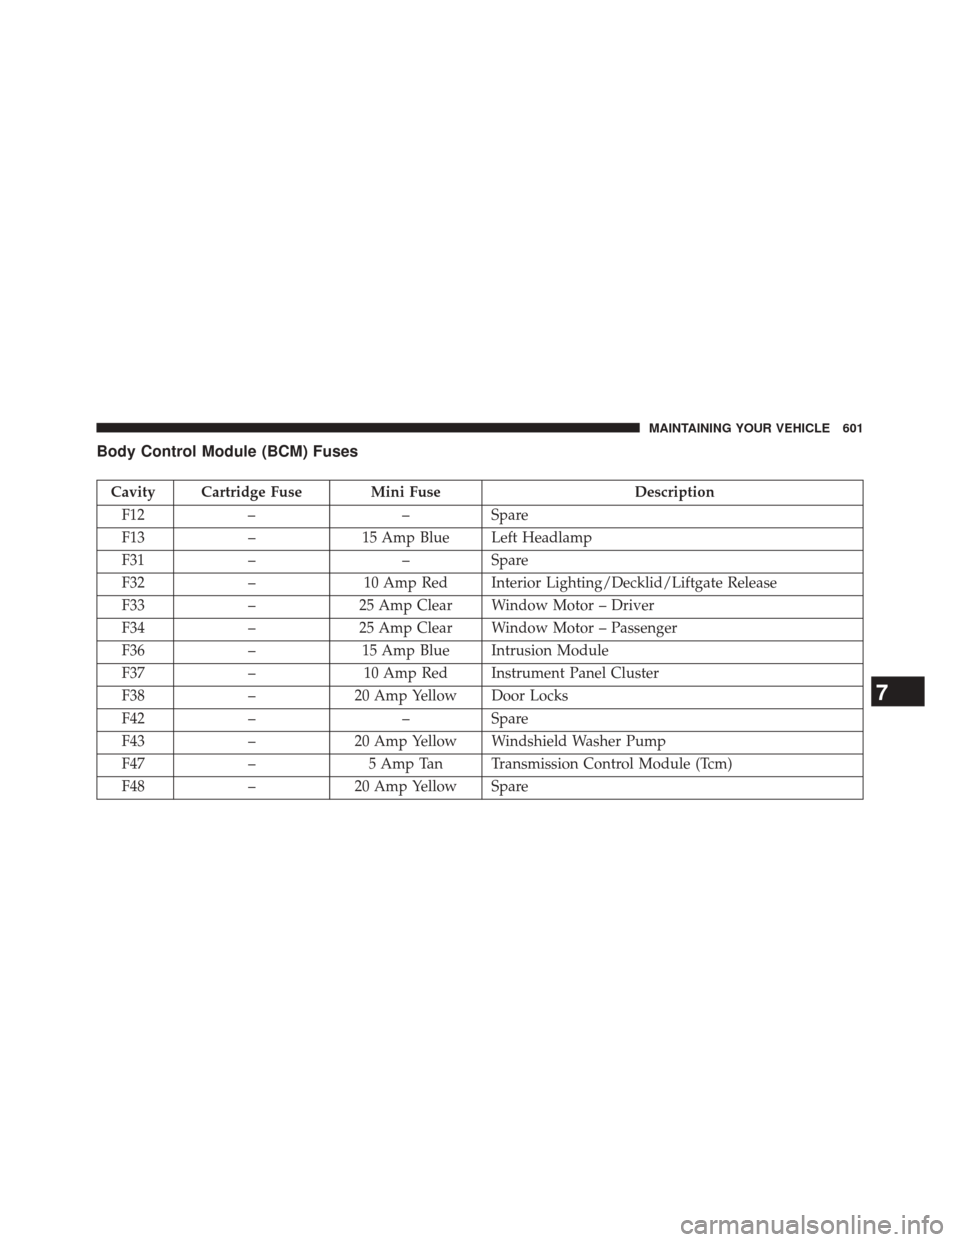
Body Control Module (BCM) Fuses
Cavity Cartridge Fuse Mini FuseDescription
F12 – –Spare
F13 –15 Amp Blue Left Headlamp
F31 – –Spare
F32 –10 Amp Red Interior Lighting/Decklid/Liftgate Release
F33 –25 Amp Clear Window Motor – Driver
F34 –25 Amp Clear Window Motor – Passenger
F36 –15 Amp Blue Intrusion Module
F37 –10 Amp Red Instrument Panel Cluster
F38 –20 Amp Yellow Door Locks
F42 – –Spare
F43 –20 Amp Yellow Windshield Washer Pump
F47 –5 Amp Tan Transmission Control Module (Tcm)
F48 –20 Amp Yellow Spare
7
MAINTAINING YOUR VEHICLE 601
Page 608 of 656
3. Twist the bulb socket one quarter turn counter clock-wise to remove.
4. Replace bulb. 5. Twist the bulb socket one quarter turn clockwise to
install.
6. Install trim cover.
Bulb Socket
Backup Bulb
606 MAINTAINING YOUR VEHICLE
Page 634 of 656
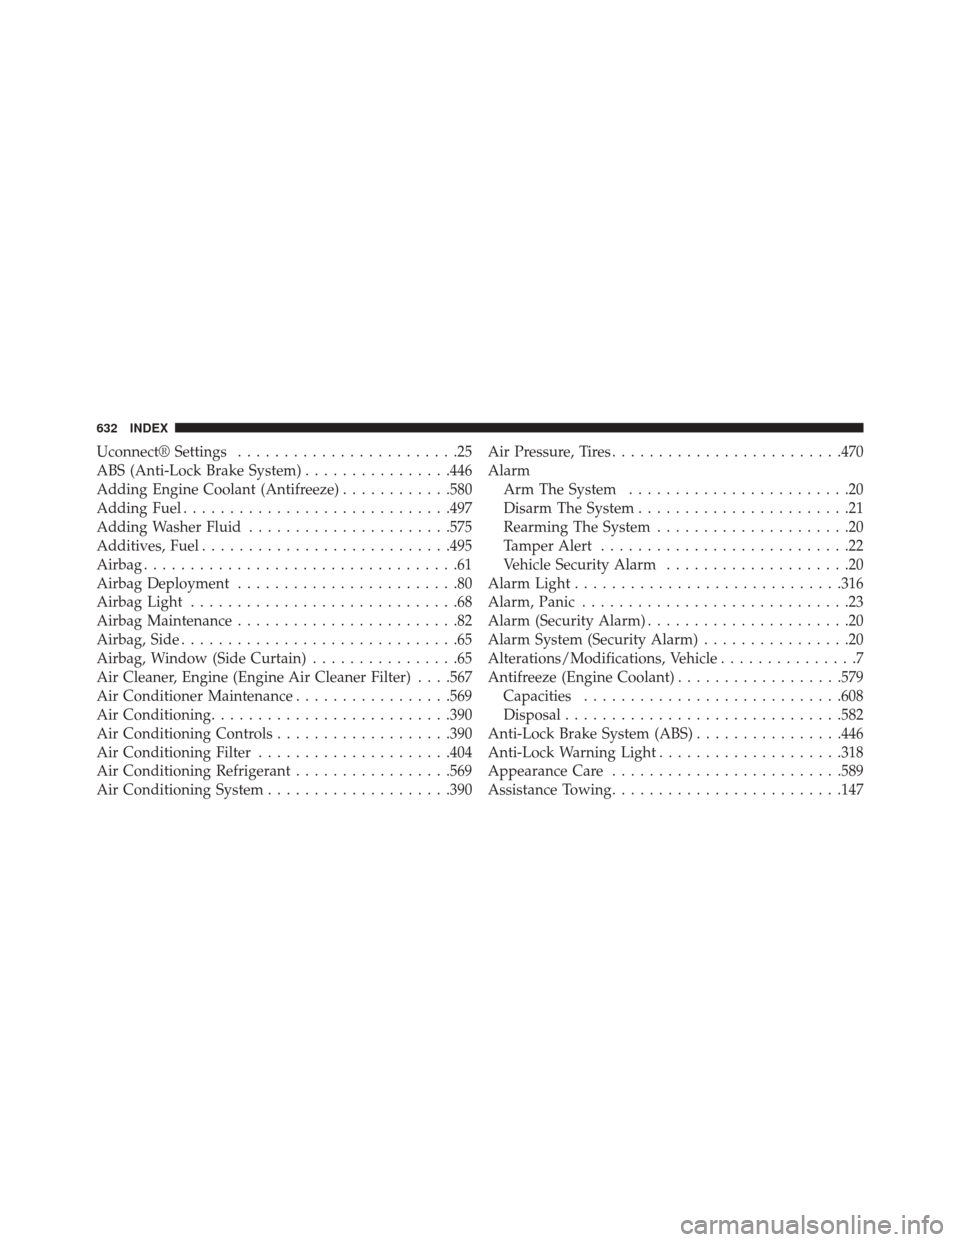
Uconnect® Settings........................25
ABS (Anti-Lock Brake System) ................446
Adding Engine Coolant (Antifreeze) ............580
Adding Fuel ............................ .497
Adding Washer Fluid ..................... .575
Additives, Fuel .......................... .495
Airbag ..................................61
Airbag Deployment ........................80
Airbag Light .............................68
Airbag Maintenance ........................82
Airbag, Side ..............................65
Airbag, Window (Side Curtain) ................65
Air Cleaner, Engine (Engine Air Cleaner Filter) . . . .567
Air Conditioner Maintenance .................569
Air Conditioning ..........................390
Air Conditioning Controls ...................390
Air Conditioning Filter .....................404
Air Conditioning Refrigerant .................569
Air Conditioning System ....................390 Air Pressure, Tires
........................ .470
Alarm Arm The System ........................20
Disarm The System .......................21
Rearming The System .....................20
Tamper Alert ...........................22
Vehicle Security Alarm ....................20
Alarm Light ............................ .316
Alarm, Panic .............................23
Alarm (Security Alarm) ......................20
Alarm System (Security Alarm) ................20
Alterations/Modifications, Vehicle ...............7
Antifreeze (Engine Coolant) ..................579
Capacities ............................608
Disposal ............................. .582
Anti-Lock Brake System (ABS) ................446
Anti-Lock Warning Light ....................318
Appearance Care ........................ .589
Assistance Towing ........................ .147
632 INDEX
Page 635 of 656
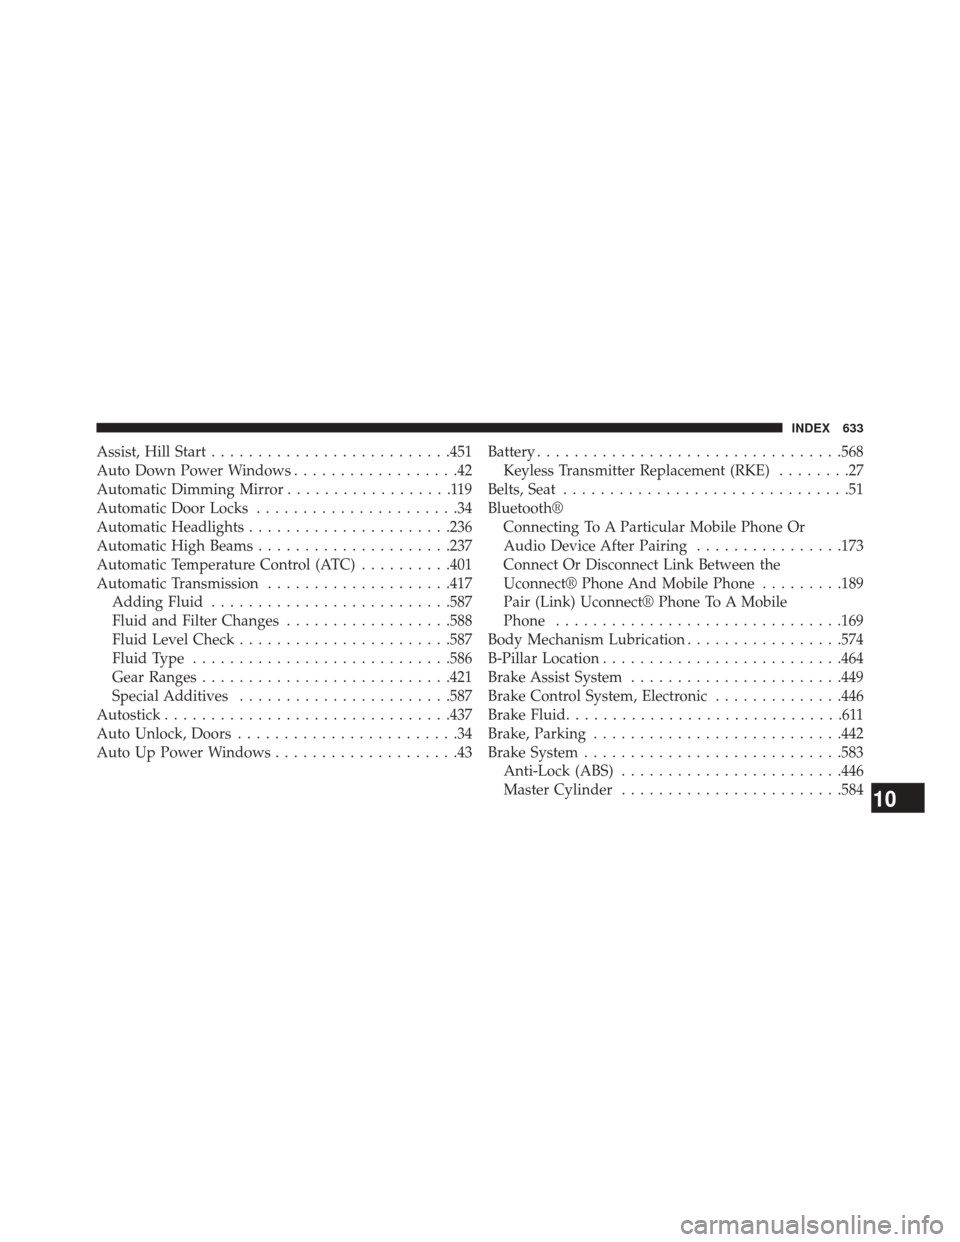
Assist, Hill Start..........................451
Auto Down Power Windows ..................42
Automatic Dimming Mirror ..................119
Automatic Door Locks ......................34
Automatic Headlights ..................... .236
Automatic High Beams .....................237
Automatic Temperature Control (ATC) ..........401
Automatic Transmission ....................417
Adding Fluid ..........................587
Fluid and Filter Changes ..................588
Fluid Level Check .......................587
Fluid Type ............................586
Gear Ranges .......................... .421
Special Additives .......................587
Autostick ...............................437
Auto Unlock, Doors ........................34
Auto Up Power Windows ....................43 Battery
.................................568
Keyless Transmitter Replacement (RKE) ........27
Belts, Seat ...............................51
Bluetooth® Connecting To A Particular Mobile Phone Or
Audio Device After Pairing ................173
Connect Or Disconnect Link Between the
Uconnect® Phone And Mobile Phone .........189
Pair (Link) Uconnect® Phone To A Mobile
Phone ...............................169
Body Mechanism Lubrication .................574
B-Pillar Location ..........................464
Brake Assist System .......................449
Brake Control System, Electronic ..............446
Brake Fluid ..............................611
Brake, Parking .......................... .442
Brake System ............................583
Anti-Lock (ABS) ........................446
Master Cylinder ........................584
10
INDEX 633