instrument panel DODGE DART 2014 PF / 1.G Owners Manual
[x] Cancel search | Manufacturer: DODGE, Model Year: 2014, Model line: DART, Model: DODGE DART 2014 PF / 1.GPages: 656, PDF Size: 4.73 MB
Page 432 of 656
Six-Speed Automatic Transmission (2.0L And
2.4L Engine Only — 6F24)
The transmission gear position display (located in the
instrument panel cluster) indicates the transmission gear
range. You must press the brake pedal and the lock
button on the shift lever to move the shift lever out of
PARK (refer to “Brake/Transmission Shift Interlock Sys-
tem” in this section). To drive, press the lock button on
the front of the shift lever and move the shift lever from
PARK or NEUTRAL to the DRIVE position.
The electronically-controlled transmission provides a
precise shift schedule. The transmission electronics are
self-calibrating; therefore, the first few shifts on a new
vehicle may be somewhat abrupt. This is a normal
condition, and precision shifts will develop within a few
hundred miles (kilometers).Only shift from DRIVE to PARK or REVERSE when the
accelerator pedal is released and the vehicle is stopped.
Be sure to keep your foot on the brake pedal when
shifting between these gears.
The transmission shift lever has PARK, REVERSE, NEU-
TRAL, DRIVE, and AutoStick® shift positions. Manual
shifts can be made using the AutoStick® shift control
(refer to “AutoStick®” in this section for further informa-
tion). Moving the shift lever rearward (+) or forward (-)
while in the AutoStick® position (beside the DRIVE
position) will manually select the transmission gear, and
will display the current gear in the instrument cluster as
1, 2, 3, etc.
430 STARTING AND OPERATING
Page 447 of 656
POWER STEERING
The electric power steering system will give you good
vehicle response and increased ease of maneuverability
in tight spaces. The system will vary its assist to provide
light efforts while parking and good feel while driving. If
the electric steering system experiences a fault that
reduces assist or prevents the vehicle from providing
assist, you will still have the ability to steer the vehicle
manually.
WARNING!
Continued operation with reduced assist could pose
a safety risk to yourself and others. Service should be
obtained as soon as possible.If the “SERVICE POWER STEERING” message
and a steering wheel icon are displayed on the
EVIC screen, it indicates that the vehicle needs
to be taken to the dealer for service. It is likely
the vehicle has lost power steering assistance. Refer to
“Electronic Vehicle Information (EVIC)” in “Understand-
ing Your Instrument Panel” for further information.
NOTE:
• Even if the power steering assistance is no longer
operational, it is still possible to steer the vehicle.
Under these conditions there will be a substantial
increase in steering effort, especially at low speeds and
during parking maneuvers.
• If the condition persists, see your authorized dealer for
service.
5
STARTING AND OPERATING 445
Page 521 of 656
HAZARD WARNING FLASHERS
The Hazard Warning flasher switch is located in the
center of the instrument panel.Press the switch to turn on the Hazard Warning
flashers. When the switch is activated, all direc-
tional turn signals will flash on and off to warn oncoming
traffic of an emergency. Press the switch a second time to
turn off the Hazard Warning flashers.
This is an emergency warning system and it should not
be used when the vehicle is in motion. Use it when your
vehicle is disabled and it is creating a safety hazard for
other motorists.
When you must leave the vehicle to seek assistance, the
Hazard Warning flashers will continue to operate even
though the ignition is placed in the OFF position.
NOTE: With extended use the Hazard Warning flashers
may wear down your battery.
IF YOUR ENGINE OVERHEATS
In any of the following situations, you can reduce the
potential for overheating by taking the appropriate action.
• On the highways — slow down.
•
In city traffic — while stopped, place the transmission in
NEUTRAL, but do not increase the engine idle speed.
NOTE: There are steps that you can take to slow down
an impending overheat condition:
• If your air conditioner (A/C) is on, turn it off. The A/C
system adds heat to the engine cooling system and
turning the A/C off can help remove this heat.
• You can also turn the temperature control to maximum
heat, the mode control to floor and the blower control
to high. This allows the heater core to act as a
supplement to the radiator and aids in removing heat
from the engine cooling system.
6
WHAT TO DO IN EMERGENCIES 519
Page 596 of 656
When cleaning the rear view mirror, spray cleaner on the
towel or rag that you are using. Do not spray cleaner
directly on the mirror.
Instrument Panel Cover
The instrument panel cover has a low glare surface which
minimizes reflections on the windshield. Do not use
protectants or other products which may cause undesir-
able reflections. Use soap and warm water to restore the
low glare surface.
Instrument Panel Bezels
CAUTION!
When installing hanging air fresheners in your ve-
hicle, read the installation instructions carefully.
Some air fresheners will damage the finish of
painted or decorated parts if allowed to directly
contact any surface.
Cleaning Plastic Instrument Cluster Lenses
The lenses in front of the instruments in this vehicle are
molded in clear plastic. When cleaning the lenses, care
must be taken to avoid scratching the plastic.
1. Clean with a wet soft rag or micro-fiber towel. A mildsoap solution may be used, but do not use high
alcohol content or abrasive cleaners. If soap is used,
wipe clean with a clean damp rag.
2. Dry with a soft cloth.
Seat Belt Maintenance
Do not bleach, dye, or clean the belts with chemical
solvents or abrasive cleaners. This will weaken the fabric.
Sun damage can also weaken the fabric.
594 MAINTAINING YOUR VEHICLE
Page 598 of 656
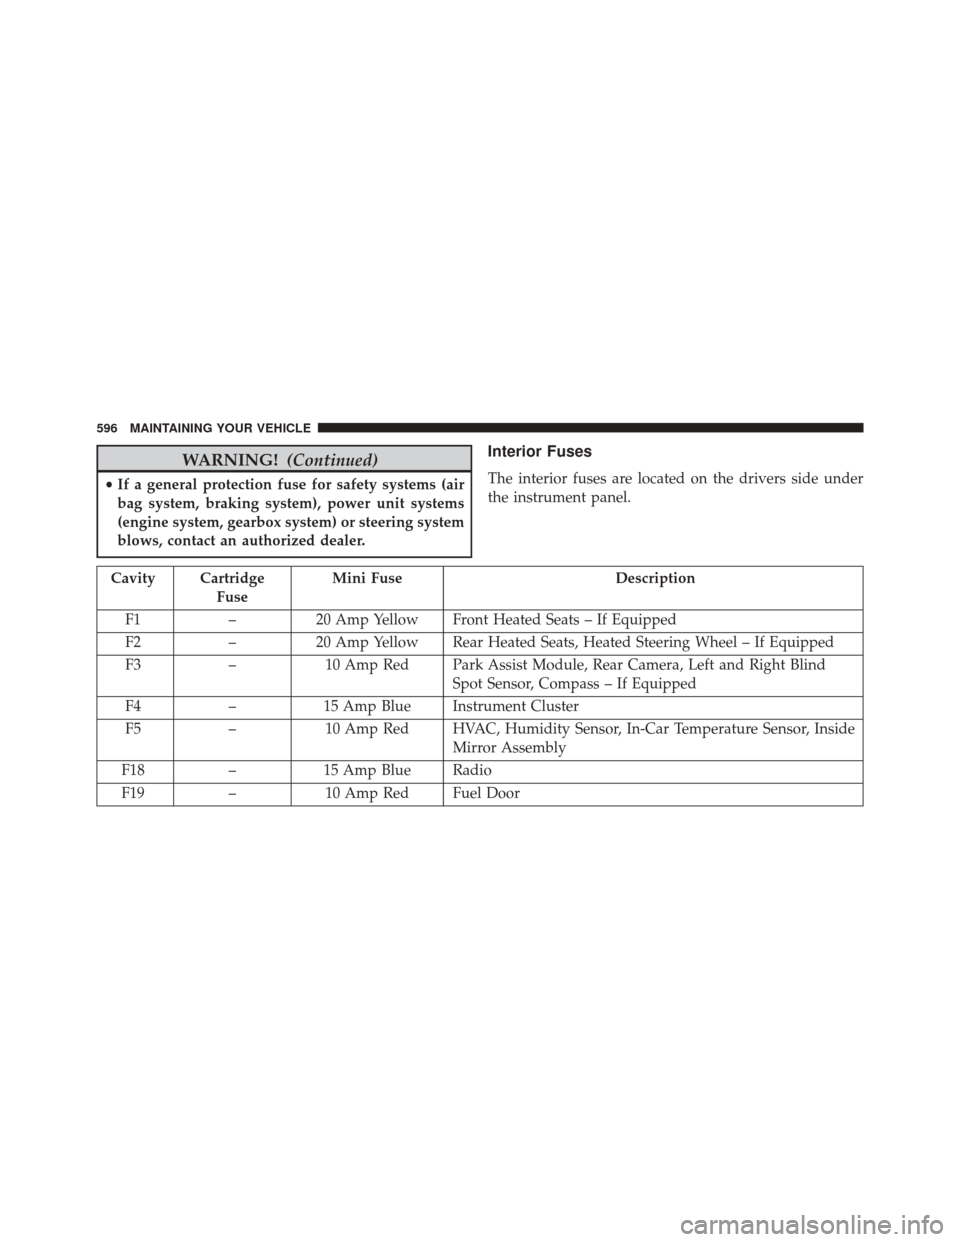
WARNING!(Continued)
•If a general protection fuse for safety systems (air
bag system, braking system), power unit systems
(engine system, gearbox system) or steering system
blows, contact an authorized dealer.
Interior Fuses
The interior fuses are located on the drivers side under
the instrument panel.
Cavity Cartridge
Fuse Mini Fuse
Description
F1 –20 Amp Yellow Front Heated Seats – If Equipped
F2 –20 Amp Yellow Rear Heated Seats, Heated Steering Wheel – If Equipped
F3 –10 Amp Red Park Assist Module, Rear Camera, Left and Right Blind
Spot Sensor, Compass – If Equipped
F4 –15 Amp Blue Instrument Cluster
F5 –10 Amp Red HVAC, Humidity Sensor, In-Car Temperature Sensor, Inside
Mirror Assembly
F18 –15 Amp Blue Radio
F19 –10 Amp Red Fuel Door
596 MAINTAINING YOUR VEHICLE
Page 603 of 656
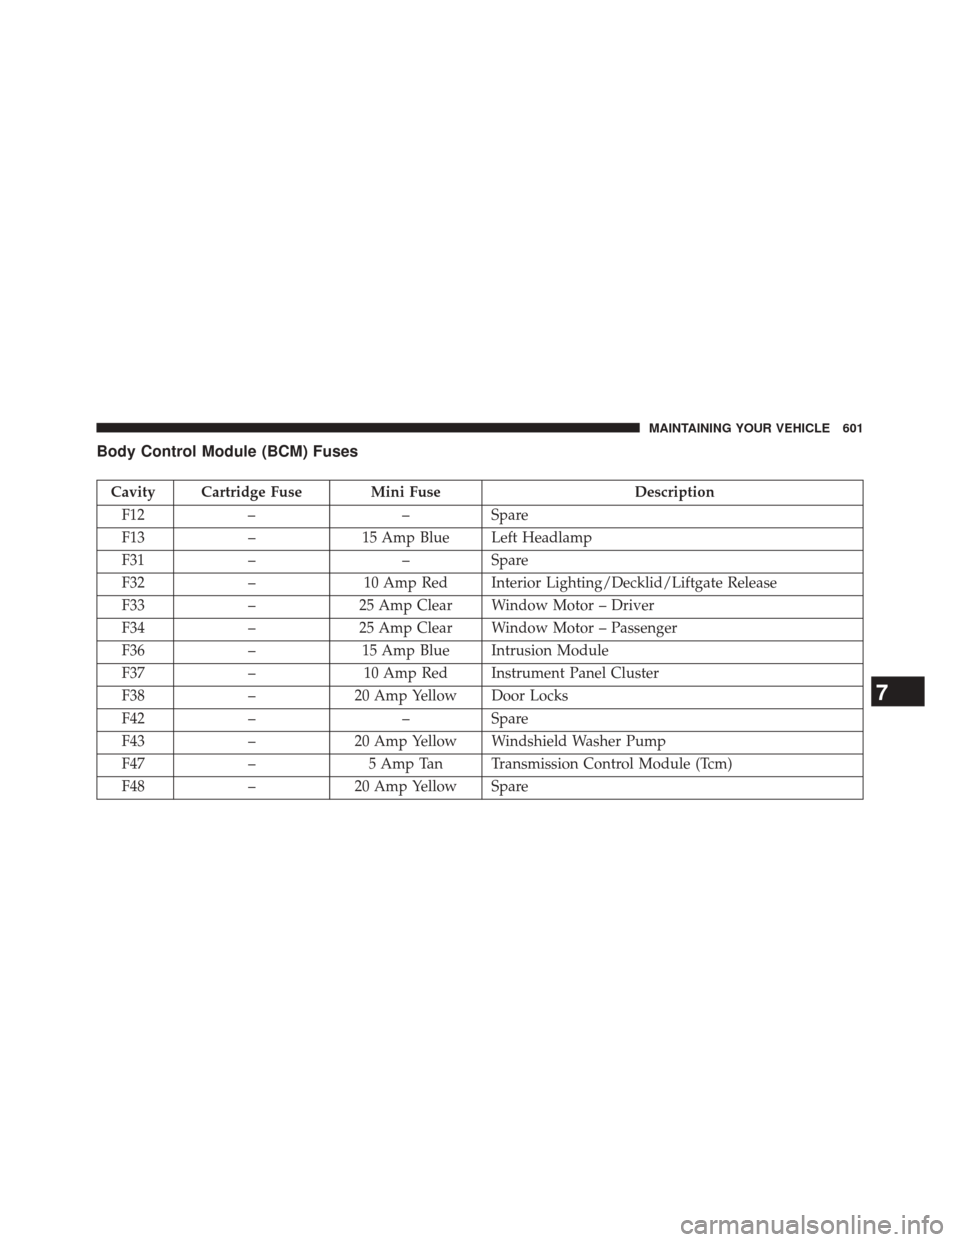
Body Control Module (BCM) Fuses
Cavity Cartridge Fuse Mini FuseDescription
F12 – –Spare
F13 –15 Amp Blue Left Headlamp
F31 – –Spare
F32 –10 Amp Red Interior Lighting/Decklid/Liftgate Release
F33 –25 Amp Clear Window Motor – Driver
F34 –25 Amp Clear Window Motor – Passenger
F36 –15 Amp Blue Intrusion Module
F37 –10 Amp Red Instrument Panel Cluster
F38 –20 Amp Yellow Door Locks
F42 – –Spare
F43 –20 Amp Yellow Windshield Washer Pump
F47 –5 Amp Tan Transmission Control Module (Tcm)
F48 –20 Amp Yellow Spare
7
MAINTAINING YOUR VEHICLE 601
Page 642 of 656
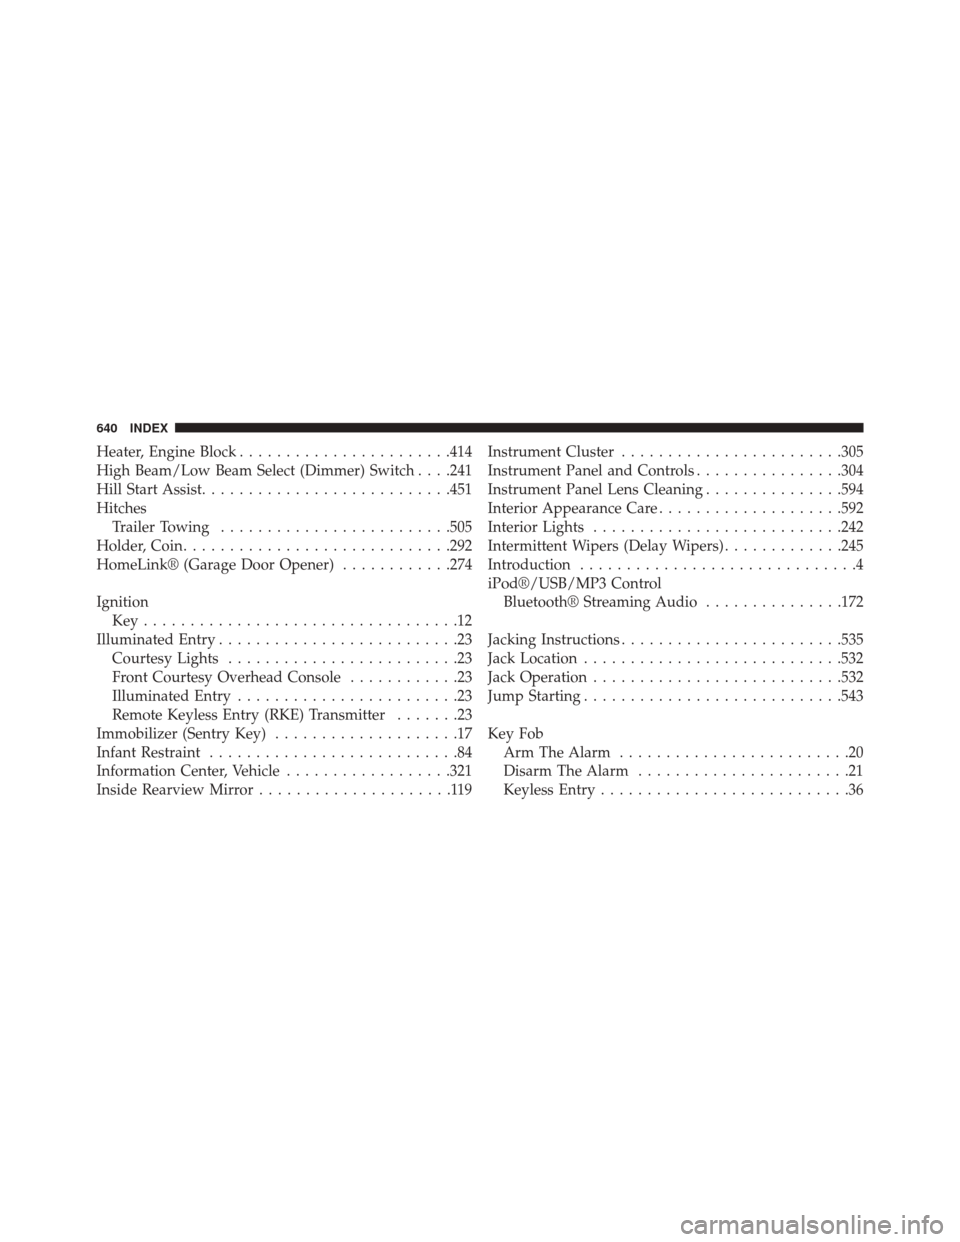
Heater, Engine Block.......................414
High Beam/Low Beam Select (Dimmer) Switch . . . .241
Hill Start Assist .......................... .451
Hitches Trailer Towing ........................ .505
Holder, Coin ............................ .292
HomeLink® (Garage Door Opener) ............274
Ignition Key..................................12
Illuminated Entry ..........................23
Courtesy Lights .........................23
Front Courtesy Overhead Console ............23
Illuminated Entry ........................23
Remote Keyless Entry (RKE) Transmitter .......23
Immobilizer (Sentry Key) ....................17
Infant Restraint ...........................84
Information Center, Vehicle ..................321
Inside Rearview Mirror .....................119 Instrument Cluster
........................305
Instrument Panel and Controls ................304
Instrument Panel Lens Cleaning ...............594
Interior Appearance Care ....................592
Interior Lights .......................... .242
Intermittent Wipers (Delay Wipers) .............245
Introduction ..............................4
iPod®/USB/MP3 Control Bluetooth® Streaming Audio ...............172
Jacking Instructions ........................535
Jack Location ............................532
Jack Operation .......................... .532
Jump Starting ............................543
Key Fob Arm The Alarm .........................20
Disarm The Alarm .......................21
Keyless Entry ...........................36
640 INDEX