climate control DODGE DART 2014 PF / 1.G User Guide
[x] Cancel search | Manufacturer: DODGE, Model Year: 2014, Model line: DART, Model: DODGE DART 2014 PF / 1.GPages: 656, PDF Size: 4.73 MB
Page 398 of 656
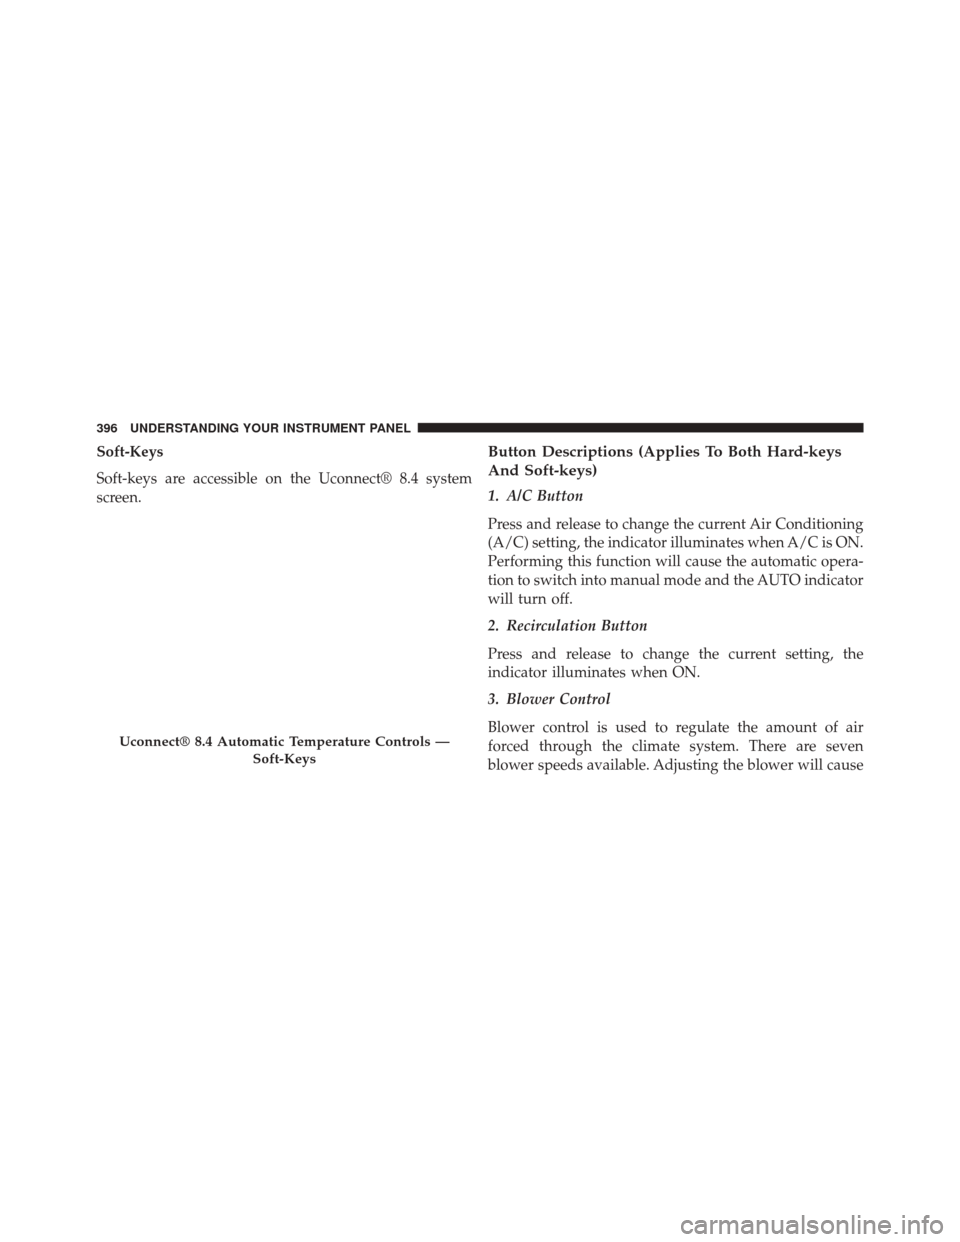
Soft-Keys
Soft-keys are accessible on the Uconnect® 8.4 system
screen.Button Descriptions (Applies To Both Hard-keys
And Soft-keys)
1. A/C Button
Press and release to change the current Air Conditioning
(A/C) setting, the indicator illuminates when A/C is ON.
Performing this function will cause the automatic opera-
tion to switch into manual mode and the AUTO indicator
will turn off.
2. Recirculation Button
Press and release to change the current setting, the
indicator illuminates when ON.
3. Blower Control
Blower control is used to regulate the amount of air
forced through the climate system. There are seven
blower speeds available. Adjusting the blower will cause
Uconnect® 8.4 Automatic Temperature Controls —Soft-Keys
396 UNDERSTANDING YOUR INSTRUMENT PANEL
Page 399 of 656
automatic mode to switch to manual operation. The
speeds can be selected using either hard-keys or soft-keys
as follows:
Hard-key
The blower speed increases as you turn the control
clockwise from the lowest blower setting. The blower
speed decreases as you turn the knob counter-clockwise.
Soft-key
Use the small blower icon to reduce the blower setting
and the large blower icon to increase the blower setting.
Blower can also be selected by pressing the blower bar
area between the icons.4. Front Defrost Button
Press and release to change the current airflow setting to
Defrost mode. The indicator illuminates when this fea-
ture is ON. Performing this function will cause the ATC
to switch into manual mode. The blower speed may
increase when Defrost mode is selected. If the front
defrost mode is turned off the climate system will return
the previous setting.
5. Rear Defrost Button
Press and release this button to turn on the rear window
defroster and the heated outside mirrors (if equipped).
An indicator will illuminate when the rear window
defroster is on. The rear window defroster automatically
turns off after 15 minutes.
4
UNDERSTANDING YOUR INSTRUMENT PANEL 397
Page 400 of 656
CAUTION!
Failure to follow these cautions can cause damage to
the heating elements:
•Use care when washing the inside of the rear
window. Do not use abrasive window cleaners on
the interior surface of the window. Use a soft cloth
and a mild washing solution, wiping parallel to the
heating elements. Labels can be peeled off after
soaking with warm water.
• Do not use scrapers, sharp instruments, or abrasive
window cleaners on the interior surface of the
window.
• Keep all objects a safe distance from the window.
6. Passenger Temperature Control Up Button
Provides the passenger with independent temperature
control. Push the button for warmer temperature set-
tings. NOTE:
Pressing this button while in Sync mode will
automatically exit Sync.
7. Passenger Temperature Control Down Button
Provides the passenger with independent temperature
control. Push the button for cooler temperature settings.
NOTE: Pressing this button while in Sync mode will
automatically exit Sync.
8. Climate Control OFF Button
Press and release this button to turn the Climate Control
ON/OFF.
9. AUTO Operation Button
Automatically controls the interior cabin temperature by
adjusting airflow distribution and amount. Performing
this function will cause the ATC to switch between
manual mode and automatic modes. Refer to “Automatic
Operation” for more information.
398 UNDERSTANDING YOUR INSTRUMENT PANEL
Page 402 of 656
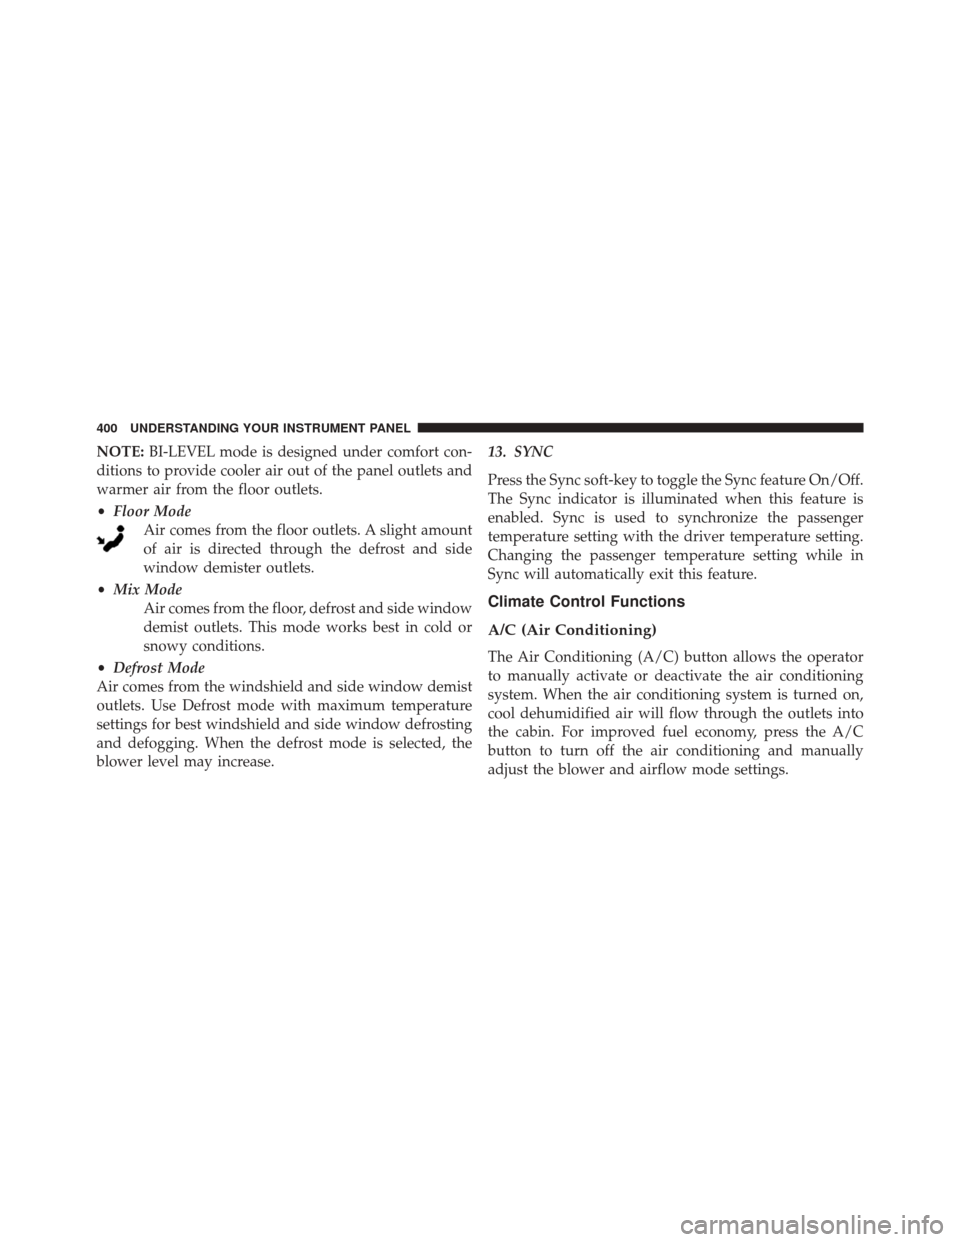
NOTE:BI-LEVEL mode is designed under comfort con-
ditions to provide cooler air out of the panel outlets and
warmer air from the floor outlets.
• Floor Mode
Air comes from the floor outlets. A slight amount
of air is directed through the defrost and side
window demister outlets.
• Mix Mode
Air comes from the floor, defrost and side window
demist outlets. This mode works best in cold or
snowy conditions.
• Defrost Mode
Air comes from the windshield and side window demist
outlets. Use Defrost mode with maximum temperature
settings for best windshield and side window defrosting
and defogging. When the defrost mode is selected, the
blower level may increase. 13. SYNC
Press the Sync soft-key to toggle the Sync feature On/Off.
The Sync indicator is illuminated when this feature is
enabled. Sync is used to synchronize the passenger
temperature setting with the driver temperature setting.
Changing the passenger temperature setting while in
Sync will automatically exit this feature.
Climate Control Functions
A/C (Air Conditioning)
The Air Conditioning (A/C) button allows the operator
to manually activate or deactivate the air conditioning
system. When the air conditioning system is turned on,
cool dehumidified air will flow through the outlets into
the cabin. For improved fuel economy, press the A/C
button to turn off the air conditioning and manually
adjust the blower and airflow mode settings.
400 UNDERSTANDING YOUR INSTRUMENT PANEL
Page 406 of 656
NOTE:
•Recirculate without A/C should not be used for long
periods, as fogging may occur.
• Automatic Temperature Controls (ATC) will automati-
cally adjust the climate control settings to reduce or
eliminate window fogging on the front windshield.
When this occurs, recirculation will be unavailable.
Outside Air Intake
Make sure the air intake, located directly in front of the
windshield, is free of obstructions such as leaves. Leaves
collected in the air intake may reduce airflow, and if they
enter the plenum, they could plug the water drains. In
winter months, make sure the air intake is clear of ice,
slush, and snow.
A/C Air Filter
The climate control system filters outside air containing
dust, pollen and some odors. Strong odors cannot be
totally filtered out. Refer to “Maintenance Procedures” in
“Maintaining Your Vehicle” for filter replacement
instructions.
404 UNDERSTANDING YOUR INSTRUMENT PANEL
Page 457 of 656
Electronic Stability Control (ESC)
This system enhances directional control and stability of
the vehicle under various driving conditions. ESC cor-
rects for over-steering and under-steering the vehicle by
applying the brake of the appropriate wheel. Engine
power may also be reduced to help the vehicle maintain
the desired path.
ESC reduces engine torque and applies brake pressure to
select individual wheels to mitigate vehicle under-steer
and vehicle over-steer. The system uses engine torque
reduction along with individual wheel brake pressure to
correct under-steer and over-steer conditions.
•Over-steer - when the vehicle is turning more than
appropriate for the steering wheel position.
• Under-steer - when the vehicle is turning less than
appropriate for the steering wheel position.
ESC Operating Modes
The ESC system has two available operating modes.
Full On
This is the normal operating mode for ESC. Whenever the
vehicle is started the system will be in this mode. This
mode should be used for most driving situations. ESC
should only be turned to “Partial Off” for specific reasons
as noted. Refer to “Partial Off” for additional information.
Partial Off
The “ESC Off” button is located in the switch bank above
the climate control. To enter the “Partial Off” mode,
momentarily press the “ESC Off” button and the “ESC
Off Indicator Light” will illuminate. To turn the ESC on
again, momentarily press the “ESC Off” button and the
“ESC Off Indicator Light” will turn off. This will restore
the normal “ESC On” mode of operation.5
STARTING AND OPERATING 455
Page 631 of 656
Call toll free at:
•1–800–890–4038 (U.S.)
• 1–800–387–1143 (Canada)
Or
Visit us on the Worldwide Web at:
• www.techauthority.com
DEPARTMENT OF TRANSPORTATION UNIFORM
TIRE QUALITY GRADES
The following tire grading categories were established by
the National Highway Traffic Safety Administration. The
specific grade rating assigned by the tire’s manufacturer
in each category is shown on the sidewall of the tires on
your vehicle.
All passenger car tires must conform to Federal safety
requirements in addition to these grades.
Treadwear
The Treadwear grade is a comparative rating, based on
the wear rate of the tire when tested under controlled
conditions on a specified government test course. For
example, a tire graded 150 would wear one and one-half
times as well on the government course as a tire graded
100. The relative performance of tires depends upon the
actual conditions of their use, however, and may depart
significantly from the norm due to variations in driving
habits, service practices, and differences in road charac-
teristics and climate.
Traction Grades
The Traction grades, from highest to lowest, are AA, A, B,
and C. These grades represent the tire’s ability to stop on
wet pavement, as measured under controlled conditions on
specified government test surfaces of asphalt and concrete.
A tire marked C may have poor traction performance.
9
IF YOU NEED CONSUMER ASSISTANCE 629
Page 636 of 656
Warning Light........................ .313
Brake/Transmission Interlock .................420
Brightness, Interior Lights ...................243
Bulb Replacement ........................ .603
Bulbs, Light .............................111
Camera, Rear ............................270
Capacities, Antifreeze (Engine Coolant) ..........608
Capacities, Fluid ..........................608
Caps, Filler Fuel .................................497
Oil (Engine) .......................... .558
Radiator (Coolant Pressure) ................581
Carbon Monoxide Warning ..................108
Cargo Area Features .......................296
Cargo Compartment .......................296
Car Washes ............................ .589
CD (Compact Disc) Player ...................379
Cellular Phone .......................... .133Chains, Tire
............................ .481
Changing A Flat Tire .......................532
Chart, Tire Sizing ........................ .459
Check Engine Light (Malfunction Indicator Light) . .318
Checking Your Vehicle For Safety ..............107
Checks, Safety .......................... .107
Child Restraint ............................84
Child Restraints Child Seat Installation ....................102
Install A LATCH-compatible Child Restraint .....98
Installing Child Restraints Using The Vehicle
Seat Belt ............................. .100
Lower Anchors And Tethers For Children .......91
Seating Positions ........................90
Child Safety Locks .........................35
Clean Air Gasoline ........................493
Cleaning Wheels ...............................591
Climate Control ..........................390
634 INDEX