service DODGE DART 2014 PF / 1.G Owner's Manual
[x] Cancel search | Manufacturer: DODGE, Model Year: 2014, Model line: DART, Model: DODGE DART 2014 PF / 1.GPages: 140, PDF Size: 4.57 MB
Page 95 of 140
6. Finish tightening the wheel bolts. Push down on the wrench while at the end of thehandle for increased leverage. Tighten the wheel bolts in a star pattern until each wheel
bolt has been tightened twice. The correct tightness of each wheel bolt is 100 ft/lbs
(135 N·m). If in doubt about the correct tightness, have them checked with a torque
wrench by your authorized dealer or service station.
7. After 25 miles (40 km) check the wheel bolt torque with a torque wrench to ensure that all wheel bolts are properly seated against the wheel.
Vehicles Without Wheel Covers
1. Mount the road tire on the axle.
2. Install the remaining wheel bolts with the threaded end of the wheel bolt toward the wheel. Lightly tighten the wheel bolts.
3. Lower the vehicle to the ground by turning the jack handle counterclockwise.
4.
Finish tightening the wheel bolts. Push down on the wrench while at the end of the handle
for increased leverage. Tighten the wheel bolts in a star pattern until each bolt has been
tightened twice. The correct tightness of each wheel bolt is 100 ft/lbs (135 N·m). If in doubt
about the correct tightness, have them checked with a torque wrench by your authorized
dealer or service station.
5. After 25 miles (40 km) check the wheel bolt torque with a torque wrench to ensure that all wheel bolts are properly seated against the wheel.
CAUTION!
• The winch mechanism is designed for use with the jack-handle only. Use of an air wrench or other power tools is not recommended and they can damage the winch.
• Do not attempt to raise the vehicle by jacking on locations other than those indicated
in the Jacking Instructions for this vehicle.
• Be sure to mount the spare tire with the valve stem facing outward. The vehicle could
be damaged if the spare tire is mounted incorrectly.
WHAT TO DO IN EMERGENCIES
93
Page 96 of 140
WARNING!
• Do not attempt to change a tire on the side of the vehicle close to moving traffic. Pullfar enough off the road to avoid the danger of being hit when operating the jack or
changing the wheel.
• Being under a jacked-up vehicle is dangerous. The vehicle could slip off the jack and
fall on you. You could be crushed. Never put any part of your body under a vehicle that
is on a jack. If you need to get under a raised vehicle, take it to an authorized service
center where it can be raised on a lift.
• Never start or run the engine while the vehicle is on a jack.
• The jack is designed to be used as a tool for changing tires only. The jack should not
be used to lift the vehicle for service purposes. The vehicle should be jacked on a firm
level surface only. Avoid ice or slippery areas.
• Carefully follow these tire changing warnings to help prevent personal injury or
damage to your vehicle:
• Always park on a firm, level surface as far from the edge of the roadway as possible
before raising the vehicle.
• Turn on the Hazard Warning flasher.
• Block the wheel diagonally opposite the wheel to be raised.
• Set the parking brake firmly and set an automatic transmission in PARK.
• Do not let anyone sit in the vehicle when it is on a jack.
• Do not get under the vehicle when it is on a jack.
• Only use the jack in the positions indicated and for lifting this vehicle during a tire
change.
• If working on or near a roadway, be extremely careful of motor traffic.
• To assure that spare tires, flat or inflated, are securely stowed, spares must be
stowed with the valve stem facing the ground.
• Raising the vehicle higher than necessary can make the vehicle less stable. It could
slip off the jack and hurt someone near it. Raise the vehicle only enough to remove
the tire.
• To avoid possible personal injury, handle the wheel covers with care to avoid contact
with any sharp edges.
•
To avoid the risk of forcing the vehicle off the jack, do not tighten the wheel nuts fully
until the vehicle has been lowered. Failure to follow this warning may result in personal
injury.
• A loose tire or jack, thrown forward in a collision or hard stop could endanger the
occupants of the vehicle. Always stow the jack parts and the spare tire in the places
provided. Have the deflated (flat) tire repaired or replaced immediately.
WHAT TO DO IN EMERGENCIES
94
Page 101 of 140
4.Have the tire inspected and repaired or replaced at the earliest opportunity at an authorized
dealer or tire service center.
5. Replace the Sealant Bottle (1) and Sealant Hose (6) assembly at your authorized dealer as soon as possible. Refer to “(F) Sealant Bottle and Hose Replacement.”
NOTE:
• If the tire becomes over-inflated, press the Deflation Button to reduce the tire pressure to the recommended inflation pressure before continuing.
• When having the tire serviced, advise the authorized dealer or service center that the tire has been sealed using the TIREFIT service kit.
(F) Sealant Bottle And Hose Replacement:
1. Uncoil the Sealant Hose (6) (clear in color).
2. Locate the round Sealant Bottle release button in the recessed area under the sealant
bottle.
3. Press the Sealant Bottle release button. The Sealant Bottle (1) will pop up. Remove the bottle and dispose of it accordingly.
4. Clean any remaining sealant from the TIREFIT housing.
5. Position the new Sealant Bottle (1) in the housing so that the Sealant Hose (6) aligns with the hose slot in the front of the housing. Press the bottle into the housing. An audible
click will be heard indicating the bottle is locked into place.
6. Verify that the cap is installed on the fitting at the end of the Sealant Hose (6) and return the hose to its storage area (located on the bottom of the air pump).
7. Return the TIREFIT kit to its storage location in the vehicle.
CAUTION!
• The metal end fitting from Power Plug (8) may get hot after use, so it should be handled carefully.
• Failure to reinstall the cap on the fitting at the end of the Sealant Hose (6) can result
in sealant contacting your skin, clothing, and the vehicle’s interior. It can also result in
sealant contacting internal TIREFIT kit components which may cause permanent
damage to the kit.
WHAT TO DO IN EMERGENCIES
99
Page 115 of 140
MAINTENANCE SCHEDULE
Your vehicle is equipped with an automatic oil change indicator system. The oil change indicator
system will remind you that it is time to take your vehicle in for scheduled maintenance.
Based on engine operation conditions, the oil change indicator message will illuminate.
This means that service is required for your vehicle. Operating conditions such as frequent
short-trips, trailer tow, extremely hot or cold ambient temperatures, and E85 fuel usage will
influence when the “Change Oil” message is displayed. Severe Operating Conditions can
cause the change oil message to illuminate as early as 3,500 miles (5,600 km) since last
reset. Have your vehicle serviced as soon as possible, within the next 500 miles (805 km).
Your authorized dealer will reset the oil change indicator message after completing the
scheduled oil change. If a scheduled oil change is performed by someone other than your
authorized dealer, the message can be reset by referring to the steps described under
“Instrument Cluster Warning Lights” in “What To Do In Emergencies” in this guide or
“Electronic Vehicle Information Center (EVIC)” in “Understanding Your Instrument Panel” in
your Owners Manual on the DVD for further information.
NOTE:
Under no circumstances should oil change intervals exceed 10,000 miles (16,000 km) or
twelve months, whichever comes first.
Severe Duty All Models
Change Engine Oil at 4000 miles (6,500 km) if the vehicle is operated in a dusty and off road
environment. This type of vehicle use is considered Severe Duty.
• Once A Month Or Before A Long Trip:
• Check engine oil level.
• Check windshield washer fluid level.
• Check the tire inflation pressures and look for unusual wear or damage.
• Check the fluid levels of the coolant reservoir, and brake master cylinder as needed.
• Check function of all interior and exterior lights.
Required Maintenance
Refer to the Maintenance Schedules on the following pages for required maintenance.
At Every Oil Change Interval As Indicated By Oil Change Indicator System:
• Change engine oil and filter.
• Rotate the tires. Rotate at the first sign of irregular wear, even if it occurs before the oil
indicator system turns on.
• Inspect battery and clean and tighten terminals as required.
• Inspect brake pads, shoes, rotors, drums, hoses and park brake.
• Inspect engine cooling system protection and hoses.
• Inspect exhaust system.
• Inspect engine air cleaner if using in dusty or off-road conditions.
MAINTAINING YOUR VEHICLE
113
Page 116 of 140
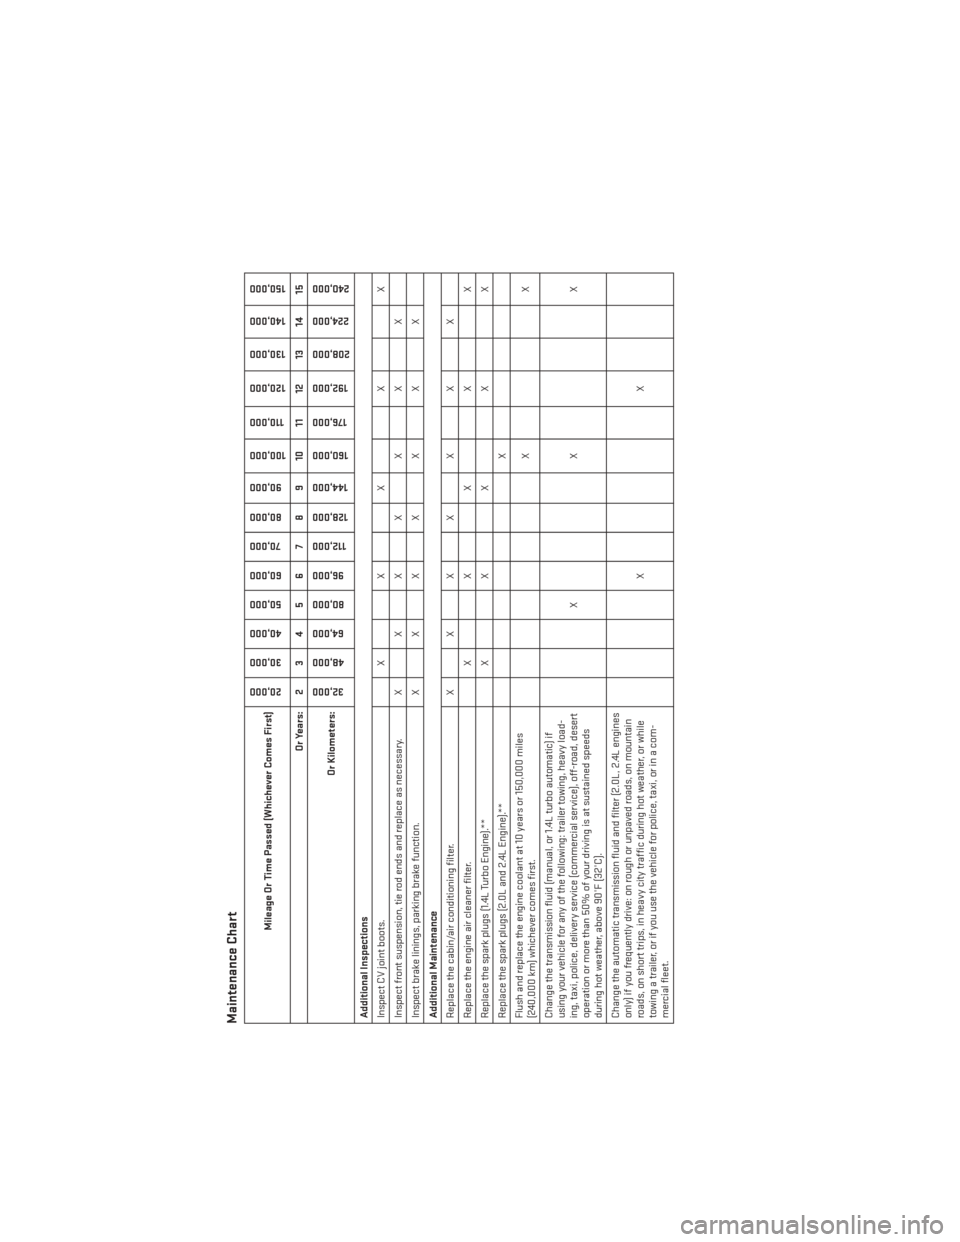
Maintenance Chart
Mileage Or Time Passed (Whichever Comes First)
20,00030,000
40,000
50,000
60,000 70,000
80,000
90,000
100,000
110,000
120,000
130,000
140,000
150,000
Or Years: 2 3 4 5 6 7 8 9 10 11 12 13 14 15
Or Kilometers:
32,000
48,000 64,000
80,000 96,000
112,000
128,000
144,000
160,000
176,000
192,000
208,000 224,000
240,000
Additional Inspections
Inspect CV joint boots. X X X X X
Inspect front suspension, tie rod ends and replace as necessary. X X X X X X X
Inspect brake linings, parking brake function. X X X X X X X
Additional Maintenance
Replace the cabin/air conditioning filter. X X X X X X X
Replace the engine air cleaner filter. X X X X X
Replace the spark plugs (1.4L Turbo Engine).** X X X X X
Replace the spark plugs (2.0L and 2.4L Engine).** X
Flush and replace the engine coolant at 10 years or 150,000 miles
(240,000 km) whichever comes first. XX
Change the transmission fluid (manual, or 1.4L turbo automatic) if
using your vehicle for any of the following: trailer towing, heavy load-
ing, taxi, police, delivery service (commercial service), off-road, desert
operation or more than 50% of your driving is at sustained speeds
during hot weather, above 90°F (32°C). XX X
Change the automatic transmission fluid and filter (2.0L, 2.4L engines
only) if you frequently drive: on rough or unpaved roads, on mountain
roads, on short trips, in heavy city traffic during hot weather, or while
towing a trailer, or if you use the vehicle for police, taxi, or in a com-
mercial fleet. XX
MAINTAINING YOUR VEHICLE
114
Page 117 of 140
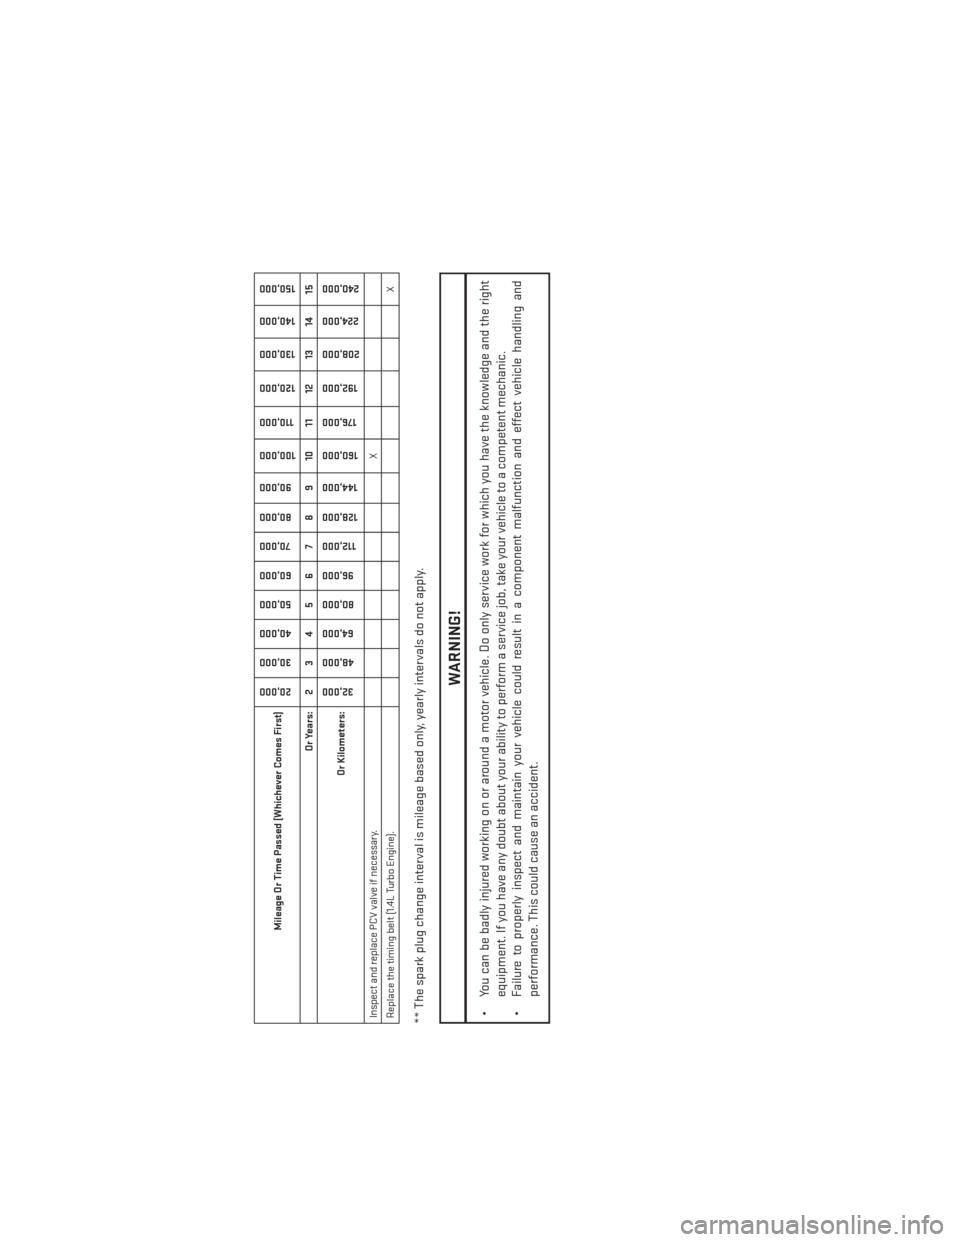
Mileage Or Time Passed (Whichever Comes First)
20,00030,000
40,000
50,000
60,000 70,000
80,000
90,000
100,000
110,000
120,000
130,000
140,000
150,000
Or Years: 2 3 4 5 6 7 8 9 10 11 12 13 14 15
Or Kilometers:
32,000
48,000 64,000
80,000 96,000
112,000
128,000
144,000
160,000
176,000
192,000
208,000 224,000
240,000
Inspect and replace PCV valve if necessary. X
Replace the timing belt (1.4L Turbo Engine). X** The spark plug change interval is mileage based only, yearly intervals do not apply.
WARNING!
• You can be badly injured working on or around a motor vehicle. Do only service work for which you have the knowledge and the right
equipment. If you have any doubt about your ability to perform a service job, take your vehicle to a competent mechanic.
• Failure to properly inspect and maintain your vehicle could result in a component malfunction and effect vehicle handling and
performance. This could cause an accident.
MAINTAINING YOUR VEHICLE
115
Page 118 of 140
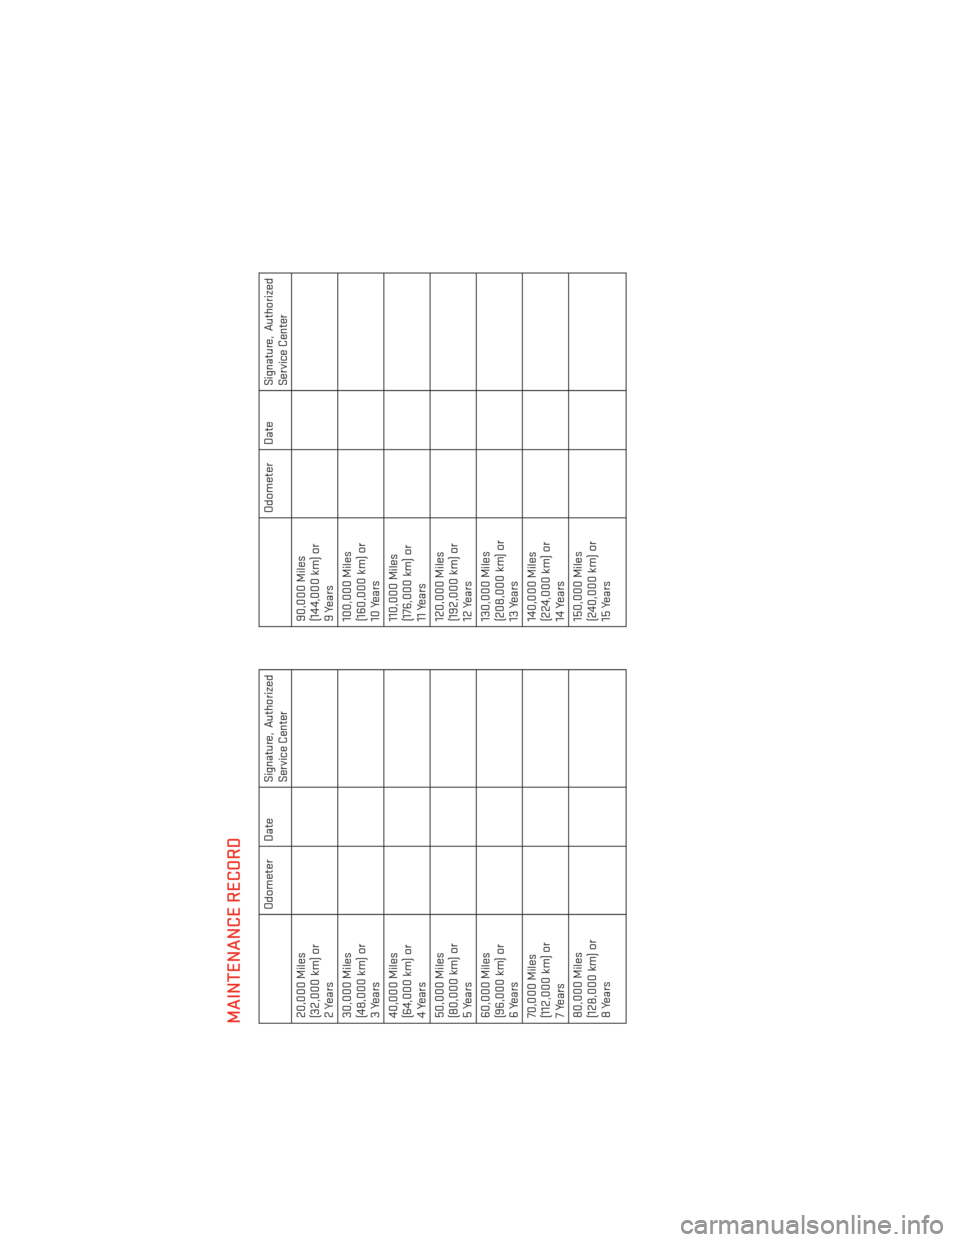
MAINTENANCE RECORD
Odometer Date
Signature, Authorized
Service Center
20,000 Miles
(32,000 km) or
2Years
30,000 Miles
(48,000 km) or
3Years
40,000 Miles
(64,000 km) or
4 Years
50,000 Miles
(80,000 km) or
5Years
60,000 Miles
(96,000 km) or
6 Years
70,000 Miles
(112,000 km) or
7 Years
80,000 Miles
(128,000 km) or
8Years
Odometer Date
Signature, Authorized
Service Center
90,000 Miles
(144,000 km) or
9 Years
100,000 Miles
(160,000 km) or
10 Years
110,000 Miles
(176,000 km) or
11 Years
120,000 Miles
(192,000 km) or
12 Years
130,000 Miles
(208,000 km) or
13 Years
140,000 Miles
(224,000 km) or
14 Years
150,000 Miles
(240,000 km) or
15 Years
MAINTAINING YOUR VEHICLE
116
Page 123 of 140
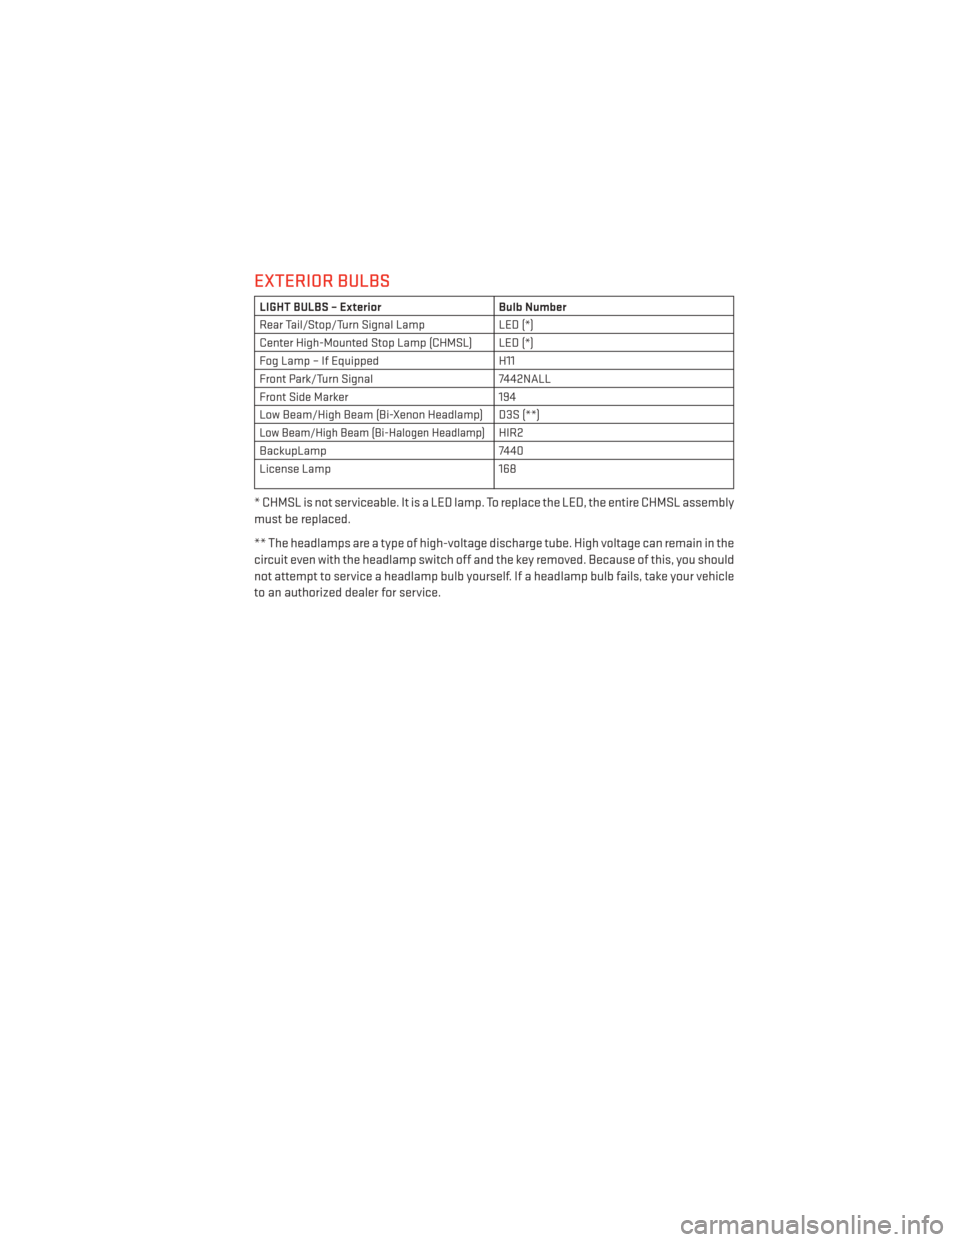
EXTERIOR BULBS
LIGHT BULBS – ExteriorBulb Number
Rear Tail/Stop/Turn Signal Lamp LED (*)
Center High-Mounted Stop Lamp (CHMSL) LED (*)
Fog Lamp – If Equipped H11
Front Park/Turn Signal 7442NALL
Front Side Marker 194
Low Beam/High Beam (Bi-Xenon Headlamp) D3S (**)
Low Beam/High Beam (Bi-Halogen Headlamp)HIR2
BackupLamp 7440
License Lamp 168
* CHMSL is not serviceable. It is a LED lamp. To replace the LED, the entire CHMSL assembly
must be replaced.
** The headlamps are a type of high-voltage discharge tube. High voltage can remain in the
circuit even with the headlamp switch off and the key removed. Because of this, you should
not attempt to service a headlamp bulb yourself. If a headlamp bulb fails, take your vehicle
to an authorized dealer for service.
MAINTAINING YOUR VEHICLE
121
Page 124 of 140
CHRYSLER GROUP LLC CUSTOMER CENTER
P.O. Box 21–8004 Auburn Hills, MI 48321–8004 Phone: 1–800–423–6343
CHRYSLER CANADA INC. CUSTOMER CENTER
P.O. Box 1621 Windsor, Ontario N9A 4H6 Phone: 1–800–465–2001 (English)
Phone: 1–800–387–9983 (French)
ASSISTANCE FOR THE HEARING IMPAIRED
To assist customers who have hearing difficulties, the manufacturer has installed special
TDD (Telecommunication Devices for the Deaf) equipment at its customer center. Any
hearing or speech impaired customer, who has access to a TDD or a conventional teletype-
writer (TTY) in the United States, can communicate with the manufacturer by dialing
1–800–380–CHRY. Canadian residents with hearing difficulties that require assistance can
use the special needs relay service offered by Bell Canada. For TTY teletypewriter users, dial
711 and for Voice callers, dial 1–800–855–0511 to connect with a Bell Relay Service operator.
WARNING!
Engine exhaust, some of its constituents, and certain vehicle components contain, or
emit, chemicals known to the State of California to cause cancer and birth defects, or
other reproductive harm. In addition, certain fluids contained in vehicles and certain
products of component wear contain, or emit, chemicals known to the State of California
to cause cancer and birth defects, or other reproductive harm.
PUBLICATIONS ORDERING
•If you are the first registered retail owner of your vehicle, you may obtain one free
printed copy of the Owner's Manual, Warranty Booklet or Radio Manuals on your DVD by
calling 1–800–423–6343 (U.S.) or 1–800–387–1143 (Canada) or by contacting your dealer.
• Replacement User Guide kits or DVDs or, if you prefer, additional printed copies of the Owner's Manual, Warranty Booklet or Radio Manuals may be purchased by visiting
www.techauthority.com or by calling 1–800–890–4038 (U.S.) or 1–800–387–1143
(Canada). Visa, Master Card, American Express and Discover orders are accepted. If you
prefer mailing your order, please call the above numbers for an order form.
NOTE:
• A street address is required when ordering manuals (no P.O. Boxes).
• The Owner's Manual and User Guide electronic files are also available on the Chrysler, Jeep, Ram Truck, Dodge and SRT websites.
• Click on the “For Owners” tab, select “Owner/Service Manuals”, then select your desired model year and vehicle from the drop down lists.
CONSUMER ASSISTANCE
122
Page 125 of 140
REPORTING SAFETY DEFECTS IN THE UNITED STATES
If you believe that your vehicle has a defect that could cause a collision or cause injury or
death, you should immediately inform the National Highway Traffic Safety Administration
(NHTSA) in addition to notifying the manufacturer.
If NHTSA receives similar complaints, it may open an investigation, and if it finds that a
safety defect exists in a group of vehicles, it may order a recall and remedy campaign.
However, NHTSA cannot become involved in individual problems between you, your autho-
rized dealer and the manufacturer.
To contact NHTSA, you may either call the Auto Safety Hotline toll free at 1–888–327–4236
(TTY: 1–800–424–9153), or go to http://www.safercar.gov; or write to: Administrator, NHTSA,
1200 New Jersey Avenue, SE., West Building, Washington, D.C. 20590. You can also obtain
other information about motor vehicle safety from http://www.safercar.gov.
In Canada
If you believe that your vehicle has a safety defect, you should contact the Customer
Service Department immediately. Canadian customers who wish to report a safety
defect to the Canadian government should contact Transport Canada, Motor Vehicle
Defect Investigations and Recalls at 1-800-333-0510 or go to http://www.tc.gc.ca/eng/
roadsafety/safedrivers-childsafety-index-53.htm
French Canadian customers who wish to report a safety defect to the Canadian government
should contact Transport Canada, Motor Vehicle Defect Investigations and Recalls at
1-800-333-0510 or go to http://www.tc.gc.ca/securiteroutiere/
Uconnect® CUSTOMER CENTER
• Uconnect® CUSTOMER CENTER Phone: 1–877–855–8400 www.DriveUconnect.com
• Uconnect® Canadian Residents CUSTOMER CENTER Phone: 1–800–465–2001 (English)or 1–800–387–7783 (French) www.UconnectPhone.com
CONSUMER ASSISTANCE
123