mirror DODGE DART 2015 PF / 1.G User Guide
[x] Cancel search | Manufacturer: DODGE, Model Year: 2015, Model line: DART, Model: DODGE DART 2015 PF / 1.GPages: 664, PDF Size: 16.96 MB
Page 134 of 664
WARNING!(Continued)
system is not designed to detect pedestrians, bicy-
clists, or animals. Even if your vehicle is equipped
with the BSM system, always check your vehicle’s
mirrors, glance over your shoulder, and use your turn
signal before changing lanes. Failure to do so can
result in serious injury or death.
Rear Cross Path
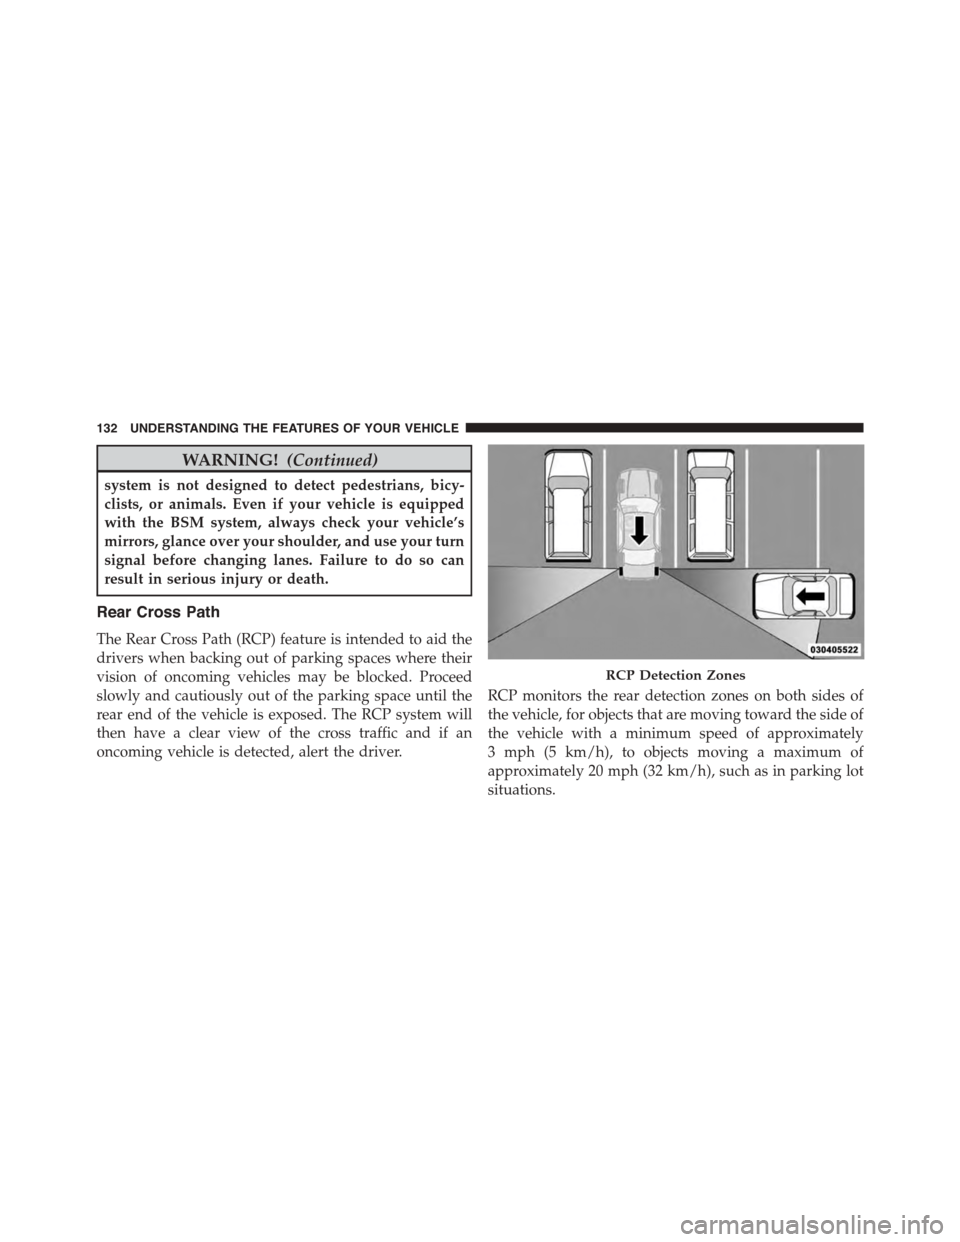
The Rear Cross Path (RCP) feature is intended to aid the
drivers when backing out of parking spaces where their
vision of oncoming vehicles may be blocked. Proceed
slowly and cautiously out of the parking space until the
rear end of the vehicle is exposed. The RCP system will
then have a clear view of the cross traffic and if an
oncoming vehicle is detected, alert the driver.
RCP monitors the rear detection zones on both sides of
the vehicle, for objects that are moving toward the side of
the vehicle with a minimum speed of approximately
3 mph (5 km/h), to objects moving a maximum of
approximately 20 mph (32 km/h), such as in parking lot
situations.
RCP Detection Zones
132 UNDERSTANDING THE FEATURES OF YOUR VEHICLE
Page 135 of 664
NOTE:In a parking lot situation, oncoming vehicles can
be obscured by vehicles parked on either side. If the
sensors are blocked by other structures or vehicles, the
system will not be able to alert the driver.
When RCP is on and the vehicle is in REVERSE, the
driver is alerted using both the visual and audible
alarms, including reducing the radio volume.
WARNING!
RCP is not a Back Up Aid system. It is intended to be
used to help a driver detect an oncoming vehicle in a
parking lot situation. Drivers must be careful when
backing up, even when using RCP. Always check
carefully behind your vehicle, look behind you, and
be sure to check for pedestrians, animals, other
vehicles, obstructions, and blind spots before back-
ing up. Failure to do so can result in serious injury or
death.
Modes Of Operation
Modes Of Operation With Uconnect® System — If
Equipped
Three selectable modes of operation are available in the
Uconnect® system screen. Refer to “Customer Program-
mable Features — Uconnect® Access settings ” in “Un-
derstanding Your Instrument Panel” for further informa-
tion.
Blind Spot Alert Lights Only
When operating in Blind Spot Alert mode, the BSM
system will provide a visual alert in the appropriate side
view mirror based on a detected object. However, when
the system is operating in Rear Cross Path mode, the
system will respond with both visual and audible alerts
when a detected object is present. Whenever an audible
alert is requested, the radio volume is reduced.
3
UNDERSTANDING THE FEATURES OF YOUR VEHICLE 133
Page 136 of 664
Blind Spot Alert Lights/Chime
When operating in Blind Spot Alert Lights/Chime mode,
the BSM system will provide a visual alert in the appro-
priate side view mirror based on a detected object. If the
turn signal is then activated, and it corresponds to an
alert present on that side of the vehicle, an audible chime
will also be sounded. Whenever a turn signal and de-
tected object are present on the same side at the same
time, both the visual and audio alerts will be issued. In
addition to the audible alert the radio (if on) volume will
be muted.
NOTE:
•Whenever an audible alert is requested by the BSM
system, the radio volume is muted.
•If the hazard flashers are on, the system will request
the appropriate visual alert only.
When the system is in RCP, the system shall respond with
both visual and audible alerts when a detected object is
present. Whenever an audible alert is requested, the radio
volume is reduced. Turn/hazard signal status is ignored;
the RCP state always requests the chime.
Blind Spot Alert Off
When the BSM system is turned off there will be no
visual or audible alerts from either the BSM or RCP
systems.
NOTE:The BSM system will store the current operating
mode when the vehicle is shut off. Each time the vehicle
is started the previously stored mode will be recalled and
used.
134 UNDERSTANDING THE FEATURES OF YOUR VEHICLE
Page 159 of 664
For best performance:
•Adjust the rearview mirror to provide at least½inch (1
cm) gap between the overhead console (if equipped)
and the mirror.
•Always wait for the beep before speaking.
•Speak normally, without pausing, just as you would
speak to a person sitting a few feet/meters away from
you.
•Make sure that no one other than you is speaking
during a Voice Command period.
Performance is maximized under:
•Low-To-Medium Blower Setting.
•Low-To-Medium Vehicle Speed.
•Low Road Noise.
•Smooth Road Surface.
•Fully Closed Windows.
•Dry Weather Condition.
Even though the system is designed for users speaking in
North American English, French, and Spanish accents,
the system may not always work for some. When navi-
gating through an automated system such as voice mail,
or when sending a page, at the end of speaking the digit
string, make sure to say “Send.”
NOTE:
•Storing names in the phonebook when the vehicle is in
motion is not recommended.
•It is not recommended to store similar sounding names
in the Uconnect® Phonebook.
Phonebook (Downloaded and Uconnect® Phone Local)
name recognition rate is optimized when the entries are
not similar. Numbers must be spoken in single digits.
3
UNDERSTANDING THE FEATURES OF YOUR VEHICLE 157
Page 194 of 664
Mute/Un-Mute (Mute ON/OFF)
When you mute the Uconnect® Phone, you will still be
able to hear the conversation coming from the other
party, but the other party will not be able to hear you. To
mute the Uconnect® Phone simply press the “Mute”
button on the Phone main screen.
Advanced Phone Connectivity
Transfer Call To And From Mobile Phone
The Uconnect® Phone allows ongoing calls to be trans-
ferred from your mobile phone to the Uconnect® Phone
without terminating the call. To transfer an ongoing call
from your connected mobile phone to the Uconnect®
Phone or vice versa, press the “Transfer” button on the
Phone main screen.
Connect Or Disconnect Link Between The
Uconnect® Phone And Mobile Phone
If you would like to connect or disconnect the Bluetooth®
connection between a Uconnect® Phone paired mobile
phone and the Uconnect® Phone, follow the instructions
described in your mobile phone User’s Manual.
Things You Should Know About Your Uconnect®
Phone
Voice Command
For the best performance:
•Adjust the rearview mirror to provide at least½inch
(1 cm) gap between the overhead console (if equipped)
and the mirror.
•Always wait for the beep before speaking.
192 UNDERSTANDING THE FEATURES OF YOUR VEHICLE
Page 241 of 664
Automatic High Beam Headlamp Control — If
Equipped
The Automatic High Beam Headlamp Control system
provides increased forward lighting at night by automat-
ing high beam control through the use of a digital camera
mounted on the inside rearview mirror. This camera
detects vehicle specific light and automatically switches
from high beams to low beams until the approaching
vehicle is out of view.
NOTE:
•The Automatic High Beam Headlamp Control can be
turned on or off using the Uconnect® System. Refer to
“Uconnect® Settings” in “Understanding Your Instru-
ment Panel” for further information.
•Broken, muddy, or obstructed headlights and taillights
of vehicles in the field of view will cause headlights to
remain on longer (closer to the vehicle). Also, dirt, film,
and other obstructions on the windshield or camera
lens will cause the system to function improperly.
•To opt out of the Advanced Auto High-Beam Sensitiv-
ity Control (default) and enter Reduced High-Beam
Sensitivity Control (not recommended), toggle high-
beam lever 6 full on/off cycles within 10 seconds of
ignition ON. System will return to default setting upon
ignition off.
If the windshield or Automatic High Beam Headlamp
Control mirror is replaced, the mirror must be re-aimed
to ensure proper performance. See your local authorized
dealer.
3
UNDERSTANDING THE FEATURES OF YOUR VEHICLE 239
Page 300 of 664
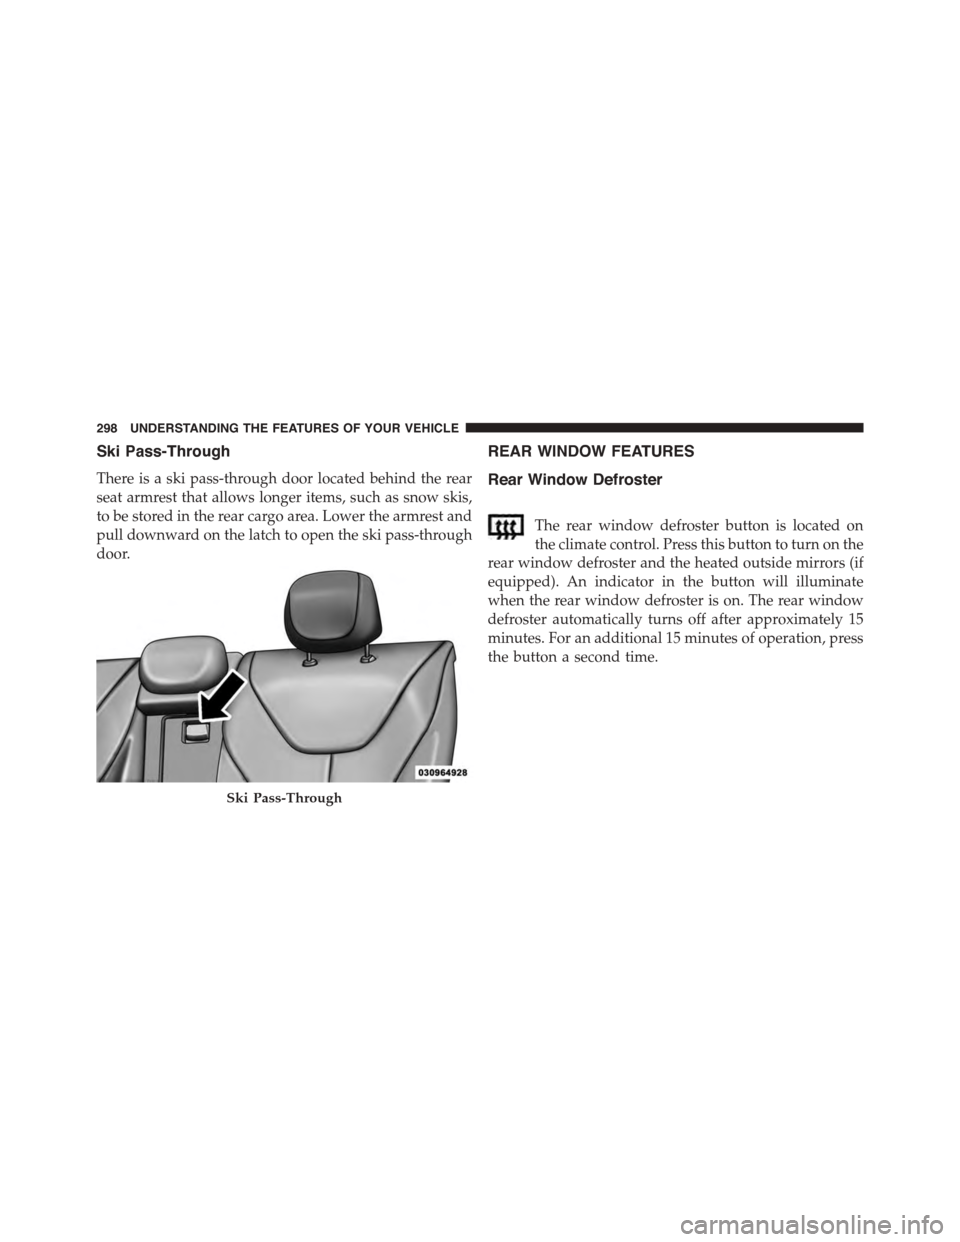
Ski Pass-Through
There is a ski pass-through door located behind the rear
seat armrest that allows longer items, such as snow skis,
to be stored in the rear cargo area. Lower the armrest and
pull downward on the latch to open the ski pass-through
door.
REAR WINDOW FEATURES
Rear Window Defroster
The rear window defroster button is located on
the climate control. Press this button to turn on the
rear window defroster and the heated outside mirrors (if
equipped). An indicator in the button will illuminate
when the rear window defroster is on. The rear window
defroster automatically turns off after approximately 15
minutes. For an additional 15 minutes of operation, press
the button a second time.
Ski Pass-Through
298 UNDERSTANDING THE FEATURES OF YOUR VEHICLE
Page 358 of 664
•Show Time In Status Bar — If Equipped
When in this display, you may turn on or shut off the
digital clock in the status bar. To change the Show Time
Status setting press the “Show Time in Status Bar” button
on the touchscreen until a check-mark appears next to
setting, indicating that the setting has been selected. Press
the back arrow button on the touchscreen to return to the
previous menu.
Safety & Driving Assistance
After pressing the Safety/Assistance button on the touch-
screen the following settings will be available.
•Park Assist — If Equipped
The Rear Park Assist system will scan for objects behind
the vehicle when the transmission shift lever is in RE-
VERSE and the vehicle speed is less than 11 mph
(18 km/h). The system can be enabled with Sound Only,
Sound and Display, or turned OFF. To change the Park
Assist status, press and release the OFF, Sound Only or
Sounds and Display button. Then press the back arrow
button on the touchscreen. Refer to “ParkSense® Rear
Park Assist” in “Understanding The Features Of Your
Vehicle” for system function and operating information.
•Blind Spot Alert — If Equipped
When this feature is selected, the Blind Spot Alert feature
can be set to Off, Lights or Lights and Chime. The Blind
Spot Alert feature can be activated in “Lights” mode.
When this mode is selected, the Blind Spot Monitor
(BSM) system is activated and will only show a visual
alert in the outside mirrors. When “Lights & Chime”
mode is activated, the Blind Spot Monitor (BSM) will
show a visual alert in the outside mirrors as well as an
audible alert when the turn signal is on. When “Off” is
selected, the Blind Spot Monitor (BSM) system is deacti-
vated. To change the Blind Spot Alert status, press the
Off, Lights or Lights & Chime button on the touchscreen.
Then press the back arrow button on the touchscreen.
356 UNDERSTANDING YOUR INSTRUMENT PANEL
Page 396 of 664
6. Electronic Rear Window Defrost
Press this button to turn on the rear window defroster
and the heated outside mirrors (if equipped). An indica-
tor in the button will illuminate when the rear window
defroster is on. The rear window defroster automatically
turns off after approximately 15 minutes. For an addi-
tional 15 minutes of operation, press the button a second
time.
NOTE:
•You can turn off the heated mirror feature at anytime
by pressing the rear window defroster switch a
second time.
•To prevent excessive battery drain, use the rear
window defroster only when the engine is operating.
CAUTION!
Failure to follow these cautions can cause damage to
the heating elements:
•Use care when washing the inside of the rear
window. Do not use abrasive window cleaners on
the interior surface of the window. Use a soft cloth
and a mild washing solution, wiping parallel to the
heating elements. Labels can be peeled off after
soaking with warm water.
•Do not use scrapers, sharp instruments, or abrasive
window cleaners on the interior surface of the
window.
•Keep all objects a safe distance from the window.
394 UNDERSTANDING YOUR INSTRUMENT PANEL
Page 399 of 664
6. Rear Defrost Button
Press and release this button to turn on the rear window
defroster and the heated outside mirrors (if equipped).
An indicator will illuminate when the rear window
defroster is on. The rear window defroster automatically
turns off after 15 minutes.
CAUTION!
Failure to follow these cautions can cause damage to
the heating elements:
•Use care when washing the inside of the rear
window. Do not use abrasive window cleaners on
the interior surface of the window. Use a soft cloth
and a mild washing solution, wiping parallel to the
heating elements. Labels can be peeled off after
soaking with warm water.
(Continued)
CAUTION!(Continued)
•Do not use scrapers, sharp instruments, or abrasive
window cleaners on the interior surface of the
window.
•Keep all objects a safe distance from the window.
7. Passenger Temperature Control Up Button
Provides the passenger with independent temperature
control. Press the button on the faceplate for warmer
temperature settings or on the touchscreen, press and
slide the button on the touchscreen temperature bar
towards the red arrow button on the touchscreen for
warmer temperature settings.
NOTE:Pressing this button while in Sync mode will
automatically exit Sync.
4
UNDERSTANDING YOUR INSTRUMENT PANEL 397