ESP DODGE DART 2015 PF / 1.G Owner's Guide
[x] Cancel search | Manufacturer: DODGE, Model Year: 2015, Model line: DART, Model: DODGE DART 2015 PF / 1.GPages: 664, PDF Size: 16.96 MB
Page 251 of 664
Headlights On With Wipers (Available With
Automatic Headlights Only)
When this feature is active, the headlights will turn on
approximately 10 seconds after the wipers are turned on
if the headlight switch is placed in the AUTO position. In
addition, the headlights will turn off when the wipers are
turned off if they were turned on by this feature.
The Headlights On with Wipers feature can be turned on
and off using the Uconnect® System, refer to “Uconnect®
Settings” in “Understanding Your Instrument Panel” for
further information.
Rain Sensing Wipers — If Equipped
This feature senses moisture on the windshield and
automatically activates the wipers for the driver. The
feature is especially useful for road splash or over spray
from the windshield washers of the vehicle ahead. Rotate
the end of the multifunction lever to one of four settings
to activate this feature.
The sensitivity of the system can be adjusted with the
multifunction lever. Wiper delay position 1 is the least
sensitive, and wiper delay position 4 is the most sensi-
tive. Setting 3 should be used for normal rain conditions.
Settings 1 and 2 can be used if the driver desires less
wiper sensitivity. Setting 4 can be used if the driver
desires more sensitivity. The rain sense wipers will
automatically change between an intermittent wipe, slow
wipe and a fast wipe depending on the amount of
moisture that is sensed on the windshield. Place the
wiper switch in the OFF position when not using the
system.
The Rain Sensing feature can be turned on and off using
the Uconnect® System, refer to “Uconnect® Settings” in
“Understanding Your Instrument Panel” for further in-
formation.
3
UNDERSTANDING THE FEATURES OF YOUR VEHICLE 249
Page 255 of 664
WARNING!
•Persons who are unable to feel pain to the skin
because of advanced age, chronic illness, diabetes,
spinal cord injury, medication, alcohol use, exhaus-
tion, or other physical conditions must exercise
care when using the steering wheel heater. It may
cause burns even at low temperatures, especially if
used for long periods.
•Do not place anything on the steering wheel that
insulates against heat, such as a blanket or steering
wheel covers of any type and material. This may
cause the steering wheel heater to overheat.
ELECTRONIC SPEED CONTROL — IF EQUIPPED
When engaged, the Electronic Speed Control takes over
accelerator operations at speeds greater than 25 mph
(40 km/h).
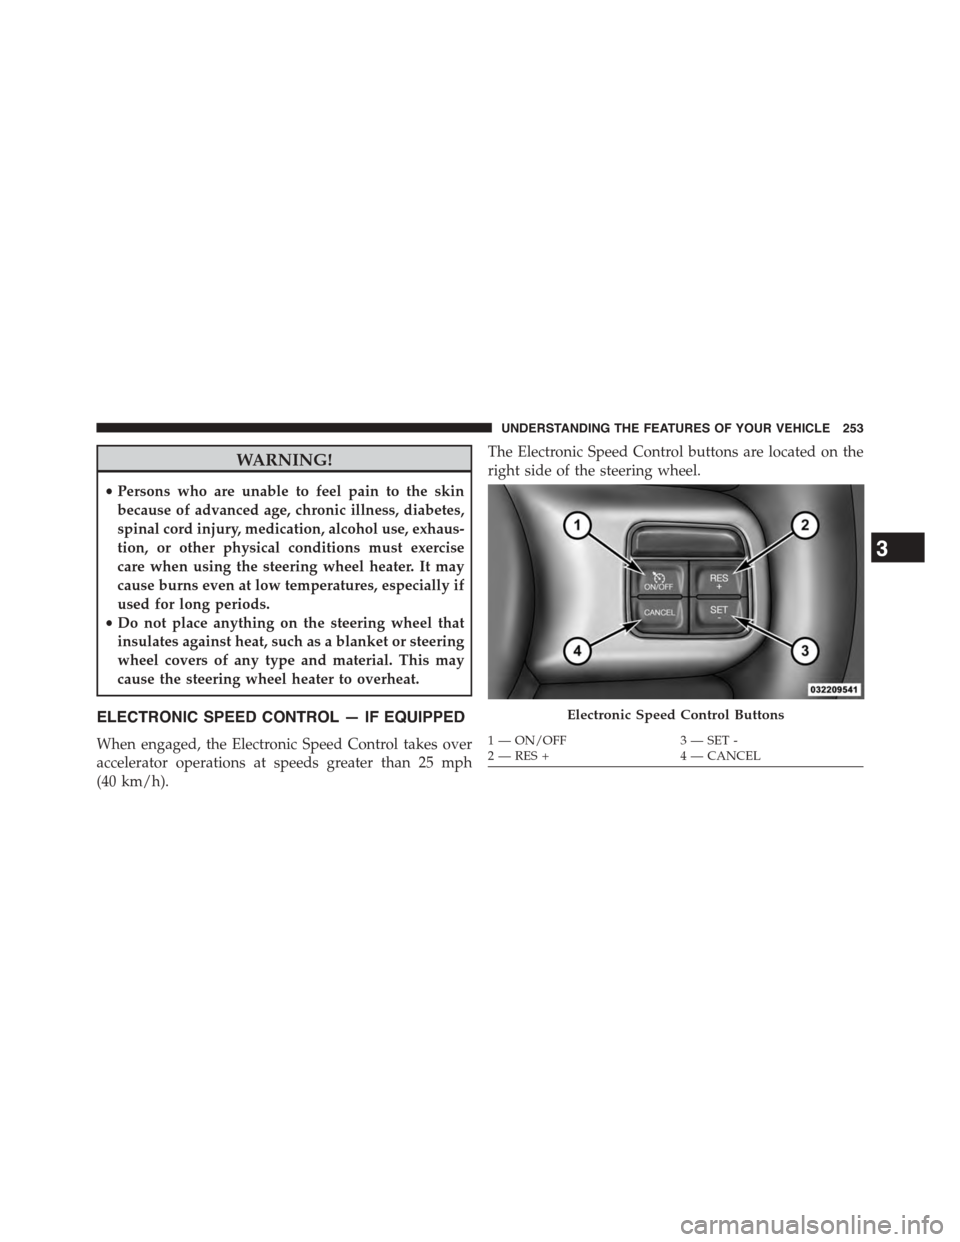
The Electronic Speed Control buttons are located on the
right side of the steering wheel.
Electronic Speed Control Buttons
1—ON/OFF3—SET-2—RES+4—CANCEL
3
UNDERSTANDING THE FEATURES OF YOUR VEHICLE 253
Page 272 of 664
WARNING!
•Drivers must be careful when backing up even
when using ParkSense®. Always check carefully
behind your vehicle, look behind you, and be sure
to check for pedestrians, animals, other vehicles,
obstructions, and blind spots before backing up.
You are responsible for safety and must continue to
pay attention to your surroundings. Failure to do so
can result in serious injury or death.
(Continued)
WARNING!(Continued)
•Before using ParkSense®, it is strongly recom-
mended that the ball mount and hitch ball assem-
bly is disconnected from the vehicle when the
vehicle is not used for towing. Failure to do so can
result in injury or damage to vehicles or obstacles
because the hitch ball will be much closer to the
obstacle than the rear fascia when the loudspeaker
sounds the continuous tone. Also, the sensors
could detect the ball mount and hitch ball assem-
bly, depending on its size and shape, giving a false
indication that an obstacle is behind the vehicle.
270 UNDERSTANDING THE FEATURES OF YOUR VEHICLE
Page 274 of 664
The following table shows the approximate distances for
each zone:
ZoneDistance to the rear of the vehicle
Red0 - 1 ft (0 - 30 cm)
Yellow1 ft - 3 ft (30 cm - 1 m)
Green3 ft or greater (1 m or greater)
WARNING!
Drivers must be careful when backing up even when
using the ParkView® Rear Back Up Camera. Always
check carefully behind your vehicle, and be sure to
check for pedestrians, animals, other vehicles, ob-
structions, or blind spots before backing up. You are
responsible for the safety of your surroundings and
must continue to pay attention while backing up.
Failure to do so can result in serious injury or death.
CAUTION!
•To avoid vehicle damage, ParkView® should only
be used as a parking aid. The ParkView® camera is
unable to view every obstacle or object in your
drive path.
(Continued)
272 UNDERSTANDING THE FEATURES OF YOUR VEHICLE
Page 285 of 664
WARNING!(Continued)
that has a “stop and reverse” feature as required by
Federal safety standards. This includes most garage
door opener models manufactured after 1982. Do not
use a garage door opener without these safety fea-
tures. Call toll-free 1-800-355-3515 or, on the Internet
atHomeLink.com for safety information or assis-
tance.
General Information
This device complies with FCC rules Part 15 and Industry
Canada RSS-210. Operation is subject to the following
two conditions:
1. This device may not cause harmful interference.
2. This device must accept any interference that may be
received including interference that may cause unde-
sired operation.
NOTE:
•The transmitter has been tested and it complies with
FCC and IC rules. Changes or modifications not ex-
pressly approved by the party responsible for compli-
ance could void the user ’s authority to operate the
device.
•The term IC before the certification/registration num-
ber only signifies that Industry Canada technical speci-
fications were met.
3
UNDERSTANDING THE FEATURES OF YOUR VEHICLE 283
Page 310 of 664
INSTRUMENT CLUSTER DESCRIPTIONS
1. Tachometer
This gauge measures engine revolutions-per-minute
(RPM x 1000).
2. Tire Pressure Monitoring Telltale Light — If Equipped
Each tire, including the spare (if provided),
should be checked monthly when cold and
inflated to the inflation pressure recommended
by the vehicle manufacturer on the vehicle
placard or tire inflation pressure label. (If your vehicle
has tires of a different size than the size indicated on the
vehicle placard or tire inflation pressure label, you should
determine the proper tire inflation pressure for those
tires.)
As an added safety feature, your vehicle has been
equipped with a Tire Pressure Monitoring System
(TPMS) that illuminates a low tire pressure telltale when
one or more of your tires is significantly under-inflated.
Accordingly, when the low tire pressure telltale illumi-
nates, you should stop and check your tires as soon as
possible, and inflate them to the proper pressure. Driving
on a significantly under-inflated tire causes the tire to
overheat and can lead to tire failure. Under-inflation also
reduces fuel efficiency and tire tread life, and may affect
the vehicle’s handling and stopping ability.
Please note that the TPMS is not a substitute for proper
tire maintenance, and it is the driver ’s responsibility to
maintain correct tire pressure, even if under-inflation has
not reached the level to trigger illumination of the TPMS
low tire pressure telltale.
Your vehicle has also been equipped with a TPMS
malfunction indicator to indicate when the system is not
operating properly. The TPMS malfunction indicator is
combined with the low tire pressure telltale. When the
system detects a malfunction, the telltale will flash for
308 UNDERSTANDING YOUR INSTRUMENT PANEL
Page 331 of 664
Tire PSI
Push and release the UP button until#Tire Pressure#is
displayed.
Tire pressure information is displayed as follows:
•If tire pressure is OK for all tires, a vehicle graphic is
displayed with tire pressure values in each corner or
the graphic.
•If one or more tires have low pressure, Inflate Tire To
XX and a vehicle graphic are displayed with tire
pressure values in each corner of the graphic. Tire
pressure values that are too low will be flashing.
•If the Tire Pressure System requires service,#Service
TPM System#is displayed. Tire Pressure is an informa-
tion only function and cannot be reset.
Stored Messages
When a stored warning message is present, this
icon is displayed in the lower left side of the
Tire Pressure menu. This feature shows the
number of stored warning messages. Pushing
the RIGHT arrow button will allow you to see what the
stored messages are.
Settings — EVIC Units And Language Selection
Displays the units used for the Outside Temperature,
Average and Current Fuel Economy, Distance to Empty
and Tire Pressure features. Push and release the RIGHT
arrow button to toggle units between#U.S.#and#MET-
RIC#.
Push and release the UP arrow button until the Language
is displayed, then push and release the Right arrow
button to select English, Francais, or Espanol depending
on availability.
4
UNDERSTANDING YOUR INSTRUMENT PANEL 329
Page 356 of 664
has been selected. Press the back arrow button on the
touchscreen to return to the previous menu.
•Units
When in this display, you may select to have the EVIC,
odometer, and navigation system (if equipped) changed
between US and Metric units of measure. Press US or
Metric until a check-mark appears next to the setting,
showing that setting has been selected. Press the back
arrow button on the touchscreen to return to the previous
menu.
•Voice Response Length
When in this display, you may change the Voice Re-
sponse Length settings. To change the Voice Response
Length, press the Brief or Detailed button on the touch-
screen until a check-mark appears next to the setting,
showing that setting has been selected. Press the back
arrow button on the touchscreen to return to the previous
menu.
•Touchscreen Beep
When in this display, you may turn on or shut off the
sound heard when a press screen button (button on the
touchscreen) is pressed. Press the Touchscreen Beep
button on the touchscreen until a check-mark appears
next to the setting, showing that setting has been se-
lected. Press the back arrow button on the touchscreen to
return to the previous menu.
•Navigation Turn-By-Turn In Cluster — If Equipped
When this feature is selected, the turn-by-turn directions
will appear in the display as the vehicle approaches a
designated turn within a programmed route. To make
your selection, press the Navigation Turn-By-Turn In
Cluster button on the touchscreen, until a check-mark
appears next to the setting, showing that setting has been
selected. Press the back arrow button on the touchscreen
to return to the previous menu.
354 UNDERSTANDING YOUR INSTRUMENT PANEL
Page 385 of 664
Controlling The iPod® Or External USB Device
Using Radio Buttons
To enter the iPod®/USB/MP3 control mode and access a
connected audio device, either push the “AUX” button
on the radio faceplate or push the VR button and say
#USB#or#Switch to USB.#Once in the iPod®/USB/MP3
control mode, audio tracks (if available from audio
device) start playing over the vehicle’s audio system.
Play Mode
When switched to iPod®/USB/MP3 control mode, the
iPod® or external USB device automatically starts Play
mode. In Play mode, the following buttons on the radio
faceplate may be used to control the iPod® or external
USB device and display data:
•Use the TUNE/SCROLL control knob to select the next
or previous track.
•Turning it clockwise (forward) by one click, while
playing a track, skips to the next track or press the
VR button and say#Next Track.#
•Turning it counterclockwise (backward) by one click,
will jump to the previous track in the list or press the
VR button and say#Previous Track#
•Jump backward in the current track by pressing and
holding the <
current track.
•Jump forward in the current track by pressing and
holding theFF>> button.
•A single press backward <
jump backward or forward respectively, for five sec-
onds.
4
UNDERSTANDING YOUR INSTRUMENT PANEL 383
Page 419 of 664
3. Pull the cord to the front of the vehicle and plug it into
a grounded, three-wire extension cord.
4. After the vehicle is running, reattach the cord to the
Velcro strap and properly stow away behind the
driver ’s side headlamp.
NOTE:
•The engine block heater cord is a factory installed
option. If your vehicle is not equipped, heater cords
are available from your authorized MOPAR® dealer.
•The engine block heater will require 110 Volts AC and
6.5 Amps to activate the heater element.
•The engine block heater must be plugged in at least
one hour to have an adequate warming effect on the
engine.
WARNING!
Remember to disconnect the engine block heater
cord before driving. Damage to the 110-115 Volt
electrical cord could cause electrocution.
MANUAL TRANSMISSION — IF EQUIPPED
WARNING!
You or others could be injured if you leave the
vehicle unattended without having the parking
brake fully applied. The parking brake should al-
ways be applied when the driver is not in the vehicle,
especially on an incline.
5
STARTING AND OPERATING 417