air condition DODGE DART 2015 PF / 1.G Owner's Guide
[x] Cancel search | Manufacturer: DODGE, Model Year: 2015, Model line: DART, Model: DODGE DART 2015 PF / 1.GPages: 664, PDF Size: 16.96 MB
Page 574 of 664
CAUTION!(Continued)
•Your vehicle has been built with improved fluids
that protect the performance and durability of your
vehicle and also allow extended maintenance inter-
vals. Do not use chemical flushes in these compo-
nents as the chemicals can damage your engine,
transmission, power steering or air conditioning.
Such damage is not covered by the New Vehicle
Limited Warranty. If a flush is needed because of
component malfunction, use only the specified
fluid for the flushing procedure.
Engine Oil
Checking Oil Level
To assure proper engine lubrication, the engine oil must
be maintained at the correct level. Check the oil level at
regular intervals, such as every fuel stop. The best time to
check the engine oil level is about five minutes after a
fully warmed engine is shut off. Do not check oil level
before starting the engine after it has sat overnight.
Checking engine oil level when the engine is cold will
give you an incorrect reading.
Checking the oil while the vehicle is on level ground and
only when the engine is hot, will improve the accuracy of
the oil level readings. Maintain the oil level between the
range markings on the dipstick. The range markings will
consist of a crosshatch zone which depicts the MIN at the
low end of the range and MAX at the high end of the
range. Adding 1 qt (1L) of oil when the reading is at the
low end of the indicated range will result in the oil level
at the full end of the indicator range.
CAUTION!
Do not overfill the engine. Overfilling the engine
will cause oil aeration, which can lead to loss of oil
(Continued)
572 MAINTAINING YOUR VEHICLE
Page 579 of 664
WARNING!(Continued)
•The battery in this vehicle has a vent hose that
should not be disconnected and should only be
replaced with a battery of the same type (vented).
CAUTION!
•It is essential when replacing the cables on the
battery that the positive cable is attached to the
positive post and the negative cable is attached to
the negative post. Battery posts are marked positive
(+) and negative (-) and are identified on the
battery case. Cable clamps should be tight on the
terminal posts and free of corrosion.
•If a “fast charger” is used while the battery is in the
vehicle, disconnect both vehicle battery cables be-
fore connecting the charger to the battery. Do not
use a “fast charger” to provide starting voltage.
Air Conditioner Maintenance
For best possible performance, your air conditioner
should be checked and serviced by an authorized dealer
at the start of each warm season. This service should
include cleaning of the condenser fins and a performance
test. Drive belt tension should also be checked at this
time.
WARNING!
•Use only refrigerants and compressor lubricants
approved by the manufacturer for your air condi-
tioning system. Some unapproved refrigerants are
flammable and can explode, injuring you. Other
unapproved refrigerants or lubricants can cause the
system to fail, requiring costly repairs. Refer to
Warranty Information Book, located on the DVD,
for further warranty information.
7
MAINTAINING YOUR VEHICLE 577
Page 580 of 664
CAUTION!
Do not use chemical flushes in your air conditioning
system as the chemicals can damage your air condi-
tioning components. Such damage is not covered by
the New Vehicle Limited Warranty.
Refrigerant Recovery And Recycling HFO 1234yf
HFO 1234yf Air Conditioning Refrigerant is a hydro-
fluorocarbon (HFC) that is endorsed by the Environmen-
tal Protection Agency and is an ozone-saving product
with a low GWP (Global Warming Potential). However,
the manufacturer recommends that air conditioning ser-
vice be performed by authorized dealer or other service
facilities using recovery and recycling equipment.
NOTE:Use only manufacturer approved A/C system
PAG compressor oil, and refrigerants.
A/C Air Filter
Refer to the “Maintenance Schedule” for the proper
maintenance intervals.
WARNING!
Do not remove the A/C air filter while the blower is
operating or personal injury may result.
The A/C air filter is located in the fresh air inlet on the
lower right of center console. Perform the following
procedure to replace the filter:
1. Remove the passenger side console closeout. (located
on the right side of the center console).
578 MAINTAINING YOUR VEHICLE
Page 582 of 664
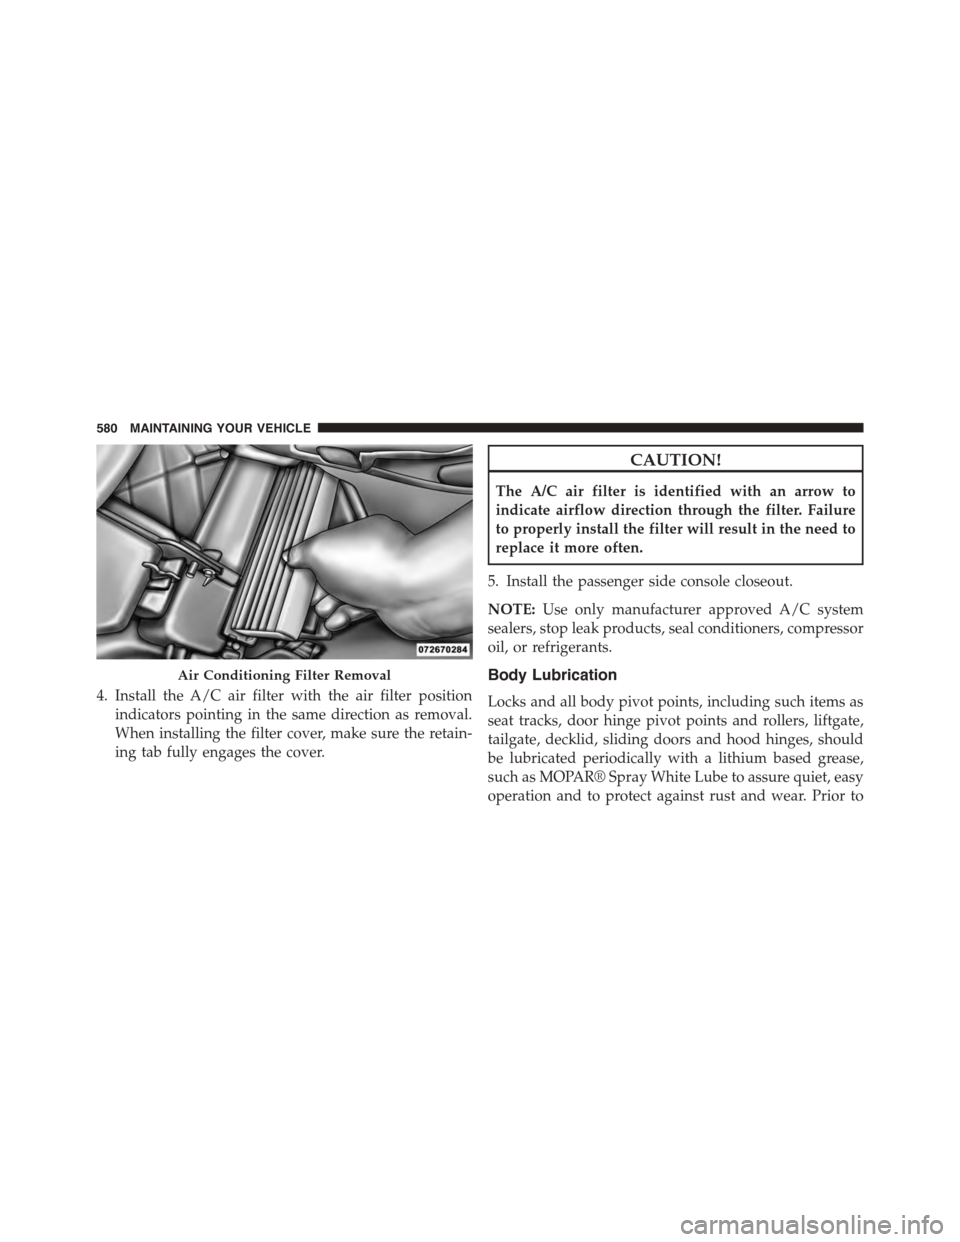
4. Install the A/C air filter with the air filter position
indicators pointing in the same direction as removal.
When installing the filter cover, make sure the retain-
ing tab fully engages the cover.
CAUTION!
The A/C air filter is identified with an arrow to
indicate airflow direction through the filter. Failure
to properly install the filter will result in the need to
replace it more often.
5. Install the passenger side console closeout.
NOTE:Use only manufacturer approved A/C system
sealers, stop leak products, seal conditioners, compressor
oil, or refrigerants.
Body Lubrication
Locks and all body pivot points, including such items as
seat tracks, door hinge pivot points and rollers, liftgate,
tailgate, decklid, sliding doors and hood hinges, should
be lubricated periodically with a lithium based grease,
such as MOPAR® Spray White Lube to assure quiet, easy
operation and to protect against rust and wear. Prior to
Air Conditioning Filter Removal
580 MAINTAINING YOUR VEHICLE
Page 592 of 664
Points To Remember
NOTE:When the vehicle is stopped after a few miles/
kilometers of operation, you may observe vapor coming
from the front of the engine compartment. This is nor-
mally a result of moisture from rain, snow, or high
humidity accumulating on the radiator and being vapor-
ized when the thermostat opens, allowing hot engine
coolant (antifreeze) to enter the radiator.
If an examination of your engine compartment shows no
evidence of radiator or hose leaks, the vehicle may be
safely driven. The vapor will soon dissipate.
•Do not overfill the coolant expansion bottle.
•Check the coolant freeze point in the radiator and in
the coolant expansion bottle. If engine coolant (anti-
freeze) needs to be added, the contents of the coolant
expansion bottle must also be protected against freez-
ing.
•If frequent engine coolant (antifreeze) additions are
required, the cooling system should be pressure tested
for leaks.
•Maintain engine coolant (antifreeze) concentration at a
minimum of 50% OAT coolant (conforming to MS-12106)
and distilled water for proper corrosion protection of
your engine which contains aluminum components.
•Make sure that the coolant expansion bottle overflow
hoses are not kinked or obstructed.
•Keep the front of the radiator clean. If your vehicle is
equipped with air conditioning, keep the front of the
condenser clean.
•Do not change the thermostat for Summer or Winter
operation. If replacement is ever necessary, install
ONLY the correct type thermostat. Other designs may
result in unsatisfactory engine coolant (antifreeze)
performance, poor gas mileage, and increased emis-
sions.
590 MAINTAINING YOUR VEHICLE
Page 596 of 664
Special Additives
The manufacturer strongly recommends against using
any special additives in the transmission.
Automatic Transmission Fluid (ATF) is an engineered
product and its performance may be impaired by supple-
mental additives. Therefore, do not add any fluid addi-
tives to the transmission. The only exception to this
policy is the use of special dyes for diagnosing fluid
leaks. Avoid using transmission sealers as they may
adversely affect seals.
CAUTION!
Do not use chemical flushes in your transmission as
the chemicals can damage your transmission compo-
nents. Such damage is not covered by the New
Vehicle Limited Warranty.
Fluid Level Check
The fluid level is preset at the factory and does not
require adjustment under normal operating conditions.
Routine fluid level checks are not required, therefore the
transmission has no dipstick. Your authorized dealer can
check your transmission fluid level using special service
tools. If you notice fluid leakage or transmission malfunc-
tion, visit your authorized dealer immediately to have
the fluid level checked. Operating the vehicle with an
improper fluid level can cause severe transmission dam-
age.
CAUTION!
If a transmission fluid leak occurs, visit your autho-
rized dealer immediately. Severe transmission dam-
age may occur. Your authorized dealer has the proper
tools to adjust the fluid level accurately.
594 MAINTAINING YOUR VEHICLE
Page 611 of 664
VEHICLE STORAGE
If you will not be using your vehicle for more than 21 days,
you may want to take steps to preserve your battery.
•Disconnect the negative cable from the battery.
•Anytime you store your vehicle, or keep it out of service
(i.e., vacation) for two weeks or more, run the air
conditioning system at idle for about five minutes in the
fresh air and high blower setting. This will ensure
adequate system lubrication to minimize the possibility
of compressor damage when the system is started again.
NOTE:When the vehicle has not been started or driven
for at least 35 days, an Extended Park Start Procedure is
required to start the vehicle. Refer to “Starting Procedures”
in “Starting And Operating” for further information.
REPLACEMENT BULBS
Interior Bulbs
Bulb Number
Dome LampW5W
Overhead Console LampW5W
7
MAINTAINING YOUR VEHICLE 609
Page 625 of 664
Check the tire inflation pressures and look for unusual
wear or damage.
Check the fluid levels of the coolant reservoir, and brake
master cylinder as needed.
Check function of all interior and exterior lights.
Required Maintenance
Refer to the Maintenance Schedules on the following
pages for required maintenance.
At Every Oil Change Interval As Indicated By Oil
Change Indicator System:
•Change engine oil and filter.
•Rotate the tires.Rotate at the first sign of irregu-
lar wear, even if it occurs before the oil indicator
system turns on.
At Every Oil Change Interval As Indicated By Oil
Change Indicator System:
•Inspect battery and clean and tighten terminals as
required.
•Inspect brake pads, shoes, rotors, drums, hoses
and park brake.
•Inspect engine cooling system protection and
hoses.
•Inspect exhaust system.
•Inspect engine air cleaner if using in dusty or
off-road conditions.
8
MAINTENANCE
SCHEDULES
MAINTENANCE SCHEDULES 623
Page 626 of 664
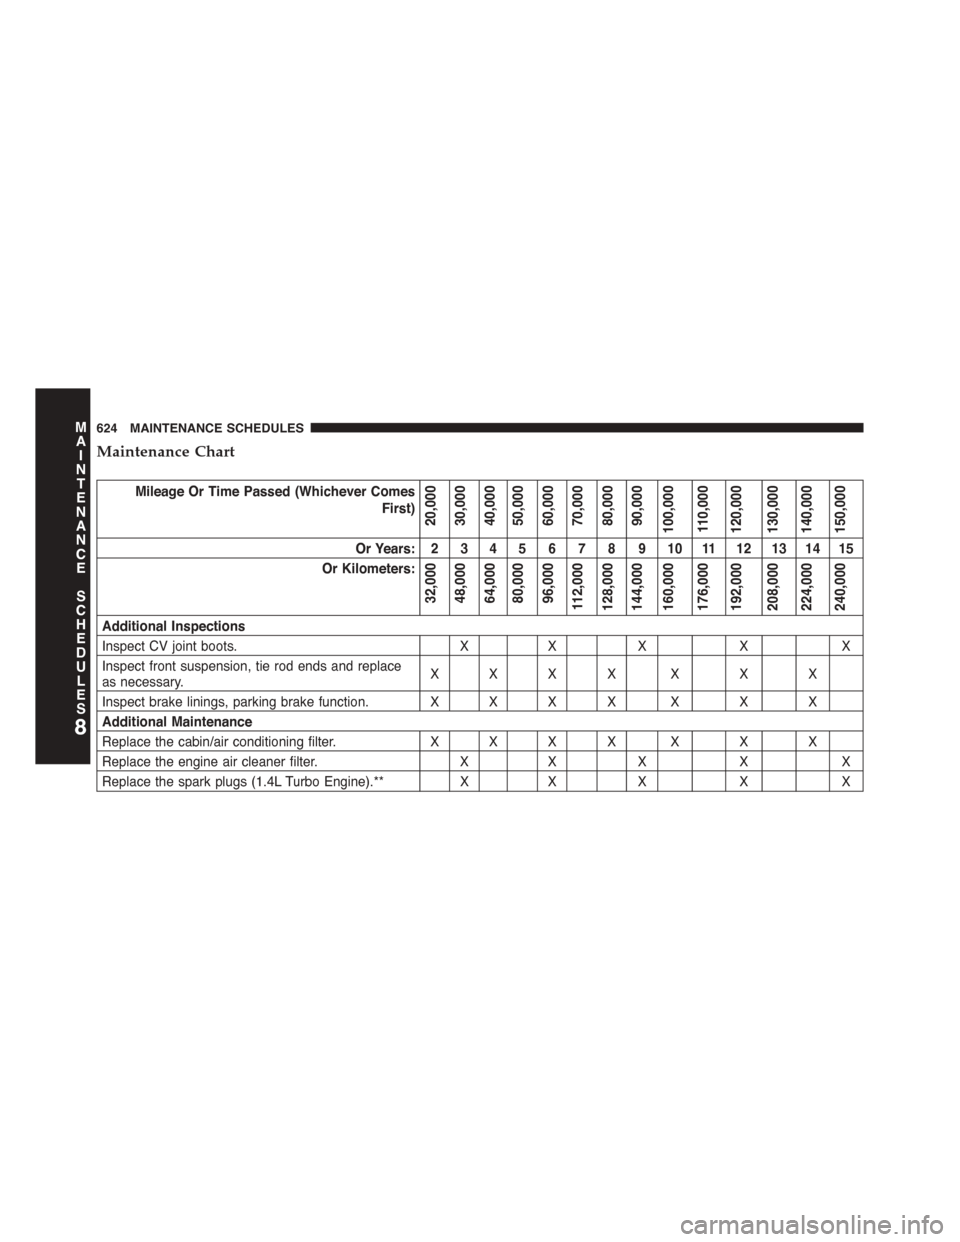
Maintenance Chart
Mileage Or Time Passed (Whichever Comes
First)20,00030,00040,00050,00060,00070,00080,00090,000100,000110,000120,000130,000140,000150,000
Or Years: 2 3 4 5 6 7 8 9 10 11 12 13 14 15
Or Kilometers:
32,00048,00064,00080,00096,000112,000128,000144,000160,000176,000192,000208,000224,000240,000
Additional Inspections
Inspect CV joint boots.XXXXX
Inspect front suspension, tie rod ends and replaceas necessary.XXX X X X X
Inspect brake linings, parking brake function. X X X X X X X
Additional Maintenance
Replace the cabin/air conditioning filter.XXX X X X X
Replace the engine air cleaner filter.XXXXX
Replace the spark plugs (1.4L Turbo Engine).**XXXXX
8
MAINTENANCE
SCHEDULES
624 MAINTENANCE SCHEDULES
Page 642 of 664
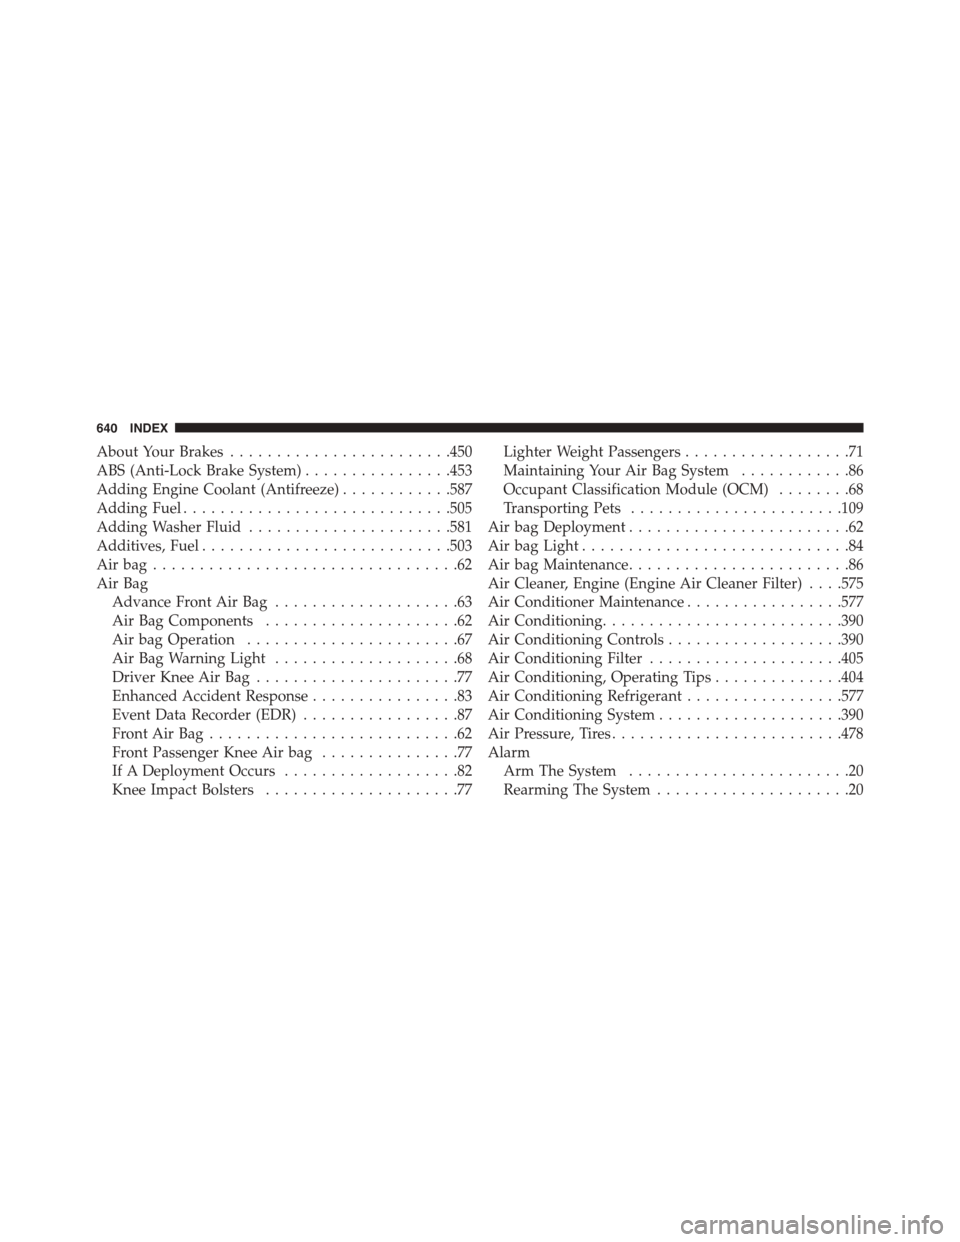
About Your Brakes........................450
ABS (Anti-Lock Brake System)................453
Adding Engine Coolant (Antifreeze)............587
Adding Fuel.............................505
Adding Washer Fluid......................581
Additives, Fuel...........................503
Air bag . . . . . . . . . . . . . . . . . . . . . . . . . . . . . . . . .62
Air Bag
Advance Front Air Bag....................63
Air Bag Components.....................62
Air bag Operation.......................67
Air Bag Warning Light....................68
Driver Knee Air Bag......................77
Enhanced Accident Response................83
Event Data Recorder (EDR).................87
Front Air Bag . . . . . . . . . . . . . . . . . . . . . . . . . . .62
Front Passenger Knee Air bag...............77
If A Deployment Occurs...................82
Knee Impact Bolsters.....................77
Lighter Weight Passengers..................71
Maintaining Your Air Bag System............86
Occupant Classification Module (OCM)........68
Transporting Pets.......................109
Air bag Deployment........................62
Air bag Light.............................84
Air bag Maintenance........................86
Air Cleaner, Engine (Engine Air Cleaner Filter) . . . .575
Air Conditioner Maintenance.................577
Air Conditioning..........................390
Air Conditioning Controls...................390
Air Conditioning Filter.....................405
Air Conditioning, Operating Tips..............404
Air Conditioning Refrigerant.................577
Air Conditioning System....................390
Air Pressure, Tires.........................478
Alarm
Arm The System........................20
Rearming The System.....................20
640 INDEX