climate control DODGE DART 2015 PF / 1.G Owners Manual
[x] Cancel search | Manufacturer: DODGE, Model Year: 2015, Model line: DART, Model: DODGE DART 2015 PF / 1.GPages: 664, PDF Size: 16.96 MB
Page 113 of 664
WARNING!(Continued)
•It is extremely dangerous to ride in a cargo area,
inside or outside of a vehicle. In a collision, people
riding in these areas are more likely to be seriously
injured or killed.
•Do not allow people to ride in any area of your
vehicle that is not equipped with seats and seat
belts.
•Be sure everyone in your vehicle is in a seat and
using a seat belt properly.
Exhaust Gas
WARNING!
Exhaust gases can injure or kill. They contain carbon
monoxide (CO), which is colorless and odorless.
Breathing it can make you unconscious and can
(Continued)
WARNING!(Continued)
eventually poison you. To avoid breathing (CO),
follow these safety tips:
•Do not run the engine in a closed garage or in
confined areas any longer than needed to move
your vehicle in or out of the area.
•If you are required to drive with the trunk/liftgate/
rear doors open, make sure that all windows are
closed and the climate control BLOWER switch is
set at high speed. DO NOT use the recirculation
mode.
•If it is necessary to sit in a parked vehicle with the
engine running, adjust your heating or cooling
controls to force outside air into the vehicle. Set the
blower at high speed.
The best protection against carbon monoxide entry into
the vehicle body is a properly maintained engine exhaust
system.
2
THINGS TO KNOW BEFORE STARTING YOUR VEHICLE 111
Page 230 of 664
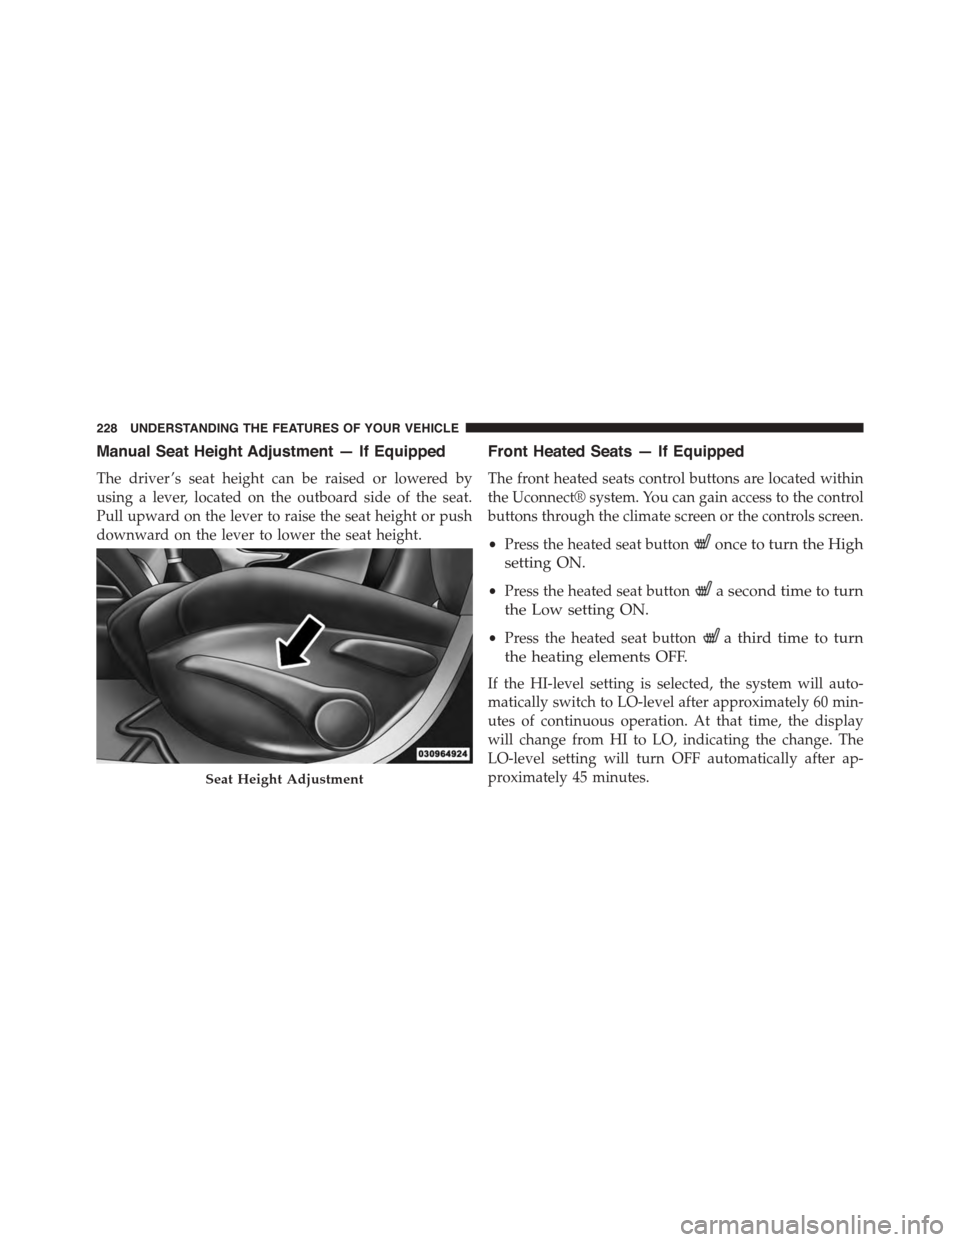
Manual Seat Height Adjustment — If Equipped
The driver ’s seat height can be raised or lowered by
using a lever, located on the outboard side of the seat.
Pull upward on the lever to raise the seat height or push
downward on the lever to lower the seat height.
Front Heated Seats — If Equipped
The front heated seats control buttons are located within
the Uconnect® system. You can gain access to the control
buttons through the climate screen or the controls screen.
•Press the heated seat buttononce to turn the High
setting ON.
•Press the heated seat buttona second time to turn
the Low setting ON.
•Press the heated seat buttona third time to turn
the heating elements OFF.
If the HI-level setting is selected, the system will auto-
matically switch to LO-level after approximately 60 min-
utes of continuous operation. At that time, the display
will change from HI to LO, indicating the change. The
LO-level setting will turn OFF automatically after ap-
proximately 45 minutes.Seat Height Adjustment
228 UNDERSTANDING THE FEATURES OF YOUR VEHICLE
Page 254 of 664
HEATED STEERING WHEEL — IF EQUIPPED
The steering wheel contains a heating element that helps
warm your hands in cold weather. The heated steering
wheel has only one temperature setting. Once the heated
steering wheel has been turned on it will operate for up
to 80 minutes before automatically shutting off. The
heated steering wheel can shut off early or may not turn
on when the steering wheel is already warm.
The heated steering wheel control button is located
within the Uconnect® system. You can gain access to the
control button through the climate screen or the controls
screen.
•Press the heated steering wheel buttononce to
turn the heating element ON.
•Press the heated steering wheel buttona second
time to turn the heating element OFF.
NOTE:The engine must be running for the heated
steering wheel to operate.
Vehicles Equipped With Remote Start
On models that are equipped with remote start, the
heated steering wheel can be programmed to come on
during a remote start through the Uconnect® system.
Refer to “Uconnect® Settings” in “Understanding Your
Instrument Panel” for further information.
252 UNDERSTANDING THE FEATURES OF YOUR VEHICLE
Page 289 of 664
open or partially open positions. This is a normal occur-
rence and can be minimized. If the buffeting occurs with
the rear windows open, open the front and rear windows
together to minimize the buffeting. If the buffeting occurs
with the sunroof open, adjust the sunroof opening to
minimize the buffeting or open any window.
Sunroof Maintenance
Use only a nonabrasive cleaner and a soft cloth to clean
the glass panel.
ELECTRICAL POWER OUTLETS — IF EQUIPPED
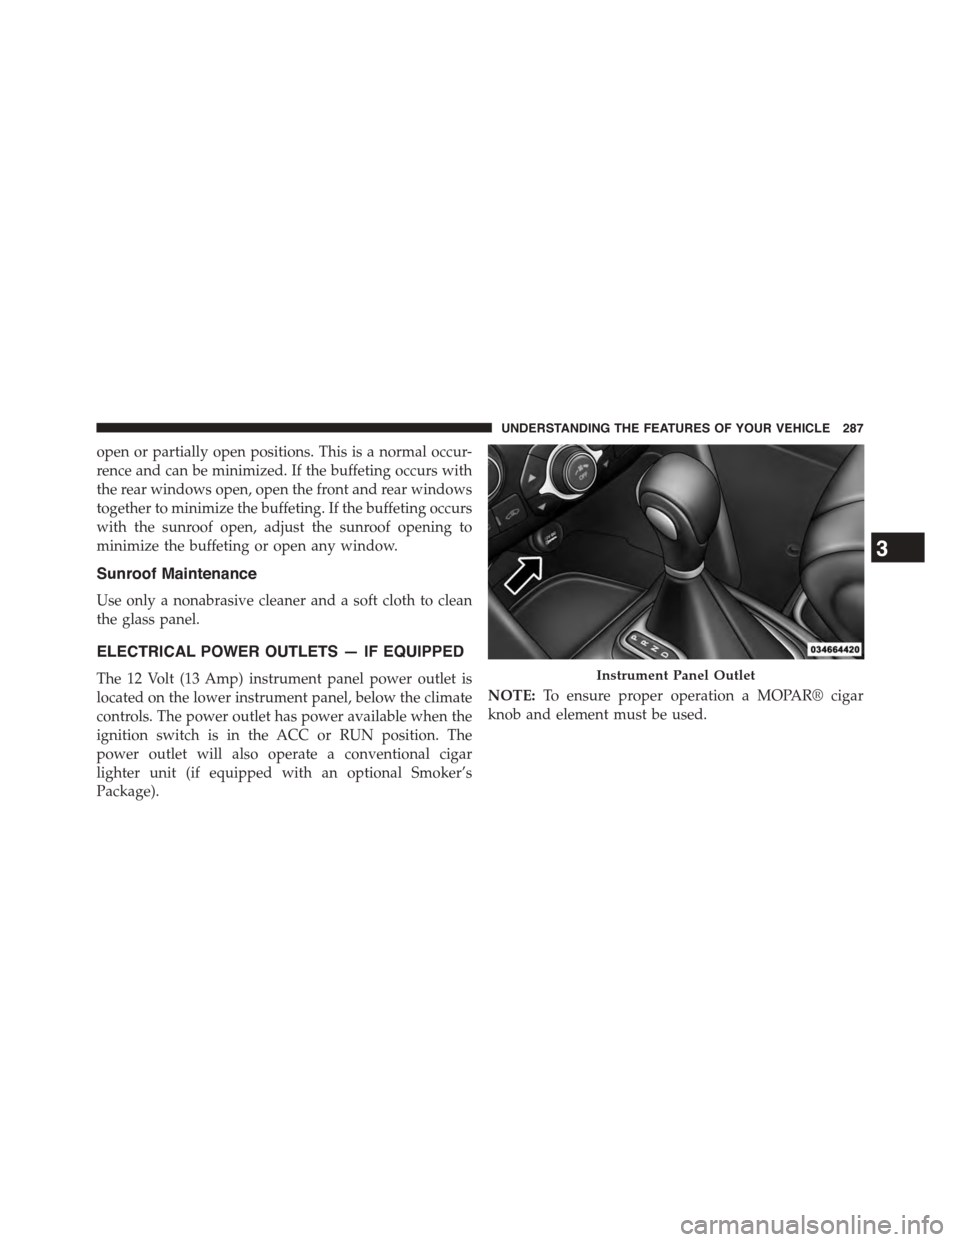
The 12 Volt (13 Amp) instrument panel power outlet is
located on the lower instrument panel, below the climate
controls. The power outlet has power available when the
ignition switch is in the ACC or RUN position. The
power outlet will also operate a conventional cigar
lighter unit (if equipped with an optional Smoker’s
Package).
NOTE:To ensure proper operation a MOPAR® cigar
knob and element must be used.
Instrument Panel Outlet
3
UNDERSTANDING THE FEATURES OF YOUR VEHICLE 287
Page 300 of 664
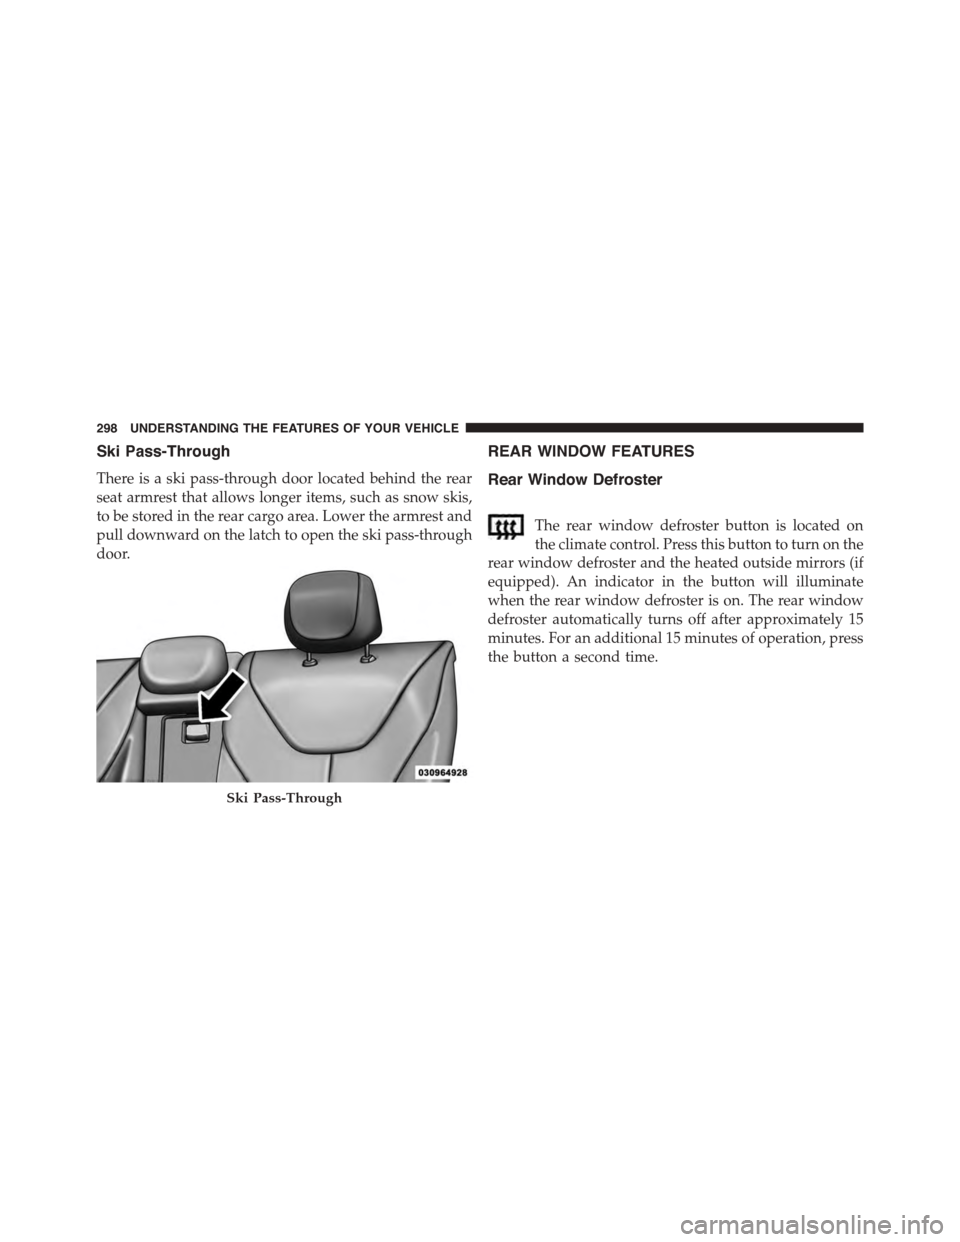
Ski Pass-Through
There is a ski pass-through door located behind the rear
seat armrest that allows longer items, such as snow skis,
to be stored in the rear cargo area. Lower the armrest and
pull downward on the latch to open the ski pass-through
door.
REAR WINDOW FEATURES
Rear Window Defroster
The rear window defroster button is located on
the climate control. Press this button to turn on the
rear window defroster and the heated outside mirrors (if
equipped). An indicator in the button will illuminate
when the rear window defroster is on. The rear window
defroster automatically turns off after approximately 15
minutes. For an additional 15 minutes of operation, press
the button a second time.
Ski Pass-Through
298 UNDERSTANDING THE FEATURES OF YOUR VEHICLE
Page 305 of 664
!RADIO OPERATION AND MOBILE
PHONES............................389
!CLIMATE CONTROLS...................390
▫Manual Heating And Air Conditioning — If
Equipped...........................390
▫Uconnect® 8.4 Climate Controls — If
Equipped...........................395
▫Climate Control Functions...............400
▫Automatic Temperature Control (ATC)......402
▫Operating Tips.......................404
4
UNDERSTANDING YOUR INSTRUMENT PANEL 303
Page 306 of 664
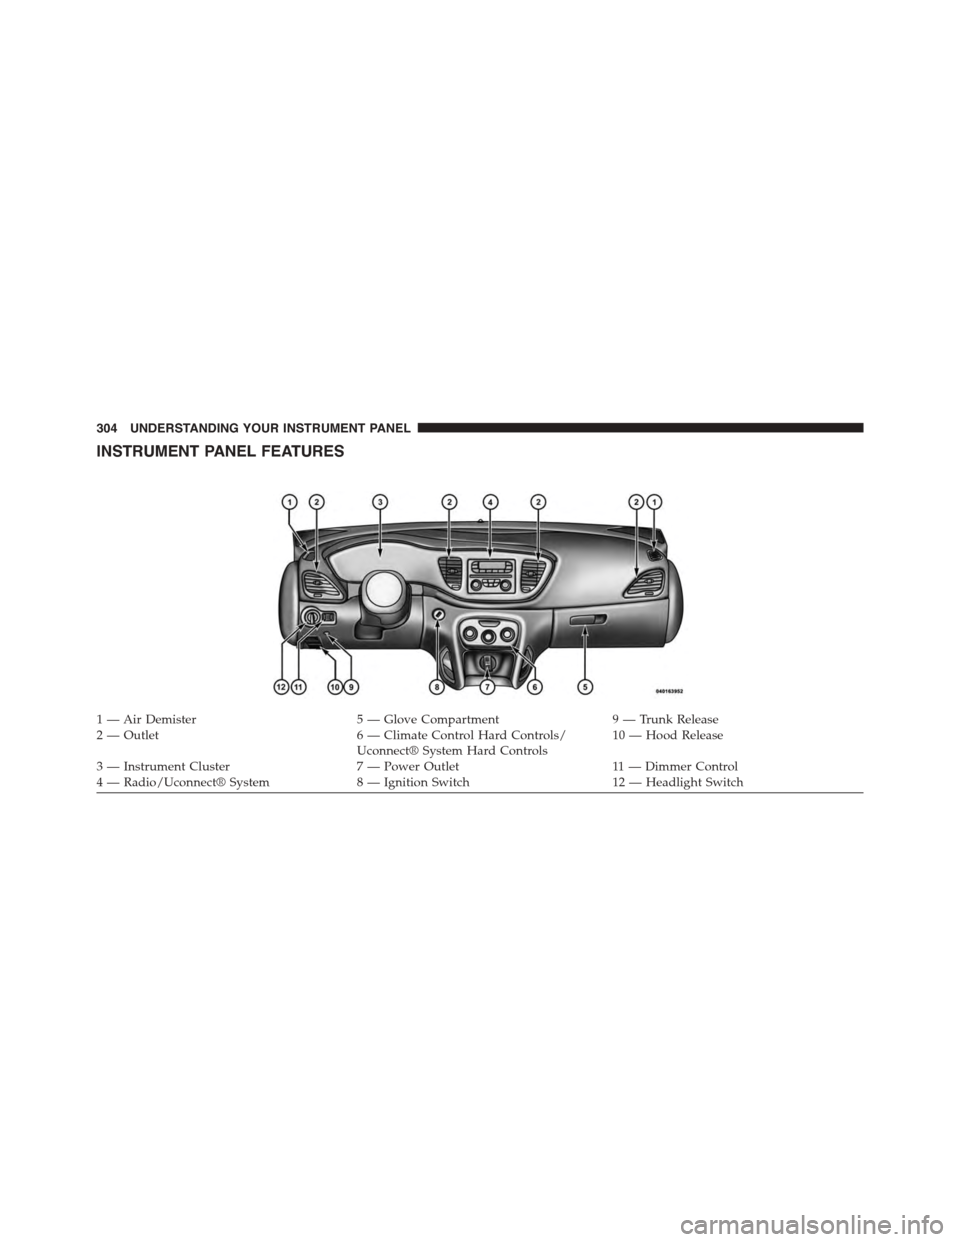
INSTRUMENT PANEL FEATURES
1—AirDemister5—GloveCompartment9—TrunkRelease2 — Outlet6 — Climate Control Hard Controls/Uconnect® System Hard Controls10 — Hood Release
3 — Instrument Cluster7 — Power Outlet11 — Dimmer Control4 — Radio/Uconnect® System8 — Ignition Switch12 — Headlight Switch
304 UNDERSTANDING YOUR INSTRUMENT PANEL
Page 354 of 664
there is a Scroll/Enter control knob located on the right
side of the Climate Controls in the center of the instru-
ment panel. Turn the control knob to scroll through
menus and change settings (i.e., 30, 60, 90), press the
center of the control knob one or more times to select or
change a setting (i.e., ON, OFF).
Buttons On The Touchscreen
Buttons on the touchscreen are accessible on the
Uconnect® Touchscreen.
Customer Programmable Features — Uconnect®
System 8.4 Settings
Press the More button on the touchscreen, then press the
Settings button on the touchscreen to display the menu
setting screen. In this mode the Uconnect® system allows
you to access programmable features that may be
equipped such as Display, Clock, Safety & Driving Assis-
tance, Lights, Doors & Locks, Auto-On Comfort & Re-
mote Start, Engine Off Operation, Compass Settings,
Audio, Phone/Bluetooth and SIRIUS Setup.
NOTE:Only one touchscreen area may be selected at a
time.
When making a selection, press the button on the touch-
screen to enter the desired mode. Once in the desired
mode press and release the preferred setting until a
check-mark appears next to the setting, showing that
setting has been selected.
Once the setting is complete press the Back Arrow button
on the touchscreen to return to the previous menu or
press the X button on the touchscreen to close out of the
settings screen. Pressing the Up or Down Arrow buttons
on the touchscreens on the right side of the screen will
allow you to toggle up or down through the available
settings.
352 UNDERSTANDING YOUR INSTRUMENT PANEL
Page 392 of 664
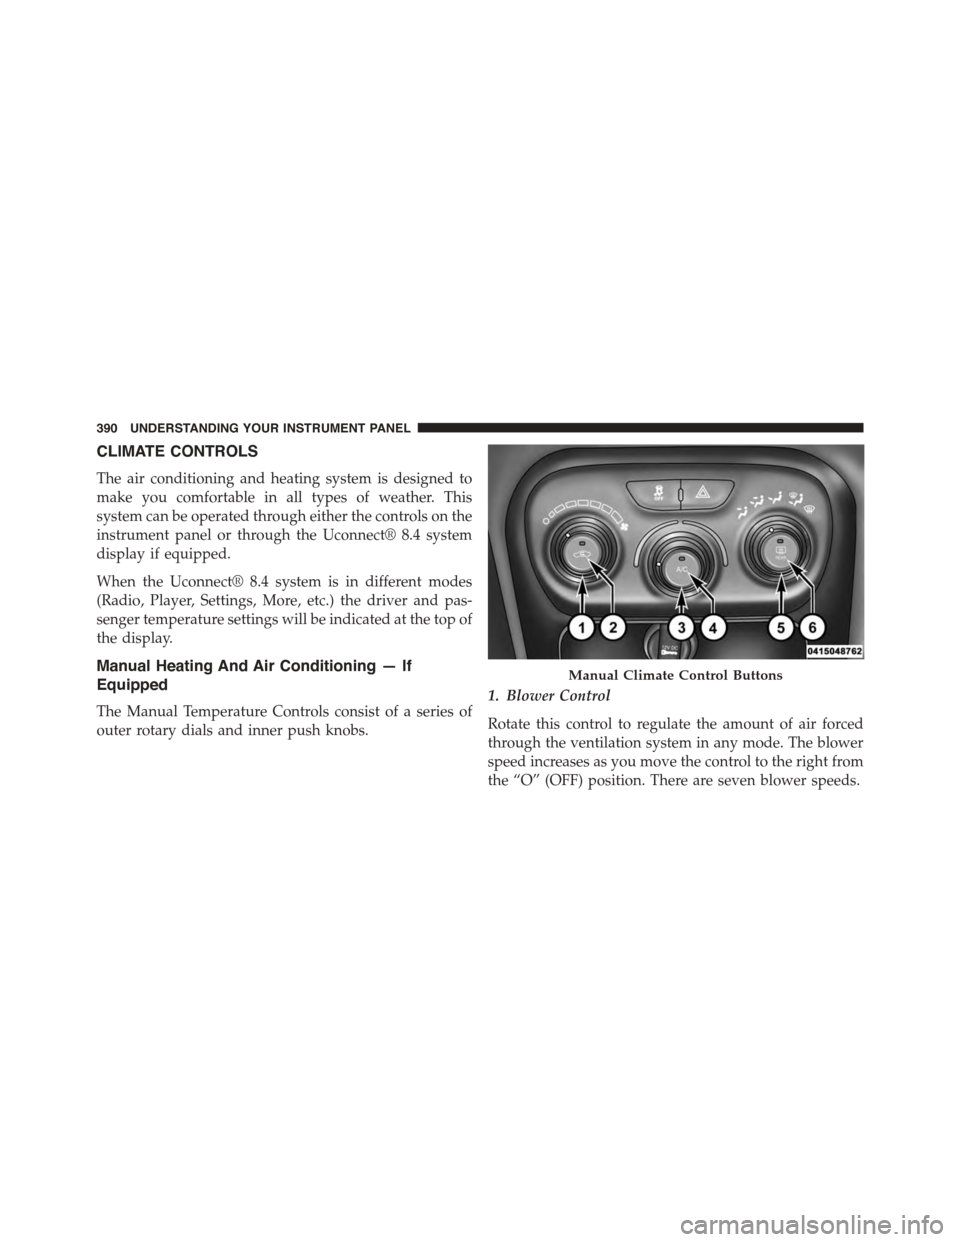
CLIMATE CONTROLS
The air conditioning and heating system is designed to
make you comfortable in all types of weather. This
system can be operated through either the controls on the
instrument panel or through the Uconnect® 8.4 system
display if equipped.
When the Uconnect® 8.4 system is in different modes
(Radio, Player, Settings, More, etc.) the driver and pas-
senger temperature settings will be indicated at the top of
the display.
Manual Heating And Air Conditioning — If
Equipped
The Manual Temperature Controls consist of a series of
outer rotary dials and inner push knobs.
1. Blower Control
Rotate this control to regulate the amount of air forced
through the ventilation system in any mode. The blower
speed increases as you move the control to the right from
the “O” (OFF) position. There are seven blower speeds.
Manual Climate Control Buttons
390 UNDERSTANDING YOUR INSTRUMENT PANEL
Page 397 of 664
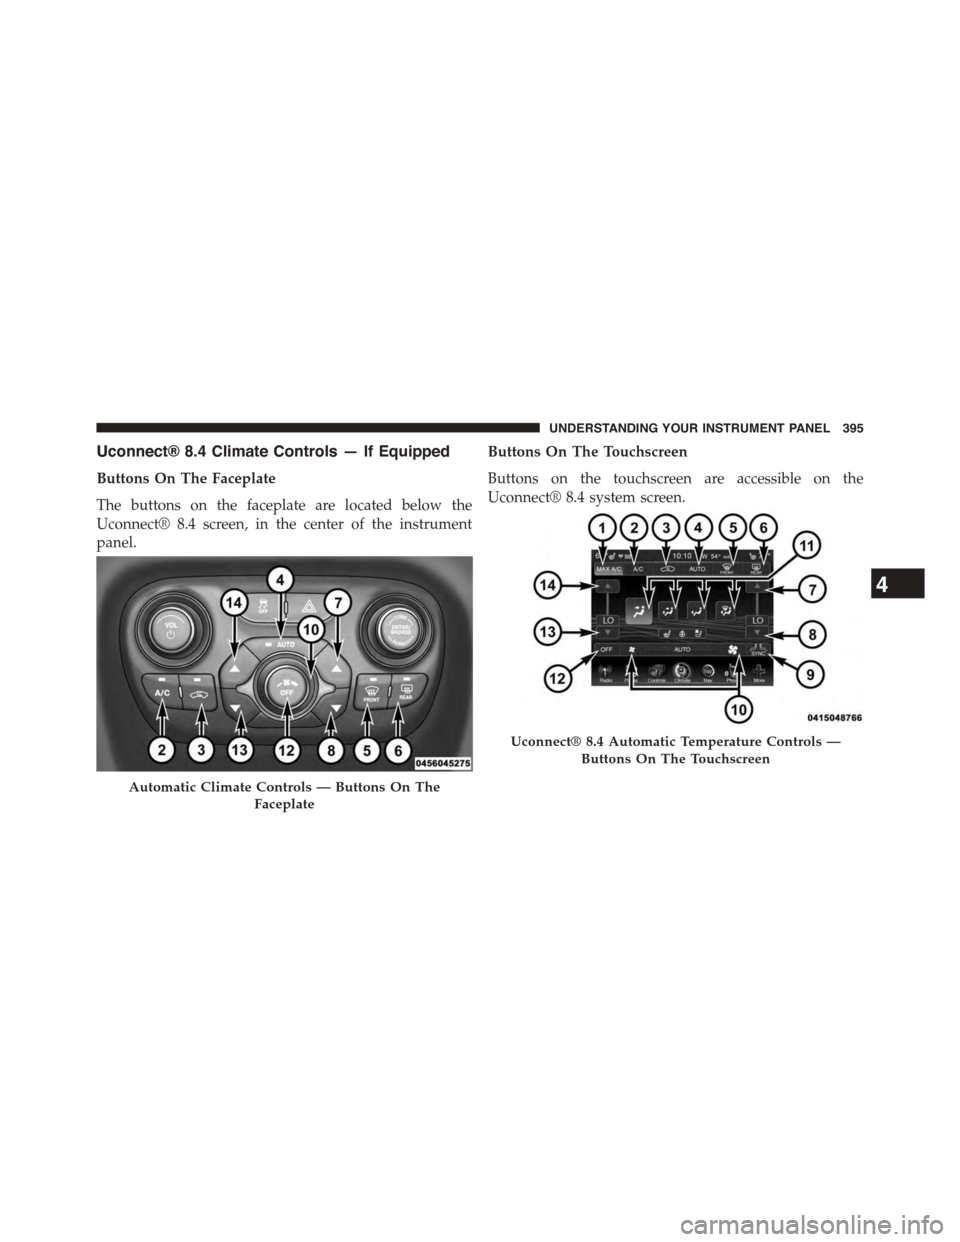
Uconnect® 8.4 Climate Controls — If Equipped
Buttons On The Faceplate
The buttons on the faceplate are located below the
Uconnect® 8.4 screen, in the center of the instrument
panel.
Buttons On The Touchscreen
Buttons on the touchscreen are accessible on the
Uconnect® 8.4 system screen.
Automatic Climate Controls — Buttons On The
Faceplate
Uconnect® 8.4 Automatic Temperature Controls —
Buttons On The Touchscreen
4
UNDERSTANDING YOUR INSTRUMENT PANEL 395