run flat DODGE DART 2015 PF / 1.G Owners Manual
[x] Cancel search | Manufacturer: DODGE, Model Year: 2015, Model line: DART, Model: DODGE DART 2015 PF / 1.GPages: 664, PDF Size: 16.96 MB
Page 86 of 664
•Cut off fuel to the engine.
•Flash hazard lights as long as the battery has power or
until the ignition switch is turned to the “OFF” posi-
tion.
•Turn on the interior lights, which remain on as long as
the battery has power or until the ignition switch is
turned to the “OFF” position.
•Unlock the doors automatically.
System Reset Procedure
In order to reset the Enhanced Accident Response System
functions after an event, the ignition switch must be
changed from ignition START or ON/RUN to ignition
OFF.
Air Bag Warning Light
The air bags must be ready to inflate for your protection
in a collision. The Occupant Restraint Control-
ler (ORC) monitors the internal circuits and
interconnecting wiring associated with air bag
system electrical components.
The ORC monitors the readiness of the electronic parts of
the air bag system whenever the ignition switch is in the
START or ON/RUN position. If the ignition switch is in
the OFF position or in the ACC position, the air bag
system is not on and the air bags will not inflate.
The ORC contains a backup power supply system that
may deploy the air bags even if the battery loses power or
it becomes disconnected prior to deployment.
The ORC turns on the Air Bag Warning Light in the
instrument panel for approximately four to eight seconds
for a self-check when the ignition switch is first turned to
84 THINGS TO KNOW BEFORE STARTING YOUR VEHICLE
Page 87 of 664
the ON/RUN position. After the self-check, the Air Bag
Warning Light will turn off. If the ORC detects a mal-
function in any part of the system, it turns on the Air Bag
Warning Light, either momentarily or continuously. A
single chime will sound to alert you if the light comes on
again after initial startup.
The ORC also includes diagnostics that will illuminate
the instrument panel Air Bag Warning Light if a malfunc-
tion is detected that could affect the air bag system. The
diagnostics also record the nature of the malfunction.
While the air bag system is designed to be maintenance
free, if any of the following occurs, have an authorized
dealer service the air bag system immediately.
•The Air Bag Warning Light does not come on during
the four to eight seconds when the ignition switch is
first turned to the ON/RUN position.
•The Air Bag Warning Light remains on after the four to
eight-second interval.
•The Air Bag Warning Light comes on intermittently or
remains on while driving.
NOTE:If the speedometer, tachometer, or any engine
related gauges are not working, the Occupant Restraint
Controller (ORC) may also be disabled. In this condition
the air bags may not be ready to inflate for your protec-
tion. Have an authorized dealer service the air bag
system immediately.
WARNING!
Ignoring the Air Bag Warning Light in your instru-
ment panel could mean you won’t have the air bags
to protect you in a collision. If the light does not come
on as a bulb check when the ignition is first turned
on, stays on after you start the vehicle, or if it comes
on as you drive, have an authorized dealer service the
air bag system immediately.
2
THINGS TO KNOW BEFORE STARTING YOUR VEHICLE 85
Page 88 of 664
Maintaining Your Air Bag System
WARNING!
•Modifications to any part of the air bag system
could cause it to fail when you need it. You could
be injured if the air bag system is not there to
protect you. Do not modify the components or
wiring, including adding any kind of badges or
stickers to the steering wheel hub trim cover or the
upper right side of the instrument panel. Do not
modify the front bumper, vehicle body structure, or
add aftermarket side steps or running boards.
•It is dangerous to try to repair any part of the air
bag system yourself. Be sure to tell anyone who
works on your vehicle that it has an air bag system.
(Continued)
WARNING!(Continued)
•Do not attempt to modify any part of your air bag
system. The air bag may inflate accidentally or may
not function properly if modifications are made.
Take your vehicle to an authorized dealer for any
air bag system service. If your seat, including your
trim cover and cushion, needs to be serviced in any
way (including removal or loosening/tightening of
seat attachment bolts), take the vehicle to your
authorized dealer. Only manufacturer approved
seat accessories may be used. If it is necessary to
modify the air bag system for persons with dis-
abilities, contact your authorized dealer.
86 THINGS TO KNOW BEFORE STARTING YOUR VEHICLE
Page 411 of 664
▫Tire Loading And Tire Pressure...........471
!TIRES — GENERAL INFORMATION........476
▫Tire Pressure........................476
▫Tire Inflation Pressures.................478
▫Tire Pressures For High Speed Operation . . . .479
▫Radial Ply Tires......................479
▫Tire Types...........................480
▫Run Flat Tires — If Equipped.............482
▫Spare Tires — If Equipped...............482
▫Tire Spinning........................485
▫Tread Wear Indicators..................485
▫Life Of Tire.........................486
▫Replacement Tires.....................487
!TIRE CHAINS (TRACTION DEVICES).......488
!TIRE ROTATION RECOMMENDATIONS.....490
!TIRE PRESSURE MONITORING SYSTEM
(TPMS)..............................491
▫Base System.........................494
▫Premium System — If Equipped...........497
▫General Information...................500
!FUEL REQUIREMENTS..................500
▫1.4L Turbo Engine.....................500
▫2.0L And 2.4L Engine...................500
▫Reformulated Gasoline.................501
▫Gasoline/Oxygenate Blends..............501
▫E-85 Usage In Non-Flex Fuel Vehicles.......502
5
STARTING AND OPERATING 409
Page 482 of 664
Tire Repair
If your tire becomes damaged, it may be repaired if it
meets the following criteria:
•The tire has not been driven on when flat.
•The damage is only on the tread section of your tire
(sidewall damage is not repairable).
•The puncture is no greater than¼#(6 mm).
Consult an authorized tire dealer for tire repairs and
additional information.
Damaged Run Flat tires, or Run Flat tires that have
experienced a loss of pressure should be replaced imme-
diately with another Run Flat tire of identical size and
service description (Load Index and Speed Symbol).
Tire Types
All Season Tires — If Equipped
All Season tires provide traction for all seasons (spring,
summer, fall and winter). Traction levels may vary be-
tween different all season tires. All season tires can be
identified by the M+S, M&S, M/S or MS designation on
the tire sidewall. Use all season tires only in sets of four;
failure to do so may adversely affect the safety and
handling of your vehicle.
Summer Or Three Season Tires — If Equipped
Summer tires provide traction in both wet and dry
conditions, and are not intended to be driven in snow or
on ice. If your vehicle is equipped with summer tires, be
aware these tires are not designed for winter or cold
driving conditions. Install winter tires on your vehicle
when ambient temperatures are less than 40°F (5°C) or if
roads are covered with ice or snow. For more informa-
tion, contact an authorized dealer.
480 STARTING AND OPERATING
Page 484 of 664
While studded tires improve performance on ice, skid
and traction capability on wet or dry surfaces may be
poorer than that of non-studded tires. Some states pro-
hibit studded tires; therefore, local laws should be
checked before using these tire types.
Run Flat Tires — If Equipped
Run Flat tires allow you the capability to drive 50 miles
(80 km) at 50 mph (80 km/h) after a rapid loss of inflation
pressure. This rapid loss of inflation is referred to as the
Run Flat mode. A Run Flat mode occurs when the tire
inflation pressure is of/or below 14 psi (96 kPa). Once a
Run Flat tire reaches the run flat mode it has limited
driving capabilities and needs to be replaced immedi-
ately. A Run Flat tire is not repairable.
It is not recommended driving a vehicle loaded at full
capacity or to tow a trailer while a tire is in the run flat
mode.
See the tire pressure monitoring section for more infor-
mation.
Spare Tires — If Equipped
NOTE:For vehicles equipped with Tire Service Kit
instead of a spare tire, please refer to “Tire Service Kit” in
“What To Do In Emergencies” for further information.
CAUTION!
Because of the reduced ground clearance, do not take
your vehicle through an automatic car wash with a
compact or limited-use temporary spare installed.
Damage to the vehicle may result.
Spare Tire Matching Original Equipped Tire And
Wheel — If Equipped
Your vehicle may be equipped with a spare tire and
wheel equivalent in look and function to the original
482 STARTING AND OPERATING
Page 532 of 664
WARNING!
To avoid the risk of forcing the vehicle off the jack,
do not tighten the lug nuts fully until the vehicle has
been lowered. Failure to follow this warning may
result in personal injury.
TIRE SERVICE KIT — IF EQUIPPED
Small punctures up to¼” (6 mm) in the tire tread can be
sealed with Tire Service Kit. Foreign objects (e.g., screws
or nails) should not be removed from the tire. Tire Service
Kit can be used in outside temperatures down to approxi-
mately -4°F (-20°C).
This kit will provide a temporary tire seal, allowing you
to drive your vehicle up to 100 miles (160 km) with a
maximum speed of 55 mph (90 km/h).
Tire Service Kit Storage
The Tire Service Kit is located in the trunk.
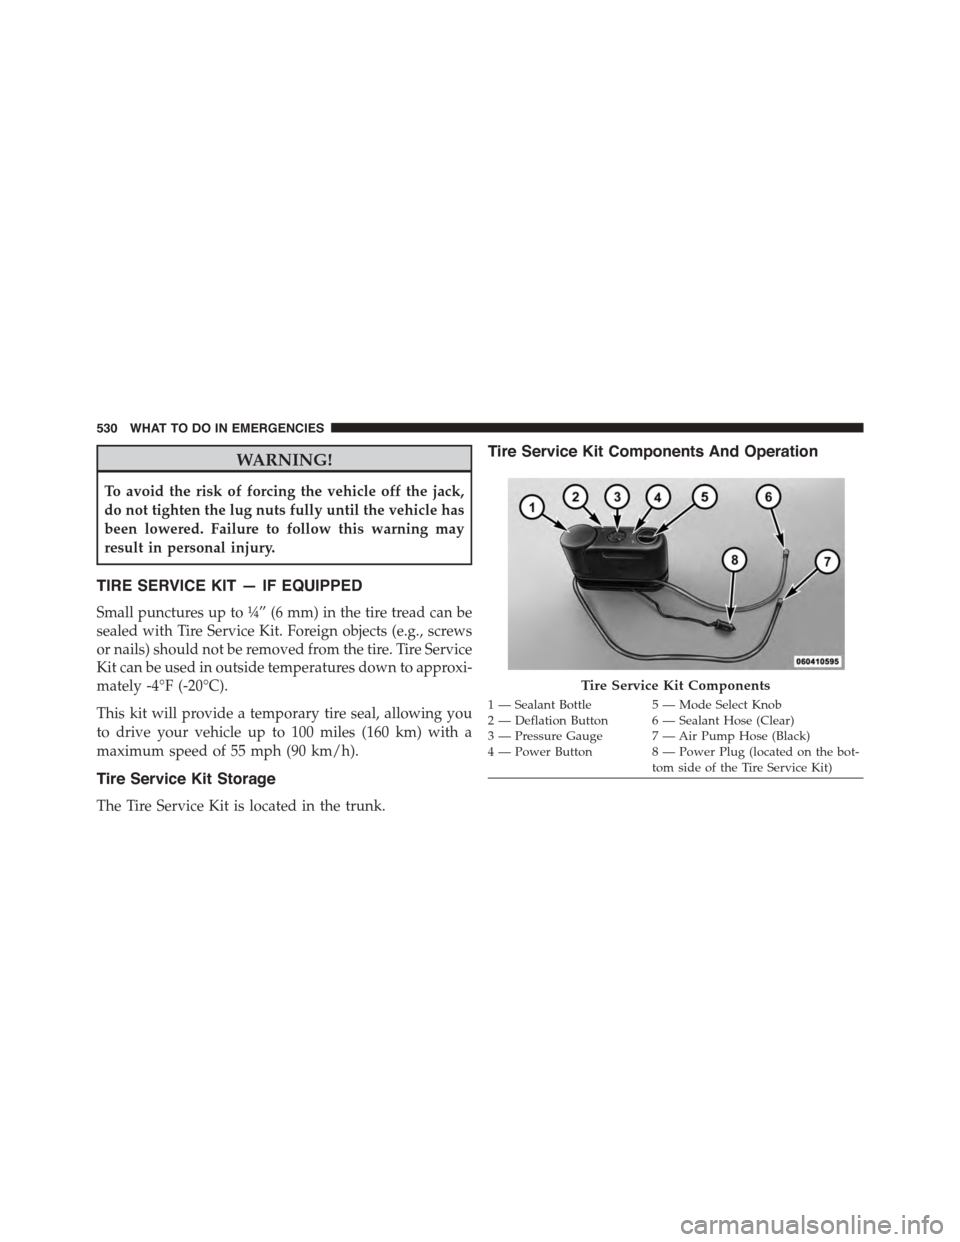
Tire Service Kit Components And Operation
Tire Service Kit Components
1—SealantBottle 5—ModeSelectKnob2 — Deflation Button 6 — Sealant Hose (Clear)3—PressureGauge 7—AirPumpHose(Black)4—PowerButton 8—PowerPlug(locatedonthebot-tom side of the Tire Service Kit)
530 WHAT TO DO IN EMERGENCIES
Page 536 of 664
WARNING!(Continued)
•Tire Service Kit Sealant solution contains latex. In
case of an allergic reaction or rash, consult a phy-
sician immediately. Keep Tire Service Kit out of
reach of children. If swallowed, rinse mouth imme-
diately with plenty of water and drink plenty of
water. Do not induce vomiting! Consult a physician
immediately.
Sealing A Tire With Tire Service Kit
(A) Whenever You Stop To Use Tire Service Kit:
1. Pull over to a safe location and turn on the vehicle’s
Hazard Warning flashers.
2. Verify that the valve stem (on the wheel with the
deflated tire) is in a position that is near to the ground.
This will allow the Tire Service Kit Hoses (6) and (7) to
reach the valve stem and keep the Tire Service Kit flat
on the ground. This will provide the best positioning
of the kit when injecting the sealant into the deflated
tire and running the air pump. Move the vehicle as
necessary to place the valve stem in this position
before proceeding.
3. Place the transmission in PARK (auto transmission) or
in Gear (manual transmission) and turn Off the igni-
tion.
4. Set the parking brake.
(B) Setting Up To Use Tire Service Kit:
1. Push in the Mode Select Knob (5) and turn to the
Sealant Mode position.
2. Uncoil the Sealant Hose (6) and then remove the cap
from the fitting at the end of the hose.
3. Place the Tire Service Kit flat on the ground next to the
deflated tire.
534 WHAT TO DO IN EMERGENCIES
Page 537 of 664
4. Remove the cap from the valve stem and then screw
the fitting at the end of the Sealant Hose (6) onto the
valve stem.
5. Uncoil the Power Plug (8) and insert the plug into the
vehicle’s 12 Volt power outlet.
NOTE:Do not remove foreign objects (e.g., screws or
nails) from the tire.
(C) Injecting Tire Service Kit Sealant Into The
Deflated Tire:
•Always start the engine before turning ON the Tire
Service Kit.
NOTE:Manual transmission vehicles must have the
parking brake engaged and the shift lever in NEUTRAL.
•After pressing the Power Button (4), the sealant (white
fluid) will flow from the Sealant Bottle (1) through the
Sealant Hose (6) and into the tire.
NOTE:Sealant may leak out through the puncture in the
tire.
If the sealant (white fluid) does not flow within0–10
seconds through the Sealant Hose (6):
1. Press the Power Button (4) to turn Off the Tire Service
Kit. Disconnect the Sealant Hose (6) from the valve
stem. Make sure the valve stem is free of debris.
Reconnect the Sealant Hose (6) to the valve stem.
Check that the Mode Select Knob (5) is in the Sealant
Mode position and not Air Mode. Press the Power
Button (4) to turn On the Tire Service Kit.
2. Connect the Power Plug (8) to a different 12 Volt
power outlet in your vehicle or another vehicle, if
available. Make sure the engine is running before
turning ON the Tire Service Kit.
3. The Sealant Bottle (1) may be empty due to previous
use. Call for assistance.
6
WHAT TO DO IN EMERGENCIES 535
Page 562 of 664
CAUTION!
•DO NOT use sling-type equipment when towing.
Vehicle damage may occur.
•When securing the vehicle to a flatbed truck, do not
attach to front or rear suspension components.
Damage to your vehicle may result from improper
towing.
•The manufacturer does not recommend towing this
vehicle using a tow dolly. Vehicle damage may
occur.
If you must use the accessories (wipers, defroster, etc.)
while being towed, the key must be in the ON/RUN
position, not the ACC position.
2.0L / 2.4L Automatic Transmission
This vehicle must be towed with all four wheels OFF
the ground using a flatbed.
CAUTION!
•DO NOT flat tow any 2.0L or 2.4L vehicle equipped
with an automatic transmission. Damage to the
drivetrain will result. If these vehicles require
towing, make sure all the wheels are OFF the
ground.
•Do not dolly tow this vehicle. Use of a towing dolly
can cause significant damage to your vehicle. Dam-
age from improper towing is not covered under the
New Vehicle Limited Warranty.
•Towing this vehicle in violation of the above re-
quirements can cause severe transmission damage.
Damage from improper towing is not covered un-
der the New Vehicle Limited Warranty.
560 WHAT TO DO IN EMERGENCIES