door lock DODGE DART 2015 PF / 1.G User Guide
[x] Cancel search | Manufacturer: DODGE, Model Year: 2015, Model line: DART, Model: DODGE DART 2015 PF / 1.GPages: 164, PDF Size: 25.19 MB
Page 10 of 164
KEY FOB
Locking And Unlocking The Doors
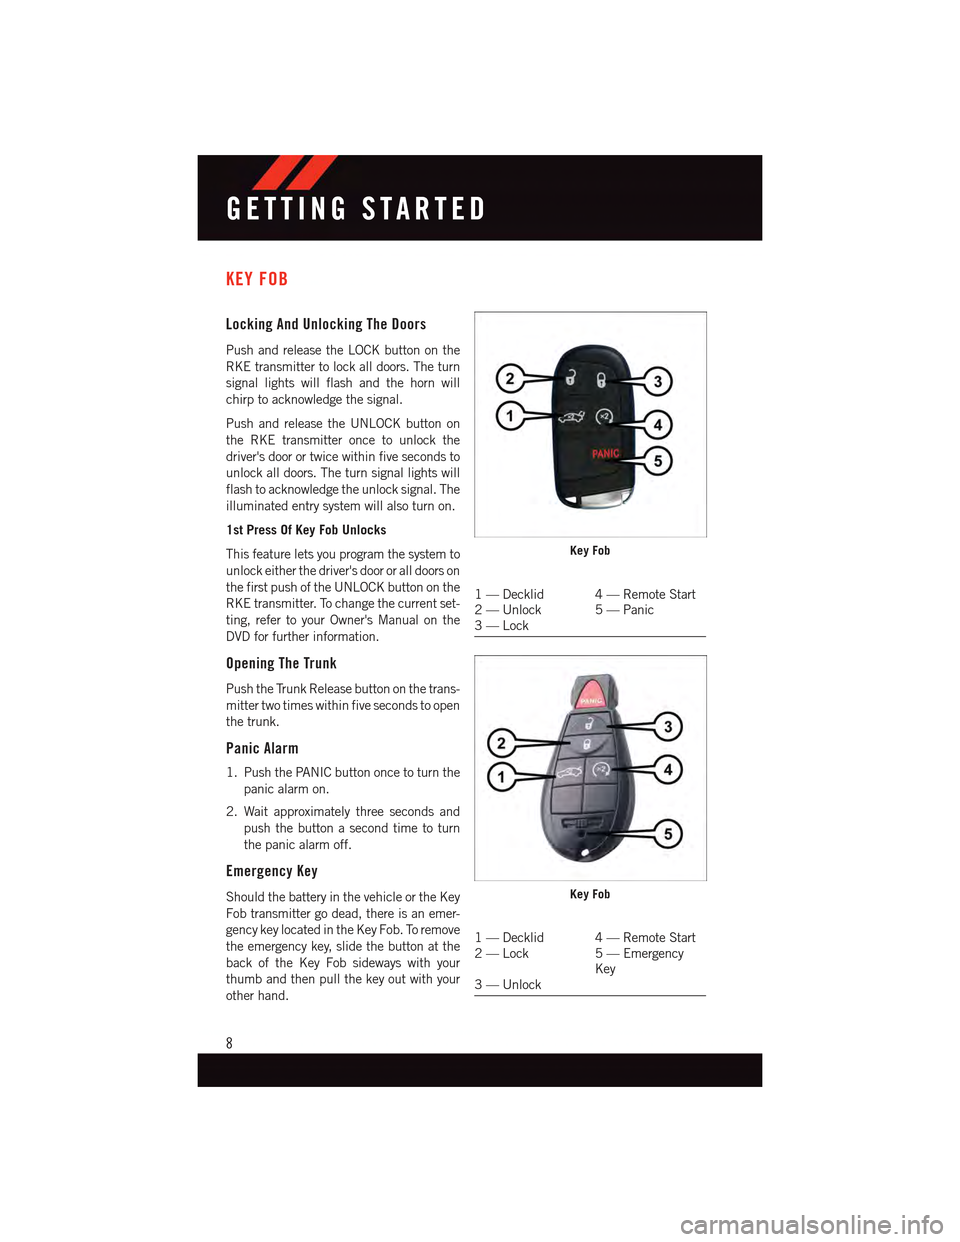
Push and release the LOCK button on the
RKE transmitter to lock all doors. The turn
signal lights will flash and the horn will
chirp to acknowledge the signal.
Push and release the UNLOCK button on
the RKE transmitter once to unlock the
driver's door or twice within five seconds to
unlock all doors. The turn signal lights will
flash to acknowledge the unlock signal. The
illuminated entry system will also turn on.
1st Press Of Key Fob Unlocks
This feature lets you program the system to
unlock either the driver's door or all doors on
the first push of the UNLOCK button on the
RKE transmitter. To change the current set-
ting, refer to your Owner's Manual on the
DVD for further information.
Opening The Trunk
Push the Trunk Release button on the trans-
mitter two times within five seconds to open
the trunk.
Panic Alarm
1. Push the PANIC button once to turn the
panic alarm on.
2. Wait approximately three seconds and
push the button a second time to turn
the panic alarm off.
Emergency Key
Should the battery in the vehicle or the Key
Fob transmitter go dead, there is an emer-
gency key located in the Key Fob. To remove
the emergency key, slide the button at the
back of the Key Fob sideways with your
thumb and then pull the key out with your
other hand.
Key Fob
1—Decklid 4—RemoteStart2—Unlock 5—Panic3—Lock
Key Fob
1—Decklid 4—RemoteStart2—Lock 5—EmergencyKey3—Unlock
GETTING STARTED
8
Page 11 of 164
The emergency key is also for locking the glove compartment.
WARNING!
•Neverleavechildrenaloneinavehicle,orwithaccesstoanunlockedvehicle.
Allowing children to be in a vehicle unattended is dangerous for a number of
reasons. A child or others could be seriously or fatally injured. Children should be
warned not to touch the parking brake, brake pedal or the transmission gear
selector.
•DonotleavetheKeyFobinornearthevehicle,orinalocationaccessibleto
children, and do not leave the ignition of a vehicle equipped with Keyless
Enter-N-Go™ in the ACC or ON/RUN mode. A child could operate power windows,
other controls, or move the vehicle.
REMOTE START
•PushtheREMOTESTARTbuttonx2on the Key Fob twice within five seconds.
•PushingtheREMOTESTARTbuttonathirdtimeshutstheengineoff.
•Todrivethevehicle,pushtheUNLOCKbuttonandcycletheignitiontotheON/RUN
position.
With remote start, the engine will only run for 15 minutes (timeout) unless the ignition is
cycled to the ON/RUN position.
The vehicle must be cycled to the ON/RUN position after two consecutive timeouts.
WARNING!
•Donotstartorrunanengineinaclosedgarageorconfinedarea.Exhaustgas
contains Carbon Monoxide (CO) which is odorless and colorless. Carbon Monoxide
is poisonous and can cause you or others to be severely injured or killed when
inhaled.
•KeepKeyFobtransmittersawayfromchildren.OperationoftheRemoteStart
System, windows, door locks or other controls could cause you and others to be
severely injured or killed.
KEYLESS ENTER-N-GO™
The Keyless Enter-N-Go™ system is an enhancement to the vehicle's Key Fob. This
feature allows you to lock and unlock the vehicle's door(s) and trunk without having to
push the Key Fob lock or unlock buttons, as well as starting and stopping the vehicle with
the push of a button.
GETTING STARTED
9
Page 12 of 164
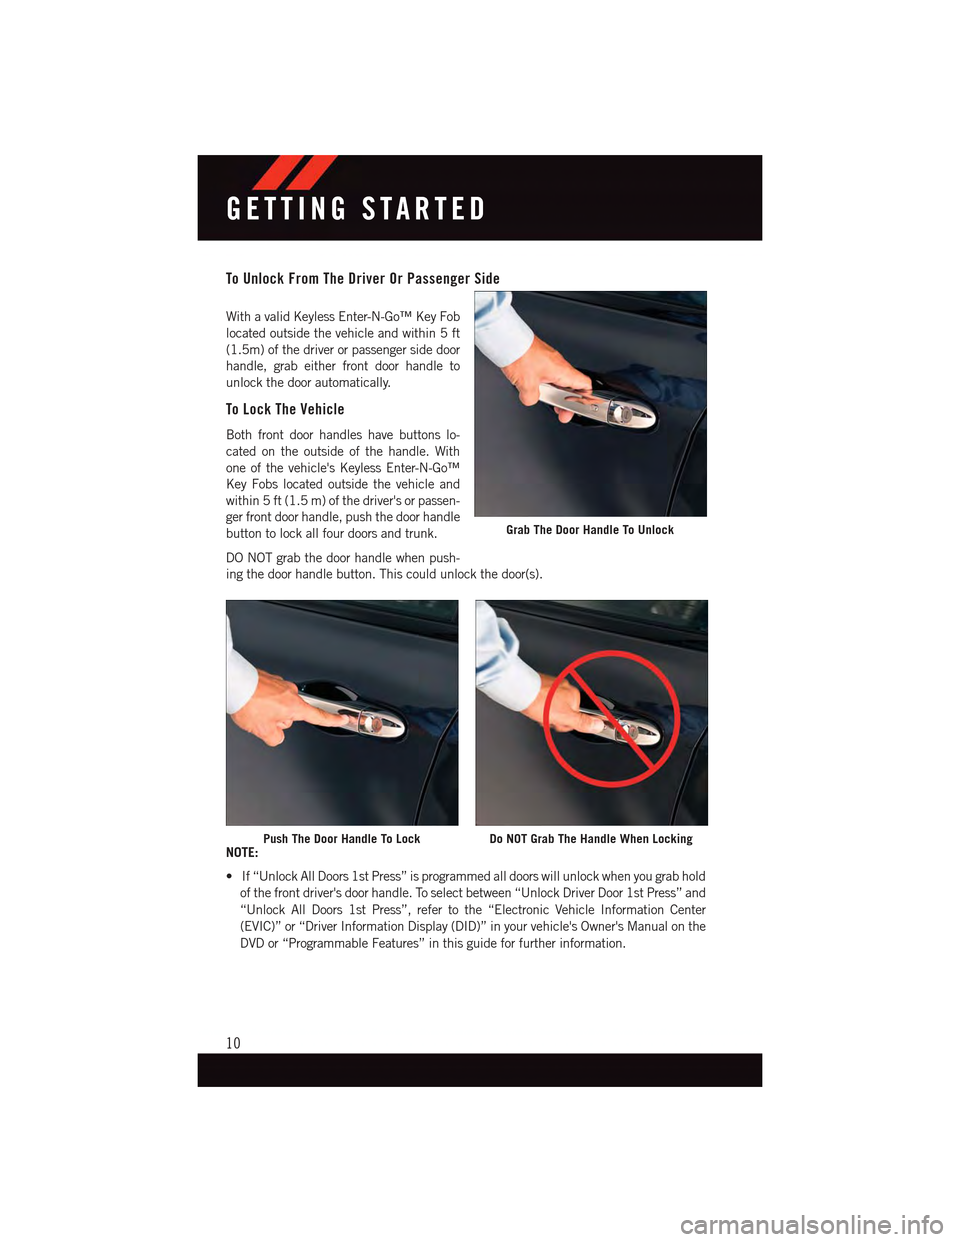
To Unlock From The Driver Or Passenger Side
With a valid Keyless Enter-N-Go™ Key Fob
located outside the vehicle and within 5 ft
(1.5m) of the driver or passenger side door
handle, grab either front door handle to
unlock the door automatically.
To Lock The Vehicle
Both front door handles have buttons lo-
cated on the outside of the handle. With
one of the vehicle's Keyless Enter-N-Go™
Key Fobs located outside the vehicle and
within 5 ft (1.5 m) of the driver's or passen-
ger front door handle, push the door handle
button to lock all four doors and trunk.
DO NOT grab the door handle when push-
ing the door handle button. This could unlock the door(s).
NOTE:
•If“UnlockAllDoors1stPress”isprogrammedalldoorswillunlockwhenyougrabhold
of the front driver's door handle. To select between “Unlock Driver Door 1st Press” and
“Unlock All Doors 1st Press”, refer to the “Electronic Vehicle Information Center
(EVIC)” or “Driver Information Display (DID)” in your vehicle's Owner's Manual on the
DVD or “Programmable Features” in this guide for further information.
Grab The Door Handle To Unlock
Push The Door Handle To LockDo NOT Grab The Handle When Locking
GETTING STARTED
10
Page 13 of 164
•If“UnlockAllDoors1stPress”isprogrammedalldoorsandtrunkwillunlockwhenyou
push the trunk button. If “Unlock Driver Door 1st Press” is programmed only the trunk
will unlock when you push the trunk button. To select between “Unlock Driver Door 1st
Press” and “Unlock All Doors 1st Press”, refer to the “Electronic Vehicle Information
Center (EVIC)” or “Driver Information Display (DID)” in your vehicle's Owner's Manual
on the DVD or “Programmable Features” in this guide for further information.
•IfaKeyFobisdetectedinthevehiclewhenlockingthevehicleusingthepowerdoor
lock switch, the doors and trunk will unlock and the horn will chirp three times. On the
third attempt, your Key Fob can be locked inside the vehicle.
•AfterpushingtheKeylessEnter-N-Go™LOCKbutton,youmustwaittwoseconds
before you can lock or unlock the vehicle using the door handle. This is done to allow
you to check if the vehicle is locked by pulling the door handle, without the vehicle
reacting and unlocking.
•IfaKeylessEnter-N-Go™doorhandlehasnotbeenusedfor72hours,theKeyless
Enter-N-Go™ feature for that handle may time out. Pulling the deactivated front door
handle will reactivate the door handle's Keyless Enter-N-Go™ feature.
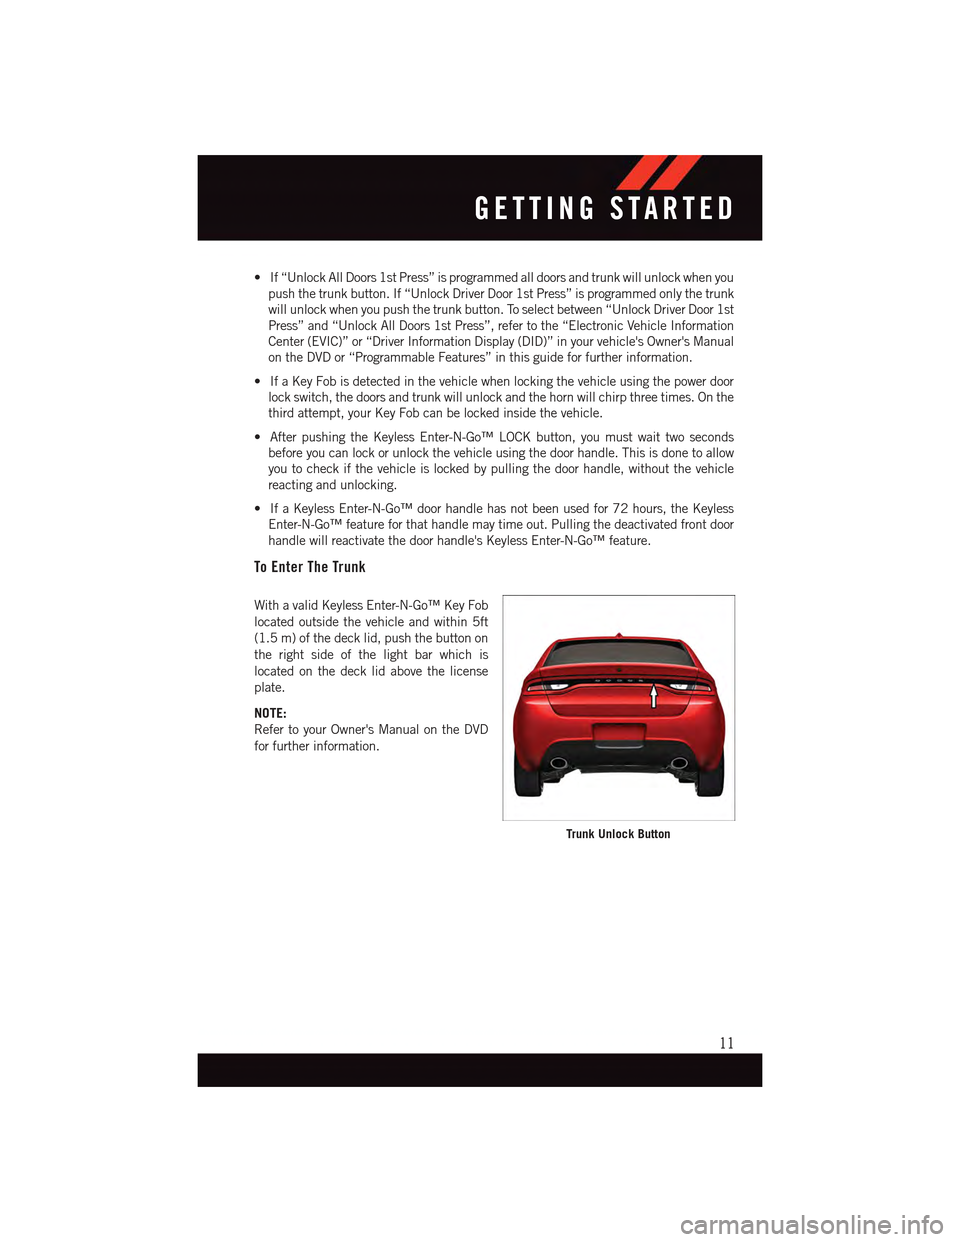
To Enter The Trunk
With a valid Keyless Enter-N-Go™ Key Fob
located outside the vehicle and within 5ft
(1.5 m) of the deck lid, push the button on
the right side of the light bar which is
located on the deck lid above the license
plate.
NOTE:
Refer to your Owner's Manual on the DVD
for further information.
Trunk Unlock Button
GETTING STARTED
11
Page 15 of 164
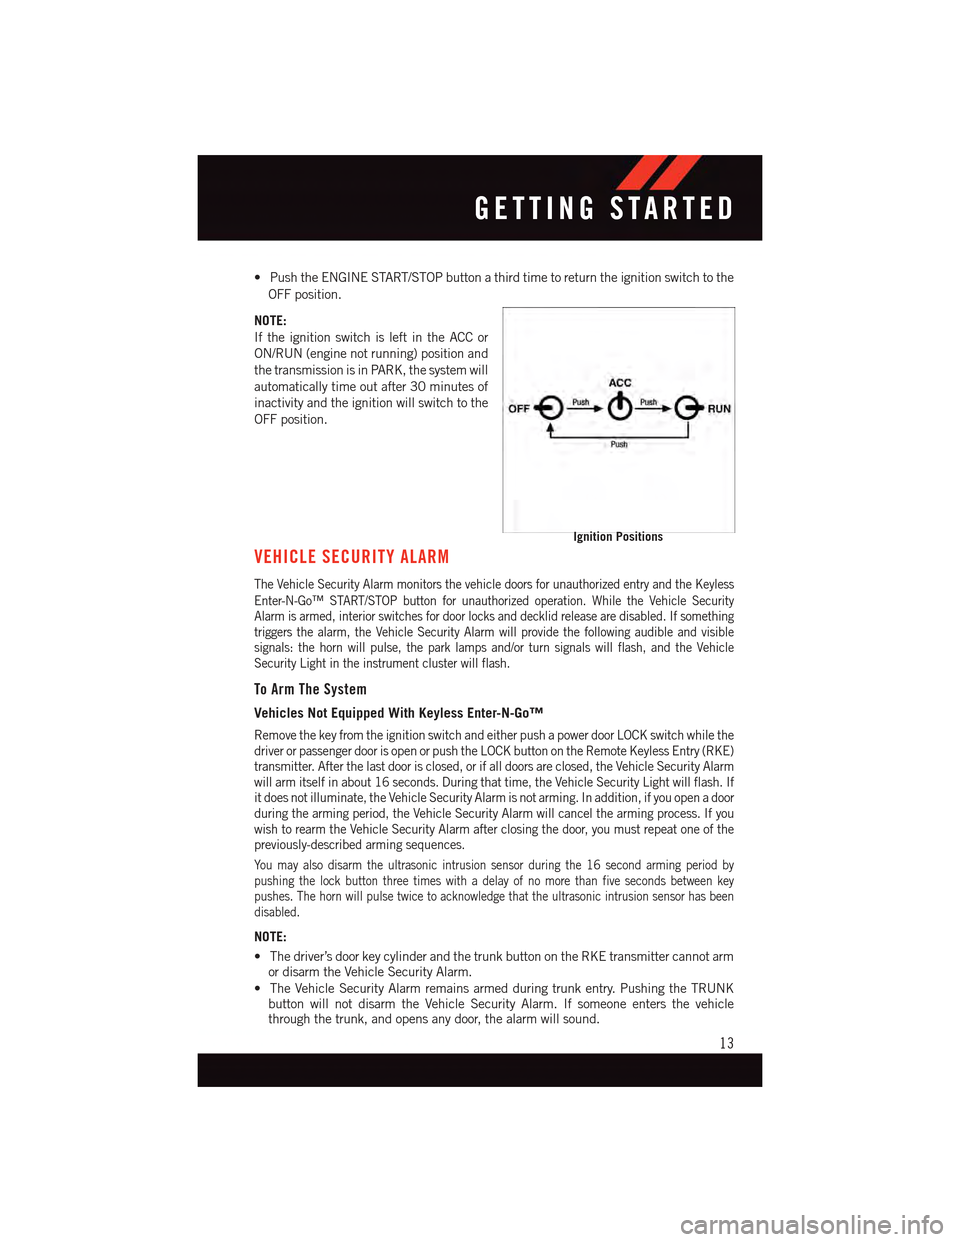
•PushtheENGINESTART/STOPbuttonathirdtimetoreturntheignitionswitchtothe
OFF position.
NOTE:
If the ignition switch is left in the ACC or
ON/RUN (engine not running) position and
the transmission is in PARK, the system will
automatically time out after 30 minutes of
inactivity and the ignition will switch to the
OFF position.
VEHICLE SECURITY ALARM
The Vehicle Security Alarm monitors the vehicle doors for unauthorized entry and the Keyless
Enter-N-Go™ START/STOP button for unauthorized operation. While the Vehicle SecurityAlarm is armed, interior switches for door locks and decklid release are disabled. If somethingtriggers the alarm, the Vehicle Security Alarm will provide the following audible and visiblesignals: the horn will pulse, the park lamps and/or turn signals will flash, and the VehicleSecurity Light in the instrument cluster will flash.
To Arm The System
Vehicles Not Equipped With Keyless Enter-N-Go™
Remove the key from the ignition switch and either push a power door LOCK switch while thedriver or passenger door is open or push the LOCK button on the Remote Keyless Entry (RKE)transmitter. After the last door is closed, or if all doors are closed, the Vehicle Security Alarmwill arm itself in about 16 seconds. During that time, the Vehicle Security Light will flash. Ifit does not illuminate, the Vehicle Security Alarm is not arming. In addition, if you open a doorduring the arming period, the Vehicle Security Alarm will cancel the arming process. If youwish to rearm the Vehicle Security Alarm after closing the door, you must repeat one of thepreviously-described arming sequences.
Yo u m a y a l s o d i s a r m t h e u l t r a s o n i c i n t r u s i o n s e n s o r d u r i n g t h e 1 6 s e c o n d a r m i n g p e r i o d b ypushing the lock button three times with a delay of no more than five seconds between keypushes. The horn will pulse twice to acknowledge that the ultrasonic intrusion sensor has beendisabled.
NOTE:
•Thedriver’sdoorkeycylinderandthetrunkbuttonontheRKEtransmittercannotarmor disarm the Vehicle Security Alarm.
•TheVehicleSecurityAlarmremainsarmedduringtrunkentry.PushingtheTRUNKbutton will not disarm the Vehicle Security Alarm. If someone enters the vehiclethrough the trunk, and opens any door, the alarm will sound.
Ignition Positions
GETTING STARTED
13
Page 16 of 164
•WhentheVehicleSecurityAlarmisarmed,theinteriorpowerdoorlockswitcheswill
not unlock the doors.
•Theultrasonicintrusionsensormaybeinadvertentlyactivatedbyachild,petorshifting
package left within the vehicle after the Vehicle Security Alarm is armed.
Vehicles Equipped With Keyless Enter-N-Go™
Push the Keyless Enter-N-Go™ START/STOP button until the EVIC/DID indicates that the
vehicle ignition is “OFF” (refer to “Starting Procedures” in “Starting And Operating” for
further information). Then either push the power door LOCK switch while the driver or
passenger door is open, push the Remote Keyless Entry (RKE) transmitter LOCK button
or push the Passive Entry Door Handle LOCK button (refer to “Keyless Enter-N-Go™” in
“Things To Know Before Starting Your Vehicle” for further information).
To Disarm The System
The Vehicle Security Alarm is designed to protect your vehicle; however, you can create
conditions where the Vehicle Security Alarm will give you a false alarm. If one of the
previously-described arming sequences has occurred, the Vehicle Security Alarm will arm
regardless of whether you are in the vehicle or not. If you remain in the vehicle and open
adoor,thealarmwillsound.Ifthisoccurs,disarmtheVehicleSecurityAlarm.
If the Vehicle Security Alarm is armed and the battery becomes disconnected the Vehicle
Security Alarm will remain armed when the battery is reconnected. The exterior lights will
flash, and the horn will sound. If this occurs, disarm the Vehicle Security Alarm.
Vehicles Not Equipped With Keyless Enter-N-Go™
Either push the UNLOCK button on the RKE transmitter or insert a valid ignition key into
the ignition switch and turn the key to the ON/RUN position.
NOTE:
•Thedriver'sdoorkeycylinderandthetrunkbuttonontheRKEtransmittercannotarm
or disarm the Vehicle Security Alarm.
•TheVehicleSecurityAlarmremainsarmedduringtrunkentry.PushingtheTRUNK
button will not disarm the Vehicle Security Alarm. If someone enters the vehicle
through the trunk, and opens any door, the alarm will sound.
•WhentheVehicleSecurityAlarmisarmed,theinteriorpowerdoorlockswitcheswill
not unlock the doors.
Vehicles Equipped With Keyless Enter-N-Go™
Either push the UNLOCK button on the RKE transmitter or grasp the Passive Entry Unlock
Door Handle (refer to “Keyless Enter-N-Go™” in “Things To Know Before Starting Your
Vehicle” for further information), push the Keyless Enter-N-Go™ START/STOP button
(requires at least one valid Key Fob in the vehicle), or insert a valid Key Fob into the
ignition switch (if the START/STOP button is removed) and rotate it to the ON/RUN
position.
GETTING STARTED
14
Page 24 of 164
WARNING!
•SideAirBagsneedroomtoinflate.Donotleanagainstthedoororwindow.Sit
upright in the center of the seat.
•BeingtooclosetotheSideAirBagsduringdeploymentcouldcauseyoutobe
severely injured or killed.
•RelyingontheSideAirBagsalonecouldleadtomoresevereinjuriesinacollision.
The Side Air Bags work with your seat belt to restrain you properly. In some
collisions, Side Air Bags won’t deploy at all. Always wear your seat belt even though
you have Side Air Bags.
•ThisvehicleisequippedwithleftandrightSupplementalSideAirBagInflatable
Curtains (SABICs). Do not stack luggage or other cargo up high enough to block the
deployment of the SABICs. The trim covering above the side windows where the
SABIC and its deployment path are located should remain free from any obstruc-
tions.
•ThisvehicleisequippedwithSABICs.InorderfortheSABICstoworkasintended,
do not install any accessory items in your vehicle which could alter the roof. Do not
add an aftermarket sunroof to your vehicle. Do not add roof racks that require
permanent attachments (bolts or screws) for installation on the vehicle roof. Do not
drill into the roof of the vehicle for any reason.
•DonotuseaccessoryseatcoversorplaceobjectsbetweenyouandtheSideAir
Bags; the performance could be adversely affected and/or objects could be pushed
into you, causing serious injury.
CHILD RESTRAINTS
Children 12 years or younger should ride properly buckled up in a rear seat, if available.
According to crash statistics, children are safer when properly restrained in the rear seats
rather than in the front.
Every state in the United States and all Canadian provinces require that small children
ride in proper restraint systems. This is the law, and you can be prosecuted for ignoring it.
NOTE:
•Foradditionalinformation,refertowww.Seatcheck.orgorcall1-866-SEATCHECK.
•CanadianresidentsshouldrefertoTransportCanada’swebsiteforadditionalinforma-
tion: http://www.tc.gc.ca/eng/motorvehiclesafety/safedrivers-childsafety-index-53.htm
GETTING STARTED
22
Page 96 of 164
Uconnect® 8.4 CUSTOMER PROGRAMMABLE FEATURES
The Uconnect®8.4 system allows you to access Customer Programmable feature settings
such as Display, Clock, Safety/Assistance, Lights, Doors & Locks, Heated Seats, Engine
Off Operation, Compass Settings, Audio, Phone/Bluetooth®and SiriusXM Setup through
buttons on the touchscreen.
Press the “More” button on the touchscreen on the bottom of the screen, then press the
“Settings” button on the touchscreen to access the Settings screen. When making a
selection, scroll up or down until the preferred setting is highlighted, then press and
release the preferred setting until a check-mark appears next to the setting, showing that
setting has been selected. The following feature settings are available:
•Display•Clock
•Safety/Assistance•Lights
•Doors&Locks•Auto-OnComfort&RemoteStart
•EngineOffOptions•CompassSettings
•Audio•Phone/Bluetooth®
•SiriusXMSetup
UNIVERSAL GARAGE DOOR OPENER (HomeLink®)
HomeLink®replaces up to three hand-held transmitters that operate devices such as
garage door openers, motorized gates, lighting or home security systems. The HomeLink®
unit is powered by your vehicles 12 Volt battery.
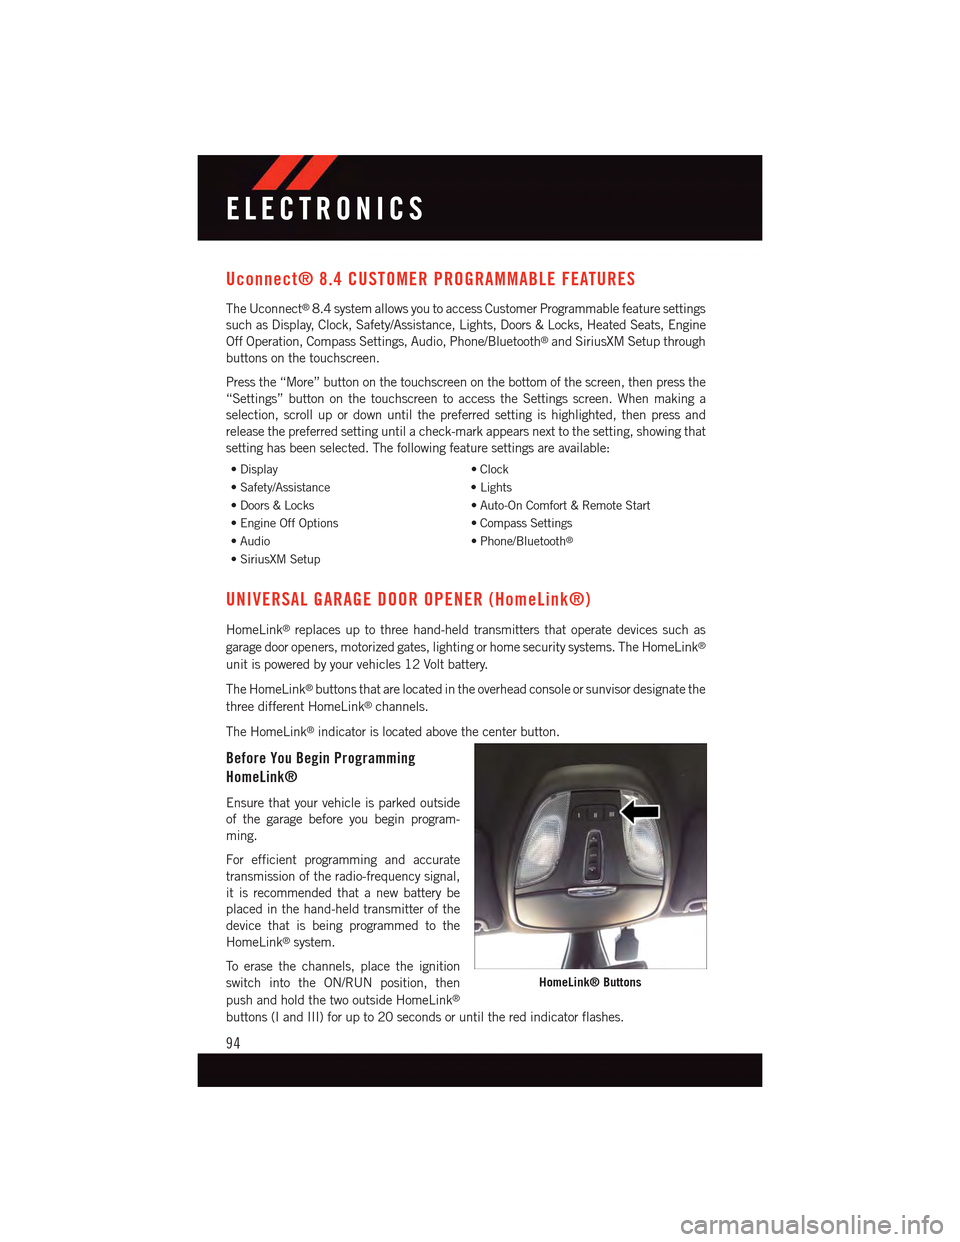
The HomeLink®buttons that are located in the overhead console or sunvisor designate the
three different HomeLink®channels.
The HomeLink®indicator is located above the center button.
Before You Begin Programming
HomeLink®
Ensure that your vehicle is parked outside
of the garage before you begin program-
ming.
For efficient programming and accurate
transmission of the radio-frequency signal,
it is recommended that a new battery be
placed in the hand-held transmitter of the
device that is being programmed to the
HomeLink®system.
To e r a s e t h e c h a n n e l s , p l a c e t h e i g n i t i o n
switch into the ON/RUN position, then
push and hold the two outside HomeLink®
buttons (I and III) for up to 20 seconds or until the red indicator flashes.
HomeLink® Buttons
ELECTRONICS
94
Page 98 of 164
Programming A Non-Rolling Code
For programming Garage Door Openers manufactured before 1995.
1. Turn the ignition switch to the ON/RUN position.
2. Place the hand-held transmitter 1 to 3 inches (3 to 8 cm) away from the HomeLink®
button you want to program while keeping the HomeLink®indicator light in view.
3. Push and hold the HomeLink®button you want to program while you push and hold
the hand-held transmitter button.
4. Continue to hold both buttons and observe the indicator light. The Homelink®
indicator will flash slowly and then rapidly after Homelink®has received the frequency
signal from the hand-held transmitter. Release both buttons after the indicator light
changes from slow to rapid.
5. Press and hold the programmed HomeLink®button and observe the indicator light.
•Iftheindicatorlightstaysonconstantly,programmingiscompleteandthegarage
door (or device) should activate when the HomeLink®button is pressed.
To p r o g r a m t h e t w o r e m a i n i n g H o m e L i n k®buttons, repeat each step for each remaining
button. DO NOT erase the channels.
Using HomeLink®
To o p e r a t e , p u s h a n d r e l e a s e t h e p r o g r a m m e d H o m e L i n k®button. Activation will now
occur for the programmed device (e.g., garage door opener, gate operator, security system,
entry door lock, home/office lighting, etc.). The hand-held transmitter of the device may
also be used at any time.
WARNING!
•Yourmotorizeddoororgatewillopenandclosewhileyouareprogrammingthe
universal transceiver. Do not program the transceiver if people or pets are in the
path of the door or gate.
•Donotrunyourvehicleinaclosedgarageorconfinedareawhileprogrammingthe
transceiver. Exhaust gas from your vehicle contains Carbon Monoxide (CO) which is
odorless and colorless. Carbon Monoxide is poisonous when inhaled and can cause
you and others to be severely injured or killed.
ELECTRONICS
96
Page 120 of 164
If tire pressure is less than 19 psi (1.3 Bar), the tire is too badly damaged. Do not attempt
to drive the vehicle further. Call for assistance.
If the tire pressure is 19 psi (1.3 Bar) or higher:
1. Press the Power Button (4) to turn on Tire Service Kit and inflate the tire to the pressure
indicated on the tire and loading information label on the driver-side door opening.
2. Disconnect the Tire Service Kit from the valve stem, reinstall the cap on the valve stem
and unplug from 12 Volt outlet.
3. Place the Tire Service Kit in its proper storage area in the vehicle.
4. Have the tire inspected and repaired or replaced at the earliest opportunity at an
authorized dealer or tire service center.
5. Remove the Speed Limit sticker from the instrument panel after the tire has been
repaired.
6. Replace the Sealant Bottle (1) and Sealant Hose (6) assembly at your authorized
dealer as soon as possible. Refer to “(F) Sealant Bottle and Hose Replacement.”
NOTE:
•Ifthetirebecomesover-inflated,presstheDeflationButtontoreducethetirepressure
to the recommended inflation pressure before continuing.
•Whenhavingthetireserviced,advisetheauthorizeddealerorservicecenterthatthe
tire has been sealed using the Tire Service Kit.
(F) Sealant Bottle And Hose Replacement:
1. Uncoil the Sealant Hose (6) (clear in color).
2. Locate the round Sealant Bottle release button in the recessed area under the sealant
bottle.
3. Press the Sealant Bottle release button. The Sealant Bottle (1) will pop up. Remove
the bottle and dispose of it accordingly.
4. Clean any remaining sealant from the Tire Service Kit housing.
5. Position the new Sealant Bottle (1) in the housing so that the Sealant Hose (6) aligns
with the hose slot in the front of the housing. Press the bottle into the housing. An
audible click will be heard indicating the bottle is locked into place.
6. Verify that the cap is installed on the fitting at the end of the Sealant Hose (6) and
return the hose to its storage area (located on the bottom of the air pump).
7. Return the Tire Service Kit to its storage location in the vehicle.
WHAT TO DO IN EMERGENCIES
118