roof DODGE DART 2015 PF / 1.G User Guide
[x] Cancel search | Manufacturer: DODGE, Model Year: 2015, Model line: DART, Model: DODGE DART 2015 PF / 1.GPages: 164, PDF Size: 25.19 MB
Page 3 of 164
INTRODUCTION/WELCOME
WELCOME FROM CHRYSLER GROUP LLC..2
CONTROLS AT A GLANCE
DRIVER COCKPIT...............4INSTRUMENT CLUSTER...........6
GETTING STARTED
KEY FOB . . . . . . . . . . . . . . . . . . . . 8REMOTE START . . . . . . . . . . . . . . . . 9KEYLESS ENTER-N-GO™..........9VEHICLE SECURITY ALARM........13SEAT BELT SYSTEMS............15SUPPLEMENTAL RESTRAINT SYSTEM(SRS) — AIR BAGS.............16CHILD RESTRAINTS............22HEAD RESTRAINTS.............26FRONT SEATS................27REAR SEAT..................29HEATED SEATS . . . . . . . . . . . . . . . 29HEATED STEERING WHEEL........30TILT/TELESCOPING STEERING COLUMN..31
OPERATING YOUR VEHICLE
ENGINE BREAK-INRECOMMENDATIONS............32TURN SIGNAL/WIPER/WASHER/HIGHBEAM LEVER.................33HEADLIGHT SWITCH............35ELECTRONIC SPEED CONTROL — IFEQUIPPED...................36MANUAL CLIMATE CONTROLS.......38Uconnect®8.4 MANUAL CLIMATECONTROLS..................39Uconnect®8.4 AUTOMATIC CLIMATECONTROLS..................41BLIND SPOT MONITORING.........44PA R K V I E W®REAR BACK-UP CAMERA . . 44WIND BUFFETING..............44POWER SUNROOF — IF EQUIPPED....45MANUAL TRANSMISSION — IFEQUIPPED...................46SIX-SPEED AUTOMATIC TRANSMISSION . . . 47
ELECTRONICS
YOUR VEHICLE'S SOUND SYSTEM....50Uconnect®200 . . . . . . . . . . . . . . . . 52Uconnect®8.4 & 8.4N............62STEERING WHEEL AUDIO CONTROLS . . 88ELECTRONIC VEHICLE INFORMATIONCENTER(EVIC) — STANDARD (2 BUTTON) . . . . . . . . 89DRIVER INFORMATION DISPLAY (DID) —PREMIUM (4 BUTTON)...........90Uconnect®8.4 CUSTOMERPROGRAMMABLE FEATURES.......94UNIVERSAL GARAGE DOOR OPENER(HomeLink®).................94POWER OUTLET...............97
UTILITY
TRAILER TOWING WEIGHTS (MAXIMUMTRAILER WEIGHT RATINGS)........98RECREATIONAL TOWING (BEHINDMOTORHOME, ETC.)............98
WHAT TO DO IN EMERGENCIES
ROADSIDE ASSISTANCE..........100INSTRUMENT CLUSTER WARNINGLIGHTS...................100INSTRUMENT CLUSTER INDICATORLIGHTS...................106IF YOUR ENGINE OVERHEATS......107JACKING AND TIRE CHANGING — IFEQUIPPED..................108TIRE SERVICE KIT.............114JUMP-STARTING..............120SHIFT LEVER OVERRIDE.........122TOWING A DISABLED VEHICLE.....123FREEING A STUCK VEHICLE.......123EVENT DATA RECORDER (EDR).....124
MAINTAINING YOUR VEHICLE
OPENING THE HOOD...........1251.4L Turbo Engine..............1262.0L Engine.................1282.4L Engine.................130FLUID CAPACITIES.............132FLUIDS, LUBRICANTS AND GENUINEPA RT S . . . . . . . . . . . . . . . . . . . . 1 3 2MAINTENANCE PROCEDURES......133MAINTENANCE SCHEDULE.......134MAINTENANCE RECORD.........138FUSES....................139TIRE PRESSURES.............142SPARE TIRES — IF EQUIPPED......143WHEEL AND WHEEL TRIM CARE....144REPLACEMENT BULBS..........145
CONSUMER ASSISTANCE
CHRYSLER GROUP LLC CUSTOMERCENTER...................146CHRYSLER CANADA INC. CUSTOMERCENTER...................146ASSISTANCE FOR THE HEARINGIMPAIRED..................146PUBLICATIONS ORDERING........147REPORTING SAFETY DEFECTS IN THEUNITED STATES..............148Uconnect®CUSTOMER CENTER.....148
MOPAR® ACCESSORIES
AUTHENTIC ACCESSORIES BY MOPAR®..149
FAQ
FREQUENTLY ASKED QUESTIONS....150
INDEX.....................152
TABLE OF CONTENTS
Page 24 of 164
WARNING!
•SideAirBagsneedroomtoinflate.Donotleanagainstthedoororwindow.Sit
upright in the center of the seat.
•BeingtooclosetotheSideAirBagsduringdeploymentcouldcauseyoutobe
severely injured or killed.
•RelyingontheSideAirBagsalonecouldleadtomoresevereinjuriesinacollision.
The Side Air Bags work with your seat belt to restrain you properly. In some
collisions, Side Air Bags won’t deploy at all. Always wear your seat belt even though
you have Side Air Bags.
•ThisvehicleisequippedwithleftandrightSupplementalSideAirBagInflatable
Curtains (SABICs). Do not stack luggage or other cargo up high enough to block the
deployment of the SABICs. The trim covering above the side windows where the
SABIC and its deployment path are located should remain free from any obstruc-
tions.
•ThisvehicleisequippedwithSABICs.InorderfortheSABICstoworkasintended,
do not install any accessory items in your vehicle which could alter the roof. Do not
add an aftermarket sunroof to your vehicle. Do not add roof racks that require
permanent attachments (bolts or screws) for installation on the vehicle roof. Do not
drill into the roof of the vehicle for any reason.
•DonotuseaccessoryseatcoversorplaceobjectsbetweenyouandtheSideAir
Bags; the performance could be adversely affected and/or objects could be pushed
into you, causing serious injury.
CHILD RESTRAINTS
Children 12 years or younger should ride properly buckled up in a rear seat, if available.
According to crash statistics, children are safer when properly restrained in the rear seats
rather than in the front.
Every state in the United States and all Canadian provinces require that small children
ride in proper restraint systems. This is the law, and you can be prosecuted for ignoring it.
NOTE:
•Foradditionalinformation,refertowww.Seatcheck.orgorcall1-866-SEATCHECK.
•CanadianresidentsshouldrefertoTransportCanada’swebsiteforadditionalinforma-
tion: http://www.tc.gc.ca/eng/motorvehiclesafety/safedrivers-childsafety-index-53.htm
GETTING STARTED
22
Page 46 of 164
BLIND SPOT MONITORING
The Blind Spot Monitoring (BSM) system uses two radar-based sensors, located inside the
rear bumper fascia, to detect Highway licensable vehicles (automobiles, trucks, motor-
cycles etc.) that enter the blind spot zones from the rear/front/side of the vehicle.
The Blind Spot Monitoring (BSM) system warning light, located in the outside mirrors, will
illuminate if a vehicle moves into a blind spot zone.
The BSM system can also be configured to sound an audible (chime) alert and mute the
radio to notify you of objects that have entered the detection zones.
Refer to your Owner's Manual on the DVD for further details.
PARKVIEW® REAR BACK-UP CAMERA
Yo u c a n s e e a n o n - s c r e e n i m a g e o f t h e r e a r o f y o u r v e h i c l e w h e n e v e r t h e s h i f t l e v e r i s p u t
into REVERSE. The ParkView®Rear Back-Up Camera image will be displayed on the radio
display screen, located on the center stack of the instrument panel.
If the radio display screen appears foggy, clean the camera lens located on the rear of the
vehicle above the rear license plate.
Refer to your Owner's Manual on the DVD for further details.
WARNING!
Drivers must be careful when backing up; even when using the ParkView®Rear
Back-Up Camera. Always check carefully behind your vehicle, and be sure to check for
pedestrians, animals, other vehicles, obstructions, or blind spots before backing up.
Yo u m u s t c o n t i n u e t o p a y a t t e n t i o n w h i l e b a c k i n g u p . F a i l u r e t o d o s o c a n r e s u l t i n
serious injury or death.
WIND BUFFETING
Wind buffeting can be described as a helicopter-type percussion sound. If buffeting
occurs with the rear windows open, adjust the front and rear windows together.
If buffeting occurs with the sunroof open, adjust the sunroof opening, or adjust any
window. This will minimize buffeting.
OPERATING YOUR VEHICLE
44
Page 47 of 164
POWER SUNROOF — IF EQUIPPED
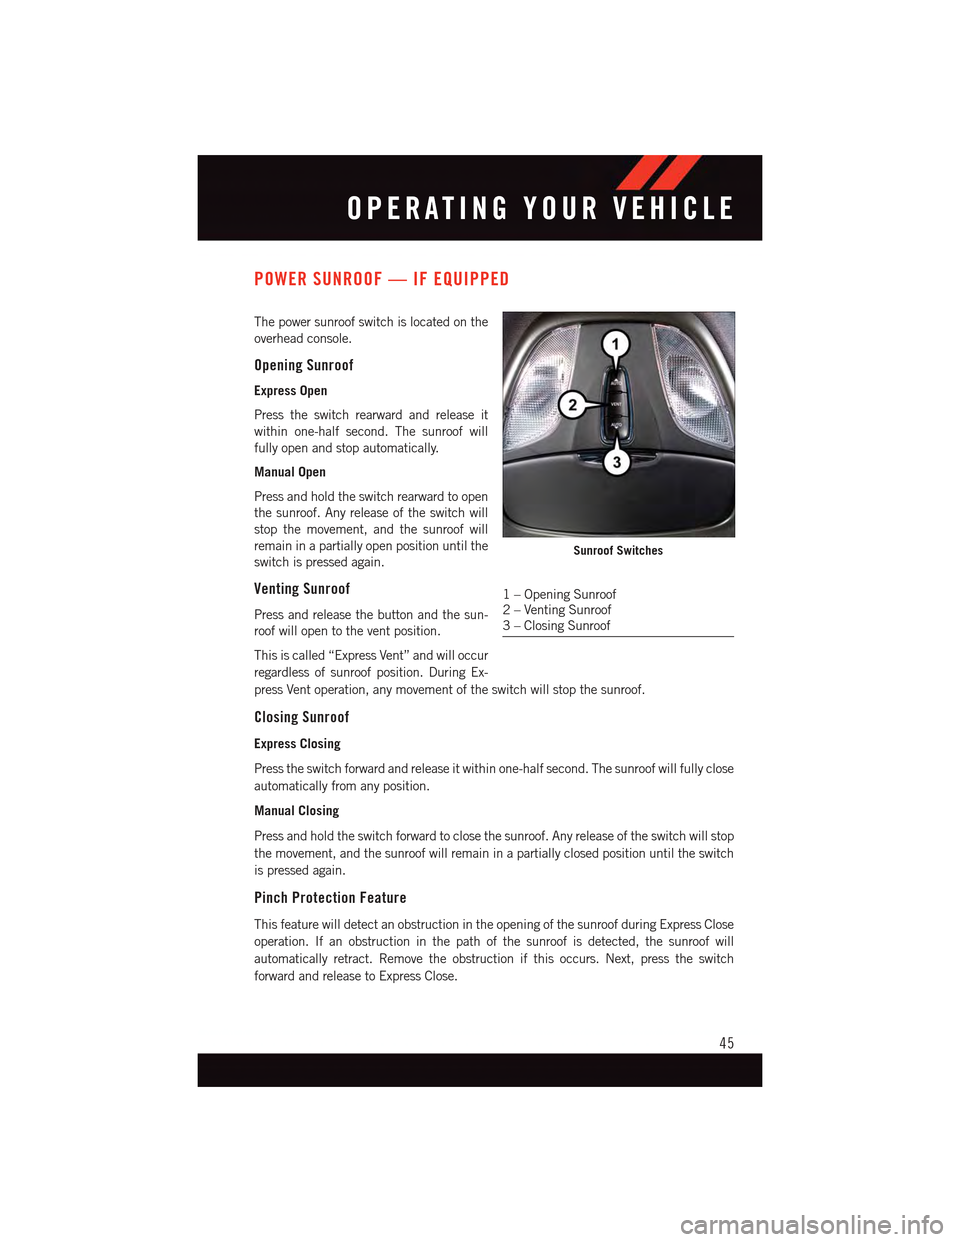
The power sunroof switch is located on the
overhead console.
Opening Sunroof
Express Open
Press the switch rearward and release it
within one-half second. The sunroof will
fully open and stop automatically.
Manual Open
Press and hold the switch rearward to open
the sunroof. Any release of the switch will
stop the movement, and the sunroof will
remain in a partially open position until the
switch is pressed again.
Venting Sunroof
Press and release the button and the sun-
roof will open to the vent position.
This is called “Express Vent” and will occur
regardless of sunroof position. During Ex-
press Vent operation, any movement of the switch will stop the sunroof.
Closing Sunroof
Express Closing
Press the switch forward and release it within one-half second. The sunroof will fully close
automatically from any position.
Manual Closing
Press and hold the switch forward to close the sunroof. Any release of the switch will stop
the movement, and the sunroof will remain in a partially closed position until the switch
is pressed again.
Pinch Protection Feature
This feature will detect an obstruction in the opening of the sunroof during Express Close
operation. If an obstruction in the path of the sunroof is detected, the sunroof will
automatically retract. Remove the obstruction if this occurs. Next, press the switch
forward and release to Express Close.
Sunroof Switches
1–OpeningSunroof2–VentingSunroof3–ClosingSunroof
OPERATING YOUR VEHICLE
45
Page 48 of 164
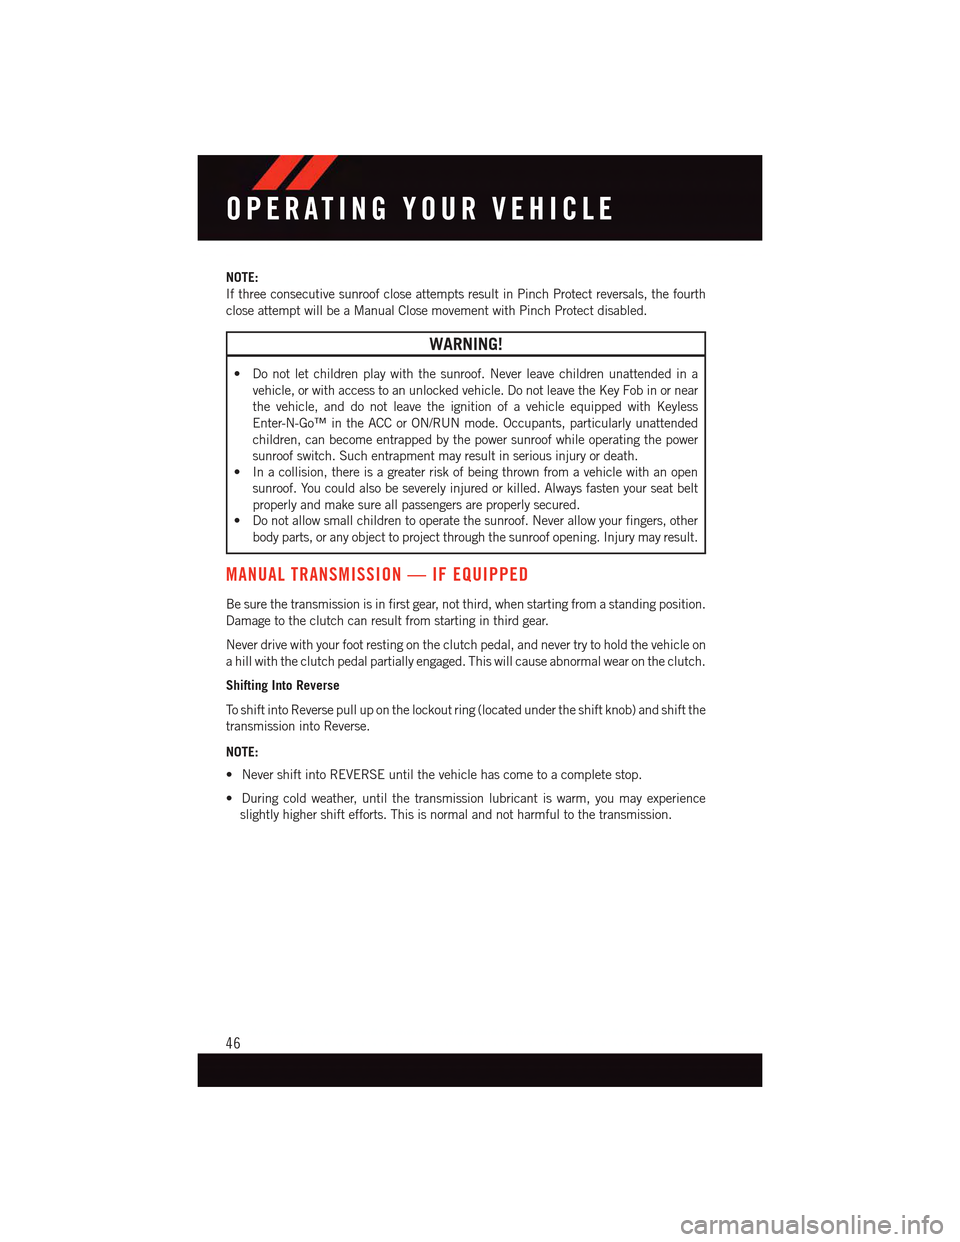
NOTE:
If three consecutive sunroof close attempts result in Pinch Protect reversals, the fourth
close attempt will be a Manual Close movement with Pinch Protect disabled.
WARNING!
•Donotletchildrenplaywiththesunroof.Neverleavechildrenunattendedina
vehicle, or with access to an unlocked vehicle. Do not leave the Key Fob in or near
the vehicle, and do not leave the ignition of a vehicle equipped with Keyless
Enter-N-Go™ in the ACC or ON/RUN mode. Occupants, particularly unattended
children, can become entrapped by the power sunroof while operating the power
sunroof switch. Such entrapment may result in serious injury or death.
•Inacollision,thereisagreaterriskofbeingthrownfromavehiclewithanopen
sunroof. You could also be severely injured or killed. Always fasten your seat belt
properly and make sure all passengers are properly secured.
•Donotallowsmallchildrentooperatethesunroof.Neverallowyourfingers,other
body parts, or any object to project through the sunroof opening. Injury may result.
MANUAL TRANSMISSION — IF EQUIPPED
Be sure the transmission is in first gear, not third, when starting from a standing position.
Damage to the clutch can result from starting in third gear.
Never drive with your foot resting on the clutch pedal, and never try to hold the vehicle on
ahillwiththeclutchpedalpartiallyengaged.Thiswillcauseabnormalwearontheclutch.
Shifting Into Reverse
To s h i f t i n t o R e v e r s e p u l l u p o n t h e l o c k o u t r i n g ( l o c a t e d u n d e r t h e s h i f t k n o b ) a n d s h i f t t h e
transmission into Reverse.
NOTE:
•NevershiftintoREVERSEuntilthevehiclehascometoacompletestop.
•Duringcoldweather,untilthetransmissionlubricantiswarm,youmayexperience
slightly higher shift efforts. This is normal and not harmful to the transmission.
OPERATING YOUR VEHICLE
46
Page 141 of 164
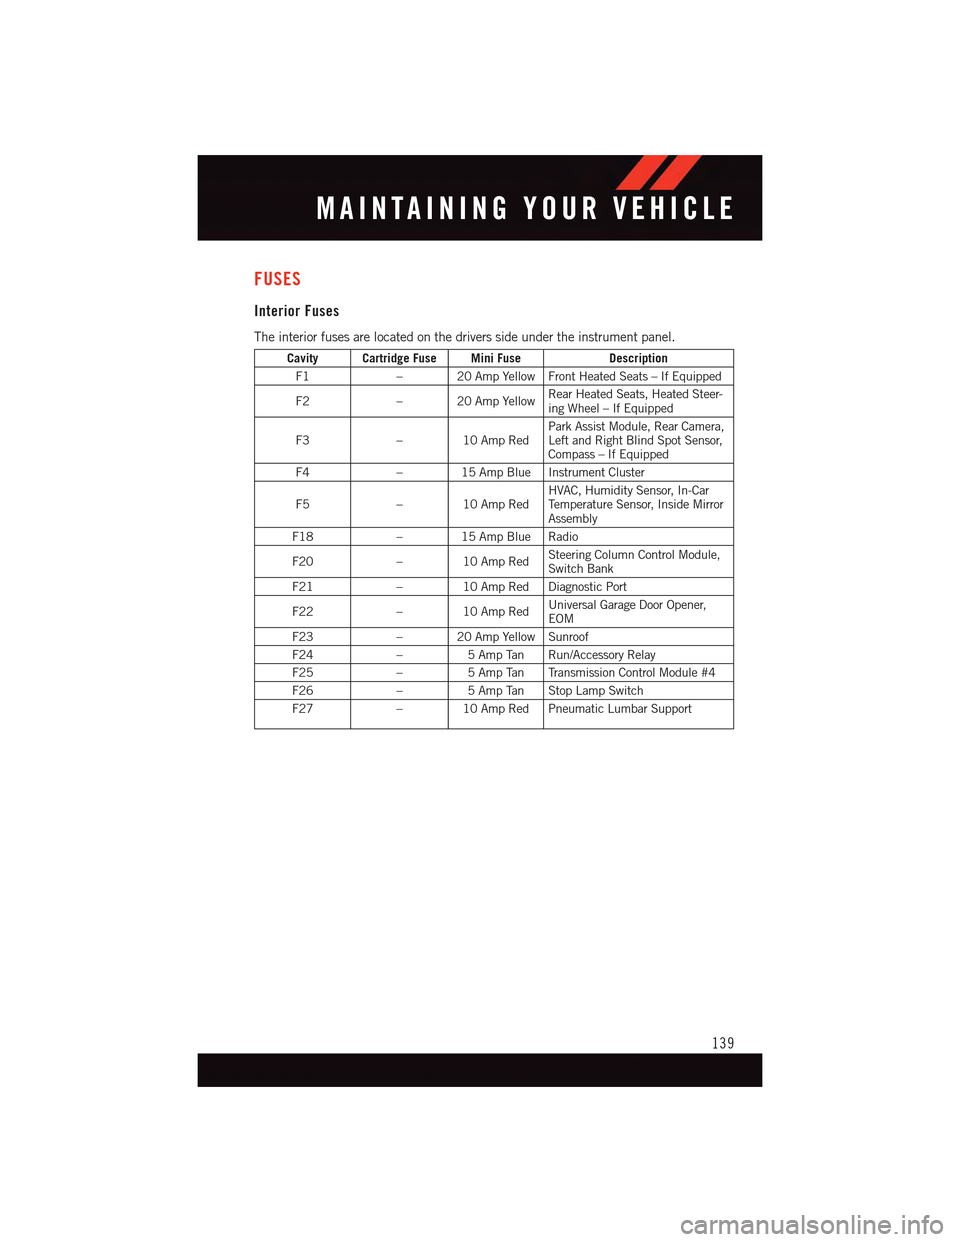
FUSES
Interior Fuses
The interior fuses are located on the drivers side under the instrument panel.
Cavity Cartridge Fuse Mini FuseDescription
F1–20AmpYellowFrontHeatedSeats–IfEquipped
F2–20AmpYellowRear Heated Seats, Heated Steer-ing Wheel – If Equipped
F3–10AmpRedPark Assist Module, Rear Camera,Left and Right Blind Spot Sensor,Compass – If Equipped
F4–15AmpBlueInstrumentCluster
F5–10AmpRedHVAC, Humidity Sensor, In-CarTe m p e r a t u r e S e n s o r, I n s i d e M i r r o rAssembly
F18–15AmpBlueRadio
F20–10AmpRedSteering Column Control Module,Switch Bank
F21–10AmpRedDiagnosticPort
F22–10AmpRedUniversal Garage Door Opener,EOM
F23–20AmpYellowSunroof
F24–5AmpTan Run/AccessoryRelay
F25–5AmpTan TransmissionControlModule#4
F26–5AmpTan StopLampSwitch
F27–10AmpRedPneumaticLumbarSupport
MAINTAINING YOUR VEHICLE
139
Page 142 of 164
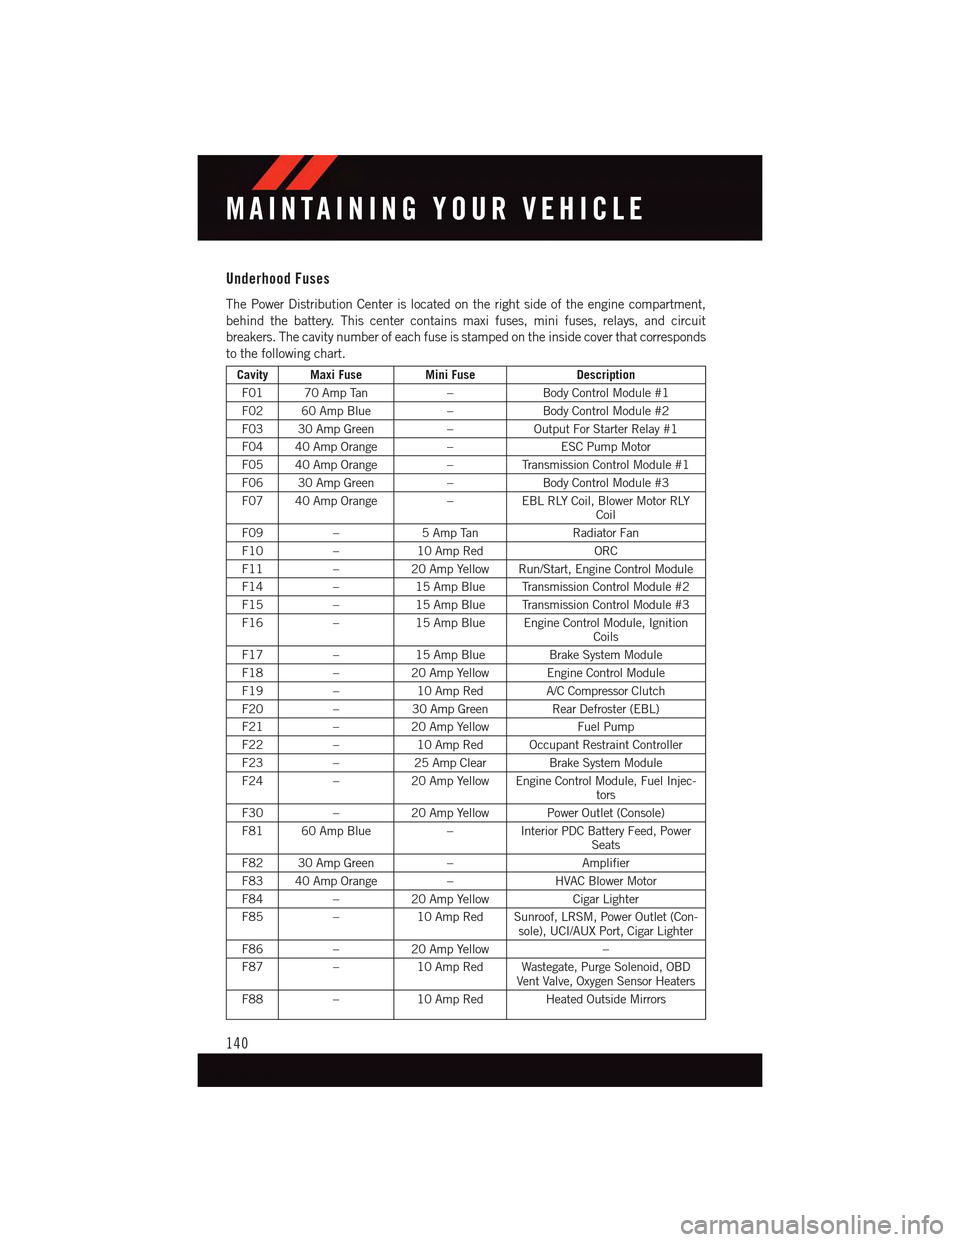
Underhood Fuses
The Power Distribution Center is located on the right side of the engine compartment,
behind the battery. This center contains maxi fuses, mini fuses, relays, and circuit
breakers. The cavity number of each fuse is stamped on the inside cover that corresponds
to the following chart.
Cavity Maxi FuseMini FuseDescription
F01 70 Amp Tan–Body Control Module #1
F02 60 Amp Blue–Body Control Module #2
F03 30 Amp Green–Output For Starter Relay #1
F04 40 Amp Orange–ESC Pump Motor
F05 40 Amp Orange–Tr a n s m i s s i o n C o n t r o l M o d u l e # 1
F06 30 Amp Green–Body Control Module #3
F07 40 Amp Orange–EBL RLY Coil, Blower Motor RLYCoil
F09–5AmpTanRadiator Fan
F10–10 Amp RedORC
F11–20 Amp Yellow Run/Start, Engine Control Module
F14–15 Amp Blue Transmission Control Module #2
F15–15 Amp Blue Transmission Control Module #3
F16–15 Amp Blue Engine Control Module, IgnitionCoils
F17–15 Amp BlueBrake System Module
F18–20 Amp Yellow Engine Control Module
F19–10 Amp RedA/C Compressor Clutch
F20–30 Amp GreenRear Defroster (EBL)
F21–20 Amp YellowFuel Pump
F22–10 Amp Red Occupant Restraint Controller
F23–25 Amp ClearBrake System Module
F24–20 Amp Yellow Engine Control Module, Fuel Injec-tors
F30–20 Amp Yellow Power Outlet (Console)
F81 60 Amp Blue–Interior PDC Battery Feed, PowerSeats
F82 30 Amp Green–Amplifier
F83 40 Amp Orange–HVAC Blower Motor
F84–20 Amp YellowCigar Lighter
F85–10 Amp Red Sunroof, LRSM, Power Outlet (Con-sole), UCI/AUX Port, Cigar Lighter
F86–20 Amp Yellow–
F87–10 Amp Red Wastegate, Purge Solenoid, OBDVent Valve, Oxygen Sensor Heaters
F88–10 Amp Red Heated Outside Mirrors
MAINTAINING YOUR VEHICLE
140
Page 151 of 164
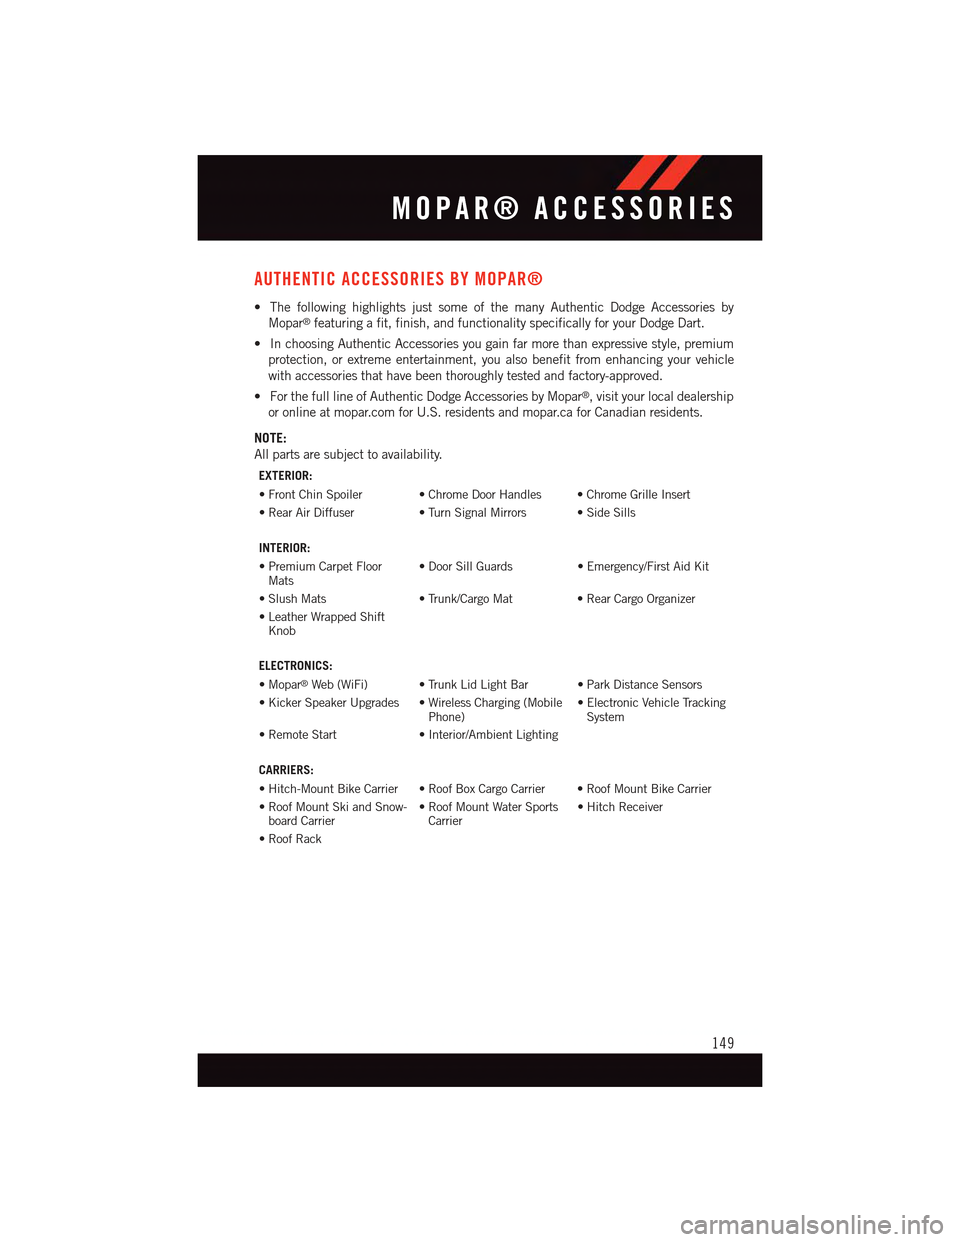
AUTHENTIC ACCESSORIES BY MOPAR®
•ThefollowinghighlightsjustsomeofthemanyAuthenticDodgeAccessoriesby
Mopar®featuring a fit, finish, and functionality specifically for your Dodge Dart.
•InchoosingAuthenticAccessoriesyougainfarmorethanexpressivestyle,premium
protection, or extreme entertainment, you also benefit from enhancing your vehicle
with accessories that have been thoroughly tested and factory-approved.
•ForthefulllineofAuthenticDodgeAccessoriesbyMopar®,visityourlocaldealership
or online at mopar.com for U.S. residents and mopar.ca for Canadian residents.
NOTE:
All parts are subject to availability.
EXTERIOR:
•FrontChinSpoiler •ChromeDoorHandles •ChromeGrilleInsert
•RearAirDiffuser •TurnSignalMirrors •SideSills
INTERIOR:
•PremiumCarpetFloorMats•DoorSillGuards •Emergency/FirstAidKit
•SlushMats •Trunk/CargoMat •RearCargoOrganizer
•LeatherWrappedShiftKnob
ELECTRONICS:
•Mopar®Web (WiFi) • Trunk Lid Light Bar • Park Distance Sensors
•KickerSpeakerUpgrades •WirelessCharging(MobilePhone)•ElectronicVehicleTrackingSystem
•RemoteStart •Interior/AmbientLighting
CARRIERS:
•Hitch-MountBikeCarrier •RoofBoxCargoCarrier •RoofMountBikeCarrier
•RoofMountSkiandSnow-board Carrier•RoofMountWaterSportsCarrier•HitchReceiver
•RoofRack
MOPAR® ACCESSORIES
149
Page 156 of 164
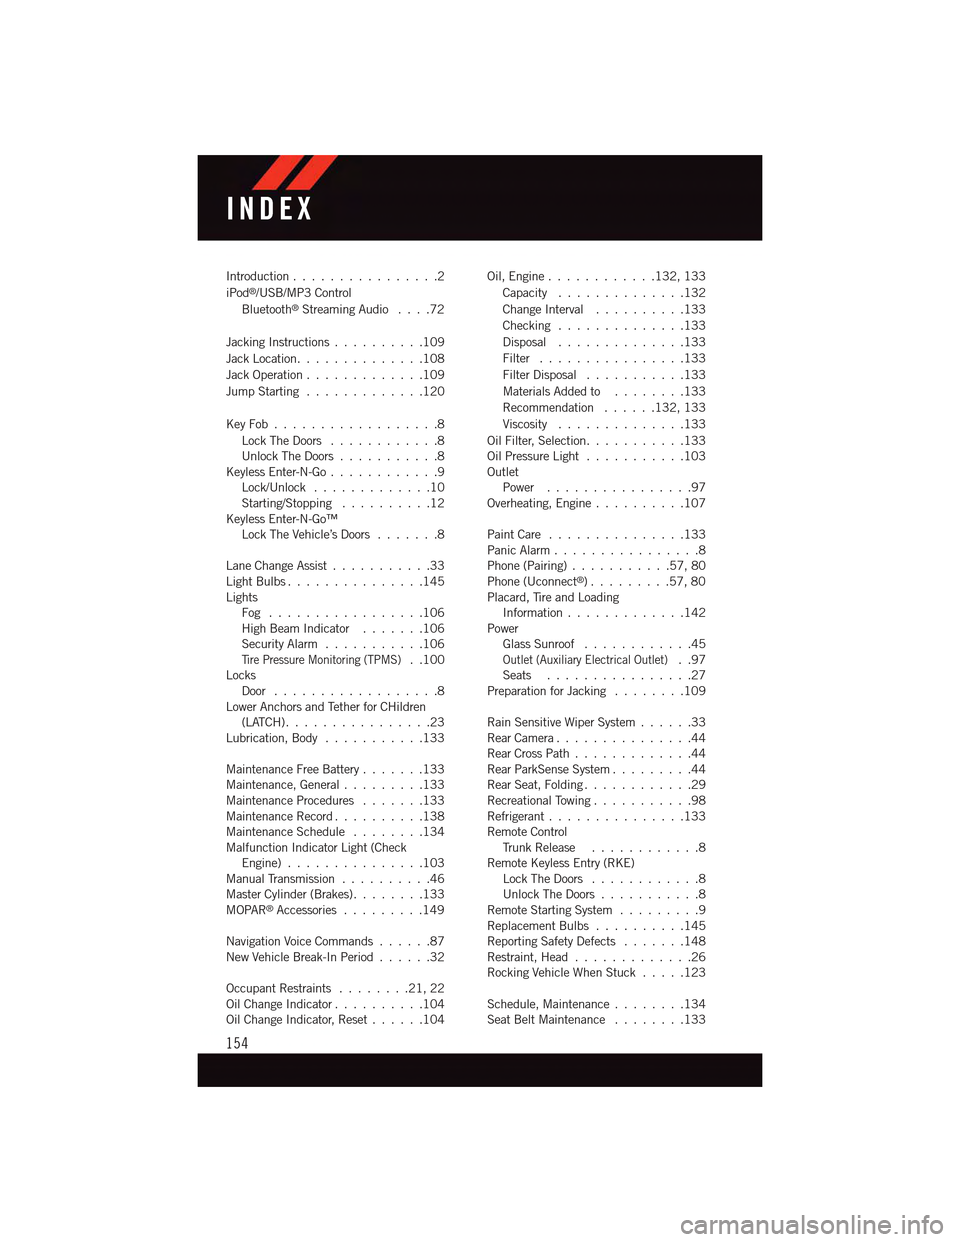
Introduction................2
iPod®/USB/MP3 Control
Bluetooth®Streaming Audio....72
Jacking Instructions . . . . . . . . . .109
Jack Location. . . . . . . . . . . . . .108
Jack Operation . . . . . . . . . . . . .109
Jump Starting.............120
Key Fob . . . . . . . . . . . . . . . . . .8
Lock The Doors............8Unlock The Doors...........8Keyless Enter-N-Go............9Lock/Unlock . . . . . . . . . . . . .10Starting/Stopping..........12Keyless Enter-N-Go™Lock The Vehicle’s Doors.......8
Lane Change Assist...........33Light Bulbs . . . . . . . . . . . . . . .145LightsFog . . . . . . . . . . . . . . . . .106High Beam Indicator . . . . . . .106Security Alarm...........106Ti r e P r e s s u r e M o n i t o r i n g ( T P M S )..100LocksDoor..................8Lower Anchors and Tether for CHildren(LATCH)................23Lubrication, Body...........133
Maintenance Free Battery . . . . . . .133Maintenance, General.........133Maintenance Procedures.......133Maintenance Record..........138Maintenance Schedule........134Malfunction Indicator Light (CheckEngine)...............103Manual Transmission..........46Master Cylinder (Brakes)........133MOPAR®Accessories.........149
Navigation Voice Commands......87New Vehicle Break-In Period . . . . . .32
Occupant Restraints........21,22Oil Change Indicator..........104Oil Change Indicator, Reset......104
Oil, Engine............132, 133
Capacity..............132
Change Interval..........133
Checking..............133
Disposal..............133
Filter................133
Filter Disposal...........133
Materials Added to........133
Recommendation......132, 133
Viscosity..............133
Oil Filter, Selection...........133Oil Pressure Light . . . . . . . . . . .103OutletPower................97Overheating, Engine..........107
Paint Care . . . . . . . . . . . . . . .133Panic Alarm................8Phone (Pairing)...........57,80Phone (Uconnect®). . . . . . . . .57,80Placard, Tire and LoadingInformation . . . . . . . . . . . . .142PowerGlass Sunroof............45Outlet (Auxiliary Electrical Outlet)..97Seats................27Preparation for Jacking........109
Rain Sensitive Wiper System......33Rear Camera...............44Rear Cross Path.............44Rear ParkSense System.........44Rear Seat, Folding............29Recreational Towing...........98Refrigerant . . . . . . . . . . . . . . .133Remote ControlTr u n k R e l e a s e . . . . . . . . . . . . 8Remote Keyless Entry (RKE)Lock The Doors............8Unlock The Doors...........8Remote Starting System.........9Replacement Bulbs..........145Reporting Safety Defects.......148Restraint, Head.............26Rocking Vehicle When Stuck.....123
Schedule, Maintenance........134Seat Belt Maintenance........133
INDEX
154
Page 157 of 164
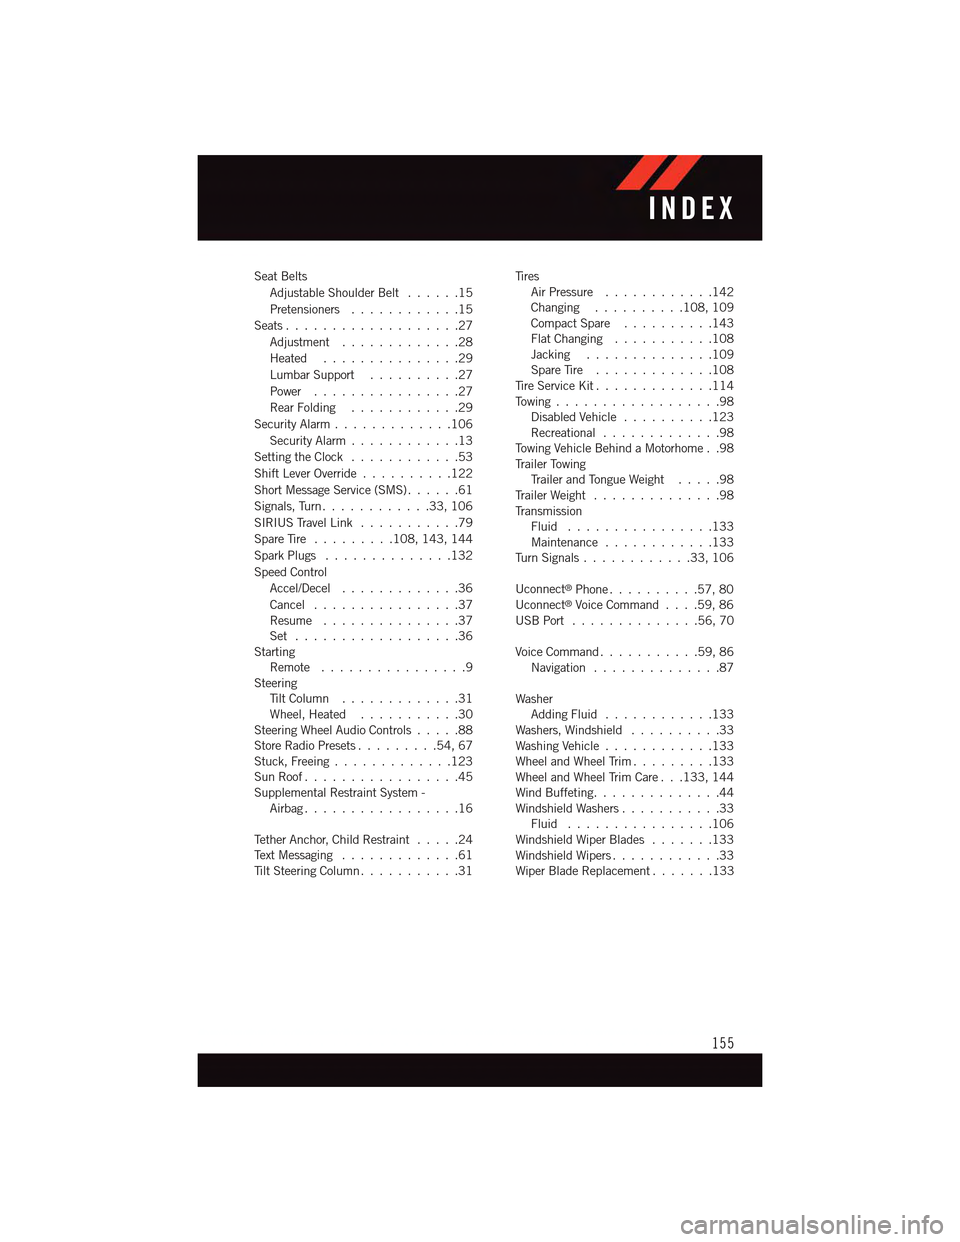
Seat Belts
Adjustable Shoulder Belt......15
Pretensioners............15
Seats . . . . . . . . . . . . . . . . . . .27
Adjustment.............28
Heated . . . . . . . . . . . . . . .29
Lumbar Support..........27
Power................27
Rear Folding............29
Security Alarm.............106
Security Alarm............13
Setting the Clock............53
Shift Lever Override..........122
Short Message Service (SMS)......61
Signals, Turn . . . . . . . . . . . .33, 106
SIRIUS Travel Link . . . . . . . . . . .79
Spare Tire . . . . . . . . .108, 143, 144
Spark Plugs . . . . . . . . . . . . . .132
Speed Control
Accel/Decel.............36
Cancel................37Resume . . . . . . . . . . . . . . .37Set . . . . . . . . . . . . . . . . . .36StartingRemote................9SteeringTi l t C o l u m n . . . . . . . . . . . . . 3 1Wheel, Heated...........30Steering Wheel Audio Controls.....88Store Radio Presets.........54,67Stuck, Freeing . . . . . . . . . . . . .123Sun Roof.................45Supplemental Restraint System -Airbag . . . . . . . . . . . . . . . . .16
Te t h e r A n c h o r, C h i l d R e s t r a i n t.....24Te x t M e s s a g i n g . . . . . . . . . . . . . 6 1Ti l t S t e e r i n g C o l u m n . . . . . . . . . . . 3 1
Ti r e sAir Pressure . . . . . . . . . . . .142Changing..........108, 109Compact Spare..........143Flat Changing...........108Jacking..............109Spare Tire.............108Ti r e S e r v i c e K i t.............114To w i n g . . . . . . . . . . . . . . . . . . 9 8Disabled Vehicle . . . . . . . . . .123Recreational.............98To w i n g V e h i c l e B e h i n d a M o t o r h o m e . . 9 8Tr a i l e r To w i n gTr a i l e r a n d To n g u e W e i g h t.....98Tr a i l e r W e i g h t . . . . . . . . . . . . . . 9 8Tr a n s m i s s i o nFluid . . . . . . . . . . . . . . . .133Maintenance............133Tu r n S i g n a l s............33,106
Uconnect®Phone..........57,80Uconnect®Voice Command....59,86USB Port . . . . . . . . . . . . . .56, 70
Voice Command...........59,86Navigation . . . . . . . . . . . . . .87
WasherAdding Fluid............133Washers, Windshield . . . . . . . . . .33Washing Vehicle . . . . . . . . . . . .133Wheel and Wheel Trim.........133Wheel and Wheel Trim Care . . .133, 144Wind Buffeting. . . . . . . . . . . . . .44Windshield Washers...........33Fluid . . . . . . . . . . . . . . . .106Windshield Wiper Blades.......133Windshield Wipers . . . . . . . . . . . .33Wiper Blade Replacement.......133
INDEX
155