spare tire location DODGE DART 2015 PF / 1.G User Guide
[x] Cancel search | Manufacturer: DODGE, Model Year: 2015, Model line: DART, Model: DODGE DART 2015 PF / 1.GPages: 164, PDF Size: 25.19 MB
Page 102 of 164
ROADSIDE ASSISTANCE
Dial toll-free 1-800-521-2779 for U.S. Residents or 1-800-363-4869 for Canadian
Residents.
•Provideyourname,vehicleidentificationnumber,licenseplatenumber,andyour
location, including the telephone number from which you are calling.
•Brieflydescribethenatureoftheproblemandanswerafewsimplequestions.
•Youwillbegiventhenameoftheserviceproviderandanestimatedtimeofarrival.If
you feel you are in an “unsafe situation”, please let us know. With your consent, we will
contact local police or safety authorities.
INSTRUMENT CLUSTER WARNING LIGHTS
-ElectronicStabilityControl(ESC)Activation/MalfunctionIndicatorLight
The “ESC Activation/Malfunction Indicator Light” in the instrument cluster will come on
when the ignition switch is turned to the ON/RUN position. It should go out with the
engine running. If the “ESC Activation/Malfunction Indicator Light” comes on continu-
ously with the engine running, a malfunction has been detected in the ESC system.
If this light remains on after several ignition cycles, and the vehicle has been driven
several miles (kilometers) at speeds greater than 30 mph (48 km/h), we recommend you
drive to the nearest service center and have the vehicle serviced immediately.
-TirePressureMonitoringSystem(TPMS)Light
Each tire, including the spare (if provided), should be checked monthly when cold and
inflated to the inflation pressure recommended by the vehicle manufacturer on the
vehicle placard or tire inflation pressure label. (If your vehicle has tires of a different size
than the size indicated on the vehicle placard or tire inflation pressure label, you should
determine the proper tire inflation pressure for those tires.)
As an added safety feature, your vehicle has been equipped with a tire pressure
monitoring system (TPMS) that illuminates a low tire pressure telltale when one or more
of your tires is significantly under-inflated. Accordingly, when the low tire pressure telltale
illuminates, you should stop and check your tires as soon as possible, and inflate them to
the proper pressure. Driving on a significantly under-inflated tire causes the tire to
overheat and can lead to tire failure. Under-inflation also reduces fuel efficiency and tire
tread life, and may affect the vehicle’s handling and stopping ability.
IF THE LIGHT STARTS FLASHING INDICATING A LOW TIRE PRESSURE, ADJUST THE AIR
PRESSURE IN THE LOW TIRE TO THE AIR PRESSURE SHOWN ON THE VEHICLE PLACARD OR
TIRE INFLATION PRESSURE LABEL LOCATED ON THE DRIVER'S DOOR.
WHAT TO DO IN EMERGENCIES
100
Page 110 of 164
JACKING AND TIRE CHANGING — IF EQUIPPED
Jack Location/Spare Tire Stowage
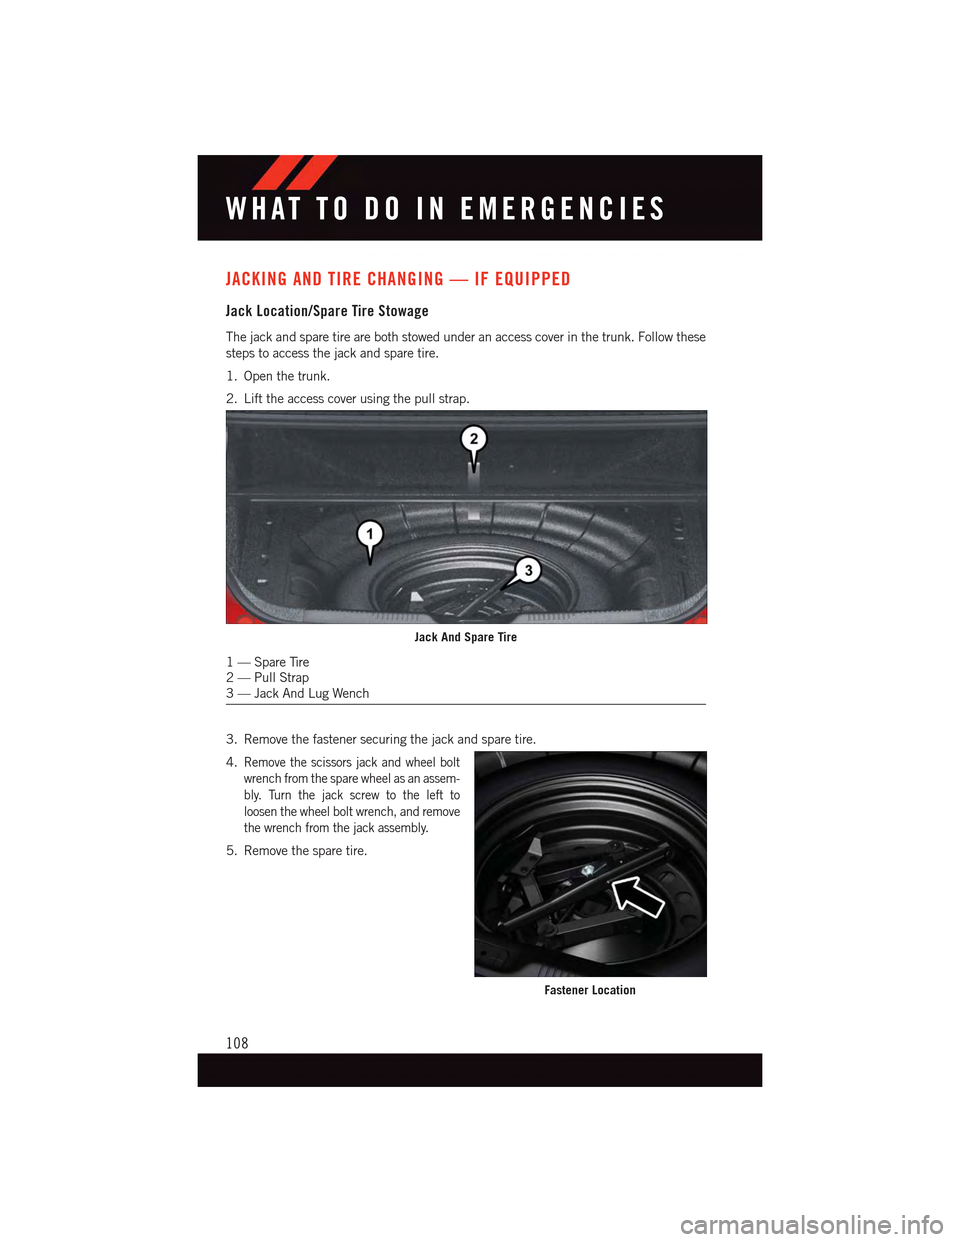
The jack and spare tire are both stowed under an access cover in the trunk. Follow these
steps to access the jack and spare tire.
1. Open the trunk.
2. Lift the access cover using the pull strap.
3. Remove the fastener securing the jack and spare tire.
4.Remove the scissors jack and wheel bolt
wrench from the spare wheel as an assem-
bly. Turn the jack screw to the left to
loosen the wheel bolt wrench, and remove
the wrench from the jack assembly.
5. Remove the spare tire.
Jack And Spare Tire
1—SpareTire2—PullStrap3—JackAndLugWench
Fastener Location
WHAT TO DO IN EMERGENCIES
108
Page 112 of 164
3. Before raising the vehicle, use the wheel bolt wrench to loosen, but not remove, the
wheel bolts on the wheel with the flat tire. Turn the wheel bolts counterclockwise one
turn while the wheel is still on the ground.
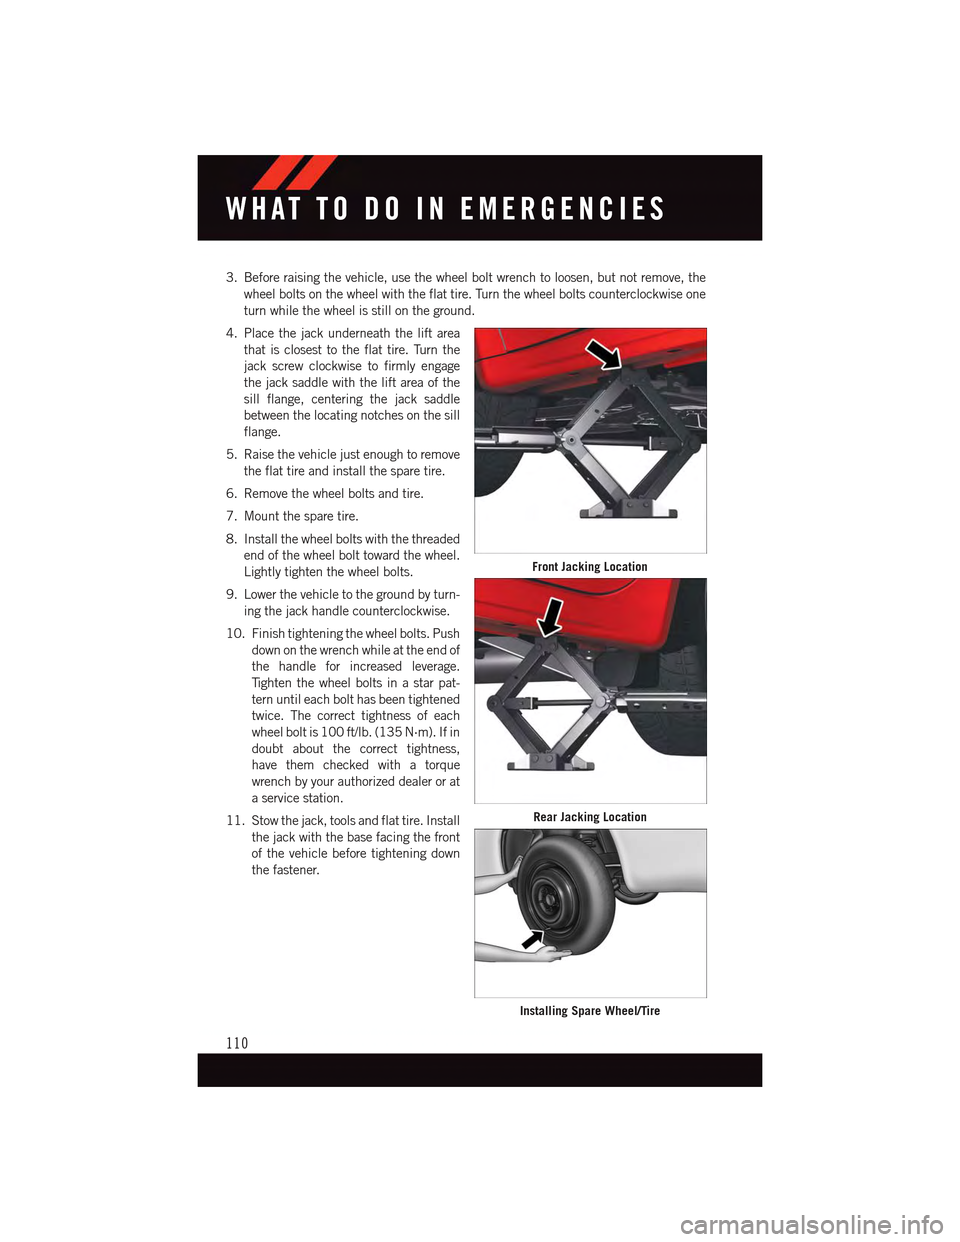
4. Place the jack underneath the lift area
that is closest to the flat tire. Turn the
jack screw clockwise to firmly engage
the jack saddle with the lift area of the
sill flange, centering the jack saddle
between the locating notches on the sill
flange.
5. Raise the vehicle just enough to remove
the flat tire and install the spare tire.
6. Remove the wheel bolts and tire.
7. Mount the spare tire.
8. Install the wheel bolts with the threaded
end of the wheel bolt toward the wheel.
Lightly tighten the wheel bolts.
9. Lower the vehicle to the ground by turn-
ing the jack handle counterclockwise.
10. Finish tightening the wheel bolts. Push
down on the wrench while at the end of
the handle for increased leverage.
Ti g h t e n t h e w h e e l b o l t s i n a s t a r p a t -
tern until each bolt has been tightened
twice. The correct tightness of each
wheel bolt is 100 ft/lb. (135 N·m). If in
doubt about the correct tightness,
have them checked with a torque
wrench by your authorized dealer or at
aservicestation.
11. Stow the jack, tools and flat tire. Install
the jack with the base facing the front
of the vehicle before tightening down
the fastener.
Front Jacking Location
Rear Jacking Location
Installing Spare Wheel/Tire
WHAT TO DO IN EMERGENCIES
110
Page 114 of 164
Vehicles Without Wheel Covers
1. Mount the road tire on the axle.
2. Install the remaining wheel bolts with the threaded end of the wheel bolt toward the
wheel. Lightly tighten the wheel bolts.
3. Lower the vehicle to the ground by turning the jack handle counterclockwise.
4. Finish tightening the wheel bolts. Push down on the wrench while at the end of the
handle for increased leverage. Tighten the wheel bolts in a star pattern until each bolt
has been tightened twice. The correct tightness of each wheel bolt is 100 ft/lbs
(135 N·m). If in doubt about the correct tightness, have them checked with a torque
wrench by your authorized dealer or service station.
5. After 25 miles (40 km) check the wheel bolt torque with a torque wrench to ensure that
all wheel bolts are properly seated against the wheel.
CAUTION!
•Thewinchmechanismisdesignedforusewiththejack-handleonly.Useofanair
wrench or other power tools is not recommended and they can damage the winch.•Donotattempttoraisethevehiclebyjackingonlocationsotherthanthose
indicated in the Jacking Instructions for this vehicle.
•Besuretomountthesparetirewiththevalvestemfacingoutward.Thevehicle
could be damaged if the spare tire is mounted incorrectly.
WHAT TO DO IN EMERGENCIES
112
Page 144 of 164
TIRE PRESSURES
Check the inflation pressure of each tire, including the spare tire, at least monthly and
inflate to the recommended pressure for your vehicle.
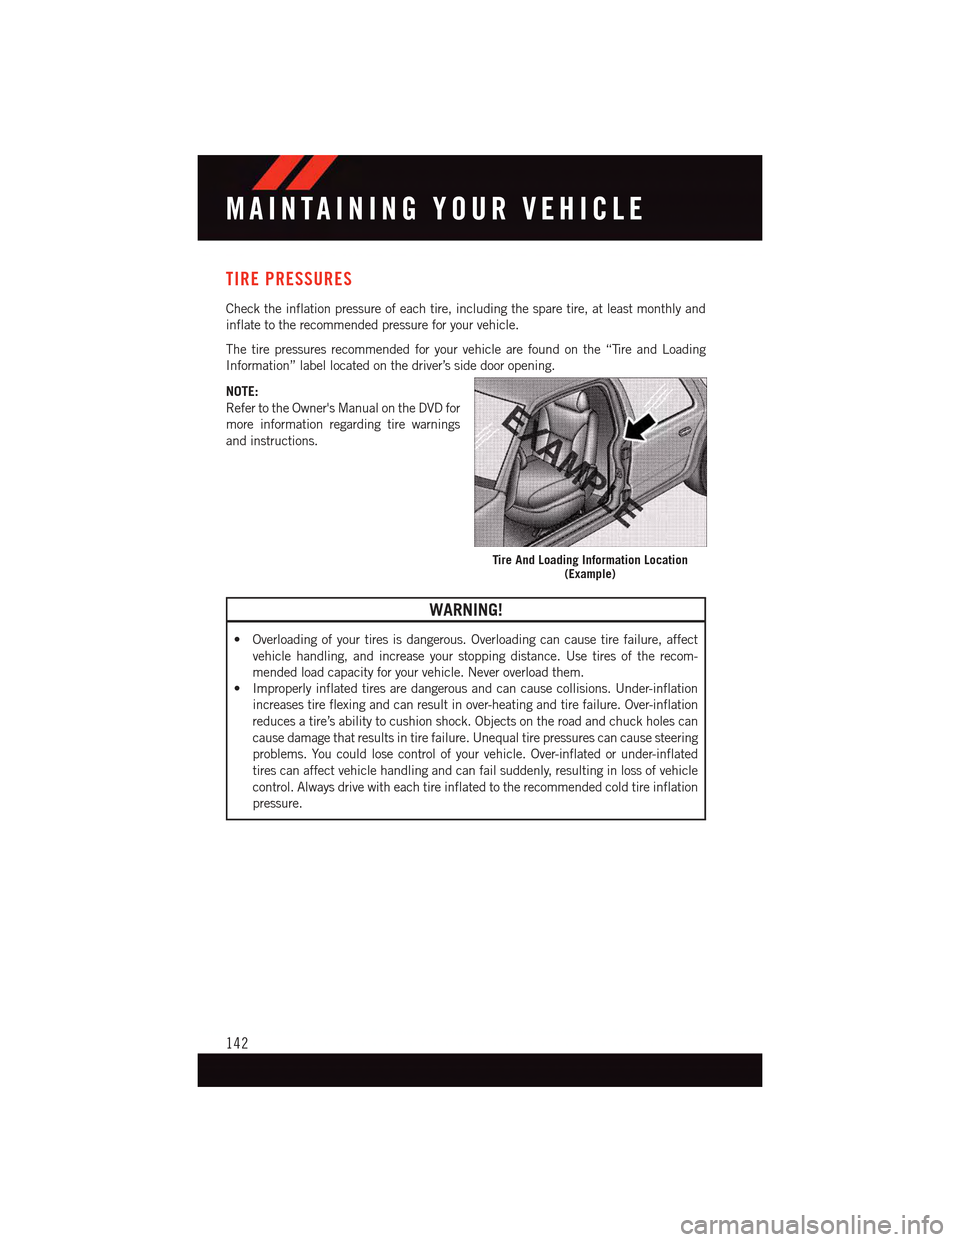
The tire pressures recommended for your vehicle are found on the “Tire and Loading
Information” label located on the driver’s side door opening.
NOTE:
Refer to the Owner's Manual on the DVD for
more information regarding tire warnings
and instructions.
WARNING!
•Overloadingofyourtiresisdangerous.Overloadingcancausetirefailure,affect
vehicle handling, and increase your stopping distance. Use tires of the recom-
mended load capacity for your vehicle. Never overload them.
•Improperlyinflatedtiresaredangerousandcancausecollisions.Under-inflation
increases tire flexing and can result in over-heating and tire failure. Over-inflation
reduces a tire’s ability to cushion shock. Objects on the road and chuck holes can
cause damage that results in tire failure. Unequal tire pressures can cause steering
problems. You could lose control of your vehicle. Over-inflated or under-inflated
tires can affect vehicle handling and can fail suddenly, resulting in loss of vehicle
control. Always drive with each tire inflated to the recommended cold tire inflation
pressure.
Tire And Loading Information Location(Example)
MAINTAINING YOUR VEHICLE
142
Page 154 of 164
Adding Engine Coolant (Antifreeze) . .133
Adding Washer Fluid..........133
Air Bag
Advanced Front Air Bag.......16
Advance Front Air Bag.......16
Air Bags . . . . . . . . . . . . . . .16
Air Bag Warning Light . . . . . . . .16
Front Air Bag . . . . . . . . . . . .16
Rollover . . . . . . . . . . . . . . .16
Side Impacts.............16
Air bag Light . . . . . . . . . . . . . .104Air Cleaner, Engine (Engine Air CleanerFilter)................133Air Conditioner Maintenance.....133Air Conditioning Refrigerant......133Air Conditioning System........133AlarmVehicle Security Alarm.......13Alarm (Security Alarm)......13,106Antifreeze (Engine Coolant) . . .132, 133Capacities.............132Disposal . . . . . . . . . . . . . .133Anti-Lock Warning Light........103Appearance Care............133Assistance Towing...........100Audio Settings............53,56Audio Systems (Radio)..........5Automatic Headlights..........35Automatic TemperatureControl (ATC) . . . . . . . . . . .39, 41Automatic TransmissionFluid Type . . . . . . . . . . . . .133
Back-Up Camera............44Battery.................133Blind Spot Monitoring..........44Body Mechanism Lubrication.....133Brake Fluid . . . . . . . . . . . . . . .133Brakes . . . . . . . . . . . . . . . . .133Brake System.............133Master Cylinder..........133Warning Light . . . . . . . . . . .102Break-In Recommendations, NewVehicle . . . . . . . . . . . . . . . .32Bulb Replacement...........145Bulbs, Light . . . . . . . . . . . . . .145
Calibration, Compass..........90
Capacities, Antifreeze (Engine
Coolant)...............132
Capacities, Fluid............132
Caps, Filler
Oil (Engine)............133
Car Washes . . . . . . . . . . . . . . .133
Change Oil Indicator..........104
Changing A Flat Tire..........108
Charging System Light.........103
Child Restraint..............22
Child RestraintsChild Tether AnchorageLocations...............25CleaningWheels...............133Windshield Wiper Blades.....133Climate Control . . . . . . . . . . . . . .5Clock Setting...............53Cluster Warning/Indicator LightsAnti-Lock Brake (ABS) Light . . .103Brake Warning Light . . . . . . . .102Charging System Light......103Electronic Speed Control ONIndicator . . . . . . . . . . . . . .106Electronic Speed Control SETIndicator . . . . . . . . . . . . . .106Electronic Throttle Control (ETC) Indi-cator Light . . . . . . . . . . . . .104Engine Temperature WarningLight . . . . . . . . . . . . . . . .102Front Fog Light Indicator . . . . .106High Beam Indicator.......106
Malfunction Indicator Light (MIL)..103Oil Pressure Warning Light . . . .103Ti r e P r e s s u r e M o n i t o r i n g S y s t e m(TPMS) Light...........100Tu r n S i g n a l I n d i c a t o r.......106Vehicle Security Light.......106Clutch . . . . . . . . . . . . . . . . .133Clutch Fluid . . . . . . . . . . . . . .133Compact Spare Tire..........143Compass Calibration...........90Coolant (Antifreeze)..........132Cooling System . . . . . . . . . . . . .133Adding Coolant (Antifreeze)....133Coolant Level...........133Disposal of Used Coolant.....133Drain, Flush, and Refill......133
INDEX
152