lock DODGE DART 2016 PF / 1.G Owners Manual
[x] Cancel search | Manufacturer: DODGE, Model Year: 2016, Model line: DART, Model: DODGE DART 2016 PF / 1.GPages: 671, PDF Size: 4.75 MB
Page 554 of 671
NOTE:•For vehicles so equipped, do not attempt to install a
center cap or wheel cover on the compact spare.
• Refer to “Compact Spare Tire” and to “Limited-Use
Spare” under “Tires — General Information” in
“Starting and Operating” for additional warnings,
cautions, and information about the spare tire, its
use, and operation.
8. Install the wheel bolts with the threaded end of the wheel bolt toward the wheel. Lightly tighten the
wheel bolts.
WARNING!
To avoid the risk of forcing the vehicle off the jack,
do not fully tighten the wheel bolts until the vehicle
has been lowered. Failure to follow this warning may
result in serious injury. 9. Lower the vehicle to the ground by turning the jack
handle counterclockwise.
10. Finish tightening the wheel bolts. Push down on the wrench while at the end of the handle for increased
leverage. Tighten the wheel bolts in a star pattern
until each wheel bolt has been tightened twice. Refer
to “Torque Specifications” in this section for proper
lug bolt torque. If in doubt about the correct tight-
ness, have them checked with a torque wrench by
your authorized dealer or at a service station.
11. Lower the jack until it is free. Remove the wheel blocks. Reassemble the lug wrench to the jack assem-
bly and stow it in the spare tire area. Secure the
assembly using the means provided. Release the
parking brake before driving the vehicle.
12. Stow the jack and tools in the storage location and secure the flat tire in the trunk.
552 WHAT TO DO IN EMERGENCIES
Page 556 of 671
snapping the cover over the two wheel bolts. Do not
use a hammer or excessive force to install the cover.
4. Install the remaining wheel bolts and lightly tighten.
WARNING!
To avoid the risk of forcing the vehicle off the jack,
do not tighten the lug nuts fully until the vehicle has
been lowered. Failure to follow this warning may
result in serious injury.
5. Lower the vehicle to the ground by turning the jack handle counterclockwise.
6. Finish tightening the wheel bolts. Push down on the wrench while at the end of the handle for increased
leverage. Tighten the wheel bolts in a star pattern until
each wheel bolt has been tightened twice. Refer to
“Torque Specifications” in this section for proper lug bolt torque. If in doubt about the correct tightness,
have them checked with a torque wrench by your
authorized dealer or service station.
7. Lower the jack until it is free. Remove the wheel blocks. Reassemble the lug wrench to the jack assem-
bly and stow it in the spare tire area. Secure the
assembly using the means provided. Release the park-
ing brake before driving the vehicle.
8. After 25 miles (40 km) check the wheel bolt torque with a torque wrench to ensure that all wheel bolts are
properly seated against the wheel.
Road Tire Installation
1. Mount the road tire on the axle.
2. Install the remaining wheel bolts with the threadedend of the wheel bolt toward the wheel. Lightly
tighten the wheel bolts.
554 WHAT TO DO IN EMERGENCIES
Page 557 of 671
WARNING!
To avoid the risk of forcing the vehicle off the jack,
do not tighten the lug nuts fully until the vehicle has
been lowered. Failure to follow this warning may
result in serious injury.
3. Lower the vehicle to the ground by turning the jack handle counterclockwise.
4. Finish tightening the wheel bolts. Push down on the wrench while at the end of the handle for increased
leverage. Tighten the wheel bolts in a star pattern until
each wheel bolt has been tightened twice. Refer to
“Torque Specifications” in this section for the proper
lug bolt torque. If in doubt about the correct tightness,
have them checked with a torque wrench by your
authorized dealer or service station. 5. Lower the jack until it is free. Remove the wheel
blocks. Reassemble the lug wrench to the jack assem-
bly and stow it in the spare tire area. Secure the
assembly using the means provided. Release the park-
ing brake before driving the vehicle.
6. After 25 miles (40 km) check the wheel bolt torque with a torque wrench to ensure that all wheel bolts are
properly seated against the wheel.
JUMP-STARTING PROCEDURES
If your vehicle has a discharged battery it can be jump-
started using a set of jumper cables and a battery in
another vehicle or by using a portable battery booster
pack. Jump-starting can be dangerous if done improperly
so please follow the procedures in this section carefully.
6
WHAT TO DO IN EMERGENCIES 555
Page 559 of 671
WARNING!
•Take care to avoid the radiator cooling fan when-
ever the hood is raised. It can start anytime the
ignition switch is ON. You can be injured by
moving fan blades.
• Remove any metal jewelry such as rings, watch
bands and bracelets that could make an inadvertent
electrical contact. You could be seriously injured.
• Batteries contain sulfuric acid that can burn your
skin or eyes and generate hydrogen gas which is
flammable and explosive. Keep open flames or
sparks away from the battery.
1. Set the parking brake, shift the automatic transmission into PARK (manual transmission in NEUTRAL) and
turn the ignition to LOCK.
2. Turn off the heater, radio, and all unnecessary electri- cal accessories. 3. If using another vehicle to jump-start the battery, park
the vehicle within the jumper cables reach, set the
parking brake and make sure the ignition is OFF.
WARNING!
Do not allow vehicles to touch each other as this
could establish a ground connection and personal
injury could result.
Jump Starting Procedure
WARNING!
Failure to follow this jump-starting procedure could
result in personal injury or property damage due to
battery explosion.
6
WHAT TO DO IN EMERGENCIES 557
Page 589 of 671
4. Install the A/C air filter with the air filter positionindicators pointing in the same direction as removal.
When installing the filter cover, make sure the retain-
ing tab fully engages the cover.
CAUTION!
The A/C air filter is identified with an arrow to
indicate airflow direction through the filter. Failure
to properly install the filter will result in the need to
replace it more often.
5. Install the passenger side console closeout.
NOTE: Use only manufacturer approved A/C system
sealers, stop leak products, seal conditioners, compressor
oil, or refrigerants.
Body Lubrication
Locks and all body pivot points, including such items as
seat tracks, door hinge pivot points and rollers, liftgate,
tailgate, decklid, sliding doors and hood hinges, should
be lubricated periodically with a lithium based grease,
such as MOPAR Spray White Lube to assure quiet, easy
operation and to protect against rust and wear. Prior to
Air Conditioning Filter Removal
7
MAINTAINING YOUR VEHICLE 587
Page 590 of 671
the application of any lubricant, the parts concerned
should be wiped clean to remove dust and grit; after
lubricating excess oil and grease should be removed.
Particular attention should also be given to hood latching
components to ensure proper function. When performing
other underhood services, the hood latch, release mecha-
nism and safety catch should be cleaned and lubricated.
The external lock cylinders should be lubricated twice a
year, preferably in the Fall and Spring. Apply a small
amount of a high quality lubricant, such as MOPAR Lock
Cylinder Lubricant directly into the lock cylinder.
Windshield Wiper Blades
Clean the rubber edges of the wiper blades and the
windshield periodically with a sponge or soft cloth and a
mild nonabrasive cleaner. This will remove accumula-
tions of salt or road film.Operation of the wipers on dry glass for long periods
may cause deterioration of the wiper blades. Always use
washer fluid when using the wipers to remove salt or dirt
from a dry windshield.
Avoid using the wiper blades to remove frost or ice from
the windshield. Keep the blade rubber out of contact with
petroleum products such as engine oil, gasoline, etc.
NOTE:
Life expectancy of wiper blades varies depend-
ing on geographical area and frequency of use. Poor
performance of blades may be present with chattering,
marks, water lines or wet spots. If any of these conditions
are present, clean the wiper blades or replace as neces-
sary.
Adding Washer Fluid
The washer fluid reservoir is located in the engine
compartment, and the fluid level should be checked at
regular intervals. Fill the reservoir with windshield
washer solvent only (not radiator antifreeze).
588 MAINTAINING YOUR VEHICLE
Page 616 of 671
CavityMaxi Fuse Mini Fuse Description
F87 –10 Amp Red Wastegate, Purge Solenoid, OBD Vent
Valve, Oxygen Sensor Heaters
F88 –10 Amp Red Heated Outside Mirrors
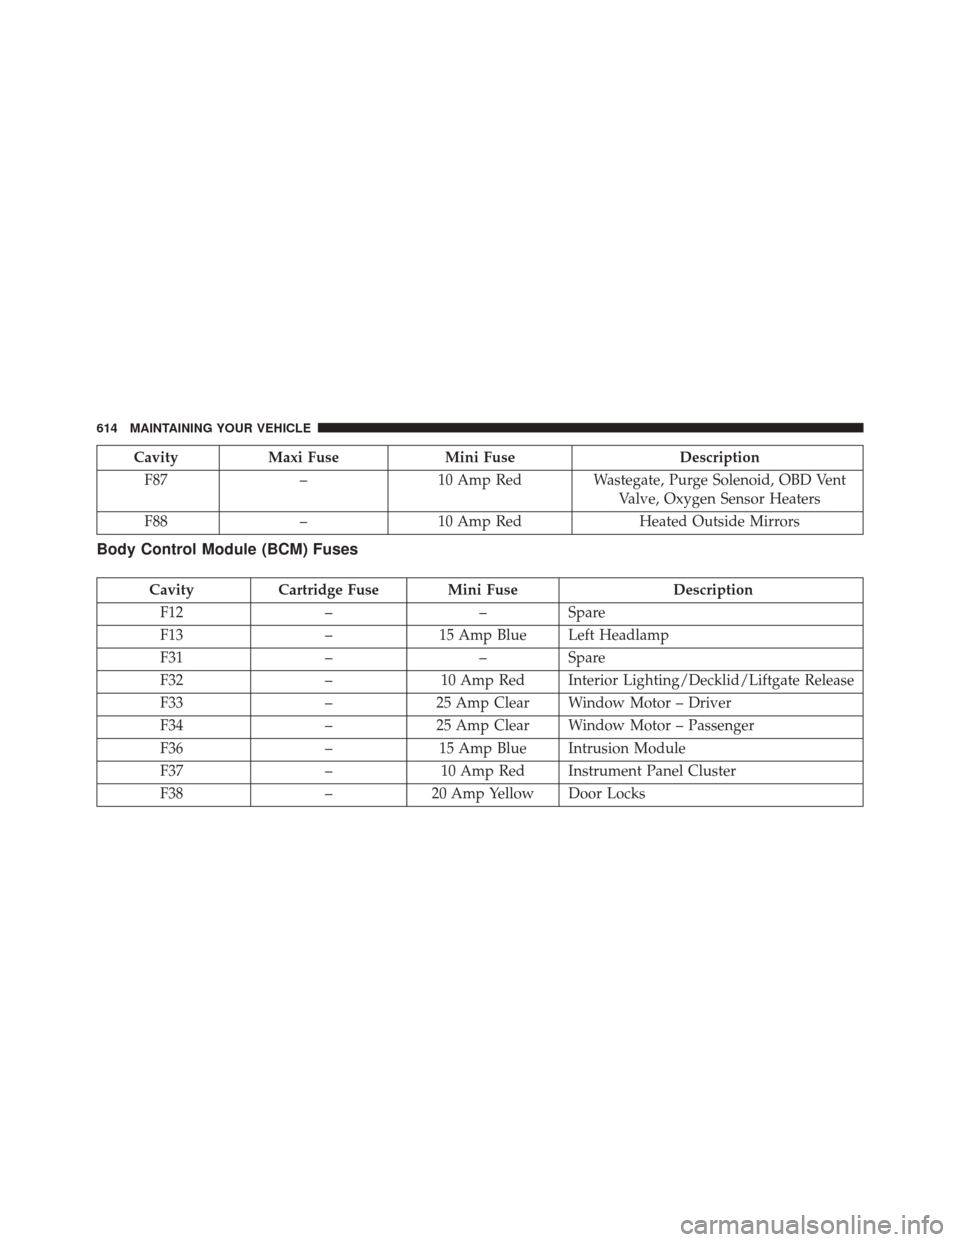
Body Control Module (BCM) Fuses
CavityCartridge Fuse Mini Fuse Description
F12 ––Spare
F13 –15 Amp Blue Left Headlamp
F31 ––Spare
F32 –10 Amp Red Interior Lighting/Decklid/Liftgate Release
F33 –25 Amp Clear Window Motor – Driver
F34 –25 Amp Clear Window Motor – Passenger
F36 –15 Amp Blue Intrusion Module
F37 –10 Amp Red Instrument Panel Cluster
F38 –20 Amp Yellow Door Locks
614 MAINTAINING YOUR VEHICLE
Page 621 of 671
3. Twist the bulb socket one quarter turn counter clock-wise to remove. 4. Replace bulb.
Trim CoverBulb Socket
7
MAINTAINING YOUR VEHICLE 619
Page 622 of 671
5. Twist the bulb socket one quarter turn clockwise toinstall.
6. Install trim cover.
License Lamp
1. Remove the screws securing the lamp to the rear fascia.
2. Remove the bulb and socket assembly.
3. Disconnect the bulb from the socket assembly and install the replacement bulb.
Backup Bulb
620 MAINTAINING YOUR VEHICLE
Page 649 of 671
Tamper Alert...........................22
Vehicle Security Alarm ....................20
Alarm, Panic .......................... .22, 26
Alarm (Security Alarm) ..................20, 310
Alarm System (Security Alarm) ................20
Alterations/Modifications, Vehicle ...............7
Antifreeze (Engine Coolant) ...........592, 622, 623
Capacities ........................... .622
Disposal ............................. .595
Anti-Lock Brake System (ABS) ................456
Anti-Lock Warning Light ....................322
Appearance Care ........................ .602
Assistance Towing ........................ .149
Assist, Hill Start ......................... .459
Auto Down Power Windows ..................44
Automatic Dimming Mirror ..................121
Automatic Door Locks ....................35, 36
Automatic Headlights ..................... .235
Automatic High Beams .....................236 Automatic Temperature Control (ATC)
..........406
Automatic Transmission .................425, 599
Adding Fluid ......................... .600
Fluid And Filter Changes ..................601
Fluid Level Check ...................... .600
Fluid Type ........................ .599, 625
Gear Ranges ...................... .430, 440
Special Additives ...................... .600
Autostick .............................. .446
Auto Unlock, Doors ........................36
Auto Up Power Windows ....................45
Battery ............................ .312, 583
Charging System Light ...................312
Keyless Transmitter Replacement (RKE) ........27
Belts, Seat ...............................110
Bluetooth Connecting To A Particular Mobile Phone Or Audio
Device After Pairing .....................174
10
INDEX 647