lock DODGE DURANGO 1999 1.G Manual Online
[x] Cancel search | Manufacturer: DODGE, Model Year: 1999, Model line: DURANGO, Model: DODGE DURANGO 1999 1.GPages: 193, PDF Size: 5.65 MB
Page 129 of 193
Downloaded from www.Manualslib.com manuals search engine SPECIFICATIONS
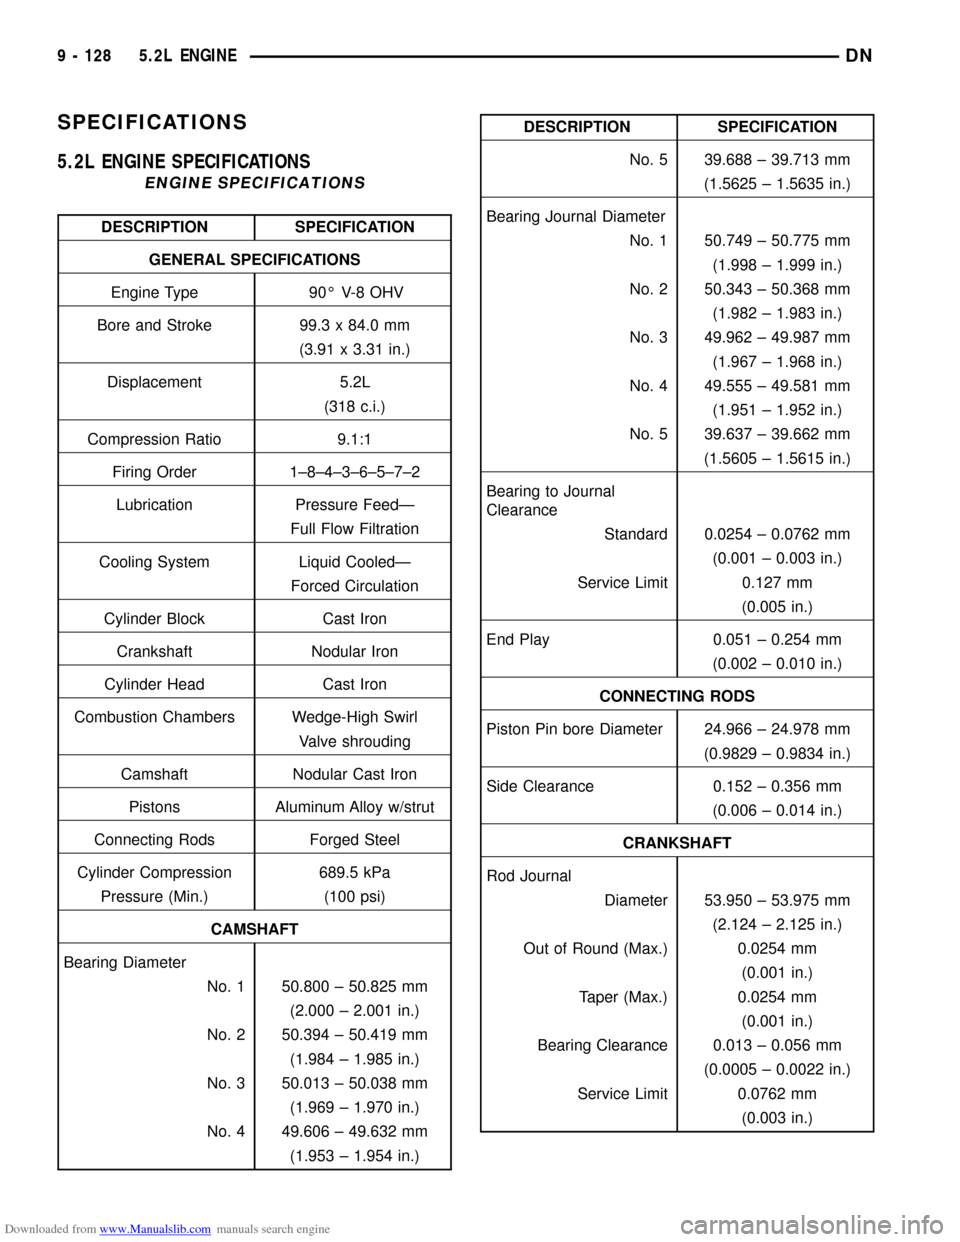
5.2L ENGINE SPECIFICATIONS
ENGINE SPECIFICATIONS
DESCRIPTION SPECIFICATION
GENERAL SPECIFICATIONS
Engine Type 90É V-8 OHV
Bore and Stroke 99.3 x 84.0 mm
(3.91 x 3.31 in.)
Displacement 5.2L
(318 c.i.)
Compression Ratio 9.1:1
Firing Order 1±8±4±3±6±5±7±2
Lubrication Pressure FeedÐ
Full Flow Filtration
Cooling System Liquid CooledÐ
Forced Circulation
Cylinder Block Cast Iron
Crankshaft Nodular Iron
Cylinder Head Cast Iron
Combustion Chambers Wedge-High Swirl
Valve shrouding
Camshaft Nodular Cast Iron
Pistons Aluminum Alloy w/strut
Connecting Rods Forged Steel
Cylinder Compression 689.5 kPa
Pressure (Min.) (100 psi)
CAMSHAFT
Bearing Diameter
No. 1 50.800 ± 50.825 mm
(2.000 ± 2.001 in.)
No. 2 50.394 ± 50.419 mm
(1.984 ± 1.985 in.)
No. 3 50.013 ± 50.038 mm
(1.969 ± 1.970 in.)
No. 4 49.606 ± 49.632 mm
(1.953 ± 1.954 in.)
DESCRIPTION SPECIFICATION
No. 5 39.688 ± 39.713 mm
(1.5625 ± 1.5635 in.)
Bearing Journal Diameter
No. 1 50.749 ± 50.775 mm
(1.998 ± 1.999 in.)
No. 2 50.343 ± 50.368 mm
(1.982 ± 1.983 in.)
No. 3 49.962 ± 49.987 mm
(1.967 ± 1.968 in.)
No. 4 49.555 ± 49.581 mm
(1.951 ± 1.952 in.)
No. 5 39.637 ± 39.662 mm
(1.5605 ± 1.5615 in.)
Bearing to Journal
Clearance
Standard 0.0254 ± 0.0762 mm
(0.001 ± 0.003 in.)
Service Limit 0.127 mm
(0.005 in.)
End Play 0.051 ± 0.254 mm
(0.002 ± 0.010 in.)
CONNECTING RODS
Piston Pin bore Diameter 24.966 ± 24.978 mm
(0.9829 ± 0.9834 in.)
Side Clearance 0.152 ± 0.356 mm
(0.006 ± 0.014 in.)
CRANKSHAFT
Rod Journal
Diameter 53.950 ± 53.975 mm
(2.124 ± 2.125 in.)
Out of Round (Max.) 0.0254 mm
(0.001 in.)
Taper (Max.) 0.0254 mm
(0.001 in.)
Bearing Clearance 0.013 ± 0.056 mm
(0.0005 ± 0.0022 in.)
Service Limit 0.0762 mm
(0.003 in.)
9 - 128 5.2L ENGINEDN
Page 130 of 193
Downloaded from www.Manualslib.com manuals search engine DESCRIPTION SPECIFICATION
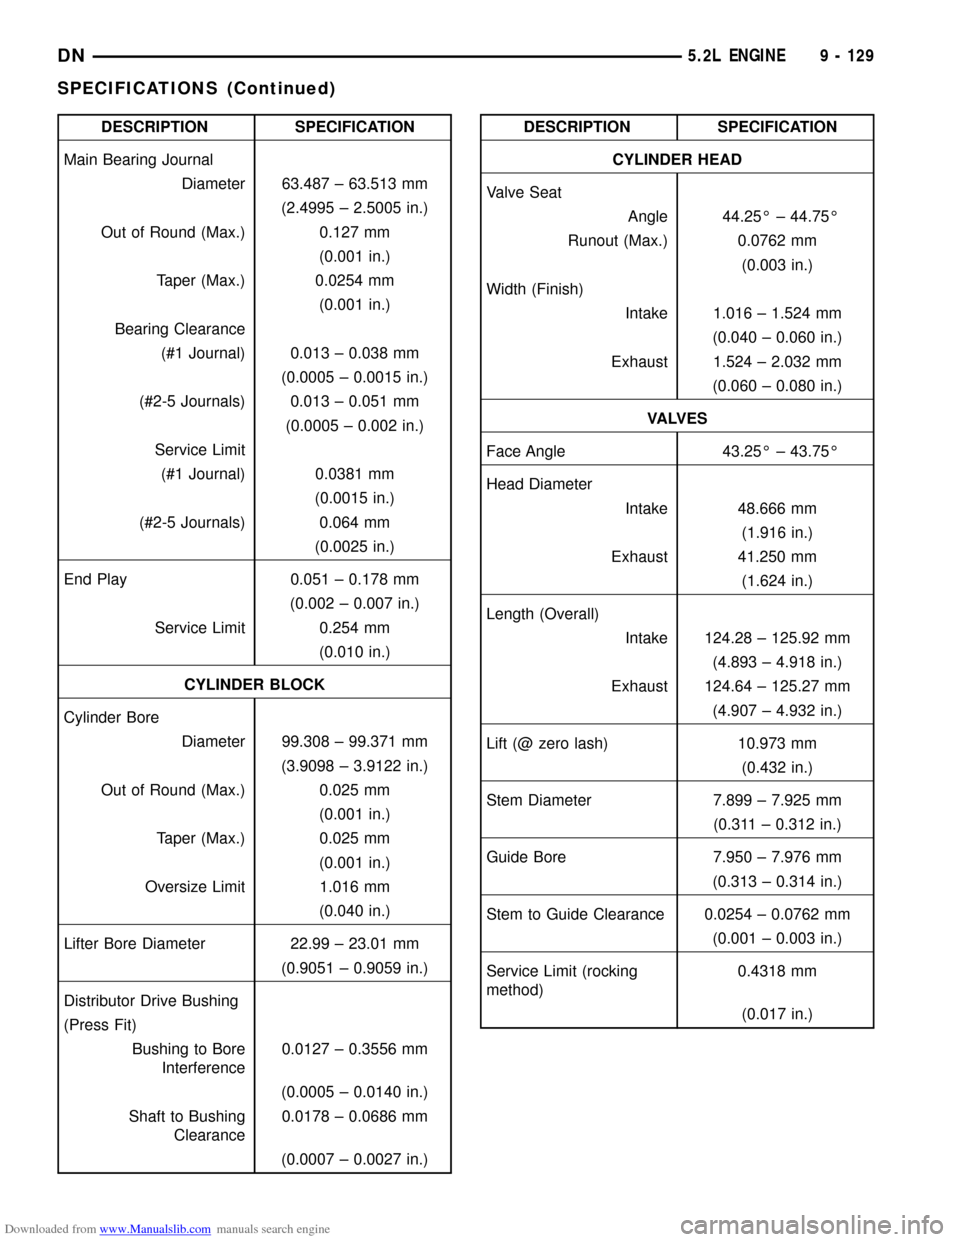
Main Bearing Journal
Diameter 63.487 ± 63.513 mm
(2.4995 ± 2.5005 in.)
Out of Round (Max.) 0.127 mm
(0.001 in.)
Taper (Max.) 0.0254 mm
(0.001 in.)
Bearing Clearance
(#1 Journal) 0.013 ± 0.038 mm
(0.0005 ± 0.0015 in.)
(#2-5 Journals) 0.013 ± 0.051 mm
(0.0005 ± 0.002 in.)
Service Limit
(#1 Journal) 0.0381 mm
(0.0015 in.)
(#2-5 Journals) 0.064 mm
(0.0025 in.)
End Play 0.051 ± 0.178 mm
(0.002 ± 0.007 in.)
Service Limit 0.254 mm
(0.010 in.)
CYLINDER BLOCK
Cylinder Bore
Diameter 99.308 ± 99.371 mm
(3.9098 ± 3.9122 in.)
Out of Round (Max.) 0.025 mm
(0.001 in.)
Taper (Max.) 0.025 mm
(0.001 in.)
Oversize Limit 1.016 mm
(0.040 in.)
Lifter Bore Diameter 22.99 ± 23.01 mm
(0.9051 ± 0.9059 in.)
Distributor Drive Bushing
(Press Fit)
Bushing to Bore
Interference0.0127 ± 0.3556 mm
(0.0005 ± 0.0140 in.)
Shaft to Bushing
Clearance0.0178 ± 0.0686 mm
(0.0007 ± 0.0027 in.)DESCRIPTION SPECIFICATION
CYLINDER HEAD
Valve Seat
Angle 44.25É ± 44.75É
Runout (Max.) 0.0762 mm
(0.003 in.)
Width (Finish)
Intake 1.016 ± 1.524 mm
(0.040 ± 0.060 in.)
Exhaust 1.524 ± 2.032 mm
(0.060 ± 0.080 in.)
VA LV E S
Face Angle 43.25É ± 43.75É
Head Diameter
Intake 48.666 mm
(1.916 in.)
Exhaust 41.250 mm
(1.624 in.)
Length (Overall)
Intake 124.28 ± 125.92 mm
(4.893 ± 4.918 in.)
Exhaust 124.64 ± 125.27 mm
(4.907 ± 4.932 in.)
Lift (@ zero lash) 10.973 mm
(0.432 in.)
Stem Diameter 7.899 ± 7.925 mm
(0.311 ± 0.312 in.)
Guide Bore 7.950 ± 7.976 mm
(0.313 ± 0.314 in.)
Stem to Guide Clearance 0.0254 ± 0.0762 mm
(0.001 ± 0.003 in.)
Service Limit (rocking
method)0.4318 mm
(0.017 in.)
DN5.2L ENGINE 9 - 129
SPECIFICATIONS (Continued)
Page 133 of 193
Downloaded from www.Manualslib.com manuals search engine TORQUE SPECIFICATIONS
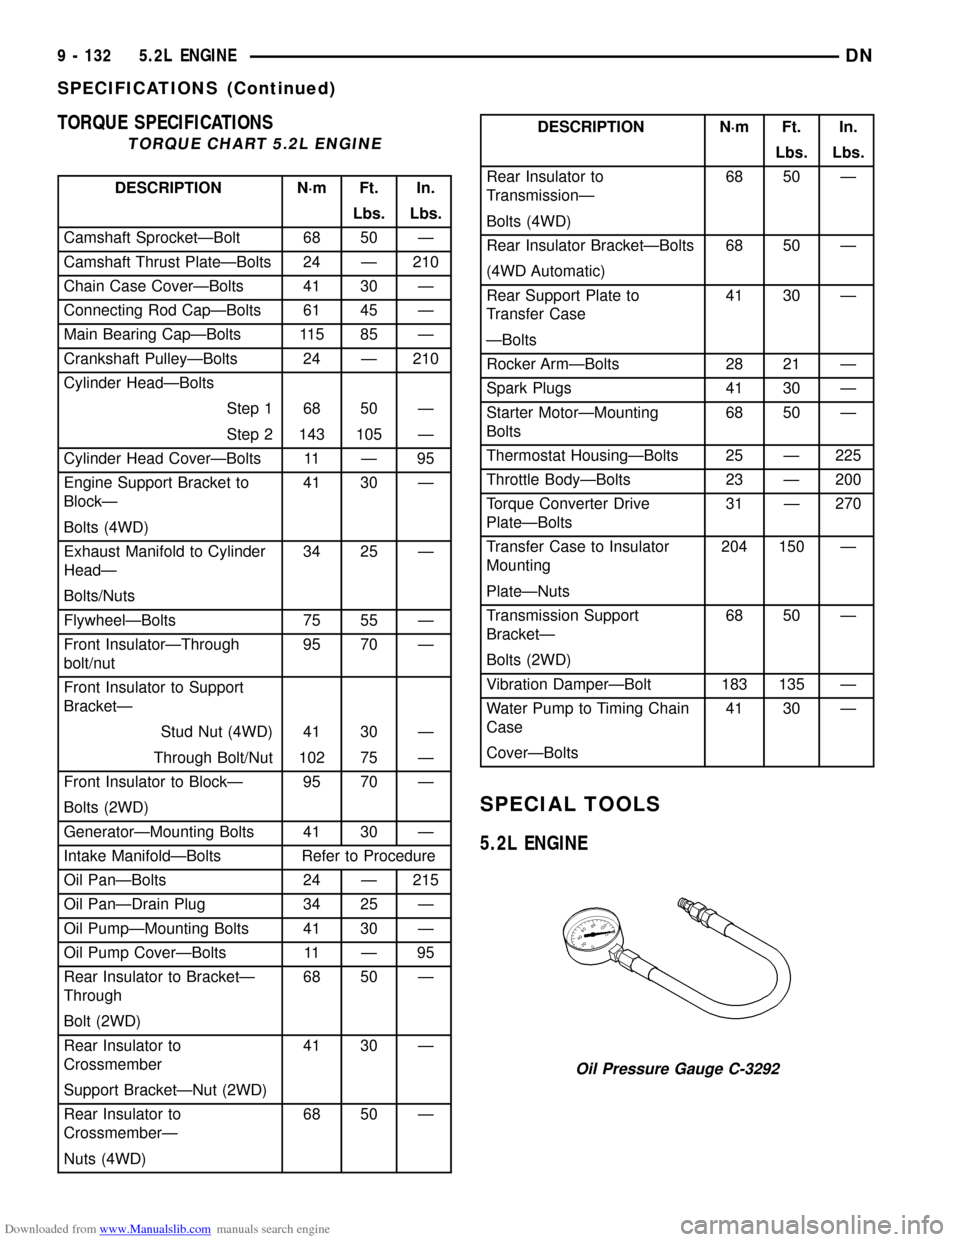
TORQUE CHART 5.2L ENGINE
DESCRIPTION N´m Ft. In.
Lbs. Lbs.
Camshaft SprocketÐBolt 68 50 Ð
Camshaft Thrust PlateÐBolts 24 Ð 210
Chain Case CoverÐBolts 41 30 Ð
Connecting Rod CapÐBolts 61 45 Ð
Main Bearing CapÐBolts 115 85 Ð
Crankshaft PulleyÐBolts 24 Ð 210
Cylinder HeadÐBolts
Step 1 68 50 Ð
Step 2 143 105 Ð
Cylinder Head CoverÐBolts 11 Ð 95
Engine Support Bracket to
BlockÐ41 30 Ð
Bolts (4WD)
Exhaust Manifold to Cylinder
HeadÐ34 25 Ð
Bolts/Nuts
FlywheelÐBolts 75 55 Ð
Front InsulatorÐThrough
bolt/nut95 70 Ð
Front Insulator to Support
BracketÐ
Stud Nut (4WD) 41 30 Ð
Through Bolt/Nut 102 75 Ð
Front Insulator to BlockÐ 95 70 Ð
Bolts (2WD)
GeneratorÐMounting Bolts 41 30 Ð
Intake ManifoldÐBolts Refer to Procedure
Oil PanÐBolts 24 Ð 215
Oil PanÐDrain Plug 34 25 Ð
Oil PumpÐMounting Bolts 41 30 Ð
Oil Pump CoverÐBolts 11 Ð 95
Rear Insulator to BracketÐ
Through68 50 Ð
Bolt (2WD)
Rear Insulator to
Crossmember41 30 Ð
Support BracketÐNut (2WD)
Rear Insulator to
CrossmemberÐ68 50 Ð
Nuts (4WD)
DESCRIPTION N´m Ft. In.
Lbs. Lbs.
Rear Insulator to
TransmissionÐ68 50 Ð
Bolts (4WD)
Rear Insulator BracketÐBolts 68 50 Ð
(4WD Automatic)
Rear Support Plate to
Transfer Case41 30 Ð
ÐBolts
Rocker ArmÐBolts 28 21 Ð
Spark Plugs 41 30 Ð
Starter MotorÐMounting
Bolts68 50 Ð
Thermostat HousingÐBolts 25 Ð 225
Throttle BodyÐBolts 23 Ð 200
Torque Converter Drive
PlateÐBolts31 Ð 270
Transfer Case to Insulator
Mounting204 150 Ð
PlateÐNuts
Transmission Support
BracketÐ68 50 Ð
Bolts (2WD)
Vibration DamperÐBolt 183 135 Ð
Water Pump to Timing Chain
Case41 30 Ð
CoverÐBolts
SPECIAL TOOLS
5.2L ENGINE
Oil Pressure Gauge C-3292
9 - 132 5.2L ENGINEDN
SPECIFICATIONS (Continued)
Page 136 of 193
Downloaded from www.Manualslib.com manuals search engine 5.9L ENGINE
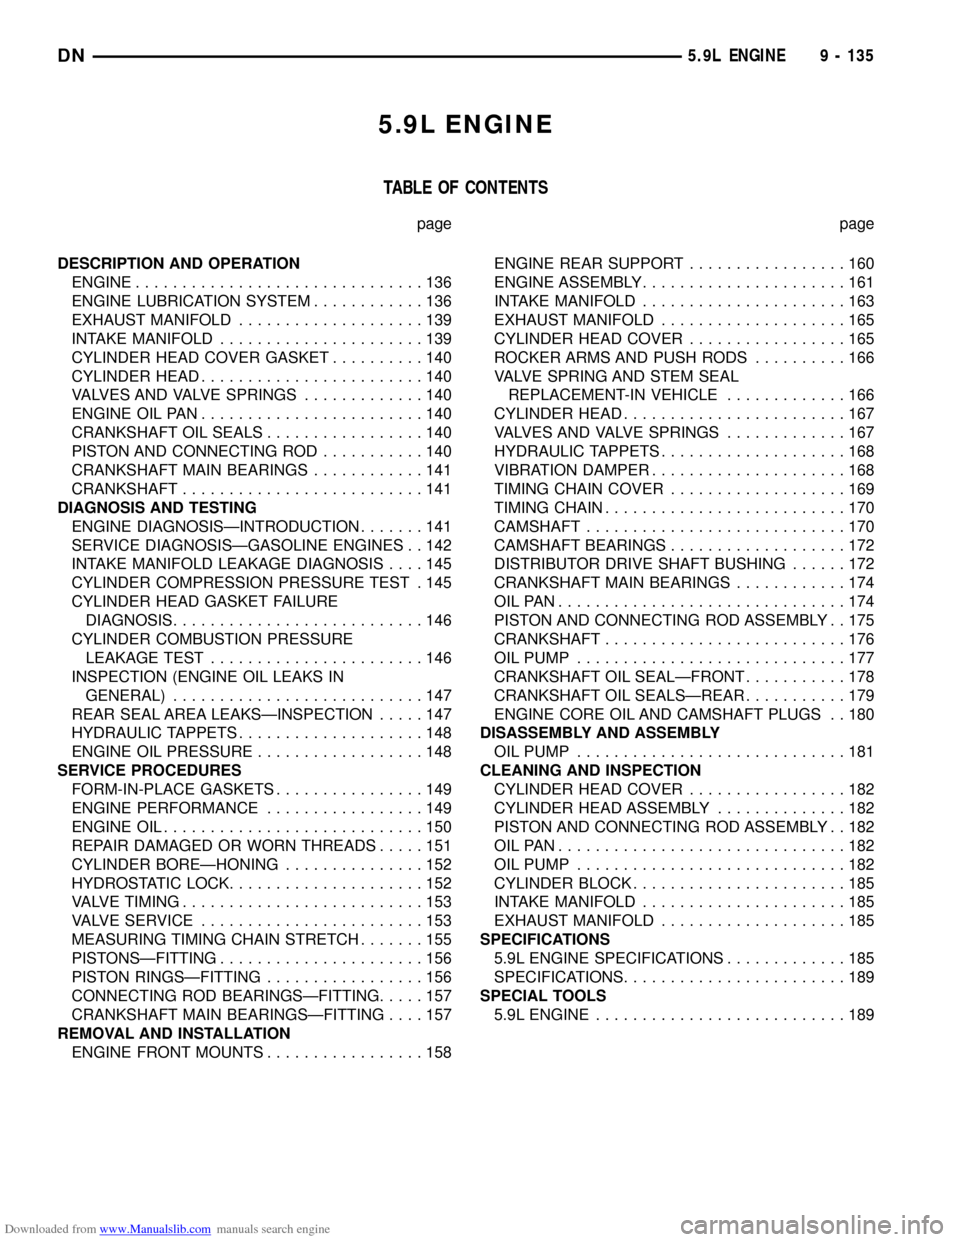
TABLE OF CONTENTS
page page
DESCRIPTION AND OPERATION
ENGINE...............................136
ENGINE LUBRICATION SYSTEM............136
EXHAUST MANIFOLD....................139
INTAKE MANIFOLD......................139
CYLINDER HEAD COVER GASKET..........140
CYLINDER HEAD........................140
VALVES AND VALVE SPRINGS.............140
ENGINE OIL PAN........................140
CRANKSHAFT OIL SEALS.................140
PISTON AND CONNECTING ROD...........140
CRANKSHAFT MAIN BEARINGS............141
CRANKSHAFT..........................141
DIAGNOSIS AND TESTING
ENGINE DIAGNOSISÐINTRODUCTION.......141
SERVICE DIAGNOSISÐGASOLINE ENGINES . . 142
INTAKE MANIFOLD LEAKAGE DIAGNOSIS....145
CYLINDER COMPRESSION PRESSURE TEST . 145
CYLINDER HEAD GASKET FAILURE
DIAGNOSIS...........................146
CYLINDER COMBUSTION PRESSURE
LEAKAGE TEST.......................146
INSPECTION (ENGINE OIL LEAKS IN
GENERAL)...........................147
REAR SEAL AREA LEAKSÐINSPECTION.....147
HYDRAULIC TAPPETS....................148
ENGINE OIL PRESSURE..................148
SERVICE PROCEDURES
FORM-IN-PLACE GASKETS................149
ENGINE PERFORMANCE.................149
ENGINE OIL............................150
REPAIR DAMAGED OR WORN THREADS.....151
CYLINDER BOREÐHONING...............152
HYDROSTATIC LOCK.....................152
VALVE TIMING..........................153
VALVE SERVICE........................153
MEASURING TIMING CHAIN STRETCH.......155
PISTONSÐFITTING......................156
PISTON RINGSÐFITTING.................156
CONNECTING ROD BEARINGSÐFITTING.....157
CRANKSHAFT MAIN BEARINGSÐFITTING....157
REMOVAL AND INSTALLATION
ENGINE FRONT MOUNTS.................158ENGINE REAR SUPPORT.................160
ENGINE ASSEMBLY......................161
INTAKE MANIFOLD......................163
EXHAUST MANIFOLD....................165
CYLINDER HEAD COVER.................165
ROCKER ARMS AND PUSH RODS..........166
VALVE SPRING AND STEM SEAL
REPLACEMENT-IN VEHICLE.............166
CYLINDER HEAD........................167
VALVES AND VALVE SPRINGS.............167
HYDRAULIC TAPPETS....................168
VIBRATION DAMPER.....................168
TIMING CHAIN COVER...................169
TIMING CHAIN..........................170
CAMSHAFT............................170
CAMSHAFT BEARINGS...................172
DISTRIBUTOR DRIVE SHAFT BUSHING......172
CRANKSHAFT MAIN BEARINGS............174
OILPAN...............................174
PISTON AND CONNECTING ROD ASSEMBLY . . 175
CRANKSHAFT..........................176
OIL PUMP.............................177
CRANKSHAFT OIL SEALÐFRONT...........178
CRANKSHAFT OIL SEALSÐREAR...........179
ENGINE CORE OIL AND CAMSHAFT PLUGS . . 180
DISASSEMBLY AND ASSEMBLY
OIL PUMP.............................181
CLEANING AND INSPECTION
CYLINDER HEAD COVER.................182
CYLINDER HEAD ASSEMBLY..............182
PISTON AND CONNECTING ROD ASSEMBLY . . 182
OILPAN...............................182
OIL PUMP.............................182
CYLINDER BLOCK.......................185
INTAKE MANIFOLD......................185
EXHAUST MANIFOLD....................185
SPECIFICATIONS
5.9L ENGINE SPECIFICATIONS.............185
SPECIFICATIONS........................189
SPECIAL TOOLS
5.9L ENGINE...........................189
DN5.9L ENGINE 9 - 135
Page 137 of 193
Downloaded from www.Manualslib.com manuals search engine DESCRIPTION AND OPERATION
ENGINE
DESCRIPTION
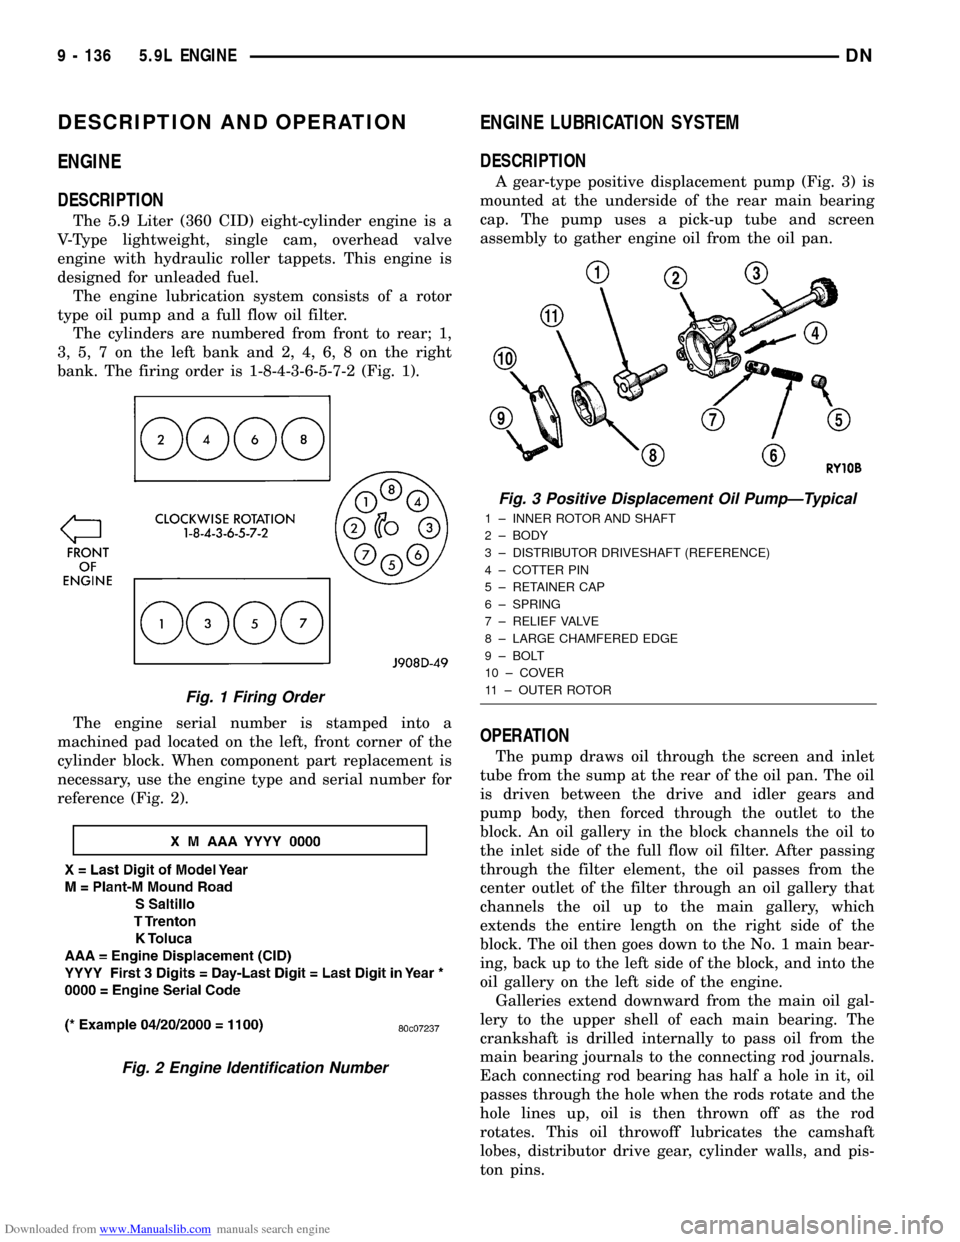
The 5.9 Liter (360 CID) eight-cylinder engine is a
V-Type lightweight, single cam, overhead valve
engine with hydraulic roller tappets. This engine is
designed for unleaded fuel.
The engine lubrication system consists of a rotor
type oil pump and a full flow oil filter.
The cylinders are numbered from front to rear; 1,
3, 5, 7 on the left bank and 2, 4, 6, 8 on the right
bank. The firing order is 1-8-4-3-6-5-7-2 (Fig. 1).
The engine serial number is stamped into a
machined pad located on the left, front corner of the
cylinder block. When component part replacement is
necessary, use the engine type and serial number for
reference (Fig. 2).
ENGINE LUBRICATION SYSTEM
DESCRIPTION
A gear-type positive displacement pump (Fig. 3) is
mounted at the underside of the rear main bearing
cap. The pump uses a pick-up tube and screen
assembly to gather engine oil from the oil pan.
OPERATION
The pump draws oil through the screen and inlet
tube from the sump at the rear of the oil pan. The oil
is driven between the drive and idler gears and
pump body, then forced through the outlet to the
block. An oil gallery in the block channels the oil to
the inlet side of the full flow oil filter. After passing
through the filter element, the oil passes from the
center outlet of the filter through an oil gallery that
channels the oil up to the main gallery, which
extends the entire length on the right side of the
block. The oil then goes down to the No. 1 main bear-
ing, back up to the left side of the block, and into the
oil gallery on the left side of the engine.
Galleries extend downward from the main oil gal-
lery to the upper shell of each main bearing. The
crankshaft is drilled internally to pass oil from the
main bearing journals to the connecting rod journals.
Each connecting rod bearing has half a hole in it, oil
passes through the hole when the rods rotate and the
hole lines up, oil is then thrown off as the rod
rotates. This oil throwoff lubricates the camshaft
lobes, distributor drive gear, cylinder walls, and pis-
ton pins.
Fig. 1 Firing Order
Fig. 2 Engine Identification Number
Fig. 3 Positive Displacement Oil PumpÐTypical
1 ± INNER ROTOR AND SHAFT
2 ± BODY
3 ± DISTRIBUTOR DRIVESHAFT (REFERENCE)
4 ± COTTER PIN
5 ± RETAINER CAP
6 ± SPRING
7 ± RELIEF VALVE
8 ± LARGE CHAMFERED EDGE
9 ± BOLT
10 ± COVER
11 ± OUTER ROTOR
9 - 136 5.9L ENGINEDN
Page 141 of 193
Downloaded from www.Manualslib.com manuals search engine CYLINDER HEAD COVER GASKET
DESCRIPTION
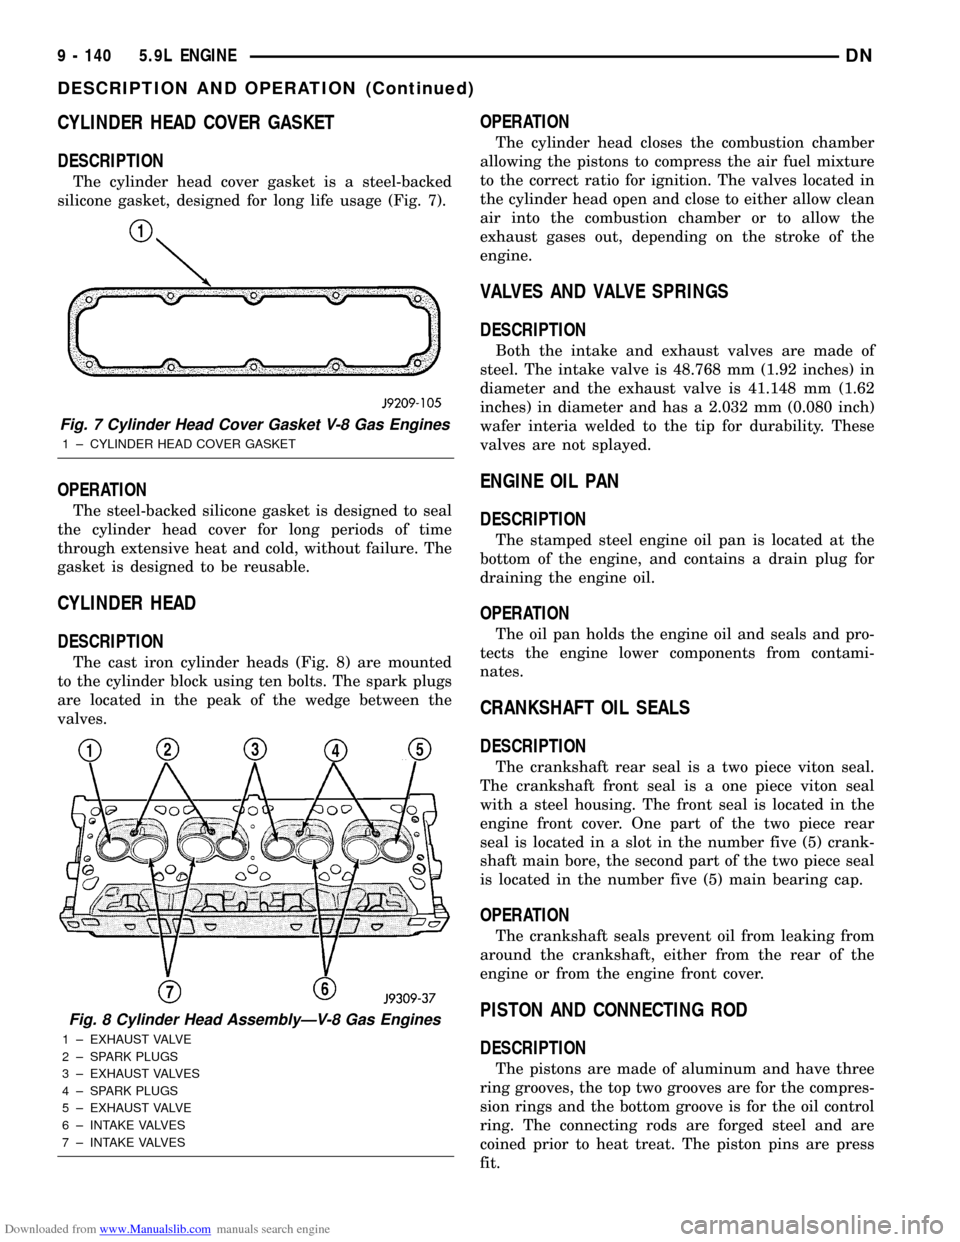
The cylinder head cover gasket is a steel-backed
silicone gasket, designed for long life usage (Fig. 7).
OPERATION
The steel-backed silicone gasket is designed to seal
the cylinder head cover for long periods of time
through extensive heat and cold, without failure. The
gasket is designed to be reusable.
CYLINDER HEAD
DESCRIPTION
The cast iron cylinder heads (Fig. 8) are mounted
to the cylinder block using ten bolts. The spark plugs
are located in the peak of the wedge between the
valves.
OPERATION
The cylinder head closes the combustion chamber
allowing the pistons to compress the air fuel mixture
to the correct ratio for ignition. The valves located in
the cylinder head open and close to either allow clean
air into the combustion chamber or to allow the
exhaust gases out, depending on the stroke of the
engine.
VALVES AND VALVE SPRINGS
DESCRIPTION
Both the intake and exhaust valves are made of
steel. The intake valve is 48.768 mm (1.92 inches) in
diameter and the exhaust valve is 41.148 mm (1.62
inches) in diameter and has a 2.032 mm (0.080 inch)
wafer interia welded to the tip for durability. These
valves are not splayed.
ENGINE OIL PAN
DESCRIPTION
The stamped steel engine oil pan is located at the
bottom of the engine, and contains a drain plug for
draining the engine oil.
OPERATION
The oil pan holds the engine oil and seals and pro-
tects the engine lower components from contami-
nates.
CRANKSHAFT OIL SEALS
DESCRIPTION
The crankshaft rear seal is a two piece viton seal.
The crankshaft front seal is a one piece viton seal
with a steel housing. The front seal is located in the
engine front cover. One part of the two piece rear
seal is located in a slot in the number five (5) crank-
shaft main bore, the second part of the two piece seal
is located in the number five (5) main bearing cap.
OPERATION
The crankshaft seals prevent oil from leaking from
around the crankshaft, either from the rear of the
engine or from the engine front cover.
PISTON AND CONNECTING ROD
DESCRIPTION
The pistons are made of aluminum and have three
ring grooves, the top two grooves are for the compres-
sion rings and the bottom groove is for the oil control
ring. The connecting rods are forged steel and are
coined prior to heat treat. The piston pins are press
fit.
Fig. 7 Cylinder Head Cover Gasket V-8 Gas Engines
1 ± CYLINDER HEAD COVER GASKET
Fig. 8 Cylinder Head AssemblyÐV-8 Gas Engines
1 ± EXHAUST VALVE
2 ± SPARK PLUGS
3 ± EXHAUST VALVES
4 ± SPARK PLUGS
5 ± EXHAUST VALVE
6 ± INTAKE VALVES
7 ± INTAKE VALVES
9 - 140 5.9L ENGINEDN
DESCRIPTION AND OPERATION (Continued)
Page 142 of 193
Downloaded from www.Manualslib.com manuals search engine CRANKSHAFT MAIN BEARINGS
DESCRIPTION
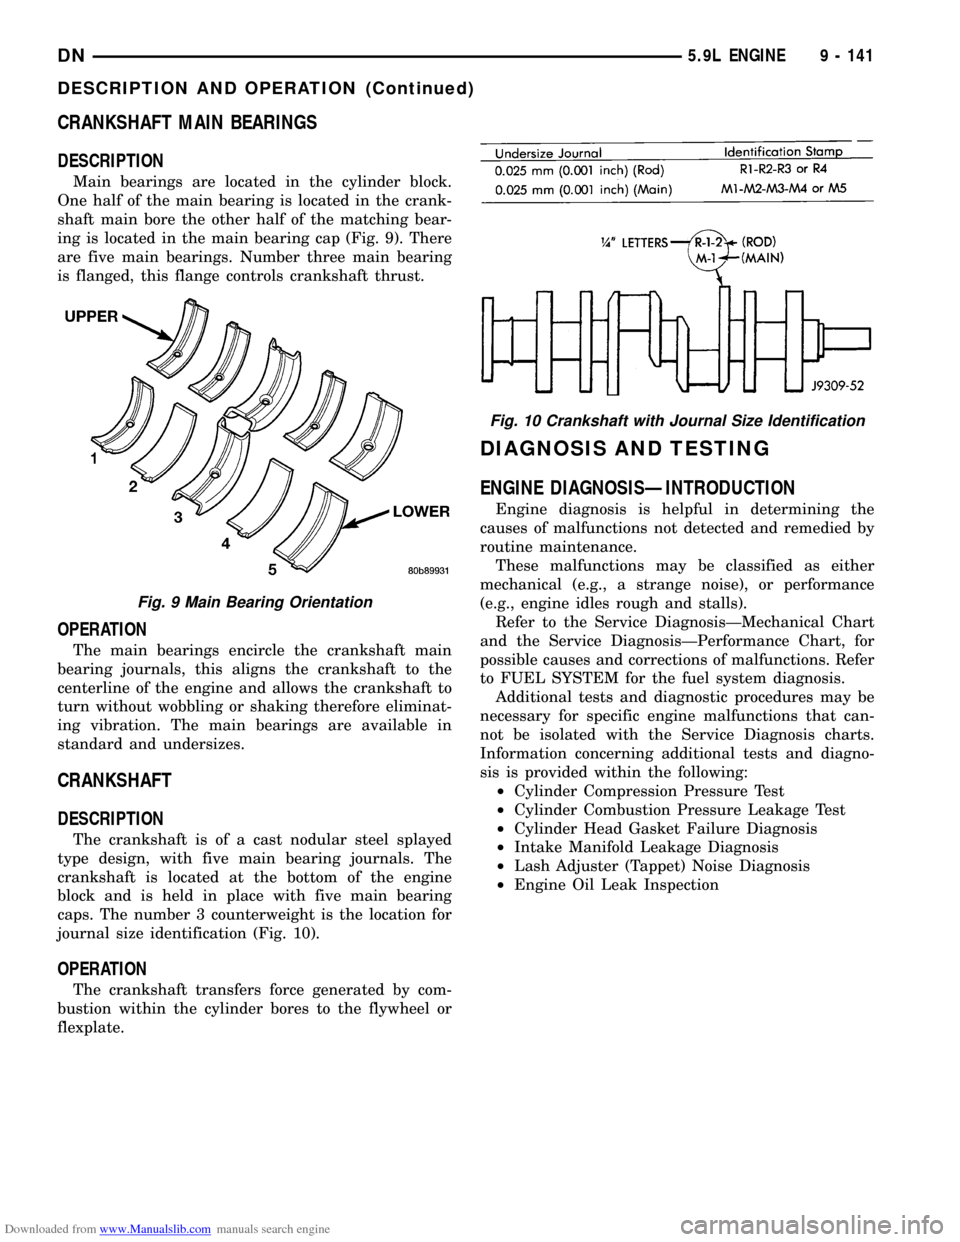
Main bearings are located in the cylinder block.
One half of the main bearing is located in the crank-
shaft main bore the other half of the matching bear-
ing is located in the main bearing cap (Fig. 9). There
are five main bearings. Number three main bearing
is flanged, this flange controls crankshaft thrust.
OPERATION
The main bearings encircle the crankshaft main
bearing journals, this aligns the crankshaft to the
centerline of the engine and allows the crankshaft to
turn without wobbling or shaking therefore eliminat-
ing vibration. The main bearings are available in
standard and undersizes.
CRANKSHAFT
DESCRIPTION
The crankshaft is of a cast nodular steel splayed
type design, with five main bearing journals. The
crankshaft is located at the bottom of the engine
block and is held in place with five main bearing
caps. The number 3 counterweight is the location for
journal size identification (Fig. 10).
OPERATION
The crankshaft transfers force generated by com-
bustion within the cylinder bores to the flywheel or
flexplate.
DIAGNOSIS AND TESTING
ENGINE DIAGNOSISÐINTRODUCTION
Engine diagnosis is helpful in determining the
causes of malfunctions not detected and remedied by
routine maintenance.
These malfunctions may be classified as either
mechanical (e.g., a strange noise), or performance
(e.g., engine idles rough and stalls).
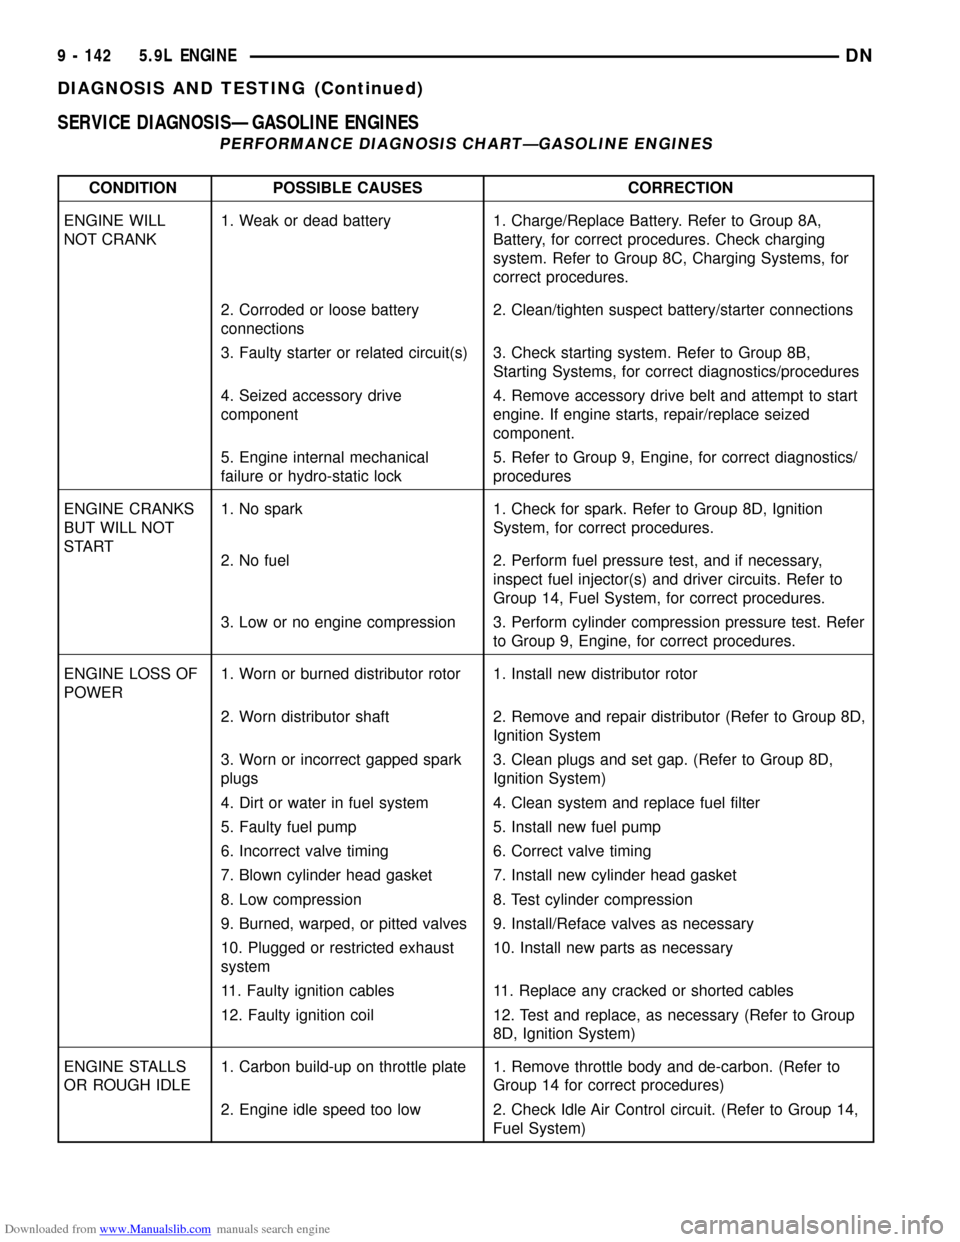
Refer to the Service DiagnosisÐMechanical Chart
and the Service DiagnosisÐPerformance Chart, for
possible causes and corrections of malfunctions. Refer
to FUEL SYSTEM for the fuel system diagnosis.
Additional tests and diagnostic procedures may be
necessary for specific engine malfunctions that can-
not be isolated with the Service Diagnosis charts.
Information concerning additional tests and diagno-
sis is provided within the following:
²Cylinder Compression Pressure Test
²Cylinder Combustion Pressure Leakage Test
²Cylinder Head Gasket Failure Diagnosis
²Intake Manifold Leakage Diagnosis
²Lash Adjuster (Tappet) Noise Diagnosis
²Engine Oil Leak Inspection
Fig. 9 Main Bearing Orientation
Fig. 10 Crankshaft with Journal Size Identification
DN5.9L ENGINE 9 - 141
DESCRIPTION AND OPERATION (Continued)
Page 143 of 193
Downloaded from www.Manualslib.com manuals search engine SERVICE DIAGNOSISÐGASOLINE ENGINES
PERFORMANCE DIAGNOSIS CHARTÐGASOLINE ENGINES
CONDITION POSSIBLE CAUSES CORRECTION
ENGINE WILL
NOT CRANK1. Weak or dead battery 1. Charge/Replace Battery. Refer to Group 8A,
Battery, for correct procedures. Check charging
system. Refer to Group 8C, Charging Systems, for
correct procedures.
2. Corroded or loose battery
connections2. Clean/tighten suspect battery/starter connections
3. Faulty starter or related circuit(s) 3. Check starting system. Refer to Group 8B,
Starting Systems, for correct diagnostics/procedures
4. Seized accessory drive
component4. Remove accessory drive belt and attempt to start
engine. If engine starts, repair/replace seized
component.
5. Engine internal mechanical
failure or hydro-static lock5. Refer to Group 9, Engine, for correct diagnostics/
procedures
ENGINE CRANKS
BUT WILL NOT
START1. No spark 1. Check for spark. Refer to Group 8D, Ignition
System, for correct procedures.
2. No fuel 2. Perform fuel pressure test, and if necessary,
inspect fuel injector(s) and driver circuits. Refer to
Group 14, Fuel System, for correct procedures.
3. Low or no engine compression 3. Perform cylinder compression pressure test. Refer
to Group 9, Engine, for correct procedures.
ENGINE LOSS OF
POWER1. Worn or burned distributor rotor 1. Install new distributor rotor
2. Worn distributor shaft 2. Remove and repair distributor (Refer to Group 8D,
Ignition System
3. Worn or incorrect gapped spark
plugs3. Clean plugs and set gap. (Refer to Group 8D,
Ignition System)
4. Dirt or water in fuel system 4. Clean system and replace fuel filter
5. Faulty fuel pump 5. Install new fuel pump
6. Incorrect valve timing 6. Correct valve timing
7. Blown cylinder head gasket 7. Install new cylinder head gasket
8. Low compression 8. Test cylinder compression
9. Burned, warped, or pitted valves 9. Install/Reface valves as necessary
10. Plugged or restricted exhaust
system10. Install new parts as necessary
11. Faulty ignition cables 11. Replace any cracked or shorted cables
12. Faulty ignition coil 12. Test and replace, as necessary (Refer to Group
8D, Ignition System)
ENGINE STALLS
OR ROUGH IDLE1. Carbon build-up on throttle plate 1. Remove throttle body and de-carbon. (Refer to
Group 14 for correct procedures)
2. Engine idle speed too low 2. Check Idle Air Control circuit. (Refer to Group 14,
Fuel System)
9 - 142 5.9L ENGINEDN
DIAGNOSIS AND TESTING (Continued)
Page 148 of 193
Downloaded from www.Manualslib.com manuals search engine All gauge pressure indications should be equal,
with no more than 25% leakage.
FOR EXAMPLE:At 552 kPa (80 psi) input pres-
sure, a minimum of 414 kPa (60 psi) should be main-
tained in the cylinder.
Refer to the Cylinder Combustion Pressure Leak-
age Test Diagnosis chart.
INSPECTION (ENGINE OIL LEAKS IN GENERAL)
Begin with a through visual inspection of the
engine, particularly at the area of the suspected leak.
If an oil leak source is not readily identifiable, the
following steps should be followed:
(1) Do not clean or degrease the engine at this
time because some solvents may cause rubber to
swell, temporarily stopping the leak.
(2) Add an oil-soluble dye (use as recommended by
manufacturer). Start the engine and let idle for
approximately 15 minutes. Check the oil dipstick to
be sure the dye is thoroughly mixed as indicated
with a bright yellow color under a black light source.
(3) Using a black light, inspect the entire engine
for fluorescent dye, particularly at the suspected area
of oil leak. If the oil leak is found and identified,
repair per service manual instructions.
(4) If dye is not observed, drive the vehicle at var-
ious speeds for approximately 24km (15 miles), and
repeat previous step.
(5) If the oil leak source is not positively identified
at this time, proceed with the air leak detection test
method as follows:
(6) Disconnect the breather cap to air cleaner hose
at the breather cap end. Cap or plug breather cap
nipple.
(7) Remove the PCV valve from the cylinder head
cover. Cap or plug the PCV valve grommet.
(8) Attach an air hose with pressure gauge and
regulator to the dipstick tube.
CAUTION: Do not subject the engine assembly to
more than 20.6 kpa (3 PSI) of test pressure.
(9) Gradually apply air pressure from 1 psi to 2.5
psi maximum while applying soapy water at the sus-
pected source. Adjust the regulator to the suitable
test pressure that provide the best bubbles which
will pinpoint the leak source. If the oil leak is
detected and identified, repair per service manual
procedures.
(10) If the leakage occurs at the rear oil seal area,
refer to the section, Inspection for Rear Seal Area
Leak.
(11) If no leaks are detected, turn off the air sup-
ply and remove the air hose and all plugs and caps.
Install the PCV valve and breather cap hose. Proceed
to next step.(12) Clean the oil off the suspect oil leak area
using a suitable solvent. Drive the vehicle at various
speeds approximately 24 km (15 miles). Inspect the
engine for signs of an oil leak by using a black light.
REAR SEAL AREA LEAKSÐINSPECTION
Since it is sometimes difficult to determine the
source of an oil leak in the rear seal area of the
engine, a more involved inspection is necessary. The
following steps should be followed to help pinpoint
the source of the leak.
If the leakage occurs at the crankshaft rear oil seal
area:
(1) Disconnect the battery.
(2) Raise the vehicle.
(3) Remove torque converter or clutch housing
cover and inspect rear of block for evidence of oil.
Use a black light to check for the oil leak:
(a) Circular spray pattern generally indicates
seal leakage or crankshaft damage.
(b) Where leakage tends to run straight down,
possible causes are a porous block, distributor seal,
camshaft bore cup plugs, oil galley pipe plugs, oil
filter runoff, and main bearing cap to cylinder
block mating surfaces. See Group 9, Engines, for
proper repair procedures of these items.
(4) If no leaks are detected, pressurized the crank-
case as outlined in the section, Inspection (Engine oil
Leaks in general)
CAUTION: Do not exceed 20.6 kPa (3 psi).
(5) If the leak is not detected, very slowly turn the
crankshaft and watch for leakage. If a leak is
detected between the crankshaft and seal while
slowly turning the crankshaft, it is possible the
crankshaft seal surface is damaged. The seal area on
the crankshaft could have minor nicks or scratches
that can be polished out with emery cloth.
CAUTION: Use extreme caution when crankshaft
polishing is necessary to remove minor nicks or
scratches. The crankshaft seal flange is specially
machined to complement the function of the rear oil
seal.
(6) For bubbles that remain steady with shaft
rotation, no further inspection can be done until dis-
assembled. Refer to the service DiagnosisÐMechani-
cal, under the Oil Leak row, for components
inspections on possible causes and corrections.
(7) After the oil leak root cause and appropriate
corrective action have been identified, Refer to Group
9, EnginesÐCrankshaft Rear Oil Seals, for proper
replacement procedures.
DN5.9L ENGINE 9 - 147
DIAGNOSIS AND TESTING (Continued)
Page 149 of 193
Downloaded from www.Manualslib.com manuals search engine HYDRAULIC TAPPETS
Before disassembling any part of the engine to cor-
rect tappet noise, check the oil pressure. If vehicle
has no oil pressure gauge, install a reliable gauge at
the pressure sending-unit. The pressure should be
between 207-552 kPa (30-80 psi) at 3,000 RPM.
Check the oil level after the engine reaches normal
operating temperature. Allow 5 minutes to stabilize
oil level, check dipstick. The oil level in the pan
should never be above the FULL mark or below the
ADD OIL mark on dipstick. Either of these two con-
ditions could be responsible for noisy tappets.
OIL LEVEL
HIGH
If oil level is above the FULL mark, it is possible
for the connecting rods to dip into the oil. With the
engine running, this condition could create foam in
the oil pan. Foam in oil pan would be fed to the
hydraulic tappets by the oil pump causing them to
lose length and allow valves to seat noisily.
LOW
Low oil level may allow oil pump to take in air.
When air is fed to the tappets, they lose length,
which allows valves to seat noisily. Any leaks on
intake side of oil pump through which air can be
drawn will create the same tappet action. Check the
lubrication system from the intake strainer to the
pump cover, including the relief valve retainer cap.
When tappet noise is due to aeration, it may be
intermittent or constant, and usually more than one
tappet will be noisy. When oil level and leaks have
been corrected, operate the engine at fast idle. Run
engine for a sufficient time to allow all of the air
inside the tappets to be bled out.
TAPPET NOISE DIAGNOSIS
(1) To determine source of tappet noise, operate
engine at idle with cylinder head covers removed.
(2) Feel each valve spring or rocker arm to detect
noisy tappet. The noisy tappet will cause the affected
spring and/or rocker arm to vibrate or feel rough in
operation.
NOTE: Worn valve guides or cocked springs are
sometimes mistaken for noisy tappets. If such is
the case, noise may be dampened by applying side
thrust on the valve spring. If noise is not apprecia-
bly reduced, it can be assumed the noise is in the
tappet. Inspect the rocker arm push rod sockets
and push rod ends for wear.
(3) Valve tappet noise ranges from light noise to a
heavy click. A light noise is usually caused by exces-
sive leak-down around the unit plunger, or by theplunger partially sticking in the tappet body cylinder.
The tappet should be replaced. A heavy click is
caused by a tappet check valve not seating, or by for-
eign particles wedged between the plunger and the
tappet body. This will cause the plunger to stick in
the down position. This heavy click will be accompa-
nied by excessive clearance between the valve stem
and rocker arm as valve closes. In either case, tappet
assembly should be removed for inspection and clean-
ing.
(4) The valve train generates a noise very much
like a light tappet noise during normal operation.
Care must be taken to ensure that tappets are mak-
ing the noise. If more than one tappet seems to be
noisy, it's probably not the tappets.
LEAK-DOWN TEST
After cleaning and inspection, test each tappet for
specified leak-down rate tolerance to ensure zero-lash
operation (Fig. 11).
Swing the weighted arm of the hydraulic valve tap-
pet tester away from the ram of the Universal Leak-
Down Tester.
(1) Place a 7.925-7.950 mm (0.312-0.313 inch)
diameter ball bearing on the plunger cap of the tap-
pet.
(2) Lift the ram and position the tappet (with the
ball bearing) inside the tester cup.
(3) Lower the ram, then adjust the nose of the ram
until it contacts the ball bearing. DO NOT tighten
the hex nut on the ram.
(4) Fill the tester cup with hydraulic valve tappet
test oil until the tappet is completely submerged.
(5) Swing the weighted arm onto the push rod and
pump the tappet plunger up and down to remove air.
When the air bubbles cease, swing the weighted arm
away and allow the plunger to rise to the normal
position.
(6) Adjust the nose of the ram to align the pointer
with the SET mark on the scale of the tester and
tighten the hex nut.
(7) Slowly swing the weighted arm onto the push
rod.
(8) Rotate the cup by turning the handle at the
base of the tester clockwise one revolution every 2
seconds.
(9) Observe the leak-down time interval from the
instant the pointer aligns with the START mark on
the scale until the pointer aligns with the 0.125
mark. A normally functioning tappet will require
20-110 seconds to leak-down. Discard tappets with
leak-down time interval not within this specification.
ENGINE OIL PRESSURE
(1) Remove oil pressure sending unit.
9 - 148 5.9L ENGINEDN
DIAGNOSIS AND TESTING (Continued)