No bus DODGE DURANGO 2000 1.G User Guide
[x] Cancel search | Manufacturer: DODGE, Model Year: 2000, Model line: DURANGO, Model: DODGE DURANGO 2000 1.GPages: 193, PDF Size: 5.65 MB
Page 90 of 193

Downloaded from www.Manualslib.com manuals search engine CYLINDER HEAD COVER GASKET
DESCRIPTION
The cylinder head cover gasket is a steel-backed
silicone gasket, designed for long life usage (Fig. 7).
OPERATION
The steel-backed silicone gasket is designed to seal
the cylinder head cover for long periods of time
through extensive heat and cold, without failure. The
gasket is designed to be reusable.
CYLINDER HEAD
DESCRIPTION
The cast iron cylinder heads are mounted to the
cylinder block using ten bolts (Fig. 8). The spark
plugs are located in the peak of the wedge between
the valves.
OPERATION
The cylinder head closes the combustion chamber
allowing the pistons to compress the air fuel mixture
to the correct ratio for ignition. The valves located in
the cylinder head open and close to either allow clean
air into the combustion chamber or to allow the
exhaust gases out, depending on the stroke of the
engine.
VALVES AND VALVE SPRINGS
DESCRIPTION
Both the intake and exhaust valves are made of
steel. The intake valve is 48.768 mm (1.92 inches) in
diameter and the exhaust valve is 41.148 mm (1.62
inches) in diameter and has a 2.032 mm (0.080 inch)
wafer interia welded to the tip for durability. These
valves are not splayed.
ENGINE OIL PAN
DESCRIPTION
The stamped steel engine oil pan is located at the
bottom of the engine, and contains a drain plug for
draining the engine oil.
OPERATION
The oil pan holds the engine oil and seals and pro-
tects the engine lower components from contami-
nates.
CRANKSHAFT OIL SEALS
DESCRIPTION
The crankshaft rear seal is a two piece viton seal.
The crankshaft front seal is a one piece viton seal
with a steel housing. The front seal is located in the
engine front cover. One part of the two piece rear
seal is located in a slot in the number five (5) crank-
shaft main bore, the second part of the two piece seal
is located in the number five (5) main bearing cap.
OPERATION
The crankshaft seals prevent oil from leaking from
around the crankshaft, either from the rear of the
engine or from the engine front cover.
PISTON AND CONNECTING ROD
DESCRIPTION
The pistons are made of aluminum and have three
ring grooves, the top two grooves are for the compres-
sion rings and the bottom groove is for the oil control
ring. The connecting rods are forged steel and are
coined prior to heat treat. The piston pins are press
fit.
Fig. 7 Cylinder Head Cover Gasket V-8 Gas Engines
1 ± CYLINDER HEAD COVER GASKET
Fig. 8 Cylinder Head AssemblyÐV-8 Gas Engines
1 ± EXHAUST VALVE
2 ± SPARK PLUGS
3 ± EXHAUST VALVES
4 ± SPARK PLUGS
5 ± EXHAUST VALVE
6 ± INTAKE VALVES
7 ± INTAKE VALVES
9 - 90 5.2L ENGINEDN
DESCRIPTION AND OPERATION (Continued)
Page 91 of 193
Downloaded from www.Manualslib.com manuals search engine CRANKSHAFT MAIN BEARINGS
DESCRIPTION
Main bearings are located in the cylinder block.
One half of the main bearing is located in the crank-
shaft main bore the other half of the matching bear-
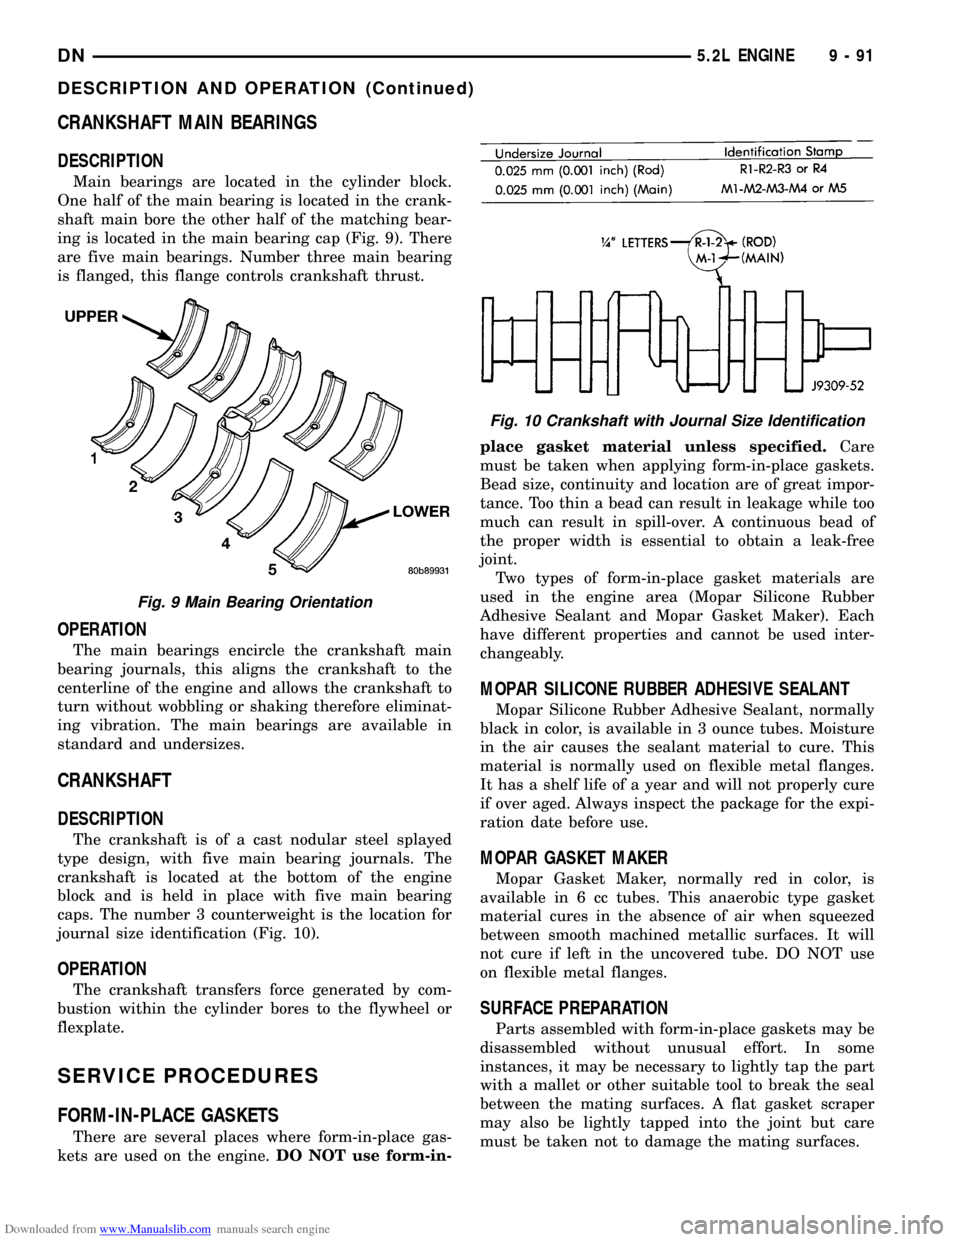
ing is located in the main bearing cap (Fig. 9). There
are five main bearings. Number three main bearing
is flanged, this flange controls crankshaft thrust.
OPERATION
The main bearings encircle the crankshaft main
bearing journals, this aligns the crankshaft to the
centerline of the engine and allows the crankshaft to
turn without wobbling or shaking therefore eliminat-
ing vibration. The main bearings are available in
standard and undersizes.
CRANKSHAFT
DESCRIPTION
The crankshaft is of a cast nodular steel splayed
type design, with five main bearing journals. The
crankshaft is located at the bottom of the engine
block and is held in place with five main bearing
caps. The number 3 counterweight is the location for
journal size identification (Fig. 10).
OPERATION
The crankshaft transfers force generated by com-
bustion within the cylinder bores to the flywheel or
flexplate.
SERVICE PROCEDURES
FORM-IN-PLACE GASKETS
There are several places where form-in-place gas-
kets are used on the engine.DO NOT use form-in-place gasket material unless specified.Care
must be taken when applying form-in-place gaskets.
Bead size, continuity and location are of great impor-
tance. Too thin a bead can result in leakage while too
much can result in spill-over. A continuous bead of
the proper width is essential to obtain a leak-free
joint.
Two types of form-in-place gasket materials are
used in the engine area (Mopar Silicone Rubber
Adhesive Sealant and Mopar Gasket Maker). Each
have different properties and cannot be used inter-
changeably.
MOPAR SILICONE RUBBER ADHESIVE SEALANT
Mopar Silicone Rubber Adhesive Sealant, normally
black in color, is available in 3 ounce tubes. Moisture
in the air causes the sealant material to cure. This
material is normally used on flexible metal flanges.
It has a shelf life of a year and will not properly cure
if over aged. Always inspect the package for the expi-
ration date before use.
MOPAR GASKET MAKER
Mopar Gasket Maker, normally red in color, is
available in 6 cc tubes. This anaerobic type gasket
material cures in the absence of air when squeezed
between smooth machined metallic surfaces. It will
not cure if left in the uncovered tube. DO NOT use
on flexible metal flanges.
SURFACE PREPARATION
Parts assembled with form-in-place gaskets may be
disassembled without unusual effort. In some
instances, it may be necessary to lightly tap the part
with a mallet or other suitable tool to break the seal
between the mating surfaces. A flat gasket scraper
may also be lightly tapped into the joint but care
must be taken not to damage the mating surfaces.
Fig. 9 Main Bearing Orientation
Fig. 10 Crankshaft with Journal Size Identification
DN5.2L ENGINE 9 - 91
DESCRIPTION AND OPERATION (Continued)
Page 92 of 193

Downloaded from www.Manualslib.com manuals search engine Scrape or wire brush all gasket surfaces to remove
all loose material. Inspect stamped parts to ensure
gasket rails are flat. Flatten rails with a hammer on
a flat plate, if required. Gasket surfaces must be free
of oil and dirt. Make sure the old gasket material is
removed from blind attaching holes.
GASKET APPLICATION
Assembling parts using a form-in-place gasket
requires care.
Mopar Silicone Rubber Adhesive Sealant should be
applied in a continuous bead approximately 3 mm
(0.12 inch) in diameter. All mounting holes must be
circled. For corner sealing,a3or6mm(1/8 or 1/4
inch) drop is placed in the center of the gasket con-
tact area. Uncured sealant may be removed with a
shop towel. Components should be torqued in place
while the sealant is still wet to the touch (within 10
minutes). The use of a locating dowel is recom-
mended during assembly to prevent smearing the
material off location.
Mopar Gasket Maker should be applied sparingly
to one gasket surface. The sealant diameter should
be 1.00 mm (0.04 inch) or less. Be certain the mate-
rial surrounds each mounting hole. Excess material
can easily be wiped off. Components should be
torqued in place within 15 minutes. The use of a
locating dowel is recommended during assembly to
prevent smearing the material off location.
ENGINE PERFORMANCE
It is important that the vehicle is operating to its
optimum performance level to maintain fuel economy
and the lowest emission levels. If vehicle is not oper-
ating to these standards, refer to Engine Diagnosis
outlined in this section. The following procedures can
assist in achieving the proper engine diagnosis.
(1) Test cranking amperage draw. Refer to Electri-
cal Group 8B, Cold Cranking Test.
(2) Check intake manifold bolt torque.
(3) Perform cylinder compression test. Refer to
Cylinder Compression Pressure Test in the Engine
Diagnosis area of this section.
(4) Clean or replace spark plugs as necessary and
adjust gap as specified in Electrical Group 8D.
Tighten to specifications.
(5) Test resistance of spark plug cables. Refer to
Electrical Group 8D, Spark Plug Cables.
(6) Inspect the primary wires. Test coil output volt-
age and primary resistance. Replace parts as neces-
sary. Refer to Electrical Group 8D, for specifications.
(7) Test fuel pump for pressure. Refer to Group 14,
Fuel System Specifications.
(8) The air filter elements should be replaced as
specified in Lubrication and Maintenance, Group 0.(9) Inspect crankcase ventilation system as out
lined in Group 0, Lubrication and Maintenance. For
emission controls see Group 25, Emission Controls
for service procedures.
(10) Road test vehicle as a final test.
ENGINE OIL
WARNING: NEW OR USED ENGINE OIL CAN BE
IRRITATING TO THE SKIN. AVOID PROLONGED OR
REPEATED SKIN CONTACT WITH ENGINE OIL.
CONTAMINANTS IN USED ENGINE OIL, CAUSED BY
INTERNAL COMBUSTION, CAN BE HAZARDOUS TO
YOUR HEALTH. THOROUGHLY WASH EXPOSED
SKIN WITH SOAP AND WATER. DO NOT WASH
SKIN WITH GASOLINE, DIESEL FUEL, THINNER, OR
SOLVENTS, HEALTH PROBLEMS CAN RESULT. DO
NOT POLLUTE, DISPOSE OF USED ENGINE OIL
PROPERLY.
ENGINE OIL SPECIFICATION
CAUTION: Do not use non-detergent or straight
mineral oil when adding or changing crankcase
lubricant. Engine failure can result.
API SERVICE GRADE CERTIFIED
In gasoline engines, use an engine oil that is API
Service Grade Certified (Fig. 11). Standard engine oil
identification notations have been adopted to aid in
the proper selection of engine oil. The identifying
notations are located on the label of engine oil plastic
bottles and the top of engine oil cans. MOPAR only
provides engine oil that conforms to this certification.
SAE VISCOSITY
An SAE viscosity grade is used to specify the vis-
cosity of engine oil. SAE 10W-30 specifies a multiple
viscosity engine oil. These are specified with a dual
SAE viscosity grade which indicates the cold-to-hot
temperature viscosity range. When choosing an
engine oil, consider the range of temperatures the
vehicle will be operated in before the next oil change.
Select an engine oil that is best suited to your area's
Fig. 11 Engine Oil Container Standard Notations
9 - 92 5.2L ENGINEDN
SERVICE PROCEDURES (Continued)
Page 114 of 193
Downloaded from www.Manualslib.com manuals search engine INSTALLATION
Only one main bearing should be selectively fitted
while all other main bearing caps are properly tight-
ened. All bearing capbolts removed during service pro-
cedures are to be cleaned and oiled before installation.
When installing a new upper bearing shell, slightly
chamfer the sharp edges from the plain side.
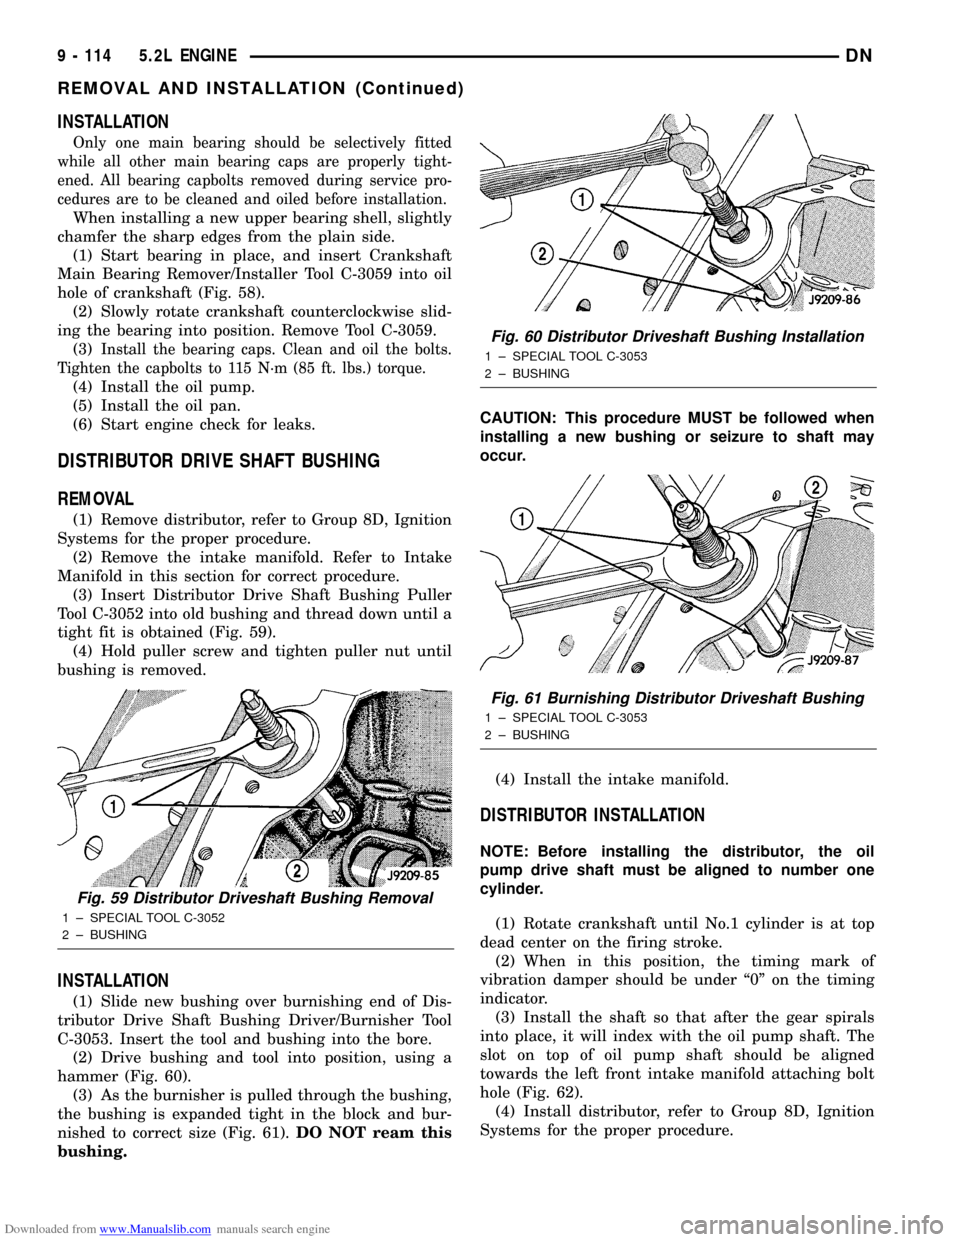
(1) Start bearing in place, and insert Crankshaft
Main Bearing Remover/Installer Tool C-3059 into oil
hole of crankshaft (Fig. 58).
(2) Slowly rotate crankshaft counterclockwise slid-
ing the bearing into position. Remove Tool C-3059.
(3)
Install the bearing caps. Clean and oil the bolts.
Tighten the capbolts to 115 N´m (85 ft. lbs.) torque.
(4) Install the oil pump.
(5) Install the oil pan.
(6) Start engine check for leaks.
DISTRIBUTOR DRIVE SHAFT BUSHING
REMOVAL
(1) Remove distributor, refer to Group 8D, Ignition
Systems for the proper procedure.
(2) Remove the intake manifold. Refer to Intake
Manifold in this section for correct procedure.
(3) Insert Distributor Drive Shaft Bushing Puller
Tool C-3052 into old bushing and thread down until a
tight fit is obtained (Fig. 59).
(4) Hold puller screw and tighten puller nut until
bushing is removed.
INSTALLATION
(1) Slide new bushing over burnishing end of Dis-
tributor Drive Shaft Bushing Driver/Burnisher Tool
C-3053. Insert the tool and bushing into the bore.
(2) Drive bushing and tool into position, using a
hammer (Fig. 60).
(3) As the burnisher is pulled through the bushing,
the bushing is expanded tight in the block and bur-
nished to correct size (Fig. 61).DO NOT ream this
bushing.CAUTION: This procedure MUST be followed when
installing a new bushing or seizure to shaft may
occur.
(4) Install the intake manifold.
DISTRIBUTOR INSTALLATION
NOTE: Before installing the distributor, the oil
pump drive shaft must be aligned to number one
cylinder.
(1) Rotate crankshaft until No.1 cylinder is at top
dead center on the firing stroke.
(2) When in this position, the timing mark of
vibration damper should be under ª0º on the timing
indicator.
(3) Install the shaft so that after the gear spirals
into place, it will index with the oil pump shaft. The
slot on top of oil pump shaft should be aligned
towards the left front intake manifold attaching bolt
hole (Fig. 62).
(4) Install distributor, refer to Group 8D, Ignition
Systems for the proper procedure.
Fig. 59 Distributor Driveshaft Bushing Removal
1 ± SPECIAL TOOL C-3052
2 ± BUSHING
Fig. 60 Distributor Driveshaft Bushing Installation
1 ± SPECIAL TOOL C-3053
2 ± BUSHING
Fig. 61 Burnishing Distributor Driveshaft Bushing
1 ± SPECIAL TOOL C-3053
2 ± BUSHING
9 - 114 5.2L ENGINEDN
REMOVAL AND INSTALLATION (Continued)
Page 129 of 193
Downloaded from www.Manualslib.com manuals search engine SPECIFICATIONS
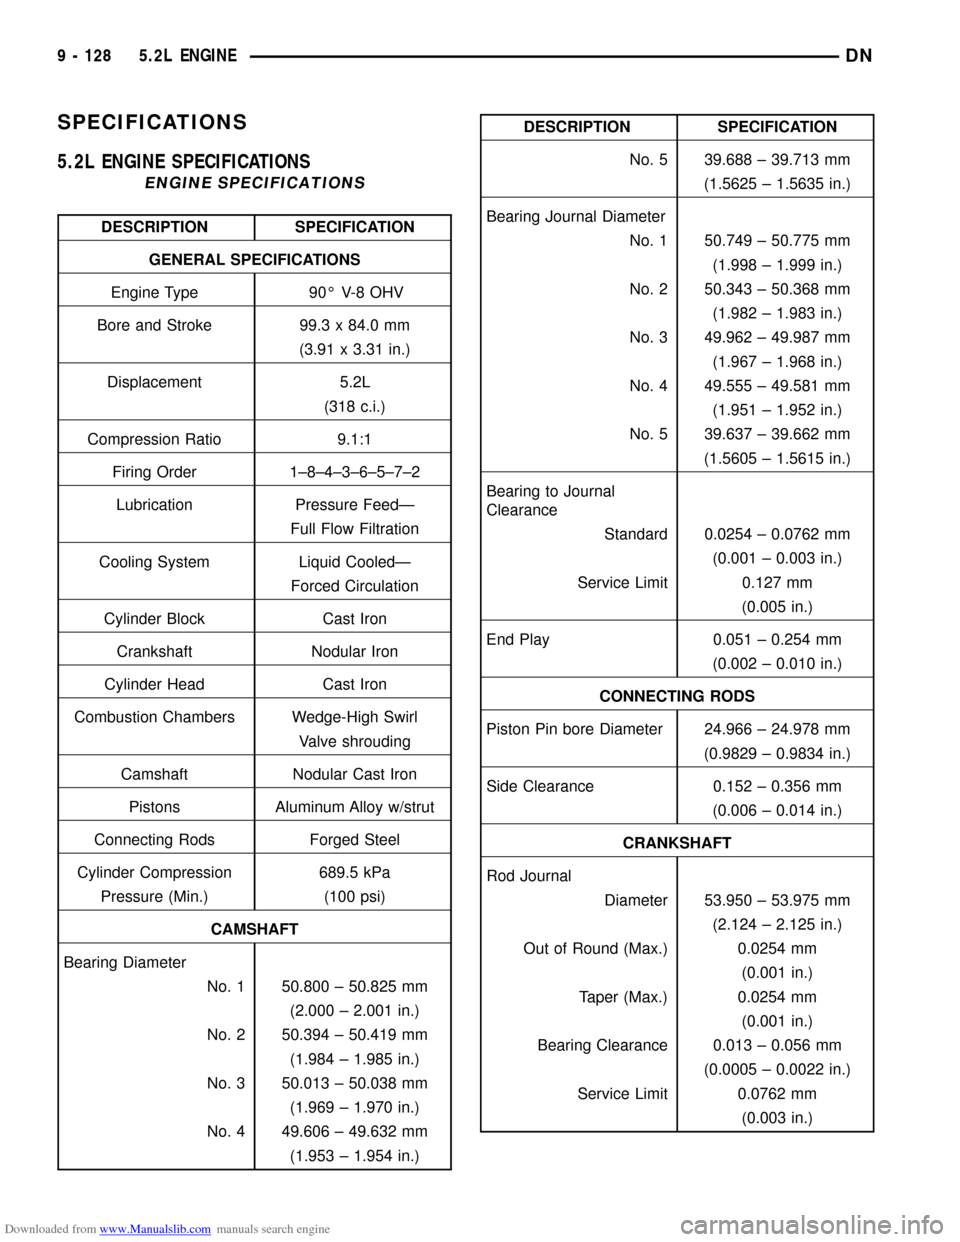
5.2L ENGINE SPECIFICATIONS
ENGINE SPECIFICATIONS
DESCRIPTION SPECIFICATION
GENERAL SPECIFICATIONS
Engine Type 90É V-8 OHV
Bore and Stroke 99.3 x 84.0 mm
(3.91 x 3.31 in.)
Displacement 5.2L
(318 c.i.)
Compression Ratio 9.1:1
Firing Order 1±8±4±3±6±5±7±2
Lubrication Pressure FeedÐ
Full Flow Filtration
Cooling System Liquid CooledÐ
Forced Circulation
Cylinder Block Cast Iron
Crankshaft Nodular Iron
Cylinder Head Cast Iron
Combustion Chambers Wedge-High Swirl
Valve shrouding
Camshaft Nodular Cast Iron
Pistons Aluminum Alloy w/strut
Connecting Rods Forged Steel
Cylinder Compression 689.5 kPa
Pressure (Min.) (100 psi)
CAMSHAFT
Bearing Diameter
No. 1 50.800 ± 50.825 mm
(2.000 ± 2.001 in.)
No. 2 50.394 ± 50.419 mm
(1.984 ± 1.985 in.)
No. 3 50.013 ± 50.038 mm
(1.969 ± 1.970 in.)
No. 4 49.606 ± 49.632 mm
(1.953 ± 1.954 in.)
DESCRIPTION SPECIFICATION
No. 5 39.688 ± 39.713 mm
(1.5625 ± 1.5635 in.)
Bearing Journal Diameter
No. 1 50.749 ± 50.775 mm
(1.998 ± 1.999 in.)
No. 2 50.343 ± 50.368 mm
(1.982 ± 1.983 in.)
No. 3 49.962 ± 49.987 mm
(1.967 ± 1.968 in.)
No. 4 49.555 ± 49.581 mm
(1.951 ± 1.952 in.)
No. 5 39.637 ± 39.662 mm
(1.5605 ± 1.5615 in.)
Bearing to Journal
Clearance
Standard 0.0254 ± 0.0762 mm
(0.001 ± 0.003 in.)
Service Limit 0.127 mm
(0.005 in.)
End Play 0.051 ± 0.254 mm
(0.002 ± 0.010 in.)
CONNECTING RODS
Piston Pin bore Diameter 24.966 ± 24.978 mm
(0.9829 ± 0.9834 in.)
Side Clearance 0.152 ± 0.356 mm
(0.006 ± 0.014 in.)
CRANKSHAFT
Rod Journal
Diameter 53.950 ± 53.975 mm
(2.124 ± 2.125 in.)
Out of Round (Max.) 0.0254 mm
(0.001 in.)
Taper (Max.) 0.0254 mm
(0.001 in.)
Bearing Clearance 0.013 ± 0.056 mm
(0.0005 ± 0.0022 in.)
Service Limit 0.0762 mm
(0.003 in.)
9 - 128 5.2L ENGINEDN
Page 130 of 193
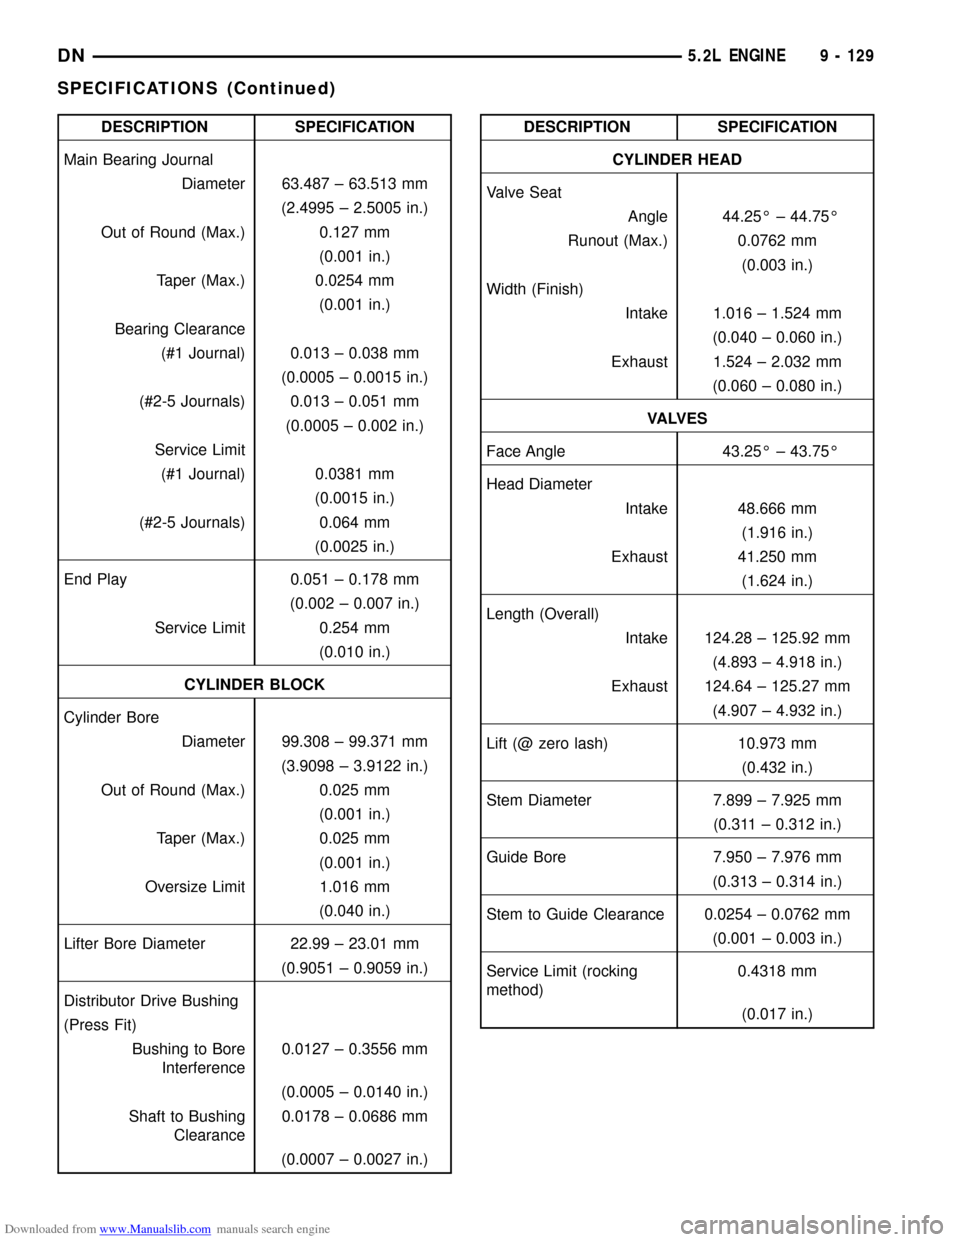
Downloaded from www.Manualslib.com manuals search engine DESCRIPTION SPECIFICATION
Main Bearing Journal
Diameter 63.487 ± 63.513 mm
(2.4995 ± 2.5005 in.)
Out of Round (Max.) 0.127 mm
(0.001 in.)
Taper (Max.) 0.0254 mm
(0.001 in.)
Bearing Clearance
(#1 Journal) 0.013 ± 0.038 mm
(0.0005 ± 0.0015 in.)
(#2-5 Journals) 0.013 ± 0.051 mm
(0.0005 ± 0.002 in.)
Service Limit
(#1 Journal) 0.0381 mm
(0.0015 in.)
(#2-5 Journals) 0.064 mm
(0.0025 in.)
End Play 0.051 ± 0.178 mm
(0.002 ± 0.007 in.)
Service Limit 0.254 mm
(0.010 in.)
CYLINDER BLOCK
Cylinder Bore
Diameter 99.308 ± 99.371 mm
(3.9098 ± 3.9122 in.)
Out of Round (Max.) 0.025 mm
(0.001 in.)
Taper (Max.) 0.025 mm
(0.001 in.)
Oversize Limit 1.016 mm
(0.040 in.)
Lifter Bore Diameter 22.99 ± 23.01 mm
(0.9051 ± 0.9059 in.)
Distributor Drive Bushing
(Press Fit)
Bushing to Bore
Interference0.0127 ± 0.3556 mm
(0.0005 ± 0.0140 in.)
Shaft to Bushing
Clearance0.0178 ± 0.0686 mm
(0.0007 ± 0.0027 in.)DESCRIPTION SPECIFICATION
CYLINDER HEAD
Valve Seat
Angle 44.25É ± 44.75É
Runout (Max.) 0.0762 mm
(0.003 in.)
Width (Finish)
Intake 1.016 ± 1.524 mm
(0.040 ± 0.060 in.)
Exhaust 1.524 ± 2.032 mm
(0.060 ± 0.080 in.)
VA LV E S
Face Angle 43.25É ± 43.75É
Head Diameter
Intake 48.666 mm
(1.916 in.)
Exhaust 41.250 mm
(1.624 in.)
Length (Overall)
Intake 124.28 ± 125.92 mm
(4.893 ± 4.918 in.)
Exhaust 124.64 ± 125.27 mm
(4.907 ± 4.932 in.)
Lift (@ zero lash) 10.973 mm
(0.432 in.)
Stem Diameter 7.899 ± 7.925 mm
(0.311 ± 0.312 in.)
Guide Bore 7.950 ± 7.976 mm
(0.313 ± 0.314 in.)
Stem to Guide Clearance 0.0254 ± 0.0762 mm
(0.001 ± 0.003 in.)
Service Limit (rocking
method)0.4318 mm
(0.017 in.)
DN5.2L ENGINE 9 - 129
SPECIFICATIONS (Continued)
Page 135 of 193

Downloaded from www.Manualslib.com manuals search engine Distributor Bushing Puller C-3052
Distributor Bushing Driver/Burnisher C-3053
Piston Ring Compressor C-385
Crankshaft Main Bearing Remover C-3059
Cylinder Bore Gauge C-119
9 - 134 5.2L ENGINEDN
SPECIAL TOOLS (Continued)
Page 136 of 193
Downloaded from www.Manualslib.com manuals search engine 5.9L ENGINE
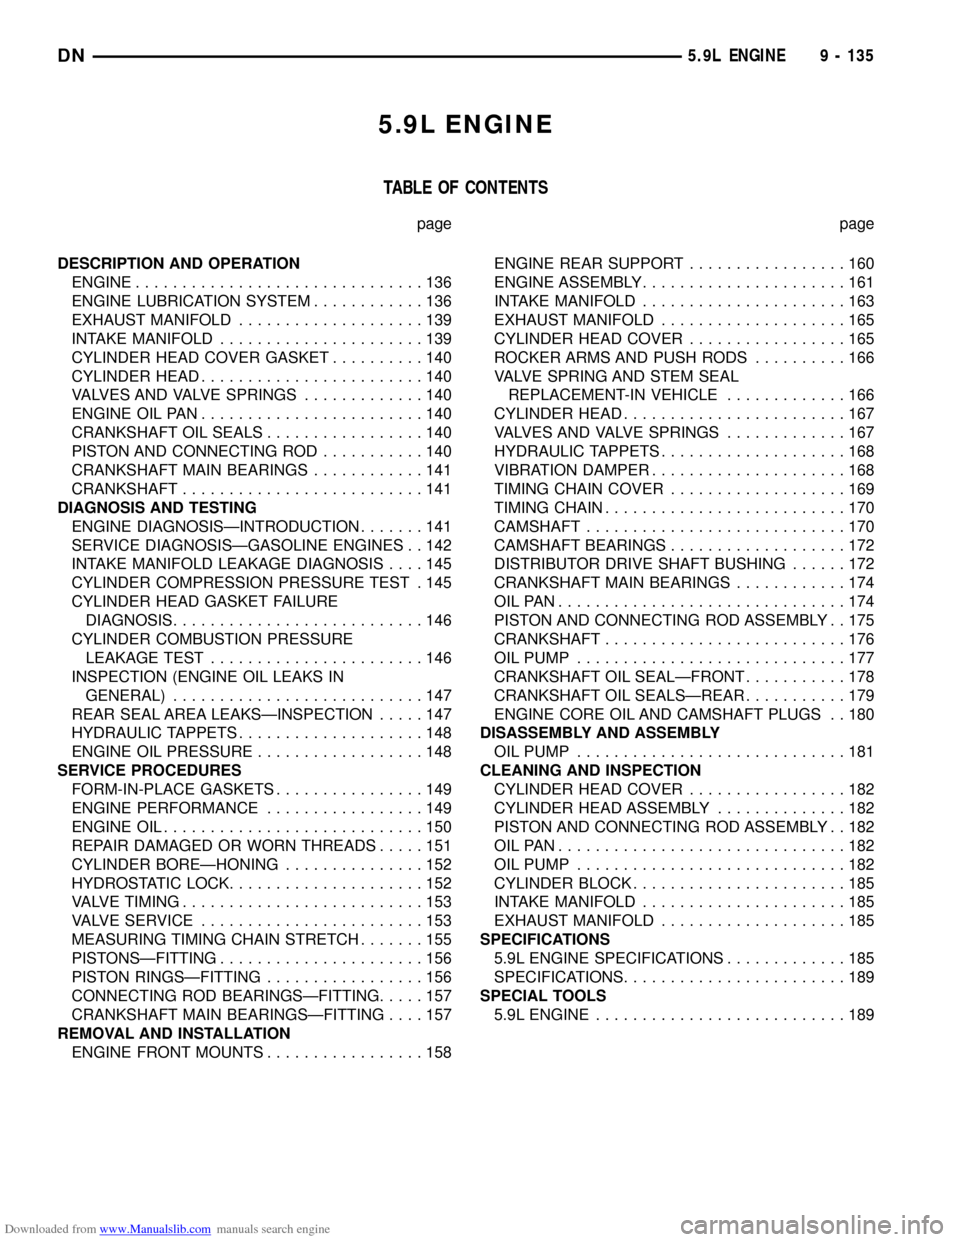
TABLE OF CONTENTS
page page
DESCRIPTION AND OPERATION
ENGINE...............................136
ENGINE LUBRICATION SYSTEM............136
EXHAUST MANIFOLD....................139
INTAKE MANIFOLD......................139
CYLINDER HEAD COVER GASKET..........140
CYLINDER HEAD........................140
VALVES AND VALVE SPRINGS.............140
ENGINE OIL PAN........................140
CRANKSHAFT OIL SEALS.................140
PISTON AND CONNECTING ROD...........140
CRANKSHAFT MAIN BEARINGS............141
CRANKSHAFT..........................141
DIAGNOSIS AND TESTING
ENGINE DIAGNOSISÐINTRODUCTION.......141
SERVICE DIAGNOSISÐGASOLINE ENGINES . . 142
INTAKE MANIFOLD LEAKAGE DIAGNOSIS....145
CYLINDER COMPRESSION PRESSURE TEST . 145
CYLINDER HEAD GASKET FAILURE
DIAGNOSIS...........................146
CYLINDER COMBUSTION PRESSURE
LEAKAGE TEST.......................146
INSPECTION (ENGINE OIL LEAKS IN
GENERAL)...........................147
REAR SEAL AREA LEAKSÐINSPECTION.....147
HYDRAULIC TAPPETS....................148
ENGINE OIL PRESSURE..................148
SERVICE PROCEDURES
FORM-IN-PLACE GASKETS................149
ENGINE PERFORMANCE.................149
ENGINE OIL............................150
REPAIR DAMAGED OR WORN THREADS.....151
CYLINDER BOREÐHONING...............152
HYDROSTATIC LOCK.....................152
VALVE TIMING..........................153
VALVE SERVICE........................153
MEASURING TIMING CHAIN STRETCH.......155
PISTONSÐFITTING......................156
PISTON RINGSÐFITTING.................156
CONNECTING ROD BEARINGSÐFITTING.....157
CRANKSHAFT MAIN BEARINGSÐFITTING....157
REMOVAL AND INSTALLATION
ENGINE FRONT MOUNTS.................158ENGINE REAR SUPPORT.................160
ENGINE ASSEMBLY......................161
INTAKE MANIFOLD......................163
EXHAUST MANIFOLD....................165
CYLINDER HEAD COVER.................165
ROCKER ARMS AND PUSH RODS..........166
VALVE SPRING AND STEM SEAL
REPLACEMENT-IN VEHICLE.............166
CYLINDER HEAD........................167
VALVES AND VALVE SPRINGS.............167
HYDRAULIC TAPPETS....................168
VIBRATION DAMPER.....................168
TIMING CHAIN COVER...................169
TIMING CHAIN..........................170
CAMSHAFT............................170
CAMSHAFT BEARINGS...................172
DISTRIBUTOR DRIVE SHAFT BUSHING......172
CRANKSHAFT MAIN BEARINGS............174
OILPAN...............................174
PISTON AND CONNECTING ROD ASSEMBLY . . 175
CRANKSHAFT..........................176
OIL PUMP.............................177
CRANKSHAFT OIL SEALÐFRONT...........178
CRANKSHAFT OIL SEALSÐREAR...........179
ENGINE CORE OIL AND CAMSHAFT PLUGS . . 180
DISASSEMBLY AND ASSEMBLY
OIL PUMP.............................181
CLEANING AND INSPECTION
CYLINDER HEAD COVER.................182
CYLINDER HEAD ASSEMBLY..............182
PISTON AND CONNECTING ROD ASSEMBLY . . 182
OILPAN...............................182
OIL PUMP.............................182
CYLINDER BLOCK.......................185
INTAKE MANIFOLD......................185
EXHAUST MANIFOLD....................185
SPECIFICATIONS
5.9L ENGINE SPECIFICATIONS.............185
SPECIFICATIONS........................189
SPECIAL TOOLS
5.9L ENGINE...........................189
DN5.9L ENGINE 9 - 135
Page 140 of 193
Downloaded from www.Manualslib.com manuals search engine EXHAUST MANIFOLD
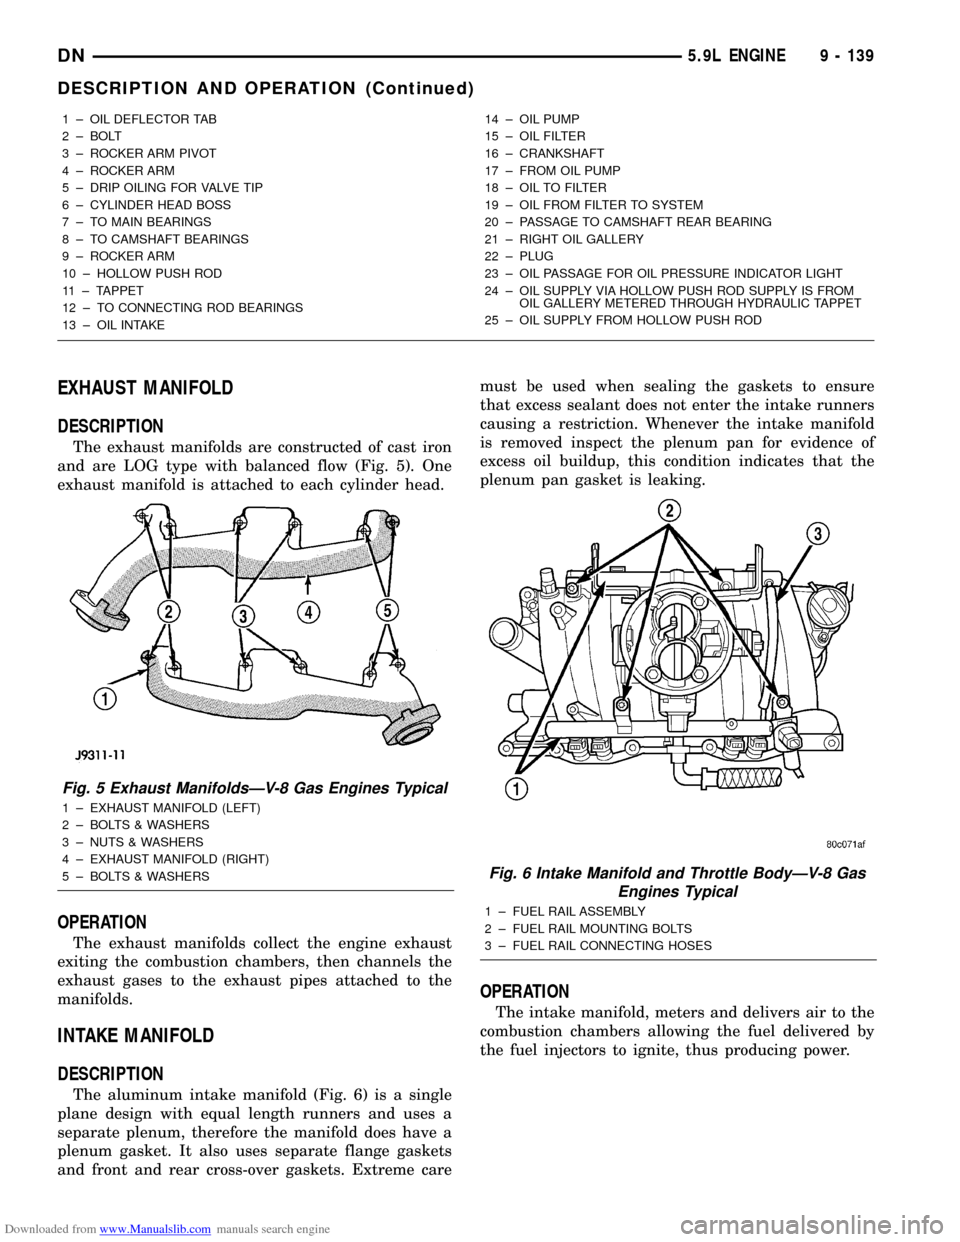
DESCRIPTION
The exhaust manifolds are constructed of cast iron
and are LOG type with balanced flow (Fig. 5). One
exhaust manifold is attached to each cylinder head.
OPERATION
The exhaust manifolds collect the engine exhaust
exiting the combustion chambers, then channels the
exhaust gases to the exhaust pipes attached to the
manifolds.
INTAKE MANIFOLD
DESCRIPTION
The aluminum intake manifold (Fig. 6) is a single
plane design with equal length runners and uses a
separate plenum, therefore the manifold does have a
plenum gasket. It also uses separate flange gaskets
and front and rear cross-over gaskets. Extreme caremust be used when sealing the gaskets to ensure
that excess sealant does not enter the intake runners
causing a restriction. Whenever the intake manifold
is removed inspect the plenum pan for evidence of
excess oil buildup, this condition indicates that the
plenum pan gasket is leaking.
OPERATION
The intake manifold, meters and delivers air to the
combustion chambers allowing the fuel delivered by
the fuel injectors to ignite, thus producing power.
1 ± OIL DEFLECTOR TAB
2 ± BOLT
3 ± ROCKER ARM PIVOT
4 ± ROCKER ARM
5 ± DRIP OILING FOR VALVE TIP
6 ± CYLINDER HEAD BOSS
7 ± TO MAIN BEARINGS
8 ± TO CAMSHAFT BEARINGS
9 ± ROCKER ARM
10 ± HOLLOW PUSH ROD
11 ± TAPPET
12 ± TO CONNECTING ROD BEARINGS
13 ± OIL INTAKE14 ± OIL PUMP
15 ± OIL FILTER
16 ± CRANKSHAFT
17 ± FROM OIL PUMP
18 ± OIL TO FILTER
19 ± OIL FROM FILTER TO SYSTEM
20 ± PASSAGE TO CAMSHAFT REAR BEARING
21 ± RIGHT OIL GALLERY
22 ± PLUG
23 ± OIL PASSAGE FOR OIL PRESSURE INDICATOR LIGHT
24 ± OIL SUPPLY VIA HOLLOW PUSH ROD SUPPLY IS FROM
OIL GALLERY METERED THROUGH HYDRAULIC TAPPET
25 ± OIL SUPPLY FROM HOLLOW PUSH ROD
Fig. 5 Exhaust ManifoldsÐV-8 Gas Engines Typical
1 ± EXHAUST MANIFOLD (LEFT)
2 ± BOLTS & WASHERS
3 ± NUTS & WASHERS
4 ± EXHAUST MANIFOLD (RIGHT)
5 ± BOLTS & WASHERS
Fig. 6 Intake Manifold and Throttle BodyÐV-8 Gas
Engines Typical
1 ± FUEL RAIL ASSEMBLY
2 ± FUEL RAIL MOUNTING BOLTS
3 ± FUEL RAIL CONNECTING HOSES
DN5.9L ENGINE 9 - 139
DESCRIPTION AND OPERATION (Continued)
Page 141 of 193
Downloaded from www.Manualslib.com manuals search engine CYLINDER HEAD COVER GASKET
DESCRIPTION
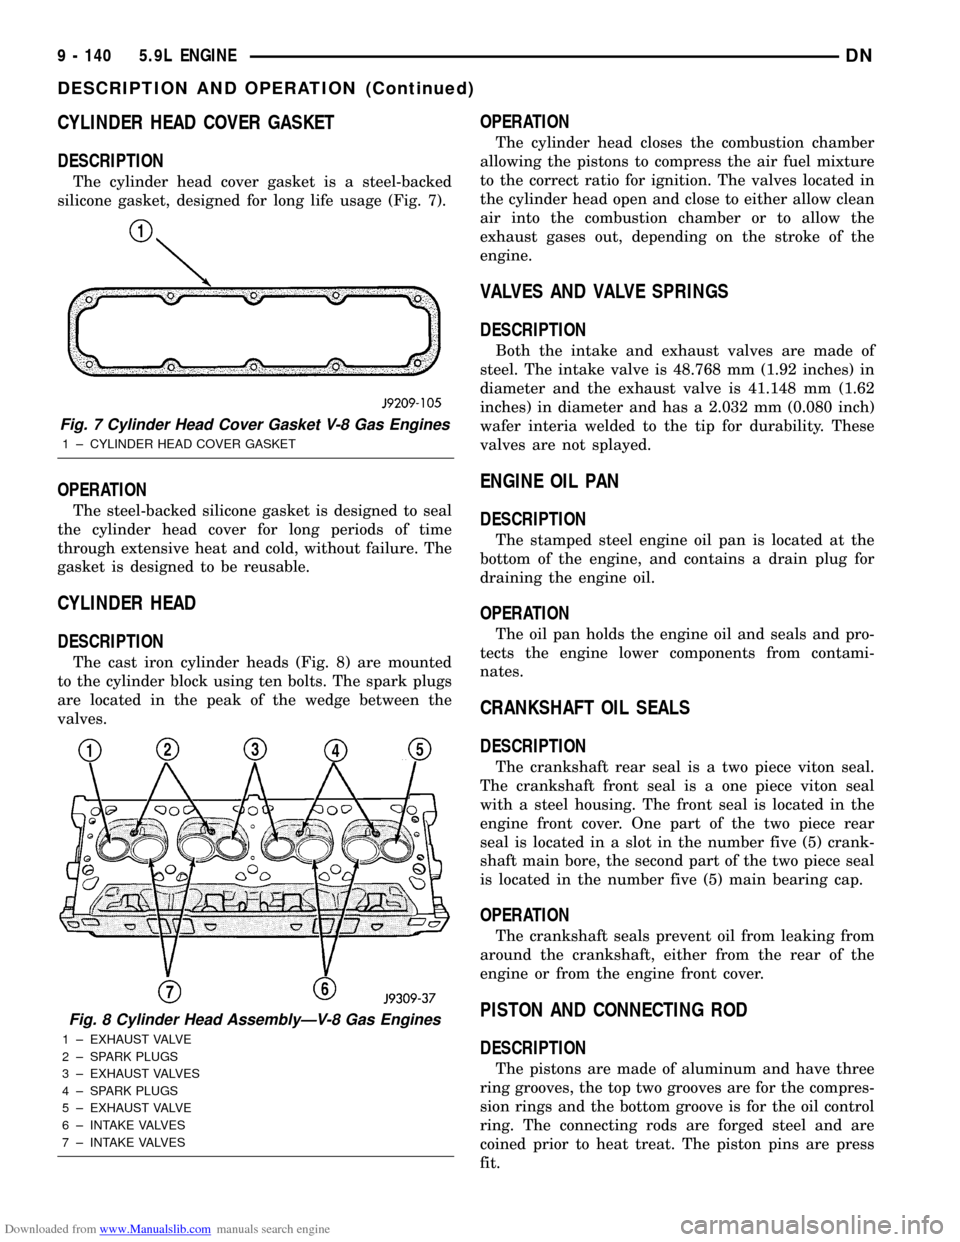
The cylinder head cover gasket is a steel-backed
silicone gasket, designed for long life usage (Fig. 7).
OPERATION
The steel-backed silicone gasket is designed to seal
the cylinder head cover for long periods of time
through extensive heat and cold, without failure. The
gasket is designed to be reusable.
CYLINDER HEAD
DESCRIPTION
The cast iron cylinder heads (Fig. 8) are mounted
to the cylinder block using ten bolts. The spark plugs
are located in the peak of the wedge between the
valves.
OPERATION
The cylinder head closes the combustion chamber
allowing the pistons to compress the air fuel mixture
to the correct ratio for ignition. The valves located in
the cylinder head open and close to either allow clean
air into the combustion chamber or to allow the
exhaust gases out, depending on the stroke of the
engine.
VALVES AND VALVE SPRINGS
DESCRIPTION
Both the intake and exhaust valves are made of
steel. The intake valve is 48.768 mm (1.92 inches) in
diameter and the exhaust valve is 41.148 mm (1.62
inches) in diameter and has a 2.032 mm (0.080 inch)
wafer interia welded to the tip for durability. These
valves are not splayed.
ENGINE OIL PAN
DESCRIPTION
The stamped steel engine oil pan is located at the
bottom of the engine, and contains a drain plug for
draining the engine oil.
OPERATION
The oil pan holds the engine oil and seals and pro-
tects the engine lower components from contami-
nates.
CRANKSHAFT OIL SEALS
DESCRIPTION
The crankshaft rear seal is a two piece viton seal.
The crankshaft front seal is a one piece viton seal
with a steel housing. The front seal is located in the
engine front cover. One part of the two piece rear
seal is located in a slot in the number five (5) crank-
shaft main bore, the second part of the two piece seal
is located in the number five (5) main bearing cap.
OPERATION
The crankshaft seals prevent oil from leaking from
around the crankshaft, either from the rear of the
engine or from the engine front cover.
PISTON AND CONNECTING ROD
DESCRIPTION
The pistons are made of aluminum and have three
ring grooves, the top two grooves are for the compres-
sion rings and the bottom groove is for the oil control
ring. The connecting rods are forged steel and are
coined prior to heat treat. The piston pins are press
fit.
Fig. 7 Cylinder Head Cover Gasket V-8 Gas Engines
1 ± CYLINDER HEAD COVER GASKET
Fig. 8 Cylinder Head AssemblyÐV-8 Gas Engines
1 ± EXHAUST VALVE
2 ± SPARK PLUGS
3 ± EXHAUST VALVES
4 ± SPARK PLUGS
5 ± EXHAUST VALVE
6 ± INTAKE VALVES
7 ± INTAKE VALVES
9 - 140 5.9L ENGINEDN
DESCRIPTION AND OPERATION (Continued)