seats DODGE DURANGO 2004 2.G Owners Manual
[x] Cancel search | Manufacturer: DODGE, Model Year: 2004, Model line: DURANGO, Model: DODGE DURANGO 2004 2.GPages: 386, PDF Size: 6.22 MB
Page 30 of 386

freely with you under normal conditions. But in a colli-
sion, the belt will lock and reduce the risk of your striking
the inside of the vehicle or being thrown out.
WARNING!
It is extremely dangerous to ride in a cargo area,
inside or outside of a vehicle. In a collision, people
riding in these areas are more likely to be seriously
injured or killed.
Do not allow people to ride in any area of your
vehicle that is not equipped with seats and seat belts.
Be sure everyone in your vehicle is in a seat and
using a seat belt properly.
WARNING!
²Wearing a seat belt incorrectly is dangerous. Seat
belts are designed to go around the large bones of
your body. These are the strongest parts of your
body and can take the forces of a collision the
best. Wearing your belt in the wrong place could
make your injuries in a collision much worse. You
might suffer internal injuries, or you could even
slide out of part of the belt. Follow these instruc-
tions to wear your seat belt safely and to keep
your passengers safe, too.
²Two people should never be belted into a single
seat belt. People belted together can crash into one
another in an accident, hurting one another badly.
Never use a lap/shoulder belt or a lap belt for
more than one person, no matter what their size.
30 THINGS TO KNOW BEFORE STARTING YOUR VEHICLE
Page 34 of 386

Adjustable Upper Shoulder Belt Anchorage
In the front and second row outboard seats, the shoulder
belt can be adjusted upward or downward to help
position the belt away from your neck. Push in on the
anchorage release button to release the anchorage, and
then move it up or down to the position that serves you
best.As a guide, if you are shorter than average, you will
prefer a lower position, and if you are taller than average,
you'll prefer a higher position. When you release the
anchorage, try to move it up or down to make sure that
it is locked in the desired position.
Second Row Center Seat Belt
The center seating position in the second row has a seat
belt assembly that can be converted from the normal
emergency locking mode to the automatic locking mode.
The seat belt should only be used in the automatic
locking mode when a child seat is installed at this seating
location.
When sitting in this seating location, ensure the seatback
is fully engaged with the seatback latch by pushing
rearward on the center seatback until you hear a click
that signals latch engagement.
34 THINGS TO KNOW BEFORE STARTING YOUR VEHICLE
Page 40 of 386

airbags work, you need the seat belts to keep you in the
right position for the airbags to protect you properly.
Here are some simple steps you can follow to minimize
the risk of harm from a deploying airbag.
1. Children 12 years and under should always ride
buckled up in a rear seat in an appropriate child restraint.
Infants in rear-facing child restraints shouldNEVERride
in the front seat of a vehicle with a passenger front airbag.
An airbag deployment can cause severe injury or death to
infants in that position.
If a child from 1 to 12 years old must ride in the front
passenger seat because the vehicle is crowded, move the
seat as far back as possible, and use the proper child
restraint. See9Child Restraint9in this section.
You should read the instructions provided with your
child restraint to make sure that you are using it properly.2. All occupants should use their lap and shoulder belts
properly.
3. The driver and front passenger seats should be moved
back as far as practical to allow the airbag room to inflate.
4. If your vehicle has window bags, do not lean against
the door or window, airbags will inflate forcefully into
the space between you and the door.
5. If the airbag system in this vehicle needs to be
modified to accommodate a disabled person, contact the
Customer Center. Phone numbers are provided in the9If
You Need Customer Assistance9section later in this
owner's manual.
40 THINGS TO KNOW BEFORE STARTING YOUR VEHICLE
Page 44 of 386

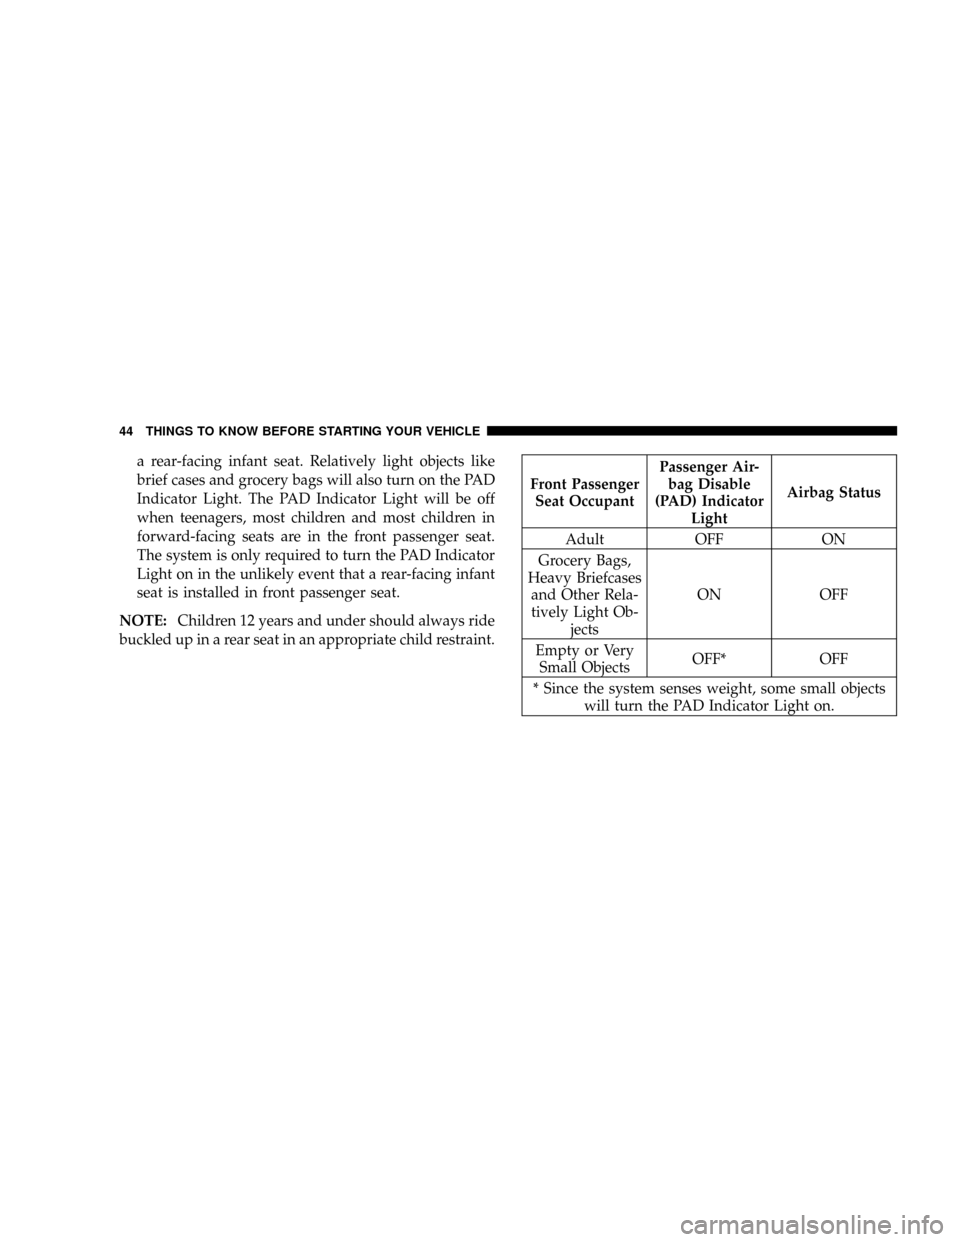
a rear-facing infant seat. Relatively light objects like
brief cases and grocery bags will also turn on the PAD
Indicator Light. The PAD Indicator Light will be off
when teenagers, most children and most children in
forward-facing seats are in the front passenger seat.
The system is only required to turn the PAD Indicator
Light on in the unlikely event that a rear-facing infant
seat is installed in front passenger seat.
NOTE:Children 12 years and under should always ride
buckled up in a rear seat in an appropriate child restraint.
Front Passenger
Seat OccupantPassenger Air-
bag Disable
(PAD) Indicator
LightAirbag Status
Adult OFF ON
Grocery Bags,
Heavy Briefcases
and Other Rela-
tively Light Ob-
jectsON OFF
Empty or Very
Small ObjectsOFF* OFF
* Since the system senses weight, some small objects
will turn the PAD Indicator Light on.
44 THINGS TO KNOW BEFORE STARTING YOUR VEHICLE
Page 50 of 386

Enhanced Accident Response System
If the airbags deploy after an impact and the electrical
system remains functional, vehicles equipped with
power door locks will unlock automatically. In addition,
approximately 5 seconds after the vehicle has stopped
moving, the interior lights will light until the ignition
switch is turned off.
Airbag Light
You will want to have the airbags ready to
inflate for your protection in an impact. While
the airbag system is designed to be mainte-
nance free, if any of the following occurs, have
an authorized dealer service the system promptly:
²The airbag light does not come on or flickers during
the 6 to 8 seconds when the ignition switch is first
turned on.
²The light remains on or flickers after the 6 to 8 second
interval.
²The light flickers or comes on and remains on while
driving.
NOTE:If the speedometer, tachometer or any engine
related gauges are not working, the airbag control mod-
ule may also be disabled. The airbags may not be ready
to inflate for your protection. Promptly check fuse block
for blown fuses. Refer to the label located on the inside of
the fuse block cover for the proper airbag fuses. See your
dealer if the fuse is good.
Child Restraint
Everyone in your vehicle needs to be buckled up all the
time - babies and children, too. Every state in the United
States and all Canadian provinces require that small
children ride in proper restraint systems. This is the law,
and you can be prosecuted for ignoring it. Children 12
years and under should ride properly buckled up in a
rear seat, if available. According to crash statistics, chil-
dren are safer when properly restrained in the rear seats
rather than in the front.
50 THINGS TO KNOW BEFORE STARTING YOUR VEHICLE
Page 51 of 386

Infants and Small Children
There are different sizes and types of restraints for
children from newborn size to the child almost large
enough for an adult seat belt. Always check the child seat
owner's manual to ensure you have the right seat for
your child. Use the restraint that is correct for your child:
²This vehicle is not capable of accommodating the
installation of a car bed used for carrying newborn
babies at the right front passenger seat position. If a car
bed must be used to transport a newborn baby, the car
bed must be installed in the second seating row only.
²Safety experts recommend that children ride
rearward-facing in the vehicle until they are at least
one year old and weigh at least 20 lbs (9 kg). Two types
of child restraints can be used rearward facing: infant
carriers and9convertible9child seats.
²The infant carrier is only used rearward-facing in the
vehicle. It is recommended for children who weigh upto about 20 lbs (9 kg).9Convertible9child seats can be
used either rearward-facing or forward-facing in the
vehicle. Convertible child seats often have a higher
weight limit in the rearward-facing direction than
infant carriers do, so they can be used rearward-facing
by children who weigh more than 20 lbs (9 kg) but are
less than one year old.
²Rearward-facing child seats mustNEVERbe used in
the front seat of a vehicle with a front passenger
airbag. An airbag deployment could cause severe
injury or death to infants in this position.
²Children who weigh more than 20 lbs (9 kg) and who
are older than one year can ride forward-facing in the
vehicle. Forward-facing child seats and convertible
child seats used in the forward-facing direction are for
children who weigh 20 to 40 lbs (9 to 18 kg), and are
older than one year old. These child seats are also held
in the vehicle by the lap/shoulder belt.
THINGS TO KNOW BEFORE STARTING YOUR VEHICLE 51
2
Page 52 of 386

²The belt-positioning booster seat is for children weigh-
ing more than 40 lbs (18 kg), but who are still too small
to fit the vehicle's seat belts properly. If the child
cannot sit with knees bent over the seat cushion while
the child's back is against the seatback, they need a
belt-positioning booster seat. The child and booster
seat are held in the vehicle by the lap/shoulder belt.
(Some booster seats are equipped with a front shield
and are held in the vehicle by the lap portion).
²For additional information, refer to
www.seatcheck.org.
WARNING!
²Improper installation can lead to failure of an
infant or child restraint. It could come loose in a
collision. The child could be badly injured or
killed. Follow the manufacturer's directions ex-
actly when installing an infant or child restraint.
²A rearward facing infant restraint should only be
used in a rear seat. A rearward facing infant
restraint in the front seat may be struck by a
deploying passenger airbag which may cause se-
vere or fatal to the infant.
Here are some tips for getting the most out of your child
restraint:
²Before buying any restraint system, make sure that it
has a label certifying that it meets all applicable Safety
52 THINGS TO KNOW BEFORE STARTING YOUR VEHICLE
Page 53 of 386

Standards. The manufacturer recommends that you
try a child restraint in the vehicle seats where you will
use it before you buy it.
²The restraint must be appropriate for your child's
weight and height. Check the label on the restraint for
weight and height limits.
²Carefully follow the instructions that come with the
restraint. If you install the restraint improperly, it may
not work when you need it.
²The second row outside seating positions and all third
row seats have cinching latch plates. The second row
center position has an adjustable locking retractor.
These are designed to keep the lap portion tight
around the child restraint so that it is not necessary to
use a locking clip. If the seat belt has a cinching latch
plate, pulling up on the shoulder portion of the
lap/shoulder belt will tighten the belt. The cinching
latch plate will keep the belt tight, however, any seatbelt system will loosen with time, so check the belt
occasionally and pull it tight if necessary. If the seat
belt has a automatic locking retractor, it will have a
distinctive label. Pull the belt from the retractor until
there is enough to allow you to pass through the child
restraint and slide the latch plate into the buckle. Then,
pull the belt until it is all extracted from the retractor.
Allow the belt to return to the retractor, pulling on the
excess webbing to tighten the lap portion about the
child restraint. Refer to9Automatic Locking Mode9
earlier in this section.
²Buckle the child into the restraint exactly as the
manufacturer's instructions tell you.
²When your child restraint is not in use, secure it in the
vehicle with the seat belt or remove it from the vehicle.
Do not leave it loose in the vehicle. In a sudden stop or
collision, it could strike the occupants or seat backs
and cause serious personal injury.
THINGS TO KNOW BEFORE STARTING YOUR VEHICLE 53
2
Page 54 of 386

LATCH - Child Seat Anchorage System (Lower
Anchors and Tether for CHildren)
Your vehicle's second row seat is equipped with the child
restraint anchorage system called LATCH. The LATCH
system provides for the installation of the child restraint
without using the vehicle's seat belts, instead securing
the child restraint using lower anchorages and upper
tether straps from the child restraint to the vehicle
structure. LATCH-compatible child restraint systems are
now available. However, because the lower anchorages
are to be introduced over a period of years, child restraint
systems having attachments for those anchorages will
continue to also have features for installation using the
vehicle's seat belts. Child restraints having tether straps
and hooks for connection to the top tether anchorages
have been available for some time. For some older child
restraints, many child restraint manufacturers offeradd-on tether strap kits or retro-fit kits. You are urged to
take advantage of all the available attachments provided
with your child restraint in any vehicle.
The outboard second row seating positions have lower
anchorages that are capable of accommodating LATCH-
compatible child seats.NEVERinstall LATCH-
compatible child seats such that two seats share a com-
mon lower anchorage. If installing child seats in adjacent
seating positions or if your child restraints are not
LATCH-compatible, install the restraints using the vehi-
cle's seat belts.
54 THINGS TO KNOW BEFORE STARTING YOUR VEHICLE
Page 60 of 386

Child Restraints in Third Row Seating (If
Equipped)
The third seating row is not capable of installing child
restraints that require the use of a tether strap. There are
no tether anchor provisions for the third seating row in
your vehicle, the hooks in the rear floor are not designed
to withstand the forces that may occur during a crash.
WARNING!
An incorrectly anchored tether strap could lead to
increased head motion and possible injury to the
child. Use only the anchor positions directly behind
the child seat to secure a child restraint top tether
strap. Do not install a child restraint that requires a
tether strap in the third seating row (if equipped) of
this vehicle.
Child Restraint Tether Anchor
There are tether strap anchorages behind each seating
position in the second row. For vehicles equipped with
third row seating, there is no Child Tether Anchorage
provided for the third row of seats. To install child
restraint tethers follow these instructions.
1. Place the child restraint in the second row of seats.
2. Route the tether strap under the head restraint and
between the two posts.
3. Attach the tether strap hook of the child restraint to
the tether anchor located on the seat back and remove the
slack in the tether strap according to the manufacturer's
instructions.
60 THINGS TO KNOW BEFORE STARTING YOUR VEHICLE