transmission oil DODGE DURANGO 2009 2.G Owners Manual
[x] Cancel search | Manufacturer: DODGE, Model Year: 2009, Model line: DURANGO, Model: DODGE DURANGO 2009 2.GPages: 498, PDF Size: 8.3 MB
Page 28 of 498
Avoid touching the new battery with your fingers. Skin
oils may cause battery deterioration. If you touch a
battery, clean it with rubbing alcohol.
3. To reassemble the RKE transmitter case, snap the two
halves of the case together. Make sure there is an even
“gap” between the two halves. If equipped, install and
tighten the screw until snug. Test RKE transmitter
operation.
REMOTE STARTING SYSTEM — IF EQUIPPED
This system uses the Remote Keyless Entry
(RKE) transmitter to start the engine conve-
niently from outside the vehicle while still
maintaining security. The system has a range of
328 ft (100 m).
NOTE:The vehicle must be equipped with an auto-
matic transmission to be equipped with Remote Start.
How to Use Remote Start
All of the following conditions must be met before the
engine will remote start:
•Shift lever in PARK
•Doors closed
•Hood closed
•Hazard switch off
•Brake switch inactive (brake pedal not pressed)
•Ignition key removed from ignition switch
•Battery at an acceptable charge level
•RKE PANIC button not pressed
26 THINGS TO KNOW BEFORE STARTING YOUR VEHICLE
Page 172 of 498
Unless reset, this message will continue to display each
time you turn the ignition switch to the ON/RUN
position. To turn off the message temporarily, press and
release the MENU button. To reset the oil change indica-
tor system (after performing the scheduled maintenance),
refer to the following procedure.
1. Turn the ignition switch to the ON position(Do not
start the engine).
2. Fully depress the accelerator pedal slowly three times
within 10 seconds.
3. Turn the ignition switch to the OFF/LOCK position.
NOTE:If the indicator message illuminates when you
start the vehicle, the oil change indicator system did not
reset. If necessary, repeat this procedure.Personal Settings (Customer-Programmable
Features)
Personal Settings allows the driver to set and recall
features when the transmission is in PARK. If the trans-
mission is not in PARK the EVIC will display NOT
AVAILABLE and VEHICLE NOT IN PARK.
Press and release the MENU button until the
Personal Settings displays on the EVIC.
Use the STEP button to display one of the following:
•“LANGUAGE” – When in this display, you may select
one of several different languages for all display
nomenclature, including the trip functions. Press the
RESET button while in this display to select your
preferred language. Then, as you continue, the infor-
mation will display in the selected language.
170 UNDERSTANDING THE FEATURES OF YOUR VEHICLE
Page 208 of 498
When the voltage is above this value again, the malfunc-
tion indicator light should go out and the ABS is opera-
tional. If the malfunction indicator light stays illumi-
nated, have the system checked at an authorized dealer
as soon as possible.
12. Oil Pressure Warning Light
This light indicates low engine oil pressure. The
light should turn on momentarily when the engine
is started. If the light turns on while driving, stop the
vehicle and shut off the engine as soon as possible. A
chime will sound when this light turns on.
Do not operate the vehicle until the cause is corrected.
This light does not show how much oil is in the engine.
The engine oil level must be checked under the hood.
13. Tachometer
This gauge measures engine Revolutions-Per-Minute
(RPM x 1000).14. Shift Lever Indicator
The shift lever indicator is self-contained within the
instrument cluster. It displays the position of the auto-
matic transmission shift lever, and the relation of each
position to all other positions. For a good signal the
display will place a box around the selected transmission
range (PRND21). If the PRNDL displays only the char-
acters PRND21 (no boxes),or if all of the gear positions
are boxed, have the system checked by an authorized
dealer.
15. Odometer / Trip Odometer
The two trip odometers show individual trip mileage. To
switch from odometer to trip odometers, press and
release the Trip Odometer button.
To reset a trip odometer, display the desired trip odom-
eter to be reset then push and hold the button until the
display resets (approximately two seconds).
206 UNDERSTANDING YOUR INSTRUMENT PANEL
Page 307 of 498
CAUTION!
•Always check the depth of the standing water
before driving through it. Never drive through
standing water that is deeper than the bottom of
the tire rims mounted on the vehicle.
•Determine the condition of the road or the path
that is under water and if there are any obstacles in
the way before driving through the standing wa-
ter.
•Do not exceed 5 mph (8 km/h) when driving
through standing water. This will minimize wave
effects.
(Continued)
CAUTION! (Continued)
•Driving through standing water may cause dam-
age to your vehicle’s drivetrain components. Al-
ways inspect your vehicle’s fluids (i.e., engine oil,
transmission/transaxle, axle, etc.) for signs of con-
tamination (i.e., fluid that is milky or foamy in
appearance) after driving through standing water.
Do not continue to operate the vehicle if any fluid
appears contaminated, as this may result in further
damage. Such damage is not covered by the New
Vehicle Limited Warranty.
•Getting water inside your vehicle’s engine can
cause it to lock up and stall out, and cause serious
internal damage to the engine. Such damage is not
covered by the New Vehicle Limited Warranty.
STARTING AND OPERATING 305
5
Page 397 of 498
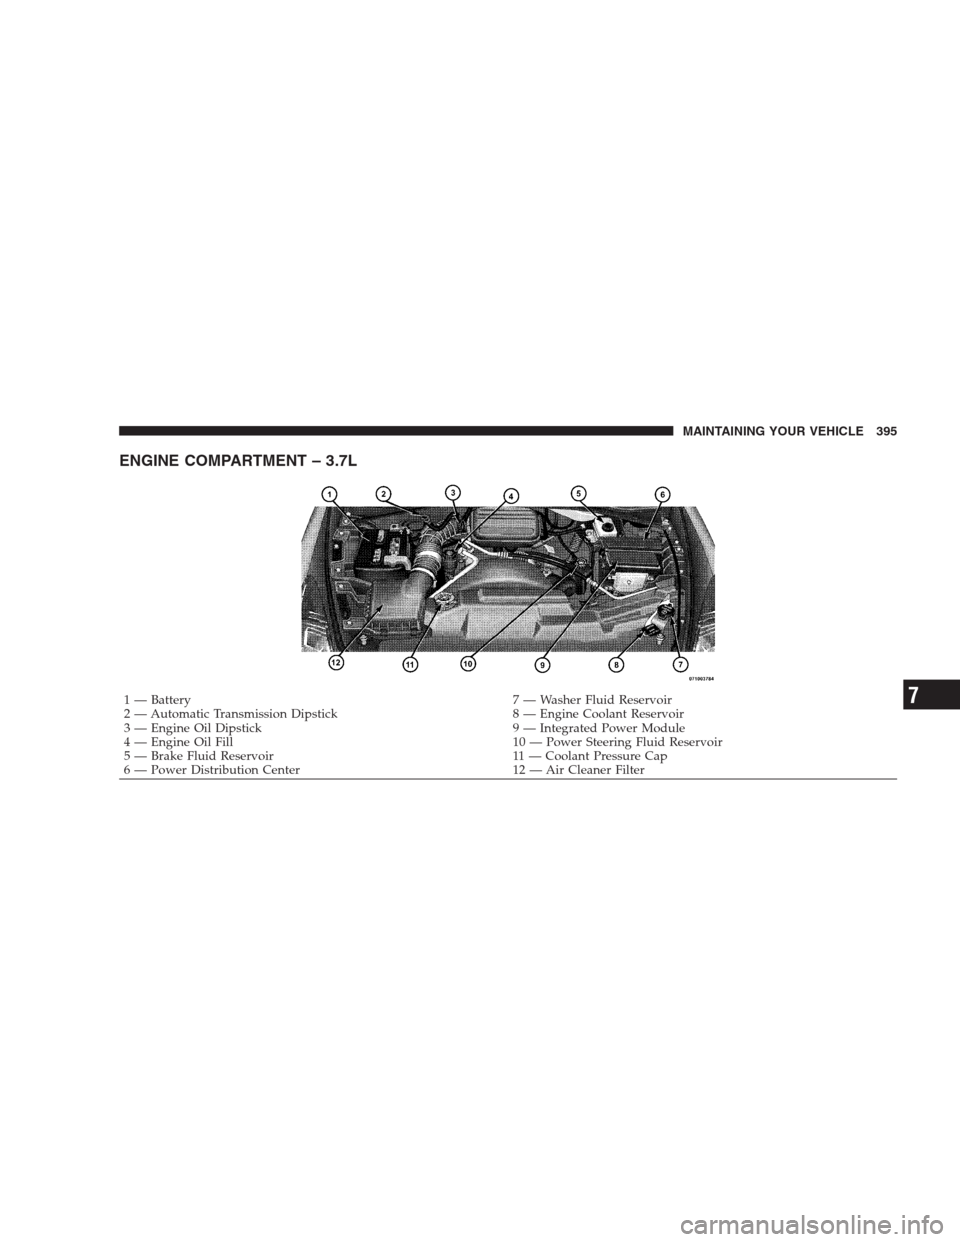
ENGINE COMPARTMENT – 3.7L
1 — Battery 7 — Washer Fluid Reservoir
2 — Automatic Transmission Dipstick 8 — Engine Coolant Reservoir
3 — Engine Oil Dipstick 9 — Integrated Power Module
4 — Engine Oil Fill 10 — Power Steering Fluid Reservoir
5 — Brake Fluid Reservoir 11 — Coolant Pressure Cap
6 — Power Distribution Center 12 — Air Cleaner FilterMAINTAINING YOUR VEHICLE 3957
Page 398 of 498
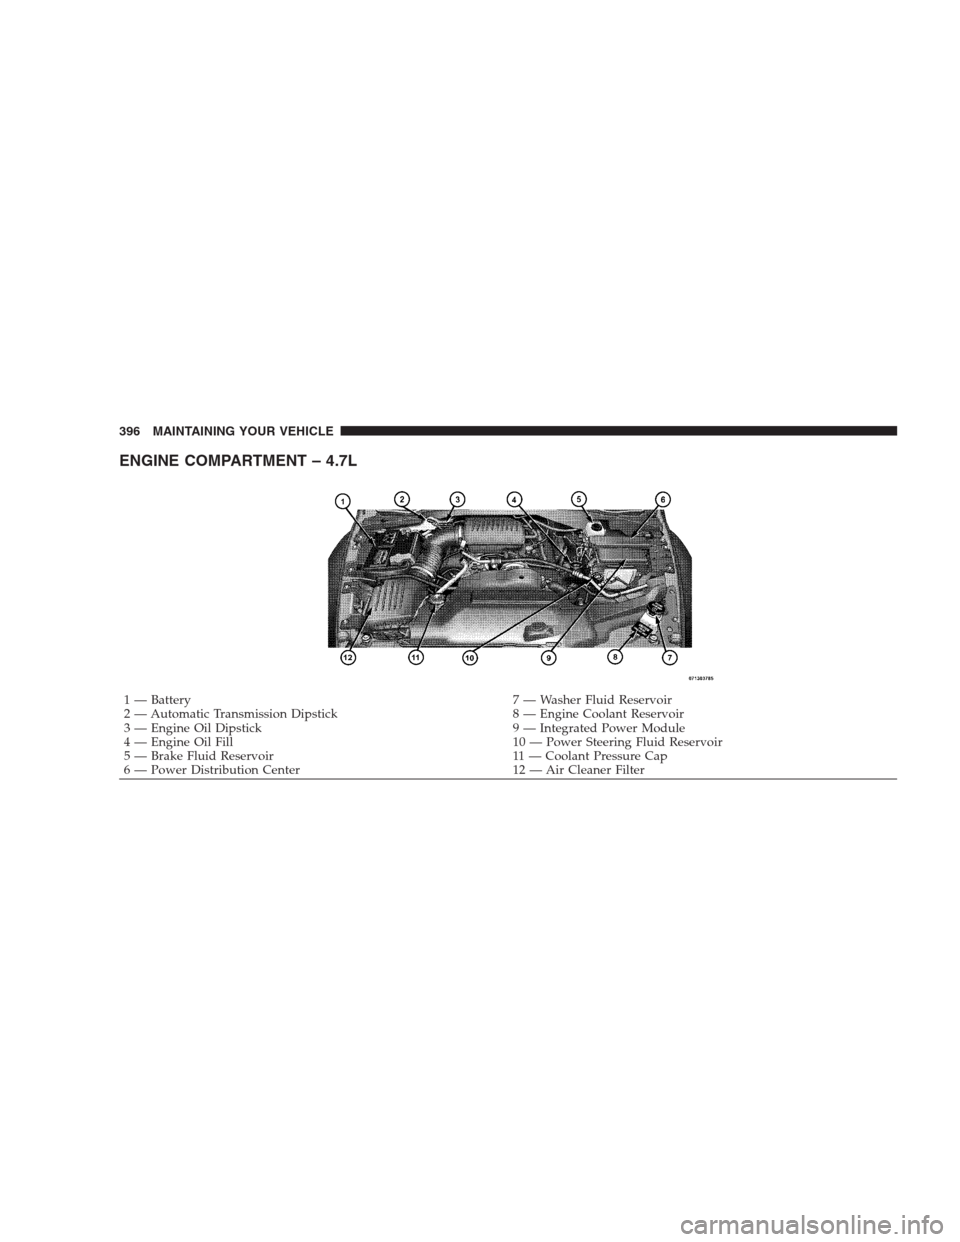
ENGINE COMPARTMENT – 4.7L
1 — Battery 7 — Washer Fluid Reservoir
2 — Automatic Transmission Dipstick 8 — Engine Coolant Reservoir
3 — Engine Oil Dipstick 9 — Integrated Power Module
4 — Engine Oil Fill 10 — Power Steering Fluid Reservoir
5 — Brake Fluid Reservoir 11 — Coolant Pressure Cap
6 — Power Distribution Center 12 — Air Cleaner Filter 396 MAINTAINING YOUR VEHICLE
Page 399 of 498
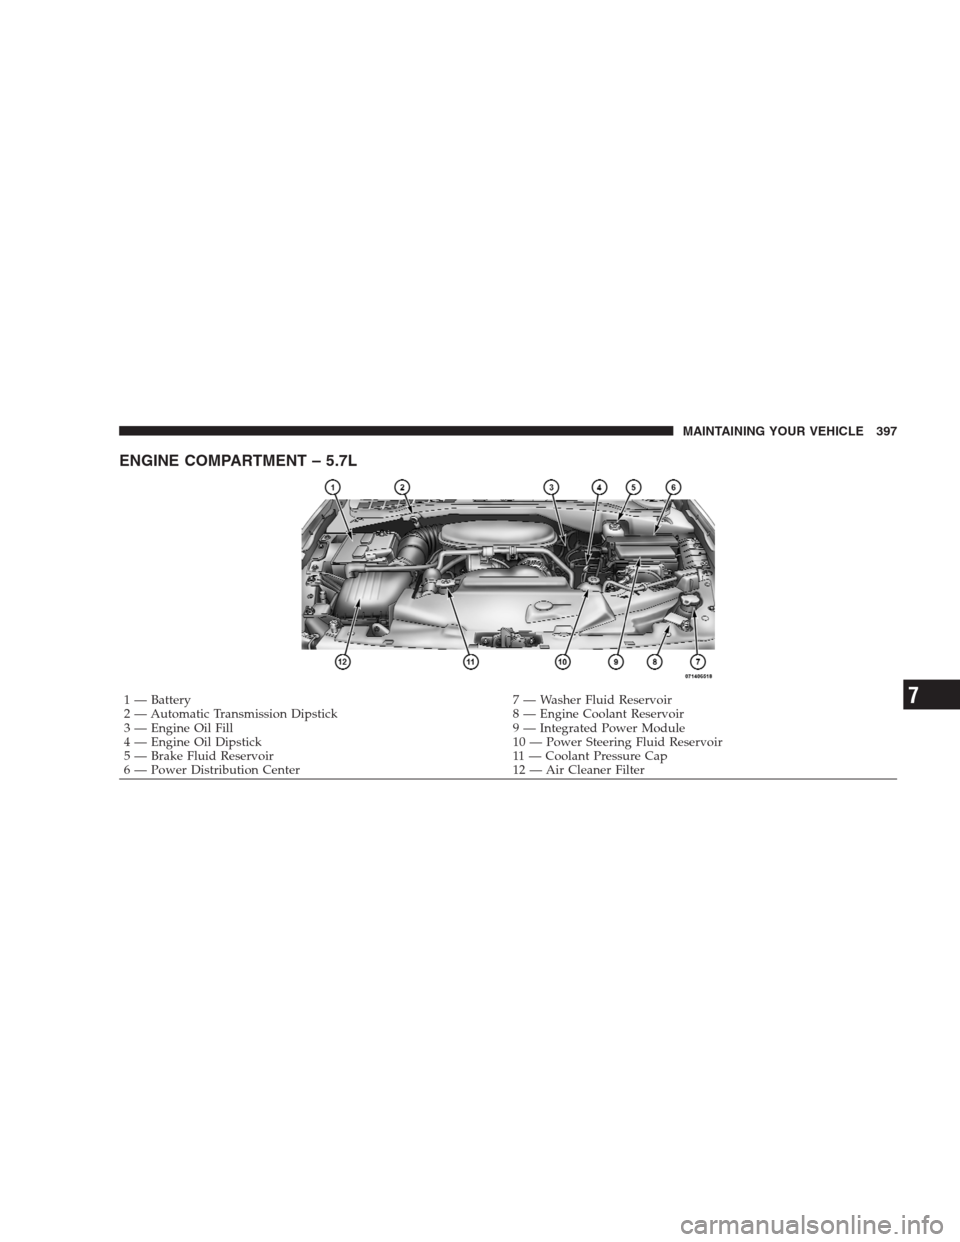
ENGINE COMPARTMENT – 5.7L
1 — Battery 7 — Washer Fluid Reservoir
2 — Automatic Transmission Dipstick 8 — Engine Coolant Reservoir
3 — Engine Oil Fill 9 — Integrated Power Module
4 — Engine Oil Dipstick 10 — Power Steering Fluid Reservoir
5 — Brake Fluid Reservoir 11 — Coolant Pressure Cap
6 — Power Distribution Center 12 — Air Cleaner FilterMAINTAINING YOUR VEHICLE 3977
Page 419 of 498
CAUTION!
Do not allow a petroleum-base fluid to contaminate
the brake fluid. Seal damage may result.
Automatic Transmission
Fluid Level Check
NOTE:If equipped with a dipstick, use the following
procedure. If your vehicle has a capped dipstick, it is
sealed and should not be tampered with. Your authorized
dealer has the proper tools to ensure that the fluid level
is set properly.
Check the fluid level while the transmission is at normal
operating temperature 180°F (82°C). This occurs after at
least 15 miles (24 km) of driving. At normal operating
temperature the fluid cannot be held comfortably be-
tween the fingertips.To check the automatic transmission fluid level properly,
the following procedure must be used:
1. Operate the engine at idle speed and normal operating
temperature.
2. The vehicle must be on level ground.
3. Fully apply the parking brake and press the brake
pedal.
4. Place the shift lever momentarily in each gear position
ending with the lever in PARK.
5. Remove the dipstick, wipe it clean and reinsert it until
seated.
6. Remove the dipstick again and note the fluid level on
both sides. The fluid level should be between the “HOT”
(upper) reference holes on the dipstick at normal operat-
ing temperature. Verify that solid coating of oil is seen on
both sides of the dipstick. If the fluid is low, add as
MAINTAINING YOUR VEHICLE 417
7
Page 420 of 498
required into the dipstick tube.Do not overfill.After
adding any quantity of oil through the oil fill tube, wait
a minimum of two minutes for the oil to fully drain into
the transmission before rechecking the fluid level.
NOTE:If it is necessary to check the transmissionbelow
the operating temperature, the fluid level should be
between the two “COLD” (lower) holes on the dipstick
with the fluid at approximately 70°F (21°C) (room tem-
perature). If the fluid level is correctly established at
room temperature, it should be between the “HOT”
(upper) reference holes when the transmission reaches
180°F ( 82°C). Remember it is best to check the level at the
normal operating temperature.CAUTION!
Be aware that if the fluid temperature is below 50°F
(10°C) it may not register on the dipstick. Do not add
fluid until the temperature is elevated enough to
produce an accurate reading.
7. Check for leaks. Release parking brake.
To prevent dirt and water from entering the transmission
after checking or replenishing fluid, make certain that the
dipstick cap is properly reseated. It is normal for the
dipstick cap to spring back slightly from its fully seated
position, as long as its seal remains engaged in the
dipstick tube.
418 MAINTAINING YOUR VEHICLE
Page 451 of 498
oil if it has been 6 months since your last oil change
even if the oil change indicator message is NOT
illuminated.
•Change your engine oil more often if you drive your
vehicle off-road for an extended period of time.
•Under no circumstances should oil change intervals
exceed 6,000 miles (10 000 km) or 6 months, whichever
comes first.
Your authorized dealer will reset the oil change indicator
message after completing the scheduled oil change. If this
scheduled oil change is performed by someone other
than your authorized dealer the message can be reset by
referring to the steps described under “OIL CHANGE
REQUIRED – If Equipped” under “System Status (EVIC
Displays)” in Section 3, or under “Odometer/Trip Odom-
eter” under “Instrument Cluster Description” in Sec-
tion 4.At Each Stop for Fuel
•Check the engine oil level about five minutes after a
fully warmed engine is shut off. Checking the oil level
while the vehicle is on level ground will improve the
accuracy of the oil level reading. Add oil only when
the level is at or below the ADD or MIN mark.
•Check the windshield washer solvent and add if
required.
Once a Month
•Check tire pressure and look for unusual wear or
damage.
•Inspect the battery and clean and tighten the terminals
as required.
•Check the fluid levels of coolant reservoir, brake
master cylinder, power steering and transmission and
add as needed.
MAINTENANCE SCHEDULES 449
8
M
A
I
N
T
E
N
A
N
C
E
S
C
H
E
D
U
L
E
S