steering wheel DODGE DURANGO 2013 3.G Owner's Manual
[x] Cancel search | Manufacturer: DODGE, Model Year: 2013, Model line: DURANGO, Model: DODGE DURANGO 2013 3.GPages: 140, PDF Size: 4.38 MB
Page 82 of 140
Operation Of The Remote
•
The remote control operates similarly to any DVD remote you have used before and allows
the rear seat passengers to change stations, tracks, discs and audio/video modes.
• The remote control is designed to control either channel by using the selector switch located on the right side of the remote.
• Pressing the power button will turn the VES™ system ON/OFF.
• Pressing the MODE button causes the Mode Selection menu to appear on the VES™ screen. Use the remote control arrow buttons to scroll through the available modes, then
press ENTER to select the desired mode.
Auxiliary Audio/Video Input Jacks
• The Aux jacks are located on the rear of the center console.
• Connect the video game or other external media devices to the AUX jacks following the color coding for VES™ jacks.
• Using either the touch-screen radio or remote control, select AUX from the Rear VES™ Control or Mode Selection screen.
• Refer to your vehicle's Owners Manual on the DVD for further details.
ELECTRONIC VEHICLE INFORMATION CENTER (EVIC)
• The EVIC features a driver interactive display that is located in the instrument cluster. Pressing the controls on the left side of the steering wheel allows the driver to select
vehicle information and Personal Settings. For additional information, refer to Program-
mable Features in this guide.
• Press and release the UP
button to
scroll upward through the main menus
(Fuel Economy, Vehicle Speed Trip Info,
Tire PSI, Vehicle Info, Messages, Units,
System Setup) and sub menus.
• Press and release the DOWN
button
to scroll downward through the main
menus and sub menus.
•
Press and release the SELECTbutton
for access to main menus, sub menus or to
select a personal setting in the setup menu.
• Press the BACK button to scroll back to a previous menu or sub menu.
NOTE:
Refer to the Driver Cockpit image in Controls At A Glance to see EVIC Display and EVIC
Controls location.
ELECTRONICS
80
Page 114 of 140
FREEING A STUCK VEHICLE
• If your vehicle becomes stuck in mud, sand or snow, it can often be moved by a rockingmotion. Turn your steering wheel right and left to clear the area around the front wheels.
Then, move the shift lever back and forth between REVERSE and DRIVE. Using minimal
accelerator pedal pressure to maintain the rocking motion, without spinning the wheels,
is most effective.
• Allow the engine to idle with the transmission shift lever in NEUTRAL for at least one minute after every five rocking-motion cycles. This will minimize overheating and reduce
the risk of transmission failure during prolonged efforts to free a stuck vehicle.
NOTE:
If your vehicle is equipped with Electronic Stability Control (ESC) then press the "ESC Off"
switch, to place the Electronic Stability Control (ESC) system in "Partial Off" mode, before
rocking the vehicle.
CAUTION!
Revving the engine or spinning the wheels too fast may lead to transmission overheating
and failure. It can also damage the tires. Do not spin the wheels above 30 mph (48 km/h)
while in gear (no transmission shifting occurring).
WARNING!
Fast spinning tires can be dangerous. Forces generated by excessive wheel speeds may
cause tire damage or failure. A tire could explode and injure someone. Do not spin your
vehicle's wheels faster than 30 mph (48 km/h) when you are stuck. Do not let anyone
near a spinning wheel, no matter what the speed.
WHAT TO DO IN EMERGENCIES
112
Page 116 of 140
OPENING THE HOOD
•Pull the hood release lever located below
the steering wheel at the base of the instru-
ment panel.
•Reach into the opening beneath the center
of the hood and move the safety latch lever
while lifting the hood at the same time.
WARNING!
Be sure the hood is fully latched before driving your vehicle. If the hood is not fully
latched, it could open when the vehicle is in motion and block your vision. Failure to
follow this warning could result in serious injury or death.
FUEL DOOR RELEASE
• The fuel door release button is located on the instrument panel below the headlight
switch.
• Push the button once and release to open the fuel door.
MAINTAINING YOUR VEHICLE
114
Page 127 of 140
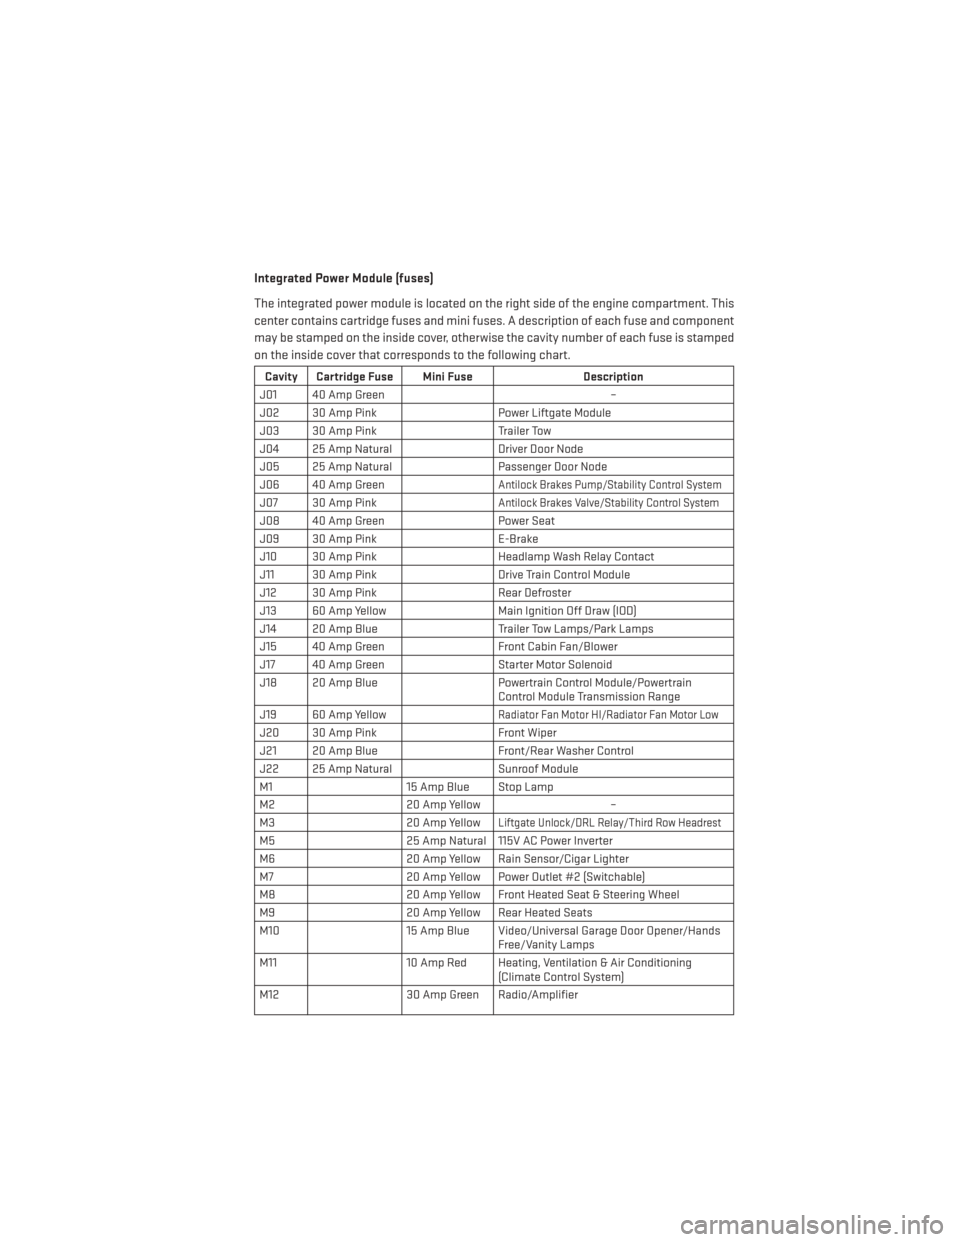
Integrated Power Module (fuses)
The integrated power module is located on the right side of the engine compartment. This
center contains cartridge fuses and mini fuses. A description of each fuse and component
may be stamped on the inside cover, otherwise the cavity number of each fuse is stamped
on the inside cover that corresponds to the following chart.
Cavity Cartridge Fuse Mini FuseDescription
J01 40 Amp Green –
J02 30 Amp Pink Power Liftgate Module
J03 30 Amp Pink Trailer Tow
J04 25 Amp Natural Driver Door Node
J05 25 Amp Natural Passenger Door Node
J06 40 Amp Green
Antilock Brakes Pump/Stability Control System
J07 30 Amp PinkAntilock Brakes Valve/Stability Control System
J08 40 Amp Green Power Seat
J09 30 Amp Pink E-Brake
J10 30 Amp Pink Headlamp Wash Relay Contact
J11 30 Amp Pink Drive Train Control Module
J12 30 Amp Pink Rear Defroster
J13 60 Amp Yellow Main Ignition Off Draw (IOD)
J14 20 Amp Blue Trailer Tow Lamps/Park Lamps
J15 40 Amp Green Front Cabin Fan/Blower
J17 40 Amp Green Starter Motor Solenoid
J18 20 Amp Blue Powertrain Control Module/Powertrain
Control Module Transmission Range
J19 60 Amp Yellow
Radiator Fan Motor HI/Radiator Fan Motor Low
J20 30 Amp Pink Front Wiper
J21 20 Amp Blue Front/Rear Washer Control
J22 25 Amp Natural Sunroof Module
M1 15 Amp Blue Stop Lamp
M2 20 Amp Yellow –
M3 20 Amp Yellow
Liftgate Unlock/DRL Relay/Third Row Headrest
M525 Amp Natural 115V AC Power Inverter
M6 20 Amp Yellow Rain Sensor/Cigar Lighter
M7 20 Amp Yellow Power Outlet #2 (Switchable)
M8 20 Amp Yellow Front Heated Seat & Steering Wheel
M9 20 Amp Yellow Rear Heated Seats
M10 15 Amp Blue Video/Universal Garage Door Opener/Hands
Free/Vanity Lamps
M11 10 Amp Red Heating, Ventilation & Air Conditioning
(Climate Control System)
M12 30 Amp Green Radio/Amplifier
MAINTAINING YOUR VEHICLE
125
Page 128 of 140
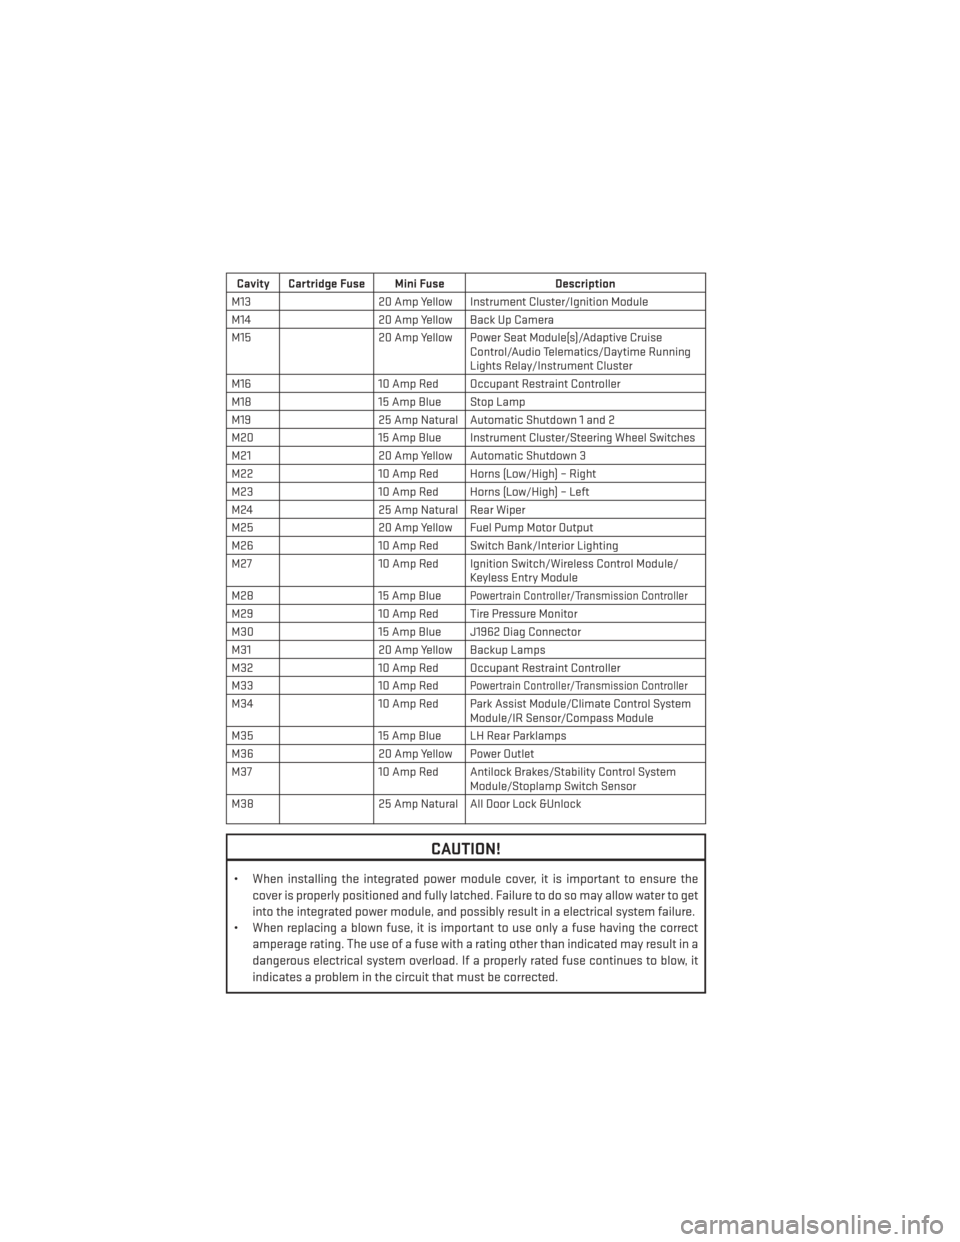
Cavity Cartridge Fuse Mini FuseDescription
M13 20 Amp Yellow Instrument Cluster/Ignition Module
M14 20 Amp Yellow Back Up Camera
M15 20 Amp Yellow Power Seat Module(s)/Adaptive Cruise
Control/Audio Telematics/Daytime Running
Lights Relay/Instrument Cluster
M16 10 Amp Red Occupant Restraint Controller
M18 15 Amp Blue Stop Lamp
M19 25 Amp Natural Automatic Shutdown 1 and 2
M20 15 Amp Blue Instrument Cluster/Steering Wheel Switches
M21 20 Amp Yellow Automatic Shutdown 3
M22 10 Amp Red Horns (Low/High) – Right
M23 10 Amp Red Horns (Low/High) – Left
M24 25 Amp Natural Rear Wiper
M25 20 Amp Yellow Fuel Pump Motor Output
M26 10 Amp Red Switch Bank/Interior Lighting
M27 10 Amp Red Ignition Switch/Wireless Control Module/
Keyless Entry Module
M28 15 Amp Blue
Powertrain Controller/Transmission Controller
M2910 Amp Red Tire Pressure Monitor
M30 15 Amp Blue J1962 Diag Connector
M31 20 Amp Yellow Backup Lamps
M32 10 Amp Red Occupant Restraint Controller
M33 10 Amp Red
Powertrain Controller/Transmission Controller
M3410 Amp Red Park Assist Module/Climate Control System
Module/IR Sensor/Compass Module
M35 15 Amp Blue LH Rear Parklamps
M36 20 Amp Yellow Power Outlet
M37 10 Amp Red Antilock Brakes/Stability Control System
Module/Stoplamp Switch Sensor
M38 25 Amp Natural All Door Lock &Unlock
CAUTION!
• When installing the integrated power module cover, it is important to ensure the
cover is properly positioned and fully latched. Failure to do so may allow water to get
into the integrated power module, and possibly result in a electrical system failure.
• When replacing a blown fuse, it is important to use only a fuse having the correct
amperage rating. The use of a fuse with a rating other than indicated may result in a
dangerous electrical system overload. If a properly rated fuse continues to blow, it
indicates a problem in the circuit that must be corrected.
MAINTAINING YOUR VEHICLE
126
Page 136 of 140
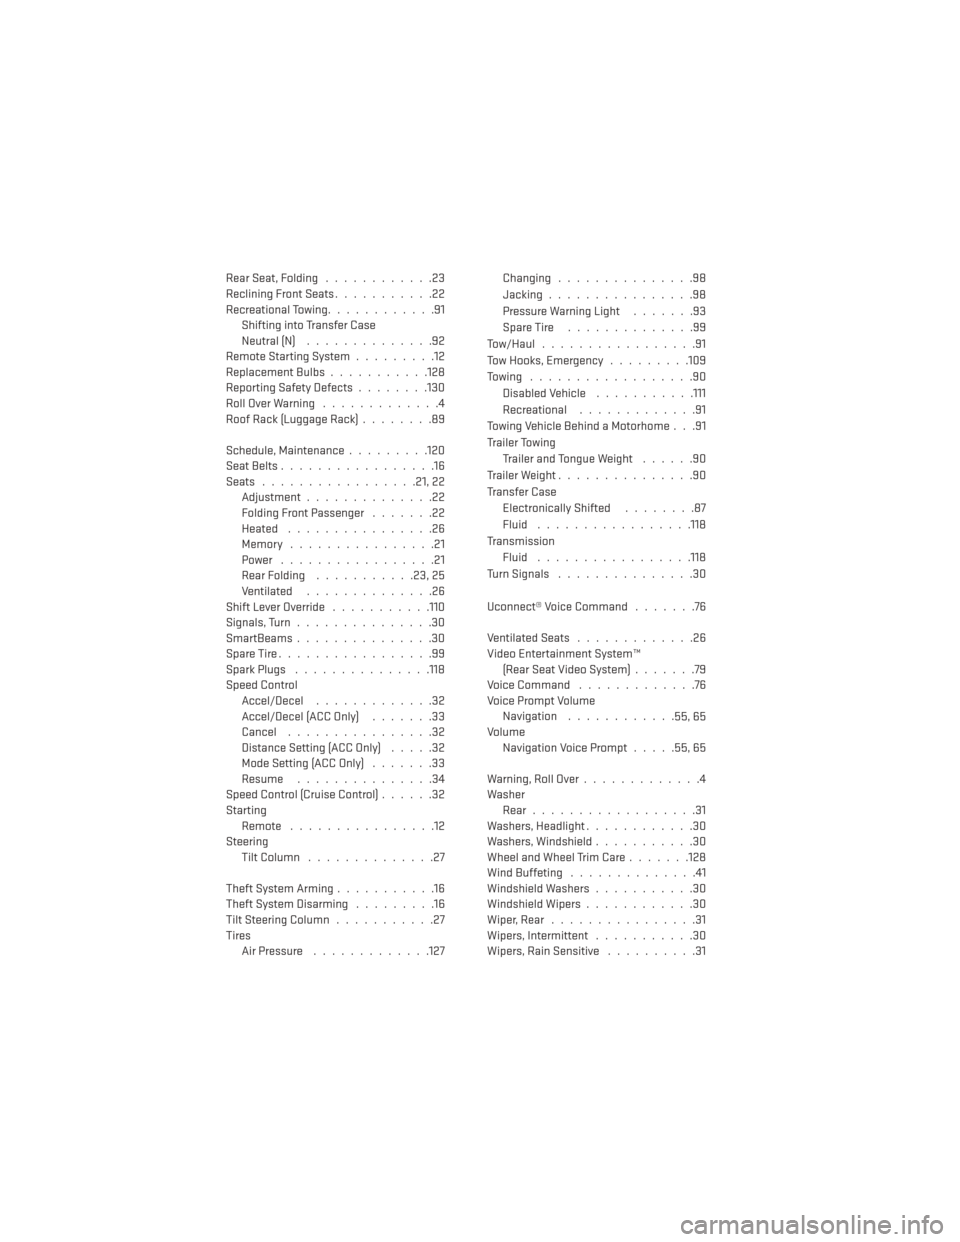
Rear Seat, Folding............23
Reclining Front Seats ...........22
Recreational Towing ............91
Shifting into Transfer Case
Neutral (N) ..............92
Remote Starting System .........12
ReplacementBulbs...........128
Reporting Safety Defects ........130
RollOverWarning .............4
Roof Rack (Luggage Rack) ........89
Schedule,Maintenance.........120
Seat Belts .................16
Seats .................21,22
Adjustment..............22
Folding Front Passenger .......22
Heated ................26
Memory ................21
Power .................21
Rear Folding ...........23,25
Ventilated ..............26
Shift Lever Override ...........110
Signals, Turn ...............30
SmartBeams...............30
SpareTire.................99
Spark Plugs ...............118
Speed Control Accel/Decel .............32
Accel/Decel (ACC Only) .......33
Cancel ................32
Distance Setting (ACC Only) .....32
Mode Setting (ACC Only) .......33
Resume ...............34
Speed Control (Cruise Control) ......32
Starting Remote ................12
Steering TiltColumn ..............27
Theft System Arming ...........16
Theft System Disarming .........16
Tilt Steering Column ...........27
Tires Air Pressure .............127 Changing ...............98
Jacking
................98
Pressure Warning Light .......93
SpareTire ..............99
Tow/Haul.................91
Tow Hooks, Emergency .........109
Towing ..................90 Disabled Vehicle ...........111
Recreational .............91
Towing Vehicle Behind a Motorhome . . .91
Trailer Towing Trailer and Tongue Weight ......90
Trailer Weight ...............90
Transfer Case Electronically Shifted ........87
Fluid .................118
Transmission Fluid .................118
Turn Signals ...............30
Uconnect® Voice Command .......76
Ventilated Seats .............26
Video Entertainment System™ (Rear Seat Video System) .......79
Voice Command .............76
Voice Prompt Volume Navigation ............
55,65
Volume Navigation Voice Prompt .....55,65
Warning,RollOver.............4
Washer Rear..................31
Washers, Headlight ............30
Washers, Windshield ...........30
Wheel and Wheel Trim Care .......128
Wind Buffeting ..............41
Windshield Washers ...........30
Windshield Wipers ............30
Wiper, Rear ................31
Wipers, Intermittent ...........30
Wipers, Rain Sensitive ..........31
INDEX
134