tire type DODGE DURANGO 2013 3.G User Guide
[x] Cancel search | Manufacturer: DODGE, Model Year: 2013, Model line: DURANGO, Model: DODGE DURANGO 2013 3.GPages: 140, PDF Size: 4.38 MB
Page 96 of 140
•When the malfunction indicator is illuminated, the system may not be able to detect or signal
low tire pressure as intended. TPMS malfunctions may occur for a variety of reasons, including
the installation of replacement or alternate tires or wheels on the vehicle that prevent the
TPMS from functioning properly. Always check the TPMS malfunction telltale after replacing
one or more tires or wheels on your vehicle, to ensure that the replacement or alternate tires
and wheels allow the TPMS to continue to function properly.
NOTE:
Tire pressures change by approximately 1 psi (7 kPa) per 12° F (7° C) of air temperature
change. Keep this in mind when checking tire pressure inside a garage, especially in the
Winter. Example: If garage temperature is 68°F (20°C) and the outside temperature is 32°F
(0°C), then the cold tire inflation pressure should be increased by 3 psi (21 kPa), which equals
1 psi (7 kPa) for every 12°F (7°C) for this outside temperature condition.
CAUTION!
The TPMS has been optimized for the original equipment tires and wheels. TPMS
pressures and warning have been established for the tire size equipped on your vehicle.
Undesirable system operation or sensor damage may result when using replacement
equipment that is not of the same size, type, and/or style. Aftermarket wheels can cause
sensor damage. Do not use tire sealant from a can, or balance beads if your vehicle is
equipped with a TPMS, as damage to the sensors may result.
BRAKE- Brake Warning Light
• The Brake Warning light illuminates when there is either a system malfunction or the parking brake is applied. If the light is on and the parking brake is not applied, it indicates
a possible brake hydraulic malfunction, brake booster problem or an Anti-Lock Brake
System problem.
• Please have your vehicle serviced immediately.
WARNING!
Driving a vehicle with the red brake light on is dangerous. Part of the brake system may
have failed. It will take longer to stop the vehicle. You could have a collision. Have the
vehicle checked immediately.
- Malfunction Indicator Light (MIL)
• Certain conditions, such as a loose or missing gas cap, poor fuel quality, etc., may illuminate the MIL after engine start. The vehicle should be serviced if the light stays on
through several typical driving cycles. In most situations, the vehicle will drive normally
and not require towing.
• If the MIL flashes when the engine is running, serious conditions may exist that could lead to immediate loss of power or severe catalytic converter damage. We recommend
you do not operate the vehicle. Have the vehicle serviced immediately.
WHAT TO DO IN EMERGENCIES
94
Page 100 of 140
JACKING AND TIRE CHANGING
Jack Location
• The scissor-type jack and tire changing tools are located in rear cargo area, below theload floor.
• Rotate the plastic thumb screw on the end of the jack to remove the jack from the bracket.
WHAT TO DO IN EMERGENCIES
98
Page 107 of 140
14. Lower the jack to the fully closed position. Return the tools to the proper positions in thetool bag. Fold the flap on the tool bag under the tools and roll the tools in the bag
underneath the others. Use the Velcro straps to secure the tool bag to the jack with the
lug wrench on the forward side of the jack. Expand the jack on the bracket by turning the
thumb screw clockwise until it is tight to prevent rattles.
15.
Reinstall the plastic plug into the floor of
the cargo area. Roll up and store the Jack,
Tool Kit and Tire Changing Instructions.
Reinstall the cover for the jack in the rear
storage bin.
NOTE:
The plastic thumb screw being on the right
and the position of the lug wrench before the
velcro straps go around the fully closed jack.
16.
Remove the blocks/rocks from the oppo-
site tire.
17.Have the aluminum road wheel and tire
repaired as soon as possible and properly
secure the spare tire, jack and tool kit.
Road Tire Installation
1. Mount the road tire on the axle.
2. Install the remaining lug nuts with the cone shaped end of the nut toward the
wheel. Lightly tighten the lug nuts.
3. Lower the vehicle to the ground by turning the jack handle counterclockwise.
4. Finish tightening the lug nuts. Push down on the wrench while at the end of the handle for increased leverage. Tighten the lug nuts in a star pattern until each nut has been
tightened twice. The correct tightness of each lug nut is 110 ft/lbs (150 N·m). If in doubt
about the correct tightness, have them checked with a torque wrench by your authorized
dealer or service station.
5. After 25 miles (40 km) check the lug nut torque with a torque wrench to ensure that all lug nuts are properly seated against the wheel.
CAUTION!
• Do not use power tools to winch the tire up or down. Impact type tools can damage the winch mechanism.
• Do not attempt to raise the vehicle by jacking on locations other than those indicated
in the Jacking Instructions for this vehicle.
• Be sure to mount the spare tire with the valve stem facing outward. The vehicle could
be damaged if the spare tire is mounted incorrectly.
WHAT TO DO IN EMERGENCIES
105
Page 108 of 140
WARNING!
• Do not attempt to change a tire on the side of the vehicle close to moving traffic. Pullfar enough off the road to avoid the danger of being hit when operating the jack or
changing the wheel.
• Being under a jacked-up vehicle is dangerous. The vehicle could slip off the jack and
fall on you. You could be crushed. Never put any part of your body under a vehicle that
is on a jack. If you need to get under a raised vehicle, take it to a service center where
it can be raised on a lift.
• The jack is designed to be used as a tool for changing tires only. The jack should not
be used to lift the vehicle for service purposes. The vehicle should be jacked on a firm
level surface only. Avoid ice or slippery areas.
• Always park on a firm, level surface as far from the edge of the roadway as possible
before raising the vehicle.
• Turn on the Hazard Warning flasher.
• Block the wheel diagonally opposite the wheel to be raised.
• Set the parking brake firmly and set the automatic transmission in PARK.
• Never start or run the engine with the vehicle on a jack.
• Do not let anyone sit in the vehicle when it is on a jack.
• Do not get under the vehicle when it is on a jack.
• Only use the jack in the positions indicated and for lifting this vehicle during a tire
change.
• If working on or near a roadway, be extremely careful of motor traffic.
• To assure that spare tires, flat or inflated, are securely stowed, spares must be
stowed with the valve stem facing the ground. Carefully follow these tire changing
warnings to help prevent personal injury or damage to your vehicle:
• Raising the vehicle higher than necessary can make the vehicle less stable.It could slip off the jack and hurt someone near it. Raise the vehicle only
enough to remove the tire.
• To avoid the risk of forcing the vehicle off the jack, do not fully tighten the
wheel nuts until the vehicle has been lowered. Failure to follow this warning
may result in personal injury.
• Do not use power tools to winch the tire up or down. Impact-type tools may
damage the winch mechanism.
• A loose tire or jack, thrown forward in a collision or hard stop could endanger
the occupants of the vehicle. Always stow the jack parts and the spare tire in
the places provided.
• To avoid the risk of forcing the vehicle off the jack, do not tighten the lug nuts
fully until the vehicle is lowered to the ground.
WHAT TO DO IN EMERGENCIES
106
Page 130 of 140
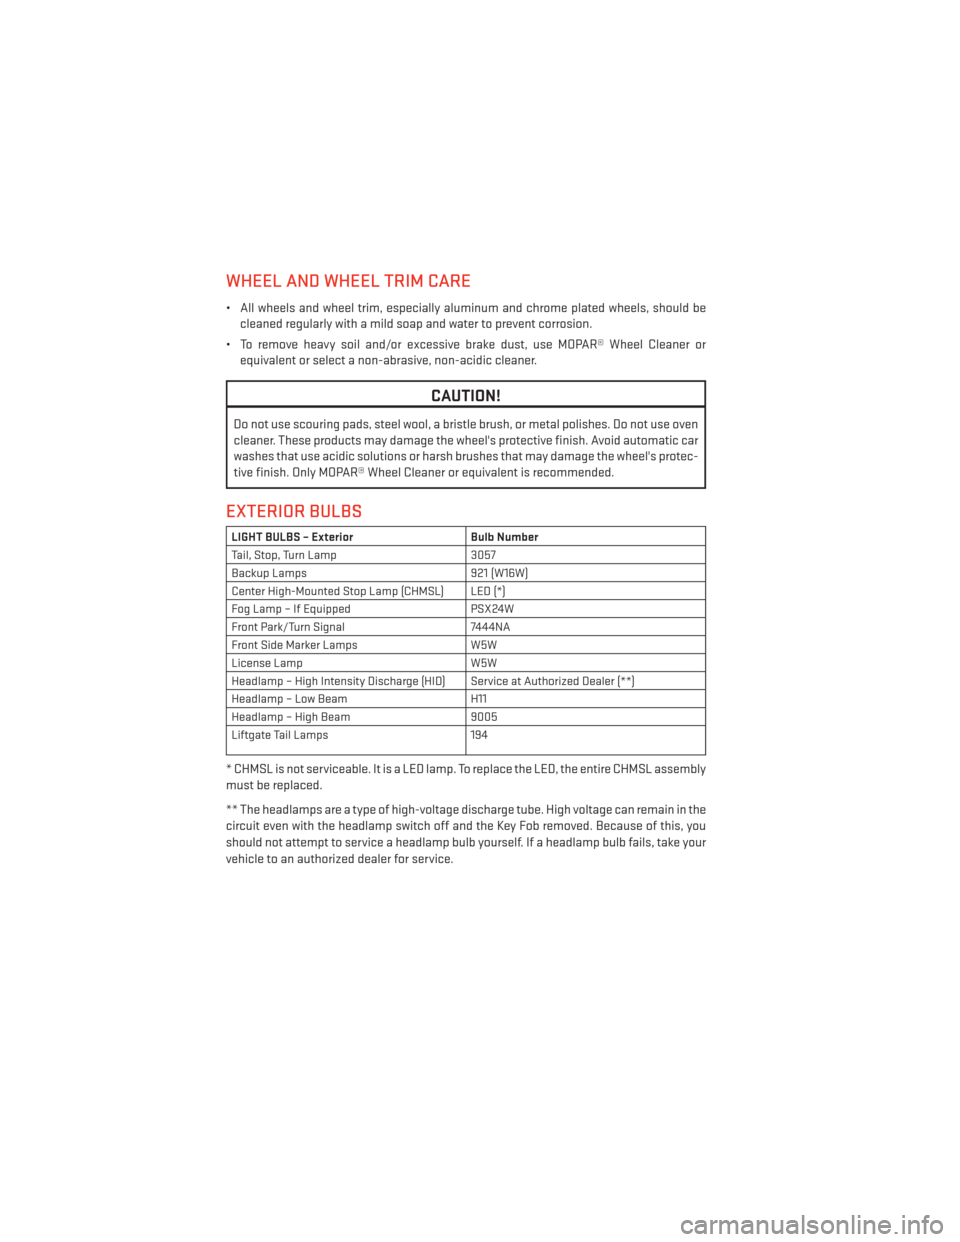
WHEEL AND WHEEL TRIM CARE
• All wheels and wheel trim, especially aluminum and chrome plated wheels, should becleaned regularly with a mild soap and water to prevent corrosion.
• To remove heavy soil and/or excessive brake dust, use MOPAR® Wheel Cleaner or equivalent or select a non-abrasive, non-acidic cleaner.
CAUTION!
Do not use scouring pads, steel wool, a bristle brush, or metal polishes. Do not use oven
cleaner. These products may damage the wheel's protective finish. Avoid automatic car
washes that use acidic solutions or harsh brushes that may damage the wheel's protec-
tive finish. Only MOPAR® Wheel Cleaner or equivalent is recommended.
EXTERIOR BULBS
LIGHT BULBS – Exterior Bulb Number
Tail, Stop, Turn Lamp 3057
Backup Lamps 921 (W16W)
Center High-Mounted Stop Lamp (CHMSL) LED (*)
Fog Lamp – If Equipped PSX24W
Front Park/Turn Signal 7444NA
Front Side Marker Lamps W5W
License Lamp W5W
Headlamp – High Intensity Discharge (HID) Service at Authorized Dealer (**)
Headlamp – Low Beam H11
Headlamp – High Beam 9005
Liftgate Tail Lamps 194
* CHMSL is not serviceable. It is a LED lamp. To replace the LED, the entire CHMSL assembly
must be replaced.
** The headlamps are a type of high-voltage discharge tube. High voltage can remain in the
circuit even with the headlamp switch off and the Key Fob removed. Because of this, you
should not attempt to service a headlamp bulb yourself. If a headlamp bulb fails, take your
vehicle to an authorized dealer for service.
MAINTAINING YOUR VEHICLE
128
Page 134 of 140
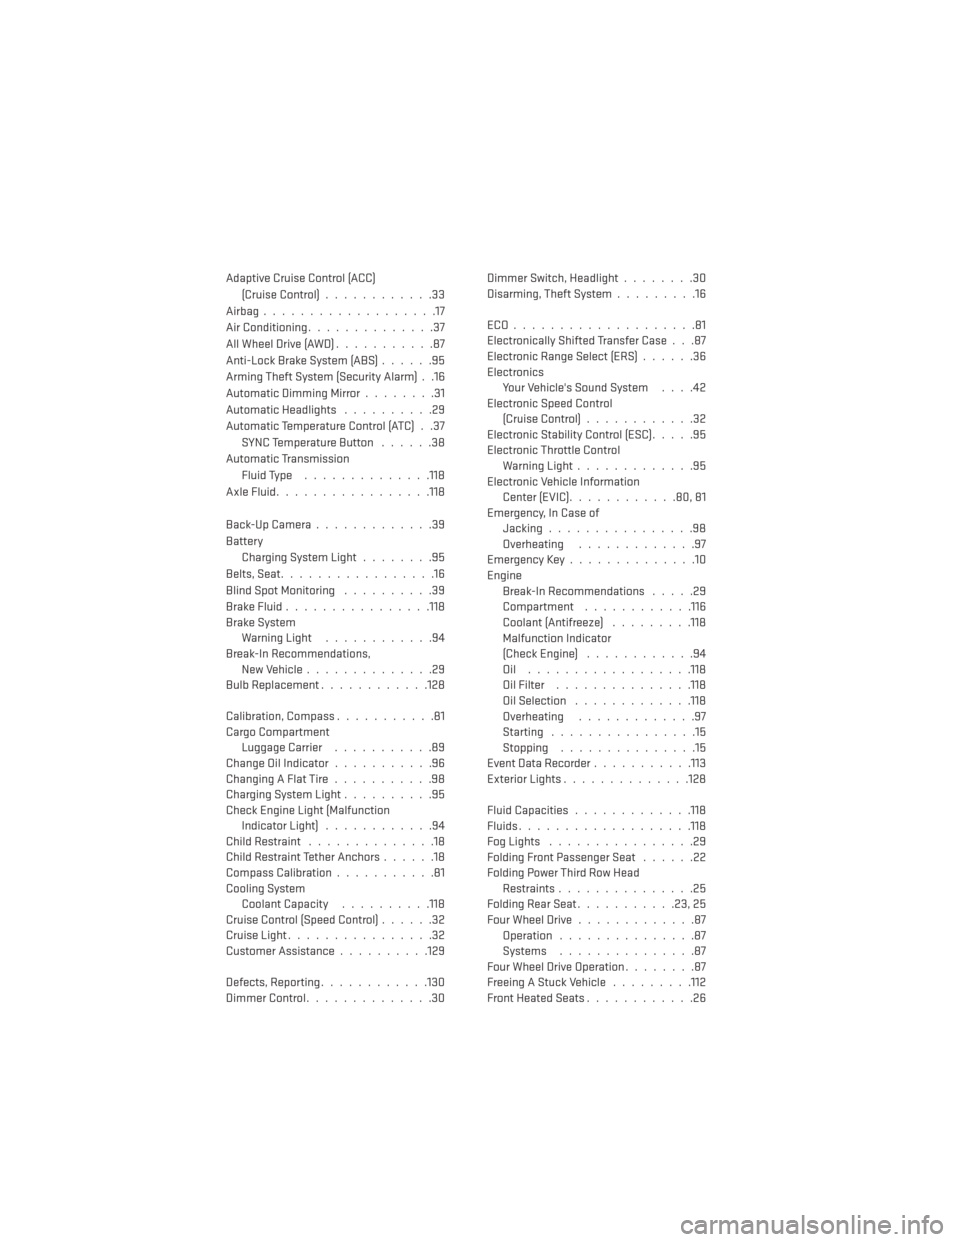
Adaptive Cruise Control (ACC)(Cruise Control) ............33
Airbag ...................17
Air Conditioning ..............37
AllWheelDrive(AWD)...........87
Anti-Lock Brake System (ABS) ......95
Arming Theft System (Security Alarm) . .16
Automatic Dimming Mirror ........31
Automatic Headlights ..........29
Automatic Temperature Control (ATC) . .37 SYNCTemperatureButton ......38
Automatic Transmission Fluid Type ..............118
AxleFluid................ .118
Back-UpCamera.............39
Battery Charging System Light ........95
Belts, Seat .................16
Blind Spot Monitoring ..........39
BrakeFluid............... .118
Brake System Warning Light ............94
Break-In Recommendations, New Vehicle ..............29
Bulb Replacement ............128
Calibration, Compass ...........81
Cargo Compartment Luggage Carrier ...........89
Change Oil Indicator ...........96
ChangingAFlatTire...........98
Charging System Light ..........95
Check Engine Light (Malfunction Indicator Light) ............94
Child Restraint ..............18
Child Restraint Tether Anchors ......18
Compass Calibration ...........81
Cooling System Coolant Capacity ..........118
Cruise Control (Speed Control) ......32
Cruise Light ................32
Customer Assistance ..........129
Defects, Reporting ............130
DimmerControl..............30 Dimmer Switch, Headlight
........30
Disarming, Theft System .........16
ECO....................81
Electronically Shifted Transfer Case . . .87
Electronic Range Select (ERS) ......36
Electronics Your Vehicle's Sound System ....42
Electronic Speed Control (Cruise Control) ............32
Electronic Stability Control (ESC) .....95
Electronic Throttle Control Warning Light .............95
Electronic Vehicle Information Center(EVIC)............80,81
Emergency, In Case of Jacking ................98
Overheating .............97
Emergency Key ..............10
Engine Break-In Recommendations .....29
Compartment ............116
Coolant
(Antifreeze) .........118
Malfunction Indicator
(Check Engine) ............94
Oil ..................118
Oil Filter ...............118
Oil Selection .............118
Overheating .............97
Starting ................15
Stopping ...............15
Event Data Recorder ...........113
Exterior Lights ..............128
Fluid Capacities .............118
Fluids.................. .118
FogLights ................29
Folding Front Passenger Seat ......22
Folding Power Third Row Head Restraints ...............25
Folding Rear Seat ...........23,25
Four Wheel Drive .............87
Operation ...............87
Systems ...............87
Four Wheel Drive Operation ........87
Freeing A Stuck Vehicle .........112
Front Heated Seats ............26
INDEX
132
Page 138 of 140
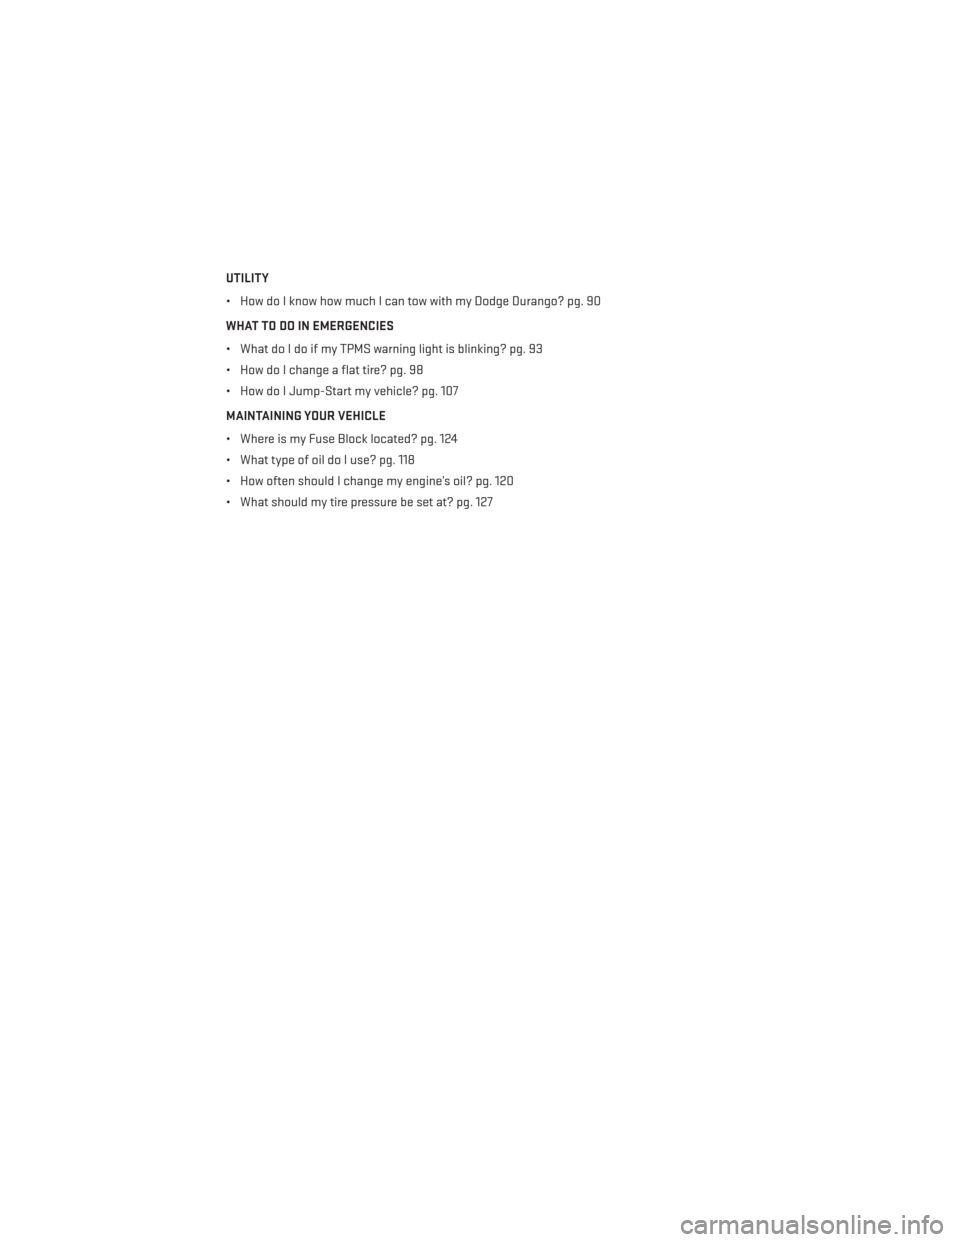
UTILITY
• How do I know how much I can tow with my Dodge Durango? pg. 90
WHAT TO DO IN EMERGENCIES
• What do I do if my TPMS warning light is blinking? pg. 93
• How do I change a flat tire? pg. 98
• How do I Jump-Start my vehicle? pg. 107
MAINTAINING YOUR VEHICLE
• Where is my Fuse Block located? pg. 124
• What type of oil do I use? pg. 118
• How often should I change my engine’s oil? pg. 120
• What should my tire pressure be set at? pg. 127
NOTES
136