ECU DODGE DURANGO 2014 3.G Owner's Manual
[x] Cancel search | Manufacturer: DODGE, Model Year: 2014, Model line: DURANGO, Model: DODGE DURANGO 2014 3.GPages: 188, PDF Size: 3.8 MB
Page 57 of 188
Purchasing Online
You can renew your subscription to a package or purchase WiFi from the Mopar Owner
Connect website. You must first set up a Uconnect® Access Payment Account online.
Log into moparownerconnect.com, select Edit Profile, then Uconnect® Payment Account.
1. Log In to the Mopar Owner Connect website (moparownerconnect.com) with yourusername/email and password.
2. Click on the “Shop” tab, then click on the Uconnect® Store.
3. From the Uconnect® Store, select the item you wish to purchase.
4.
This will launch the selected item into purchase mode along with providing additional
information. The purchase process begins when you press the “Buy” button on the touch-
screen.
5. The Uconnect® Store will display a “Purchase Overview” message confirming the finan- cial details of your purchase. Press the “Purchase” key to continue.
6. The Uconnect® Store will ask you to “Confirm Payment” using your default payment method on file in your Payment Account. Press the “Complete” key to continue.
7. The Uconnect® Payment Account will then ask for your “Payment Account PIN,” which you established when setting up your Uconnect® payment account. After entering this
four digit PIN, press the “Complete” key to make the purchase.
8. You will receive a confirmation message that your purchase has been submitted. Press the OK button to end the process.
Purchasing WiFi Hotspot While In Your Vehicle
You must set up a Uconnect® Access Payment Account online (log in to moparownerconnect.com,
go to Edit Profile, then Uconnect® Payment Account,to set up and manage your Payment Account).
1.To purchase WiFi while in your vehicle, ensure the vehicle is running and in Park. Press the
Apps button on the touchscreen, then select WiFi within the Tools menu. Follow the
on-screen instructions. When asked for your payment PIN, use the 4-digit PIN you estab-
lished when setting up your payment account on Mopar Owner Connect.
NOTE:
This may be different than the Uconnect® Security PIN you established for using features
such as Remote Vehicle Start. After purchasing WiFi, it may take up to 30 minutes (with the
vehicle running) before the WiFi will be active in your vehicle.
2. Select WiFi again, then note the hotspot name. Select this network when connecting
devices to the hotspot. Also click on View/Edit Passphrase, then note the security
passphrase you will need to connect to the network on each device.
If your devices cannot see the WiFi Hotspot network after 30 minutes, please contact
Uconnect® Care by pressing the Assist button on the rear view mirror, or by calling 855-792-4241.
ELECTRONICS
55
Page 59 of 188
Maintaining Your Uconnect® Access Account
Reinstalling An App (Uconnect® 8.4AN Only)
You can easily correct many Application related issues you may be experiencing by re-
setting the App back to the factory setting. From the vehicle’s radio touchscreen, complete
the following steps:
1. Press the “Uconnect® App” and open the Uconnect® Store. Go to My Apps.
2. In My Apps, select “Settings,” then “Reinstall App.” Press “Continue.”
3. Your Apps have been successfully re-installed.
Canceling Your Subscription
Should you want to cancel your subscription, you can remove your account information
using the same procedure contained in the Selling Your Vehicle section.
Selling Your Vehicle
When you sell your vehicle, we recommend that you remove your Uconnect® Access
Account information from the vehicle. You can do this using the radio touchscreen
in the vehicle(Uconnect® 8.4AN only) or on the Mopar Owner Connect website
(moparownerconnect.com). Removing your account information cancels your subscription
and makes your vehicle factory-ready for a new owner/subscriber.
1. From your vehicle’s radio touchscreen, select “Uconnect® Store” from the Apps Menu.
2. Select “My Apps,” then “Settings.” Press “Remove Uconnect® Account.”
3. Enter your Uconnect® Security PIN, select “Proceed to Remove Vehicle from Uconnect Account.”
For additional information on Uconnect®:
• U.S. residents - visit DriveUconnect.com or call 1-877-855-8400.
• Canadian Residents - visit DriveUconnect.com or call, 1-800-465-2001 (English) or 1-800-387-9983 (French).
ELECTRONICS
57
Page 61 of 188
4.Yelp® — Customers have the ability to search for nearby destinations or a point of
interest (POI) either by category or custom search by using keywords (for example,
“Italian restaurant”). Searching can be done by voice or using the touchscreen keypad.
Using the touchscreen, launch Yelp® by selecting the “Apps” icon, touch the “All Apps”
tab, and then touch “Yelp.” Using voice recognition press the Voice Command (VR)
button on the steering wheel and say “Launch Yelp®.”
5. Security Alarm Notification — The Security Alarm Notification feature notifies you via
email or text (SMS) message when the vehicle’s factory-installed security alarm system
has been set-off. There are a number of reasons why your alarm may have been
triggered, one of which could be that your vehicle was stolen. If so, please see the details
of the Stolen Vehicle Assistance service below. When you register, Security Alarm
Notification is automatically set to send you an email at the mail address you provide
should the alarm go off. You may also opt to have a text message sent to your mobile
device.
6. Stolen Vehicle Assistance — If your vehicle is stolen, contact local law enforcement
immediately to file a stolen vehicle report. Once this report has been filed, Uconnect®
care can help locate your vehicle. The Uconnect® Care agent will ask for the stolen
vehicle report number issued by local law enforcement. Then, using GPS technology and
the built-in wireless connection within your vehicle, the Uconnect® Care agent will be
able to locate the stolen vehicle and work with law enforcement to help recover it.
(Vehicle must be within the United States, have network coverage and must be regis-
tered with Uconnect® Access with an active subscription that includes the applicable
feature).
7. WiFi Hotspot — WiFi Hotspot is on-demand WiFi 3G connectivity that's built-in and ready
to go whenever you are. Once your vehicle is registered for Uconnect® Access, you can
purchase a Wifi Hotspot subscription at the Uconnect® Store. After you've made your
purchase, turn on your signal and connect your devices. It's never been easier to bring
your home or office with you.
Your vehicle must have a working electrical system for any of the in vehicle Uconnect®
features to operate.
Uconnect® Access Remote Features
If you own a compatible iPhone® or Android® powered device, the Uconnect® Access App
allows you to remotely lock or unlock your doors, start your engine or activate your horn
and lights from virtually anywhere (Vehicle must be within the United States and have
network coverage). You can download the App from Mopar Owner Connect or from the
App Store (iPhone) or Google Play store. Visit UconnectPhone.com to determine if your
device is compatible. For Uconnect® Phone customer support and to determine if your
device is compatible.
U.S. residents - visit UconnectPhone.com or call 1–877–855–8400
ELECTRONICS
59
Page 62 of 188
Remote Start—This feature provides the ability to start the engine on your vehicle, without the
keys and from virtually any distance. You can send a request to your vehicle in one of two ways:
1. Using the Uconnect® Access App from a compatible smartphone.
2. From the Mopar Owner Connect website.
• You can also send a command to turn-off an engine that has been remote started.
• After 15 minutes if you have not entered your vehicle with the key, the engine will shutoff automatically.
•
This remote function requires your vehicle to be equipped with a factory-installed
Remote Start system. To use this feature after the Uconnect® Access App is downloaded,
login with your user name and Uconnect® Security PIN.
•You can set-up notifications for your account to receive an email or text (SMS) message
every time a command is sent. Login to Mopar Owner Connect (moparownerconnect.com)
and click on Edit Profile to manage Uconnect® Notifications.
Remote Door Lock/Unlock — This feature provides the ability to lock or unlock the door on
your vehicle, without the keys and from virtually any distance. You can send a request to
your vehicle in one of three ways:
1. Using the Uconnect® Access App from a compatible smartphone.
2. From the Mopar Owner Connect website.
3. By contacting the Uconnect® Care on the phone.
To use this feature after the Uconnect® Access App is downloaded, login using your user
name and Uconnect® Security PIN. Press the “App” button on your smartphone with the
closed lock icon to lock the door, and press the “open lock” icon to unlock the driver’s door.
You can set-up notifications for your account to receive an email or text (SMS) message
every time a command is sent. Login to Mopar Owner Connect (moparownerconnect.com)
and click on Edit Profile to manage Uconnect® Notifications.
Remote Horn And Lights — It’s easy to locate a vehicle in a dark, crowded or noisy parking
area by activating the horn and lights. It may also help if you need to draw attention to your
vehicle for any reason. You can send a request to your vehicle in one of three ways:
1. Using the Uconnect® Access App from a compatible smartphone.
2. From the Mopar Owner Connect website.
3. By contacting the Uconnect® Care on the phone.
To use this feature after the Uconnect® Access App is downloaded, login using your user name
and Uconnect® Security PIN. You can set-up notifications for your account to receive an
email or text (SMS) message every time a command is sent. Login to Mopar Owner Connect
(moparownerconnect.com) and click on Edit Profile to manage Uconnect® Notifications.
ELECTRONICS
60
Page 120 of 188
UNIVERSAL GARAGE DOOR OPENER (HomeLink®)
•HomeLink® replaces up to three hand-held transmitters that operate devices such as
garage door openers, motorized gates, lighting or home security systems. The HomeLink®
unit is powered by your vehicles 12 Volt battery.
• The HomeLink® buttons that are located in the overhead console or sunvisor designate the three different HomeLink® channels.
• The HomeLink® indicator is located above the center button.
Before You Begin Programming HomeLink®
•Be sure that your vehicle is parked outside of
the garage before you begin programming.
•For more efficient programming and accu-
rate transmission of the radio-frequency
signal it is recommended that a new battery
be placed in the hand-held transmitter of
the device that is being programmed to the
HomeLink® system.
•Erase all channels before you begin pro-
gramming. To erase the channels, place
the ignition switch into the ON/RUN posi-
tion, then press and hold the two out-
side HomeLink® buttons (I and III) for up to
20 seconds or until the red indicator flashes.
NOTE:
• Erasing all channels should only be performed when programming HomeLink® for the
first time. Do not erase channels when programming additional buttons.
• If you have any problems, or require assistance, please call toll-free 1–800–355– 3515 or, on the Internet at www.HomeLink.com for information or assistance.
Programming A Rolling Code
NOTE:
For programming Garage Door Openers that were manufactured after 1995. These Garage Door
Openers can be identified by the “LEARN” or “TRAIN” button located where the hanging
antenna is attached to the Garage Door Opener. It is NOT the button that is normally used to
open and close the door. The name and color of the button may vary by manufacturer.
1. Place the ignition switch into the ON/RUN position.
2. Place the hand-held transmitter 1 to 3 in (3 to 8 cm) away from the HomeLink® button you
wish to program while keeping the HomeLink® indicator light in view.
3. Simultaneously press and hold both the HomeLink® button you want to program and the hand-held transmitter button.
ELECTRONICS
118
Page 122 of 188
Using HomeLink®
• To operate, press and release the programmed HomeLink® button. Activation will nowoccur for the programmed device (e.g., garage door opener, gate operator, security
system, entry door lock, home/office lighting, etc.,). The hand-held transmitter of the
device may also be used at any time.
WARNING!
• Your motorized door or gate will open and close while you are programming the
universal transceiver. Do not program the transceiver if people or pets are in the path
of the door or gate.
• Do not run your vehicle in a closed garage or confined area while programming the
transceiver. Exhaust gas from your vehicle contains Carbon Monoxide (CO) which is
odorless and colorless. Carbon Monoxide is poisonous when inhaled and can cause
you and others to be severely injured or killed.
POWER INVERTER
There is a 115 Volt, 150 Watt power inverter outlet located on the back of the center console.
This outlet can power cellular phones, electronics and other low power devices requiring
power up to 150 Watts.
NOTE:
The power inverter is designed with built-in
overload protection. If the power rating of
150 Watts is exceeded, the power inverter
will automatically shut down. Once the elec-
trical device has been removed from the
outlet, the inverter should automatically re-
set. If the power rating exceeds approxi-
mately 170 Watts, the power inverter may
have to be reset manually. To reset the in-
verter manually, unplug the device and plug
it in again. To avoid overloading the circuit,
check the power ratings on electrical devices prior to using the inverter.
WARNING!
To Avoid Serious Injury or Death DO NOT:
• insert any objects into the receptacles
• touch with wet hands
Close the lid when not in use. If this outlet is mishandled, it may cause an electric shock
and failure.
ELECTRONICS
120
Page 128 of 188
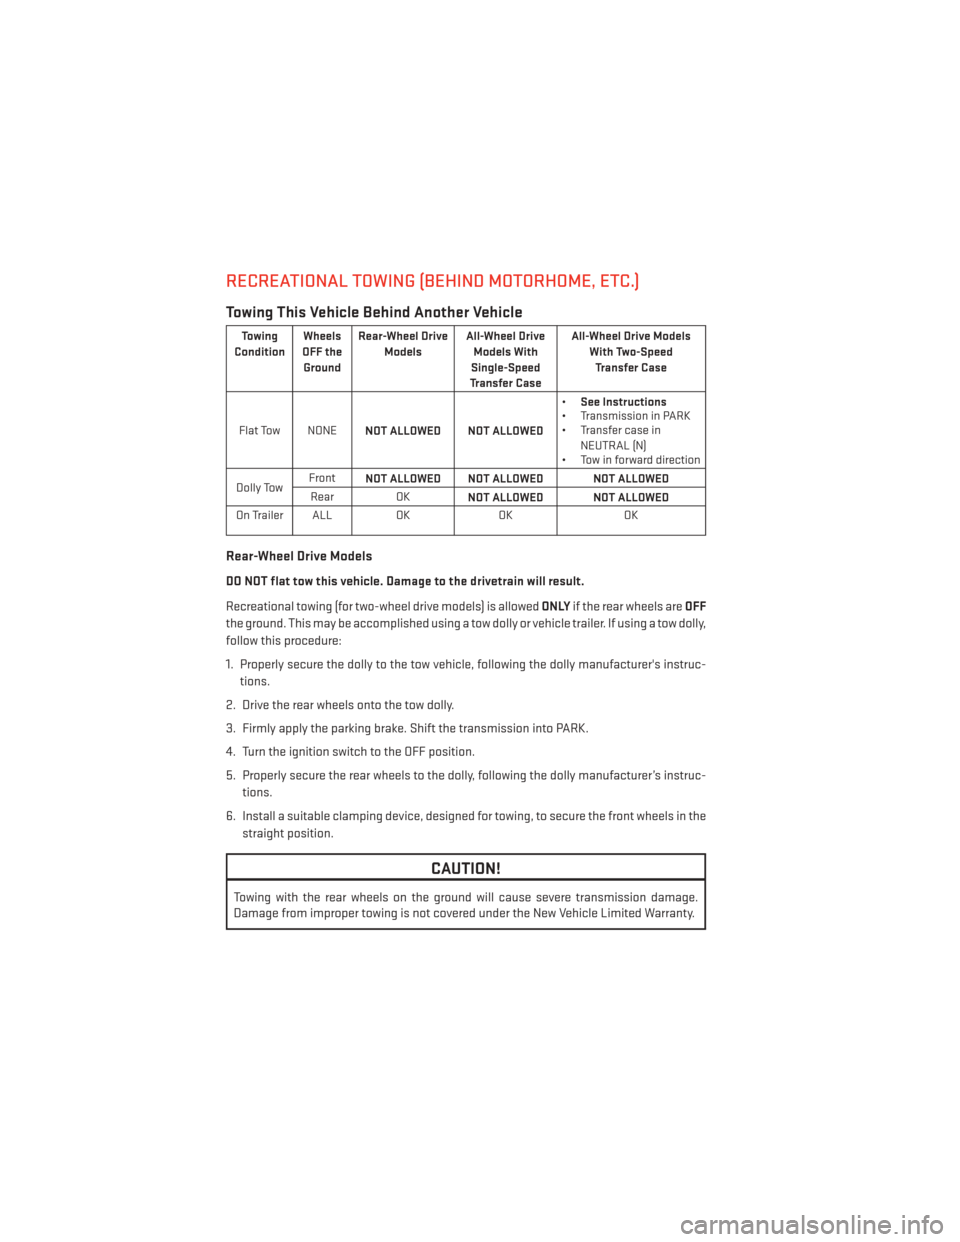
RECREATIONAL TOWING (BEHIND MOTORHOME, ETC.)
Towing This Vehicle Behind Another Vehicle
Towing
Condition Wheels
OFF the Ground Rear-Wheel Drive
Models All-Wheel Drive
Models With
Single-Speed
Transfer Case All-Wheel Drive Models
With Two-SpeedTransfer Case
Flat Tow NONE NOT ALLOWED NOT ALLOWED •
See Instructions
• Transmission in PARK
• Transfer case in
NEUTRAL (N)
• Tow in forward direction
Dolly Tow Front
NOT ALLOWED NOT ALLOWED NOT ALLOWED
Rear OK NOT ALLOWED NOT ALLOWED
On Trailer ALL OKOK OK
Rear-Wheel Drive Models
DO NOT flat tow this vehicle. Damage to the drivetrain will result.
Recreational towing (for two-wheel drive models) is allowed ONLYif the rear wheels are OFF
the ground. This may be accomplished using a tow dolly or vehicle trailer. If using a tow dolly,
follow this procedure:
1. Properly secure the dolly to the tow vehicle, following the dolly manufacturer's instruc- tions.
2. Drive the rear wheels onto the tow dolly.
3. Firmly apply the parking brake. Shift the transmission into PARK.
4. Turn the ignition switch to the OFF position.
5. Properly secure the rear wheels to the dolly, following the dolly manufacturer’s instruc- tions.
6. Install a suitable clamping device, designed for towing, to secure the front wheels in the straight position.
CAUTION!
Towing with the rear wheels on the ground will cause severe transmission damage.
Damage from improper towing is not covered under the New Vehicle Limited Warranty.
UTILITY
126
Page 146 of 188
10. Remove the Dodge center cap using ajack tool from inside the aluminum road
wheel and snap on the protective plastic
plate.
NOTE:
The plastic plate will prevent the road wheel
from being scratched when sliding it under
the vehicle.
11. Stand the wheel up against the bumper with the plastic plate facing you.
12. Slide the cable end, spring and metal tube through the wheel and plastic plate.
Rotate the stamping on the cable and
push it through the wheel and plastic
plate. Snap the stamping into place.
13.
Slide the road wheel on the ground using
the protective plate until it is directly un-
der the winch and between the rear bum-
per and exhaust system heat shields.
Raise the tire by turning the lug wrench on
the winch extension clockwise until it
clicks/skips three times to make sure the
cable is tight.
NOTE:
Double check to ensure the tire is snug against the underbody of the vehicle. Damage to the
winch cable may result if the vehicle is driven with the tire loose.
14. Lower the jack to the fully closed posi- tion. Return the tools to the proper posi-
tions in the tool bag. Fold the flap on the
tool bag under the tools and roll the tools
in the bag underneath the others. Use
the Velcro® straps to secure the tool bag
to the jack with the lug wrench on the
forward side of the jack. Expand the jack
on the bracket by turning the thumb
screw clockwise until it is tight to pre-
vent rattles.
WHAT TO DO IN EMERGENCIES
144
Page 147 of 188
15. Reinstall the plastic plug into the floor of the cargo area. Roll up and store the Jack, ToolKit and Tire Changing Instructions. Reinstall the cover for the jack in the rear storage
bin.
NOTE:
The plastic thumb screw being on the right and the position of the lug wrench before the
Velcro® straps go around the fully closed jack.
16.
Remove the blocks/rocks from the opposite tire.
17. Have the aluminum road wheel and tire repaired as soon as possible and properly secure the spare tire, jack and tool kit.
Road Tire Installation
1. Mount the road tire on the axle.
2. Install the remaining lug nuts with the cone shaped end of the nut toward the wheel.Lightly tighten the lug nuts.
3. Lower the vehicle to the ground by turning the jack handle counterclockwise.
4. Finish tightening the lug nuts. Push down on the wrench while at the end of the handle for increased leverage. Tighten the lug nuts in a star pattern until each nut has been
tightened twice. The correct tightness of each lug nut is 130 ft/lbs (176 N·m). If in doubt
about the correct tightness, have them checked with a torque wrench by your authorized
dealer or service station.
5. After 25 miles (40 km) check the lug nut torque with a torque wrench to ensure that all lug nuts are properly seated against the wheel.
CAUTION!
• Do not use power tools to winch the tire up or down. Impact type tools can damage the winch mechanism.
• Do not attempt to raise the vehicle by jacking on locations other than those indicated
in the Jacking Instructions for this vehicle.
• Be sure to mount the spare tire with the valve stem facing outward. The vehicle could
be damaged if the spare tire is mounted incorrectly.
WHAT TO DO IN EMERGENCIES
145
Page 148 of 188

WARNING!
• Do not attempt to change a tire on the side of the vehicle close to moving traffic. Pullfar enough off the road to avoid the danger of being hit when operating the jack or
changing the wheel.
• Being under a jacked-up vehicle is dangerous. The vehicle could slip off the jack and
fall on you. You could be crushed. Never put any part of your body under a vehicle that
is on a jack. If you need to get under a raised vehicle, take it to a service center where
it can be raised on a lift.
• The jack is designed to be used as a tool for changing tires only. The jack should not
be used to lift the vehicle for service purposes. The vehicle should be jacked on a firm
level surface only. Avoid ice or slippery areas.
• Always park on a firm, level surface as far from the edge of the roadway as possible
before raising the vehicle.
• Turn on the Hazard Warning flasher.
• Block the wheel diagonally opposite the wheel to be raised.
• Set the parking brake firmly and set the automatic transmission in PARK.
• Never start or run the engine with the vehicle on a jack.
• Do not let anyone sit in the vehicle when it is on a jack.
• Do not get under the vehicle when it is on a jack.
• Only use the jack in the positions indicated and for lifting this vehicle during a tire
change.
• If working on or near a roadway, be extremely careful of motor traffic.
• To assure that spare tires, flat or inflated, are securely stowed, spares must be
stowed with the valve stem facing the ground. Carefully follow these tire changing
warnings to help prevent personal injury or damage to your vehicle:
• Raising the vehicle higher than necessary can make the vehicle less stable. Itcould slip off the jack and hurt someone near it. Raise the vehicle only enough
to remove the tire.
• To avoid the risk of forcing the vehicle off the jack, do not fully tighten the
wheel nuts until the vehicle has been lowered. Failure to follow this warning
may result in personal injury.
• Do not use power tools to winch the tire up or down. Impact-type tools may
damage the winch mechanism.
• A loose tire or jack, thrown forward in a collision or hard stop could endanger
the occupants of the vehicle. Always stow the jack parts and the spare tire in
the places provided.
• To avoid the risk of forcing the vehicle off the jack, do not tighten the lug nuts
fully until the vehicle is lowered to the ground.
WHAT TO DO IN EMERGENCIES
146