automatic transmission DODGE DURANGO 2014 3.G User Guide
[x] Cancel search | Manufacturer: DODGE, Model Year: 2014, Model line: DURANGO, Model: DODGE DURANGO 2014 3.GPages: 188, PDF Size: 3.8 MB
Page 15 of 188
Lock Or Unlock The Liftgate
• To Lock The Liftgate — With a RemoteKeyless Entry (RKE) transmitter within 3 ft
(1.0 m) of the liftgate, press the passive
entry lock button located to the right of
electronic liftgate handle.
•
To Unlock/Enter The Liftgate — The liftgate
passive entry unlock feature is built into the
electronic liftgate handle. With a Remote
Keyless Entry (RKE) transmitter within 3 ft
(1.0 m) of the liftgate, press the electronic
release switch to open the liftgate.
NOTE:
Refer to your Owner's Manual on the DVD for
further information.
Engine Starting/Stopping
Starting
Perform the following starting procedure
with a Remote Keyless Entry (RKE) transmit-
ter inside the vehicle:
1. Rotate the shifter control to PARK.
2. While pressing the brake pedal, press the
ENGINE START/STOP button once. If the
engine fails to start, the starter will disen-
gage automatically after 10 seconds.
3.
To stop the cranking of the engine prior to
the engine starting, press the button again.
Stopping
1. Bring the vehicle to a complete stop.
2. Rotate the shifter control to PARK (P).
3. Press the ENGINE START/STOP button once. The ignition switch will return to the OFF position.
NOTE:
If the transmission is not in PARK and the vehicle is in motion, the ENGINE START/STOP
button must be held for two seconds with the vehicle speed above 5 mph (8 km/h) before
the engine will shut off.
Electronic Liftgate Handle
1 — Electronic Release Switch
2 — Lock Button Location
GETTING STARTED
13
Page 32 of 188
ENGINE BREAK-IN RECOMMENDATIONS
A long break-in period is not required for the engine and drivetrain (transmission and axle)
in your vehicle.
Drive moderately during the first 300 miles (500 km). After the initial 60 miles (100 km),
speeds up to 50 or 55 mph (80 or 90 km/h) are desirable.
While cruising, brief full-throttle acceleration within the limits of local traffic laws contrib-
utes to a good break-in. Wide-open throttle acceleration in low gear can be detrimental and
should be avoided.
The engine oil installed in the engine at the factory is a high-quality energy conserving type
lubricant. Oil changes should be consistent with anticipated climate conditions under
which vehicle operations will occur. For the recommended viscosity and quality grades,
refer to “Maintaining Your Vehicle.”
NOTE:
A new engine may consume some oil during its first few thousand miles (kilometers) of
operation. This should be considered a normal part of the break-in and not interpreted as an
indication of an engine problem or malfunction.
CAUTION!
Never use Non-Detergent Oil or Straight Mineral Oil in the engine or damage may result.
HEADLIGHT SWITCH
Automatic Headlights/Parking Lights/Headlights
• Rotate the headlight switch, located onthe instrument panel to the left of the
steering wheel, to the first detent for park-
ing lights
and to the second detent
for headlights
.
• With the parking lights or low beam head- lights on, push the headlight switch once
for fog lights.
• Rotate the headlight switch to “AUTO” for AUTO headlights.
• When set to AUTO, the system automati- cally turns the headlights on or off based
on ambient light levels.
OPERATING YOUR VEHICLE
30
Page 42 of 188
AUTOSTICK®
AutoStick® is a driver-interactive transmis-
sion feature providing manual shift control,
giving you more control of the vehicle.
AutoStick® allows you to maximize engine
braking, eliminate undesirable upshifts and
downshifts, and improve overall vehicle per-
formance. This system can also provide you
with more control during passing, city driving, cold slippery conditions, mountain driving,
trailer towing, and many other situations.
Operation
• When the transmission is in DRIVE, it will operate automatically, shifting between theeight available gears. To engage AutoStick®, simply tap one of the steering wheel-
mounted shift paddles (+/-). Tapping (-) to enter AutoStick® will downshift the transmis-
sion to the next lower gear, while using (+) to enter AutoStick® will retain the current gear.
When AutoStick® is active, the current transmission gear is displayed in the instrument
cluster.
In AutoStick® mode, the transmission will shift up or down when (+/-) is manually selected
by the driver, unless an engine lugging or overspeed condition would result.
NOTE:
To disengage AutoStick® mode, press and hold the (+) shift paddle until "D" is once again
displayed in the instrument cluster. You can shift in or out of AutoStick® mode at any time
without taking your foot off the accelerator pedal.
WARNING!
Do not downshift for additional engine braking on a slippery surface. The drive wheels
could lose their grip and the vehicle could skid, causing a collision or personal injury.
OPERATING YOUR VEHICLE
40
Page 130 of 188
Shifting Into NEUTRAL
Use the following procedure to prepare your vehicle for recreational towing:
1. Bring the vehicle to a complete stop, with the engine running.
2. Press and hold the brake pedal.
3. Shift the transmission into NEUTRAL.
4. Using a ballpoint pen or similar object, press and hold the recessed transfer caseNEUTRAL (N) button (located by the selector switch) for four seconds. The light behind
the N symbol will blink, indicating shift in progress. The light will stop blinking (stay on
solid) when the shift to NEUTRAL (N) is complete. A “FOUR WHEEL DRIVE SYSTEM IN
NEUTRAL” message will display on the EVIC (Electronic Vehicle Information Center).
5. After the shift is completed and the NEUTRAL (N) light stays on, release the NEUTRAL (N) button.
6. Shift the transmission into REVERSE.
7. Release the brake pedal for five seconds and ensure that there is no vehicle movement.
8. Shift the transmission back into NEUTRAL.
9. Firmly apply the parking brake.
10. With the transmission and transfer case in NEUTRAL, press and hold the ENGINE START/STOP button until the engine turns off. Turning the engine off will automatically
place the transmission in PARK.
11.
Press the ENGINE STOP/START button again (without pressing the brake pedal), if needed,
to turn the ignition switch to the OFF position.
CAUTION!
Damage to the transmission may occur if the transmission is shifted into PARK with the
transfer case in NEUTRAL (N) and the engine running. With the transfer case in NEUTRAL
(N) ensure that the engine is OFF before shifting the transmission into PARK.
12. Attach the vehicle to the tow vehicle using a suitable tow bar.
13. Release the parking brake.
UTILITY
128
Page 135 of 188
Operation of the Brake Warning Light can be checked by turning the ignition switch from the
OFF position to the ON/RUN position. The light should illuminate for approximately two
seconds. The light should then turn off unless the parking brake is applied or a brake fault
is detected. If the light does not illuminate, have the light inspected by an authorized dealer.
The light also will turn on when the parking brake is applied with the ignition switch in the
ON/RUN position.
NOTE:
This light shows only that the parking brake is applied. It does not show the degree of brake
application.
WARNING!
Driving a vehicle with the red brake light on is dangerous. Part of the brake system may
have failed. It will take longer to stop the vehicle. You could have a collision. Have the
vehicle checked immediately.
- Malfunction Indicator Light (MIL)
The Malfunction Indicator Light (MIL) is part of an onboard diagnostic system called OBD II
that monitors engine and automatic transmission control systems. The light will illuminate
when the key is in the ON/RUN position before engine start. If the bulb does not come on
when turning the key from OFF to ON/RUN, have the condition checked promptly.
Certain conditions, poor fuel quality, etc., may illuminate the light after engine start. The
vehicle should be serviced if the light stays on through several of your typical driving cycles.
In most situations, the vehicle will drive normally and will not require towing.
CAUTION!
Prolonged driving with the Malfunction Indicator Light (MIL) on could cause damage to
the engine control system. It also could affect fuel economy and driveability. If the MIL is
flashing, severe catalytic converter damage and power loss will soon occur. Immediate
service is required.
WARNING!
A malfunctioning catalytic converter, as referenced above, can reach higher tempera-
tures than in normal operating conditions. This can cause a fire if you drive slowly or park
over flammable substances such as dry plants, wood, cardboard, etc. This could result in
death or serious injury to the driver, occupants or others.
WHAT TO DO IN EMERGENCIES
133
Page 148 of 188

WARNING!
• Do not attempt to change a tire on the side of the vehicle close to moving traffic. Pullfar enough off the road to avoid the danger of being hit when operating the jack or
changing the wheel.
• Being under a jacked-up vehicle is dangerous. The vehicle could slip off the jack and
fall on you. You could be crushed. Never put any part of your body under a vehicle that
is on a jack. If you need to get under a raised vehicle, take it to a service center where
it can be raised on a lift.
• The jack is designed to be used as a tool for changing tires only. The jack should not
be used to lift the vehicle for service purposes. The vehicle should be jacked on a firm
level surface only. Avoid ice or slippery areas.
• Always park on a firm, level surface as far from the edge of the roadway as possible
before raising the vehicle.
• Turn on the Hazard Warning flasher.
• Block the wheel diagonally opposite the wheel to be raised.
• Set the parking brake firmly and set the automatic transmission in PARK.
• Never start or run the engine with the vehicle on a jack.
• Do not let anyone sit in the vehicle when it is on a jack.
• Do not get under the vehicle when it is on a jack.
• Only use the jack in the positions indicated and for lifting this vehicle during a tire
change.
• If working on or near a roadway, be extremely careful of motor traffic.
• To assure that spare tires, flat or inflated, are securely stowed, spares must be
stowed with the valve stem facing the ground. Carefully follow these tire changing
warnings to help prevent personal injury or damage to your vehicle:
• Raising the vehicle higher than necessary can make the vehicle less stable. Itcould slip off the jack and hurt someone near it. Raise the vehicle only enough
to remove the tire.
• To avoid the risk of forcing the vehicle off the jack, do not fully tighten the
wheel nuts until the vehicle has been lowered. Failure to follow this warning
may result in personal injury.
• Do not use power tools to winch the tire up or down. Impact-type tools may
damage the winch mechanism.
• A loose tire or jack, thrown forward in a collision or hard stop could endanger
the occupants of the vehicle. Always stow the jack parts and the spare tire in
the places provided.
• To avoid the risk of forcing the vehicle off the jack, do not tighten the lug nuts
fully until the vehicle is lowered to the ground.
WHAT TO DO IN EMERGENCIES
146
Page 149 of 188
BATTERY LOCATION
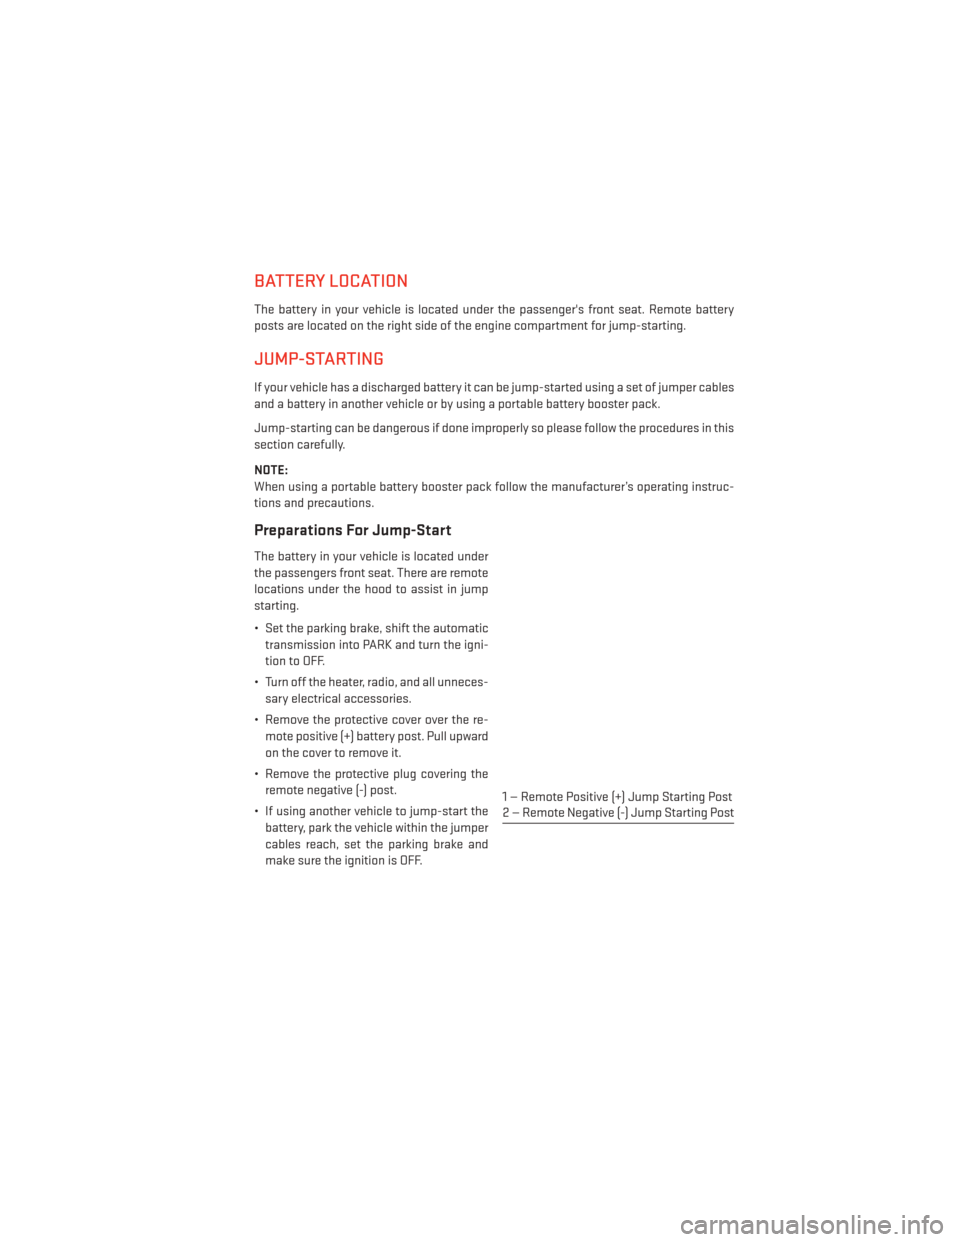
The battery in your vehicle is located under the passenger's front seat. Remote battery
posts are located on the right side of the engine compartment for jump-starting.
JUMP-STARTING
If your vehicle has a discharged battery it can be jump-started using a set of jumper cables
and a battery in another vehicle or by using a portable battery booster pack.
Jump-starting can be dangerous if done improperly so please follow the procedures in this
section carefully.
NOTE:
When using a portable battery booster pack follow the manufacturer’s operating instruc-
tions and precautions.
Preparations For Jump-Start
The battery in your vehicle is located under
the passengers front seat. There are remote
locations under the hood to assist in jump
starting.
• Set the parking brake, shift the automatictransmission into PARK and turn the igni-
tion to OFF.
• Turn off the heater, radio, and all unneces- sary electrical accessories.
• Remove the protective cover over the re- mote positive (+) battery post. Pull upward
on the cover to remove it.
• Remove the protective plug covering the remote negative (-) post.
• If using another vehicle to jump-start the battery, park the vehicle within the jumper
cables reach, set the parking brake and
make sure the ignition is OFF.
1 — Remote Positive (+) Jump Starting Post
2 — Remote Negative (-) Jump Starting Post
WHAT TO DO IN EMERGENCIES
147
Page 161 of 188
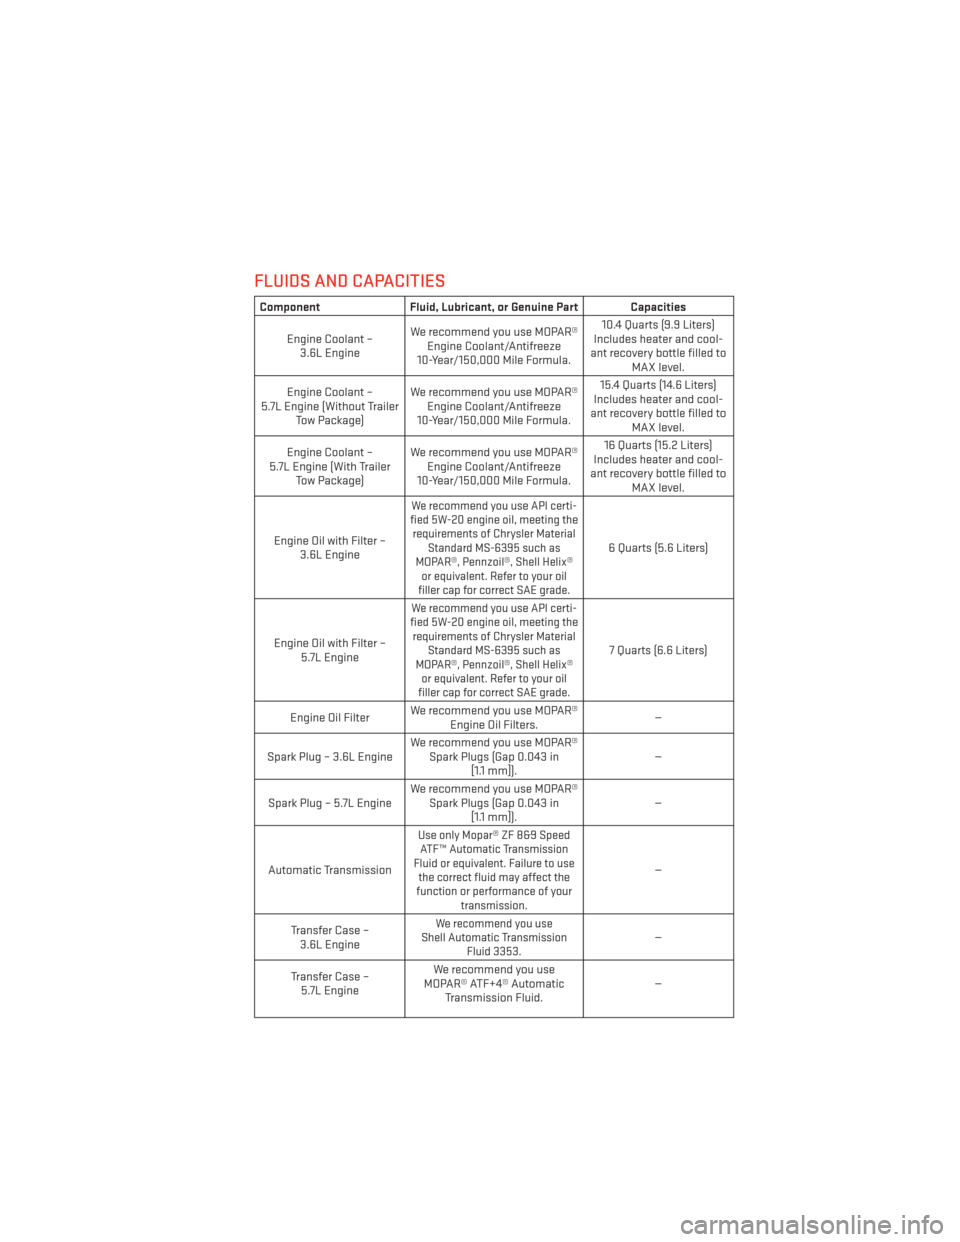
FLUIDS AND CAPACITIES
ComponentFluid, Lubricant, or Genuine Part Capacities
Engine Coolant – 3.6L Engine We recommend you use MOPAR®
Engine Coolant/Antifreeze
10-Year/150,000 Mile Formula. 10.4 Quarts (9.9 Liters)
Includes heater and cool-
ant recovery bottle filled to MAX level.
Engine Coolant –
5.7L Engine (Without Trailer Tow Package) We recommend you use MOPAR®
Engine Coolant/Antifreeze
10-Year/150,000 Mile Formula. 15.4 Quarts (14.6 Liters)
Includes heater and cool-
ant recovery bottle filled to MAX level.
Engine Coolant –
5.7L Engine (With Trailer Tow Package) We recommend you use MOPAR®
Engine Coolant/Antifreeze
10-Year/150,000 Mile Formula. 16 Quarts (15.2 Liters)
Includes heater and cool-
ant recovery bottle filled to MAX level.
Engine Oil with Filter – 3.6L Engine
We recommend you use API certi-
fied 5W-20 engine oil, meeting the requirements of Chrysler Material Standard MS-6395 such as
MOPAR®, Pennzoil®, Shell Helix® or equivalent. Refer to your oil
filler cap for correct SAE grade.
6 Quarts (5.6 Liters)
Engine Oil with Filter – 5.7L Engine
We recommend you use API certi-
fied 5W-20 engine oil, meeting the requirements of Chrysler Material Standard MS-6395 such as
MOPAR®, Pennzoil®, Shell Helix® or equivalent. Refer to your oil
filler cap for correct SAE grade.
7 Quarts (6.6 Liters)
Engine Oil Filter We recommend you use MOPAR®
Engine Oil Filters. —
Spark Plug – 3.6L Engine We recommend you use MOPAR®
Spark Plugs (Gap 0.043 in [1.1 mm]). —
Spark Plug – 5.7L Engine We recommend you use MOPAR®
Spark Plugs (Gap 0.043 in [1.1 mm]). —
Automatic Transmission
Use only Mopar® ZF 8&9 Speed ATF™ Automatic Transmission
Fluid or equivalent. Failure to use the correct fluid may affect the
function or performance of your transmission.
—
Transfer Case – 3.6L Engine
We recommend you use
Shell Automatic Transmission Fluid 3353.—
Transfer Case – 5.7L Engine We recommend you use
MOPAR® ATF+4® Automatic Transmission Fluid. —
MAINTAINING YOUR VEHICLE
159
Page 162 of 188
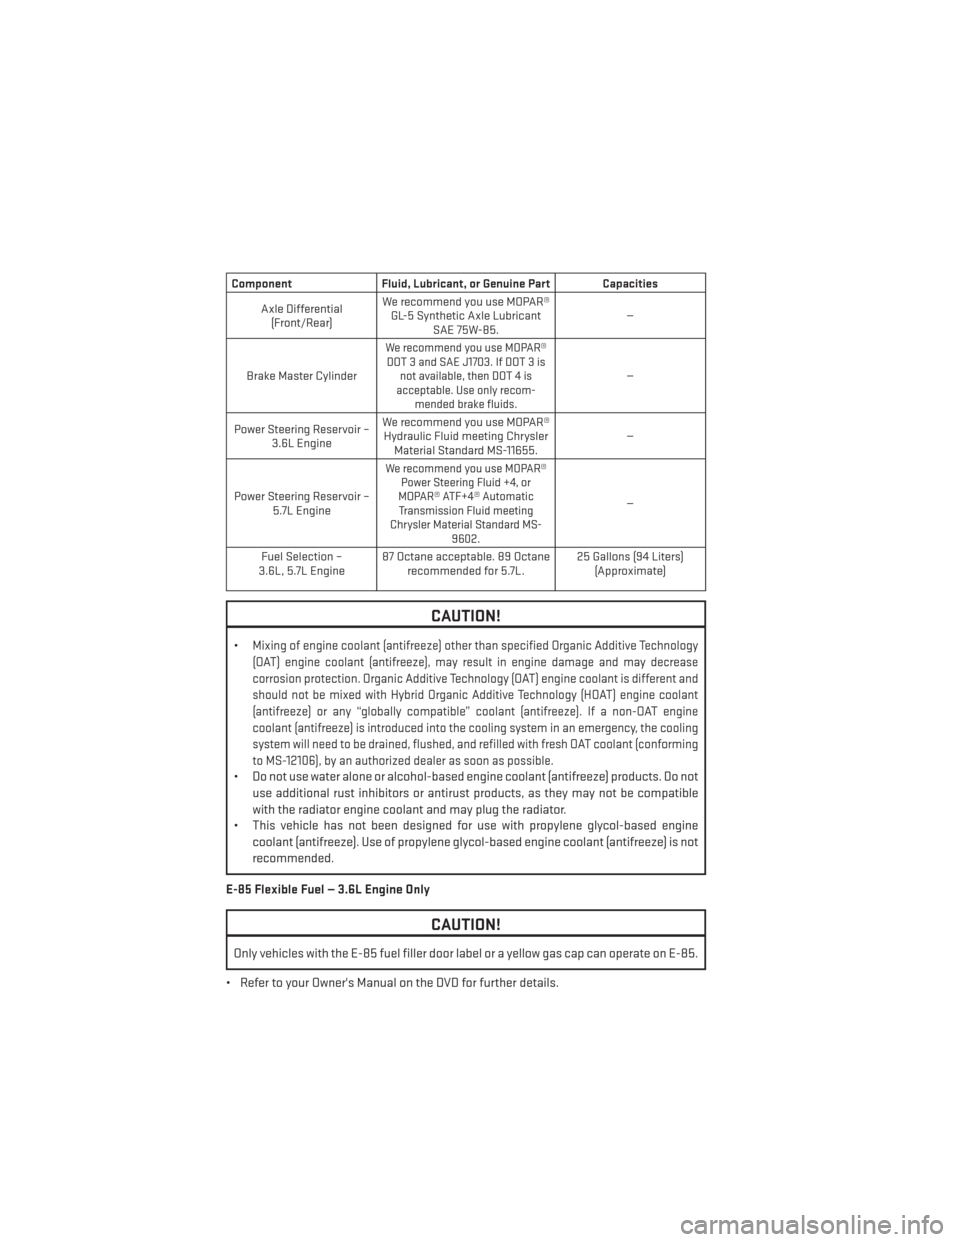
ComponentFluid, Lubricant, or Genuine Part Capacities
Axle Differential (Front/Rear) We recommend you use MOPAR®
GL-5 Synthetic Axle Lubricant SAE 75W-85. —
Brake Master Cylinder
We recommend you use MOPAR® DOT 3 and SAE J1703. If DOT 3 is not available, then DOT 4 is
acceptable. Use only recom- mended brake fluids.
—
Power Steering Reservoir – 3.6L Engine We recommend you use MOPAR®
Hydraulic Fluid meeting Chrysler Material Standard MS-11655. —
Power Steering Reservoir – 5.7L Engine
We recommend you use MOPAR®Power Steering Fluid +4, or
MOPAR® ATF+4® Automatic Transmission Fluid meeting
Chrysler Material Standard MS- 9602.
—
Fuel Selection –
3.6L, 5.7L Engine 87 Octane acceptable. 89 Octane
recommended for 5.7L. 25 Gallons (94 Liters)
(Approximate)
CAUTION!
•Mixing of engine coolant (antifreeze) other than specified Organic Additive Technology
(OAT) engine coolant (antifreeze), may result in engine damage and may decrease
corrosion protection. Organic Additive Technology (OAT) engine coolant is different and
should not be mixed with Hybrid Organic Additive Technology (HOAT) engine coolant
(antifreeze) or any “globally compatible” coolant (antifreeze). If a non-OAT engine
coolant (antifreeze) is introduced into the cooling system in an emergency, the cooling
system will need to be drained, flushed, and refilled with fresh OAT coolant (conforming
to MS-12106), by an authorized dealer as soon as possible.
• Do not use water alone or alcohol-based engine coolant (antifreeze) products. Do not
use additional rust inhibitors or antirust products, as they may not be compatible
with the radiator engine coolant and may plug the radiator.
• This vehicle has not been designed for use with propylene glycol-based engine
coolant (antifreeze). Use of propylene glycol-based engine coolant (antifreeze) is not
recommended.
E-85 Flexible Fuel — 3.6L Engine Only
CAUTION!
Only vehicles with the E-85 fuel filler door label or a yellow gas cap can operate on E-85.
• Refer to your Owner's Manual on the DVD for further details.
MAINTAINING YOUR VEHICLE
160
Page 163 of 188
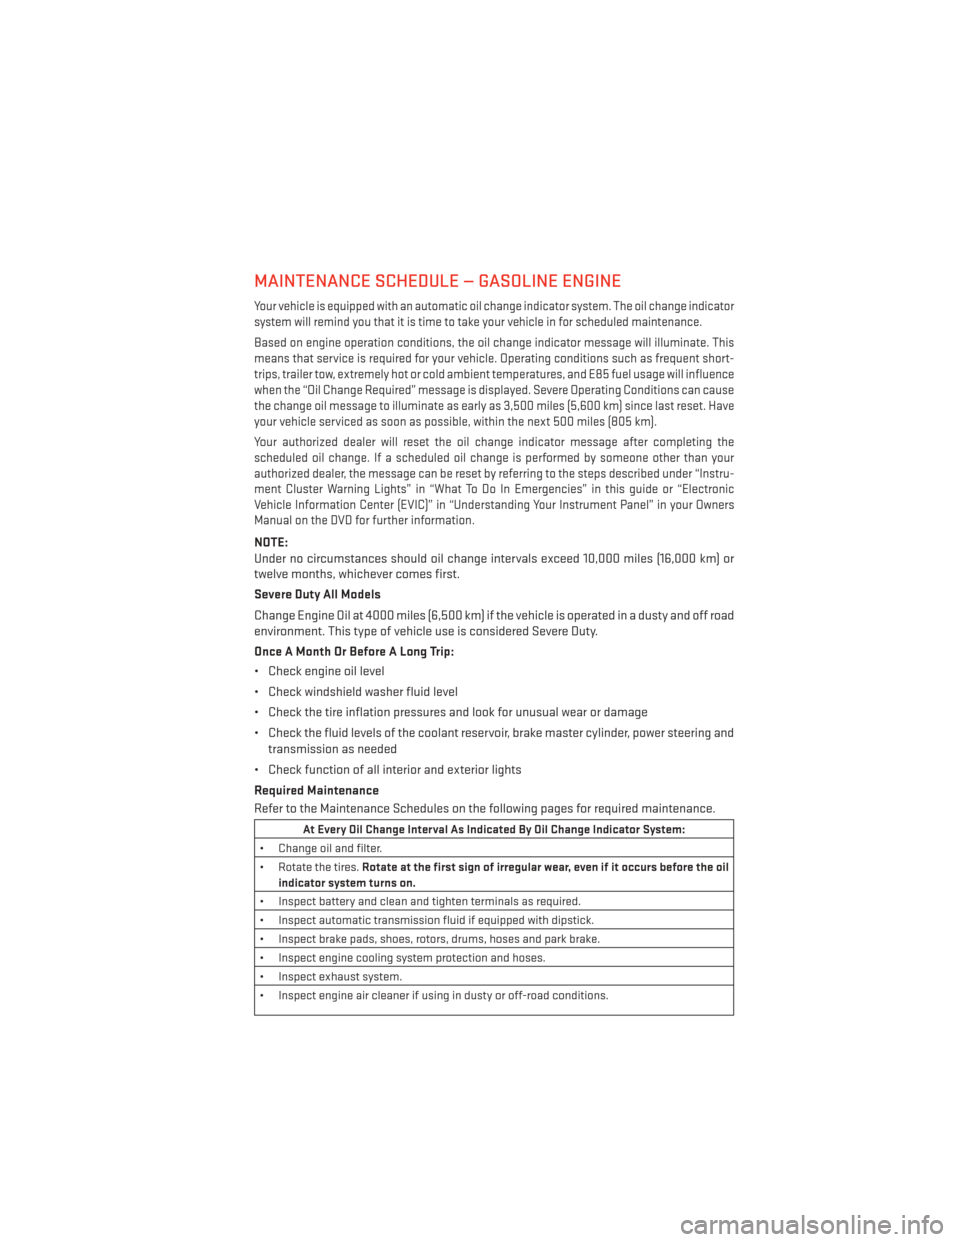
MAINTENANCE SCHEDULE — GASOLINE ENGINE
Your vehicle is equipped with an automatic oil change indicator system. The oil change indicator
system will remind you that it is time to take your vehicle in for scheduled maintenance.
Based on engine operation conditions, the oil change indicator message will illuminate. This
means that service is required for your vehicle. Operating conditions such as frequent short-
trips, trailer tow, extremely hot or cold ambient temperatures, and E85 fuel usage will influence
when the “Oil Change Required” message is displayed. Severe Operating Conditions can cause
the change oil message to illuminate as early as 3,500 miles (5,600 km) since last reset. Have
your vehicle serviced as soon as possible, within the next 500 miles (805 km).
Your authorized dealer will reset the oil change indicator message after completing the
scheduled oil change. If a scheduled oil change is performed by someone other than your
authorized dealer, the message can be reset by referring to the steps described under “Instru-
ment Cluster Warning Lights” in “What To Do In Emergencies” in this guide or “Electronic
Vehicle Information Center (EVIC)” in “Understanding Your Instrument Panel” in your Owners
Manual on the DVD for further information.
NOTE:
Under no circumstances should oil change intervals exceed 10,000 miles (16,000 km) or
twelve months, whichever comes first.
Severe Duty All Models
Change Engine Oil at 4000 miles (6,500 km) if the vehicle is operated in a dusty and off road
environment. This type of vehicle use is considered Severe Duty.
Once A Month Or Before A Long Trip:
• Check engine oil level
• Check windshield washer fluid level
• Check the tire inflation pressures and look for unusual wear or damage
• Check the fluid levels of the coolant reservoir, brake master cylinder, power steering andtransmission as needed
• Check function of all interior and exterior lights
Required Maintenance
Refer to the Maintenance Schedules on the following pages for required maintenance.
At Every Oil Change Interval As Indicated By Oil Change Indicator System:
• Change oil and filter.
• Rotate the tires. Rotate at the first sign of irregular wear, even if it occurs before the oil
indicator system turns on.
• Inspect battery and clean and tighten terminals as required.
• Inspect automatic transmission fluid if equipped with dipstick.
• Inspect brake pads, shoes, rotors, drums, hoses and park brake.
• Inspect engine cooling system protection and hoses.
• Inspect exhaust system.
• Inspect engine air cleaner if using in dusty or off-road conditions.
MAINTAINING YOUR VEHICLE
161