sensor DODGE DURANGO 2015 3.G Owner's Guide
[x] Cancel search | Manufacturer: DODGE, Model Year: 2015, Model line: DURANGO, Model: DODGE DURANGO 2015 3.GPages: 689, PDF Size: 20.05 MB
Page 507 of 689
The DID will also display a#SERVICE TPM SYSTEM#
message for a minimum of five seconds when a system
fault is detected possibly related to an incorrect sensor
location fault. In this case, the#SERVICE TPM SYSTEM#
message is then followed by a graphic display, with
pressure values still shown. This indicates the pressure
values are still being received from the TPM Sensors but
they may not be located in the correct vehicle position.
However, the system still needs to be serviced as long as
the#SERVICE TPM SYSTEM#message exists.
NOTE:There is no tire pressure monitoring sensor in the
spare tire. The TPMS will not be able to monitor the tire
pressure. If you install the spare tire in place of a road tire
that has a pressure below the low-pressure warning limit,
upon the next ignition switch cycle, the Tire Pressure
Monitoring Telltale Light will remain ON, a chime will
sound, and the DID will still display a pressure value in
the different color graphic display and an#Inflate to XXX
kPa#message will be displayed. After driving the vehicle
for up to 20 minutes above 15 mph (24 km/h), the Tire
Pressure Monitoring Telltale Light will flash on and off
for 75 seconds and then remain on solid. In addition, the
DID will display a “SERVICE TPM SYSTEM#message for
five seconds and then display dashes (- -) in place of the
pressure value. For each subsequent ignition switch
cycle, a chime will sound, the Tire Pressure Monitoring
Telltale Light will flash on and off for 75 seconds and then
remain on solid, and the DID will display a#SERVICE
TPM SYSTEM#message for five seconds and then dis-
play dashes (- -) in place of the pressure value. Once you
repair or replace the original road tire, and reinstall it on
the vehicle in place of the spare tire, the TPMS will
update automatically.
In addition, the Tire Pressure Monitoring Telltale Light
will turn OFF and the graphic in the DID will display a
new pressure value instead of dashes (- -), as long as no
tire pressure is below the low-pressure warning limit in
any of the four active road tires. The vehicle may need to
5
STARTING AND OPERATING 505
Page 508 of 689
be driven for up to 20 minutes above 15 mph (24 km/h)
in order for the TPMS to receive this information.
General Information
This device complies with Part 15 of the FCC rules and
RSS 210 of Industry Canada. Operation is subject to the
following conditions:
•This device may not cause harmful interference.
•This device must accept any interference received,
including interference that may cause undesired op-
eration.
The TPM sensors are regulated under one of the follow-
ing licenses:
United StatesMRXMERCTX1
Canada2546A-MERCTX1
FUEL REQUIREMENTS
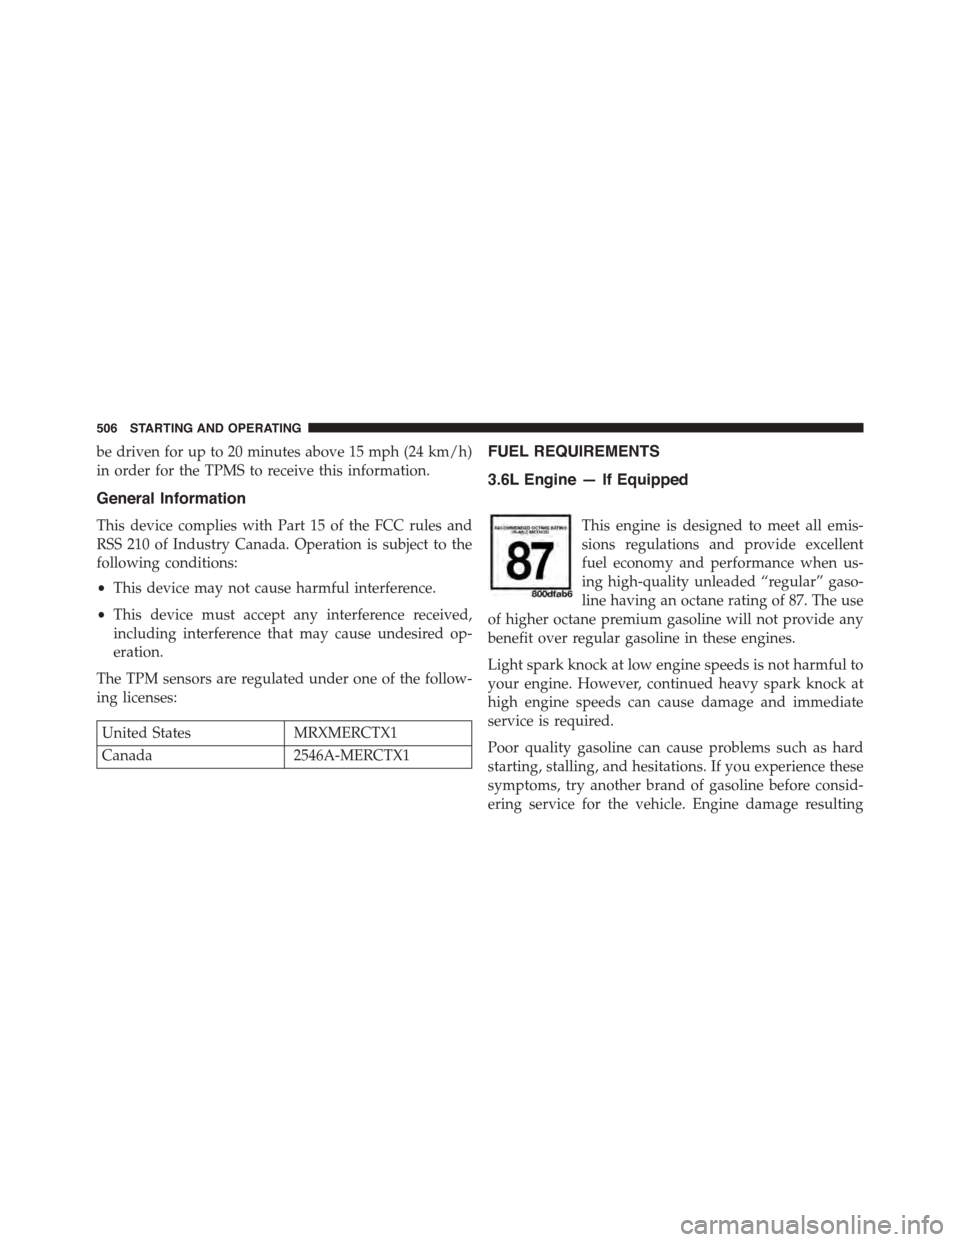
3.6L Engine — If Equipped
This engine is designed to meet all emis-
sions regulations and provide excellent
fuel economy and performance when us-
ing high-quality unleaded “regular” gaso-
line having an octane rating of 87. The use
of higher octane premium gasoline will not provide any
benefit over regular gasoline in these engines.
Light spark knock at low engine speeds is not harmful to
your engine. However, continued heavy spark knock at
high engine speeds can cause damage and immediate
service is required.
Poor quality gasoline can cause problems such as hard
starting, stalling, and hesitations. If you experience these
symptoms, try another brand of gasoline before consid-
ering service for the vehicle. Engine damage resulting
506 STARTING AND OPERATING
Page 538 of 689
•Use speed control in flat terrain and with light loads to
maximize fuel efficiency.
Cooling System
To reduce potential for engine and transmission over-
heating, take the following actions:
City Driving
When stopped for short periods of time, shift the trans-
mission into NEUTRAL and increase engine idle speed.
Highway Driving
Reduce speed.
Air Conditioning
Turn off temporarily.
SNOW PLOW
Snow plows, winches, and other aftermarket equipment
shouldnotbe added to the front end of your vehicle. The
airbag crash sensors may be affected by the change in the
front end structure. The airbags could deploy unexpect-
edly or could fail to deploy during a collision.
WARNING!
Do not add a snow plow, winches, or any other
aftermarket equipment to the front of your vehicle.
This could adversely affect the functioning of the
airbag system and you could be injured.
536 STARTING AND OPERATING
Page 606 of 689
4. Install the wiper blade pivot pin into the wiper blade
holder at the end of the wiper arm, and firmly press
the wiper blade until it snaps into place.
5. Lower the wiper blade and snap the pivot cap into
place.
Adding Washer Fluid
This vehicle is equipped with a Driver Information
Display (DID), the DID will indicate when the washer
fluid level is low. When the sensor detects a low fluid
level, the windshield will light on the vehicle graphic
outline and the “WASHER FLUID LOW” message will be
displayed.
The fluid reservoir for the windshield washers and the
rear window washer is shared. The fluid reservoir is
located in the engine compartment, be sure to check the
fluid level at regular intervals. Fill the reservoir with
windshield washer solvent only (not radiator antifreeze).
When refilling the washer fluid reservoir, take some
washer fluid and apply it to a cloth or towel and wipe
clean the wiper blades, this will help blade performance.
To prevent freeze-up of your windshield washer system
in cold weather, select a solution or mixture that meets or
exceeds the temperature range of your climate. This
rating information can be found on most washer fluid
containers.
WARNING!
Commercially available windshield washer solvents
are flammable. They could ignite and burn you. Care
must be exercised when filling or working around
the washer solution.
604 MAINTAINING YOUR VEHICLE
Page 629 of 689
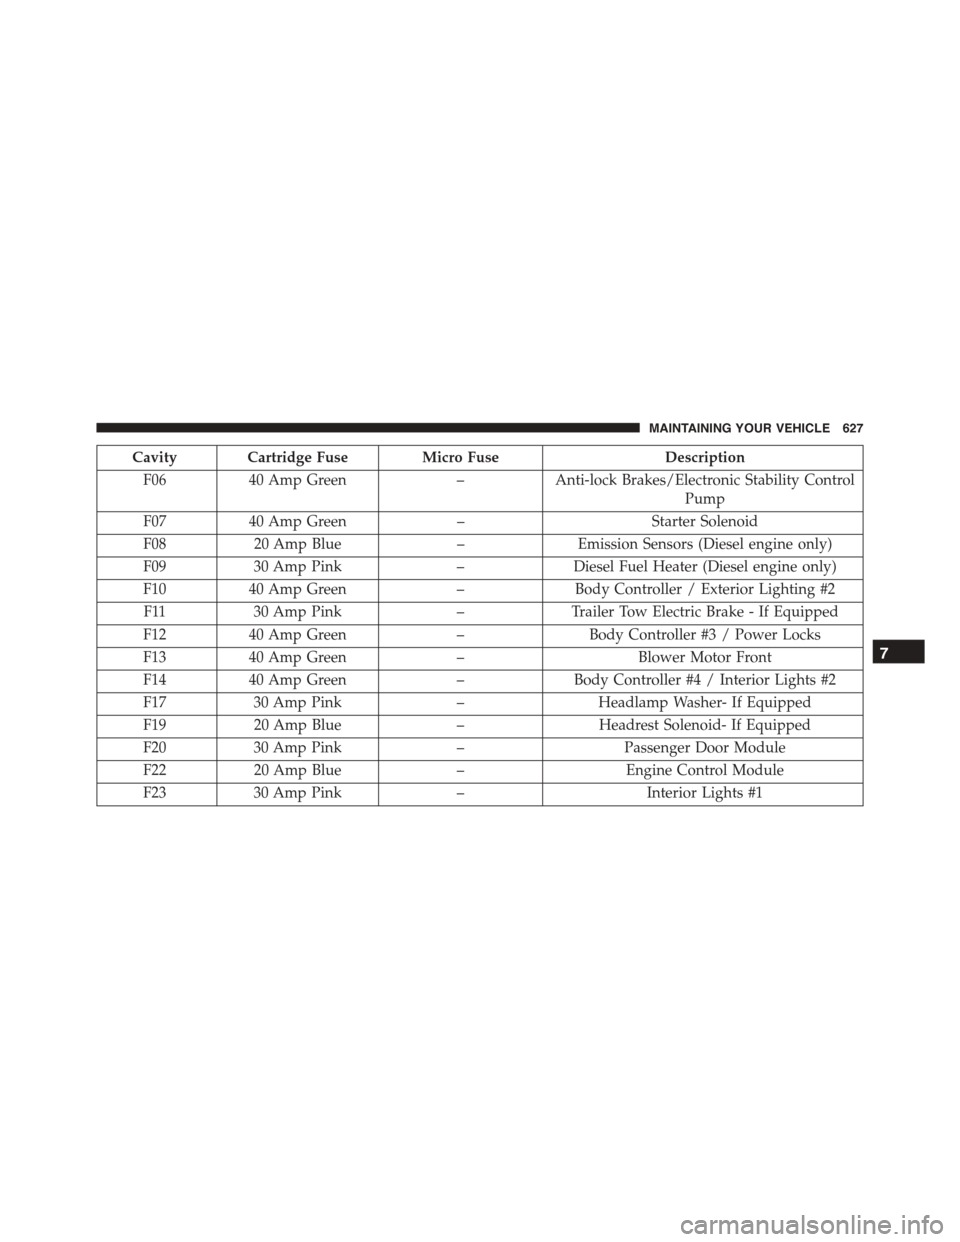
Cavity Cartridge Fuse Micro FuseDescription
F0640 Amp Green–Anti-lock Brakes/Electronic Stability Control
Pump
F0740 Amp Green–Starter Solenoid
F0820 Amp Blue–Emission Sensors (Diesel engine only)
F0930 Amp Pink–Diesel Fuel Heater (Diesel engine only)
F1040 Amp Green–Body Controller / Exterior Lighting #2
F1130 Amp Pink–Trailer Tow Electric Brake - If Equipped
F1240 Amp Green–Body Controller #3 / Power Locks
F1340 Amp Green–Blower Motor Front
F1440 Amp Green–Body Controller #4 / Interior Lights #2
F1730 Amp Pink–Headlamp Washer- If Equipped
F1920 Amp Blue–Headrest Solenoid- If Equipped
F2030 Amp Pink–Passenger Door Module
F2220 Amp Blue–Engine Control Module
F2330 Amp Pink–Interior Lights #1
7
MAINTAINING YOUR VEHICLE 627
Page 631 of 689
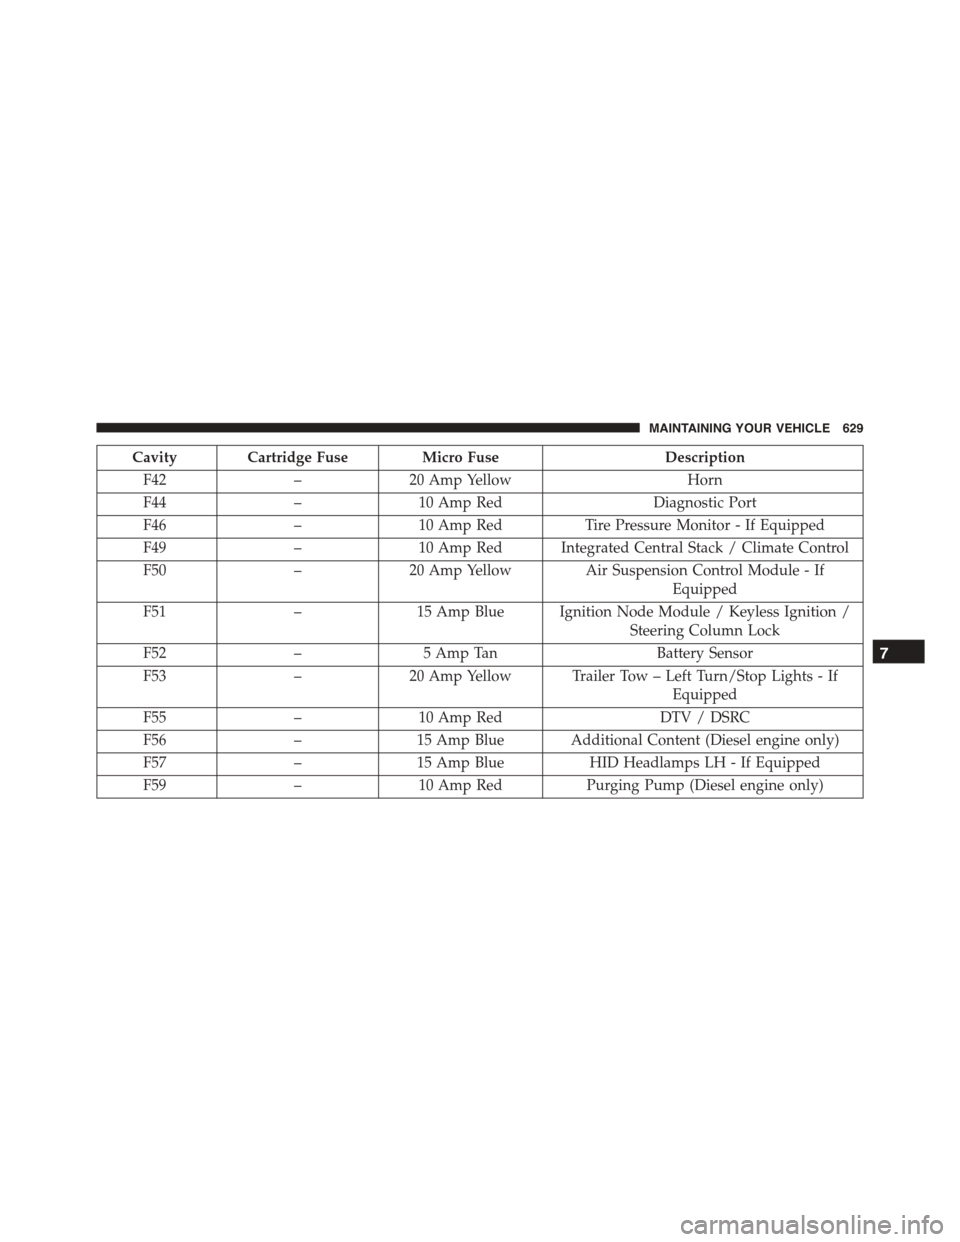
Cavity Cartridge Fuse Micro FuseDescription
F42–20 Amp YellowHorn
F44–10 Amp RedDiagnostic Port
F46–10 Amp RedTire Pressure Monitor - If Equipped
F49–10 Amp Red Integrated Central Stack / Climate Control
F50–20 Amp Yellow Air Suspension Control Module - If
Equipped
F51–15 Amp Blue Ignition Node Module / Keyless Ignition /
Steering Column Lock
F52–5 Amp TanBattery Sensor
F53–20 Amp Yellow Trailer Tow – Left Turn/Stop Lights - If
Equipped
F55–10 Amp RedDTV / DSRC
F56–15 Amp Blue Additional Content (Diesel engine only)
F57–15 Amp BlueHID Headlamps LH - If Equipped
F59–10 Amp RedPurging Pump (Diesel engine only)
7
MAINTAINING YOUR VEHICLE 629
Page 632 of 689
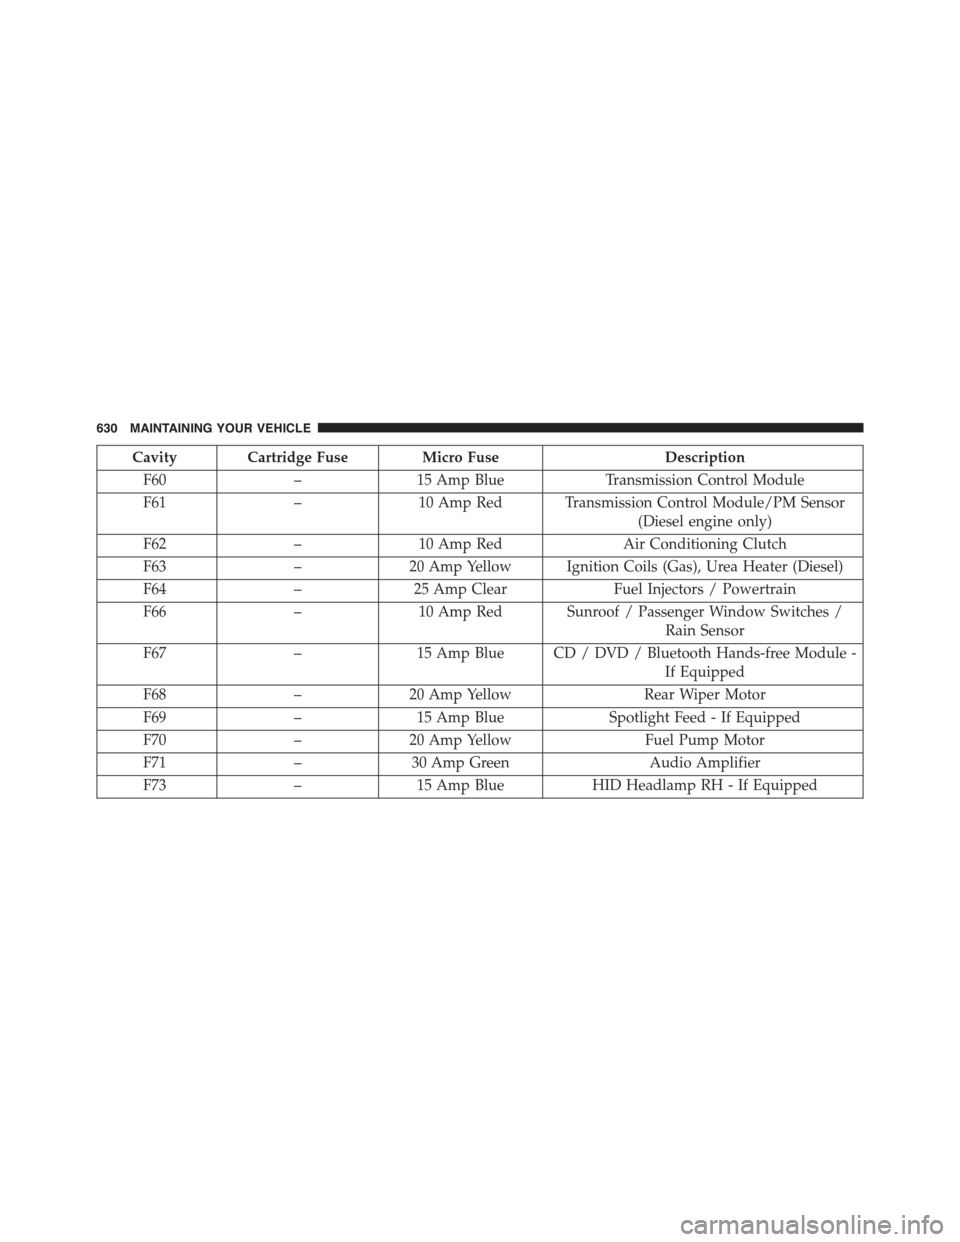
Cavity Cartridge Fuse Micro FuseDescription
F60–15 Amp BlueTransmission Control Module
F61–10 Amp Red Transmission Control Module/PM Sensor
(Diesel engine only)
F62–10 Amp RedAir Conditioning Clutch
F63–20 Amp Yellow Ignition Coils (Gas), Urea Heater (Diesel)
F64–25 Amp ClearFuel Injectors / Powertrain
F66–10 Amp Red Sunroof / Passenger Window Switches /
Rain Sensor
F67–15 Amp Blue CD / DVD / Bluetooth Hands-free Module -
If Equipped
F68–20 Amp YellowRear Wiper Motor
F69–15 Amp BlueSpotlight Feed - If Equipped
F70–20 Amp YellowFuel Pump Motor
F71–30 Amp GreenAudio Amplifier
F73–15 Amp BlueHID Headlamp RH - If Equipped
630 MAINTAINING YOUR VEHICLE