display DODGE DURANGO 2015 3.G Manual PDF
[x] Cancel search | Manufacturer: DODGE, Model Year: 2015, Model line: DURANGO, Model: DODGE DURANGO 2015 3.GPages: 689, PDF Size: 20.05 MB
Page 375 of 689
Listening To Audio With The Screen Closed
To listen to only audio portion of the channel with the
screen closed:
•Set the audio to the desired source and channel.
•Close the video screen.
•To change the current audio mode, push the remote
control’s SOURCE button. This will automatically se-
lect the next available audio mode without using the
Mode/Source Select menu.
•When the screen is reopened, the video screen will
automatically turn back on and show the appropriate
display menu or media.
If the screen is closed and there is no audio heard, verify
that the headphones are turned on (the ON indicator is
illuminated) and the headphone selector switch is on the
desired channel. If the headphones are turned on, push
the remote control’s power button to turn audio on. If
audio is still not heard, check that fully charged batteries
are installed in the headphones.
Disc Formats
The Blu-ray™ Disc player is capable of the playing the
following types of discs (12 mm or 8 mm diameter):
•BD: BDMV (Profile 1.1), BDAV (Profile 1.1),
•DVD: DVD-Video, DVD-Audio, AVCREC, AVCHD,
DVD-VR
•CD: CD-DA, VCD, CD-TEXT
•DVD/CD: MP3, WMA, AAC, DivX (versions3–6)
profile 3.0
4
UNDERSTANDING YOUR INSTRUMENT PANEL 373
Page 378 of 689
•Other compression formats such as AAC, MP3 Pro,
Ogg Vorbis, and ATRAC3 will not play. The Blu-ray™
player will automatically skip the file and begin play-
ing the next available file.
•If you are creating your own files, the recommended
fixed bit rate for MP3 files is between 96 and 192Kbps
and the recommended fixed bit rate for WMA files is
between 64 and 192Kbps. Variable bit rates are also
supported. For both formats, the recommended
sample rate is either 44.1kHz or 48kHz.
•To change the current file, use the remote control’s or
Blu-ray™ Disc player ’s$button to advance to the
next file, or the#button to return to the start of the
current or previous file.
Disc Errors
If the Blu-ray™ Disc player is unable to read the disc, a
#Disc Error#message is displayed on the rear screen and
Radio displays. A dirty, damaged, or incompatible disc
format are all potential causes for a#Disc Error#message.
If a disc has a damaged track which results in audible or
visible errors that persists for two seconds, the Blu-ray™
Disc player will attempt to continue playing the disc by
skipping forward one to three seconds at a time. If the
end of the disc is reached, the Blu-ray™ Disc player will
return to the beginning of the disc and attempt to play
the start of the first track.
The Blu-ray™ Disc player may shut down during ex-
tremely hot conditions, such as when the vehicle’s inte-
rior temperature is above 120° F (48.9° C). When this
occurs, the player will display#High Temp#and will shut
off the Rear Seat displays until a safe temperature is
reached. This shutdown is necessary to protect the optics
of the Blu-ray™ Disc player.
376 UNDERSTANDING YOUR INSTRUMENT PANEL
Page 383 of 689
NOTE:
•This equipment has been tested and found to comply
with the limits for a Class B digital device, pursuant to
Part 15 of the FCC Rules. These limits are designed to
provide reasonable protection against harmful inter-
ference in a residential installation. This equipment
generates, uses and can radiate radio frequency energy
and, if not installed and used in accordance with the
instructions, may cause harmful interference to radio
communications. However, there is no guarantee that
interference will not occur in a particular installation.
•If this equipment does cause harmful interference to
radio or television reception, which can be determined
by turning the equipment off and on, the user is
encouraged to try to correct the interference by one or
more of the following measures:
•Increase the separation between the equipment and
receiver.
•Consult the dealer or an experienced radio technician
for help.
CLIMATE CONTROLS
The air conditioning and heating system is designed to
make you comfortable in all types of weather. This
system can be operated through either the controls on the
instrument panel or through the Uconnect® system dis-
play.
When the Uconnect® system is in different modes (Ra-
dio, Player, Settings, More, etc.) the driver and passenger
temperature settings will be indicated at the top of the
display.
4
UNDERSTANDING YOUR INSTRUMENT PANEL 381
Page 392 of 689
Automatic Temperature Control (ATC)
Automatic Operation
1. Push the AUTO button on the faceplate or press the
“AUTO” button on the touchscreen.
2. Next, adjust the temperature you would like the
system to maintain by adjusting the driver and pas-
senger temperature buttons on the faceplate or but-
tons on the touchscreen. Once the desired temperature
is displayed, the system will achieve and automati-
cally maintain that comfort level.
3. When the system is set up for your comfort level, it is
not necessary to change the temperature. You will
experience the greatest efficiency by simply allowing
the system to function automatically.
NOTE:
•It is not necessary to move the temperature settings.
The system automatically adjusts the temperature,
mode, and blower speed to provide comfort as quickly
as possible.
•The temperature can be displayed in U.S. or Metric
units by selecting the Uconnect® customer-
programmable feature. Refer to the “Uconnect® Sys-
tem Settings” in this section of the manual.
To provide you with maximum comfort in the Automatic
mode, during cold start-ups the blower fan will remain
on low until the engine warms up. The blower will
increase in speed and transition into Auto mode.
390 UNDERSTANDING YOUR INSTRUMENT PANEL
Page 395 of 689
Controlling The Rear Climate Controls From The
Front ATC Panel
The Three-Zone ATC system allows for adjustment of the
rear climate controls from the front ATC panel.
To change the rear system settings:
•Press#REAR#button to change control to rear control
mode, Rear display will appear. Control functions now
operate rear system.
•To return to Front screen, press#REAR#button again,
or it will revert to the Front screen after six seconds.
Rear Lock
Pressing the Rear Temperature Lock button on the
Uconnect® touchscreen, illuminates a lock symbol in the
rear display. The rear temperature and air source are
controlled from the front Uconnect® system.
Rear second row occupants can only adjust the rear ATC
control when the Rear Temperature Lock button is turned
off.
The rear ATC is located in the headliner, near the center
of the vehicle.
4
UNDERSTANDING YOUR INSTRUMENT PANEL 393
Page 396 of 689
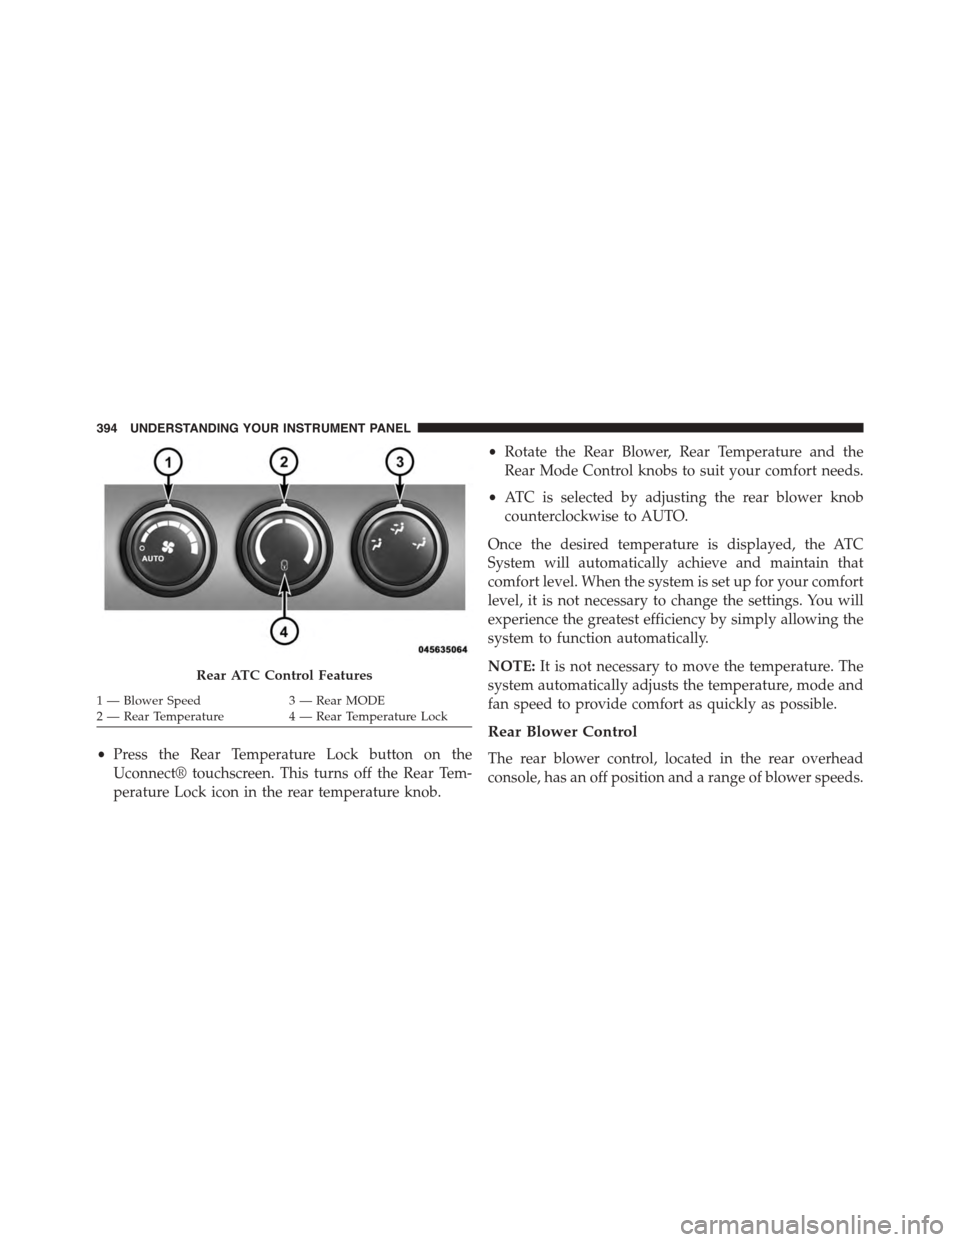
•Press the Rear Temperature Lock button on the
Uconnect® touchscreen. This turns off the Rear Tem-
perature Lock icon in the rear temperature knob.
•Rotate the Rear Blower, Rear Temperature and the
Rear Mode Control knobs to suit your comfort needs.
•ATC is selected by adjusting the rear blower knob
counterclockwise to AUTO.
Once the desired temperature is displayed, the ATC
System will automatically achieve and maintain that
comfort level. When the system is set up for your comfort
level, it is not necessary to change the settings. You will
experience the greatest efficiency by simply allowing the
system to function automatically.
NOTE:It is not necessary to move the temperature. The
system automatically adjusts the temperature, mode and
fan speed to provide comfort as quickly as possible.
Rear Blower Control
The rear blower control, located in the rear overhead
console, has an off position and a range of blower speeds.
Rear ATC Control Features
1—BlowerSpeed3—RearMODE2—RearTemperature4—RearTemperatureLock
394 UNDERSTANDING YOUR INSTRUMENT PANEL
Page 401 of 689
Uconnect® VOICE RECOGNITION QUICK TIPS
Introducing Uconnect®
Start using Uconnect® Voice Recognition with these
helpful quick tips. It provides the key Voice Commands
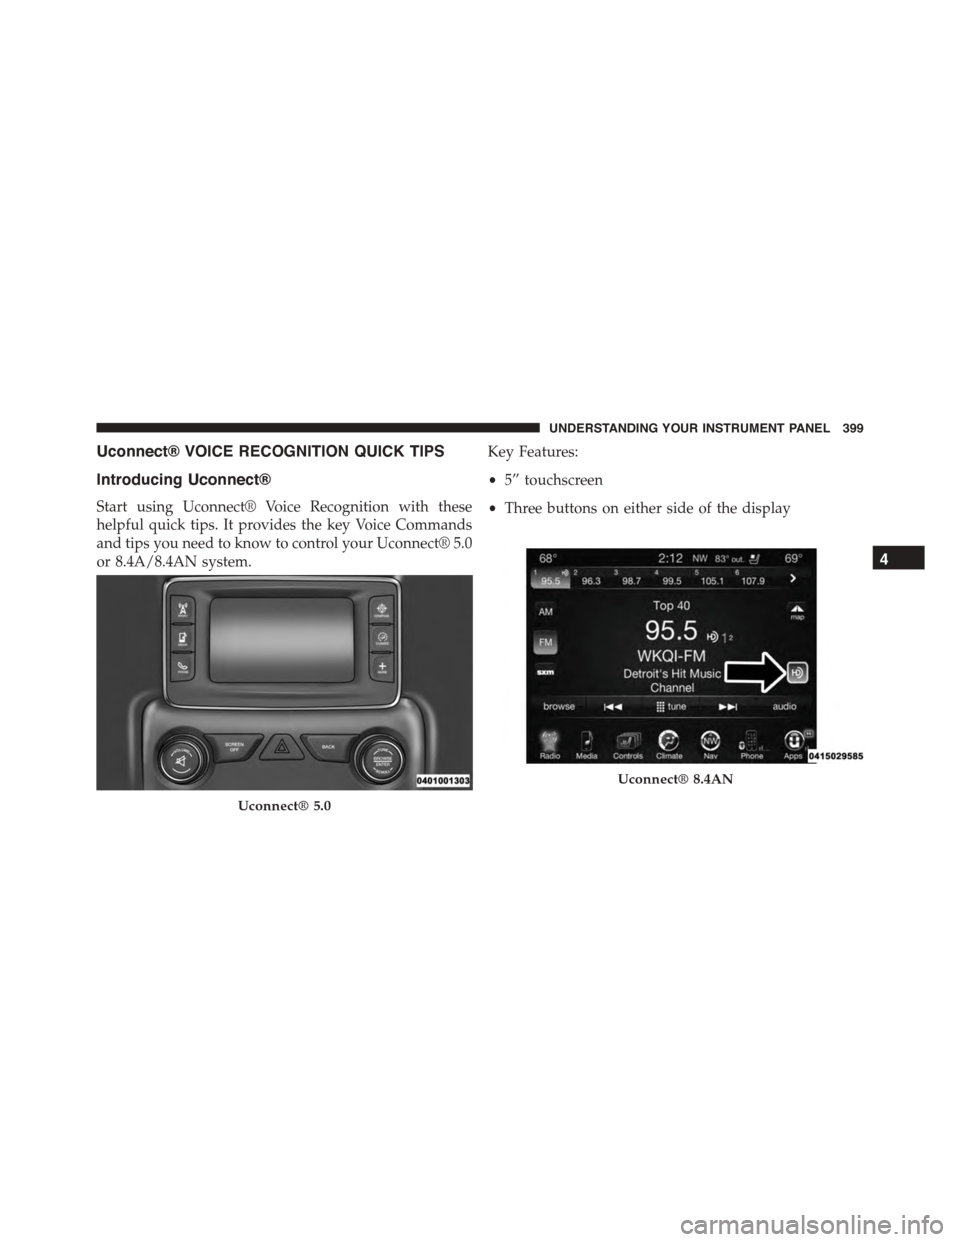
and tips you need to know to control your Uconnect® 5.0
or 8.4A/8.4AN system.
Key Features:
•5” touchscreen
•Three buttons on either side of the display
Uconnect® 5.0
Uconnect® 8.4AN
4
UNDERSTANDING YOUR INSTRUMENT PANEL 399
Page 407 of 689
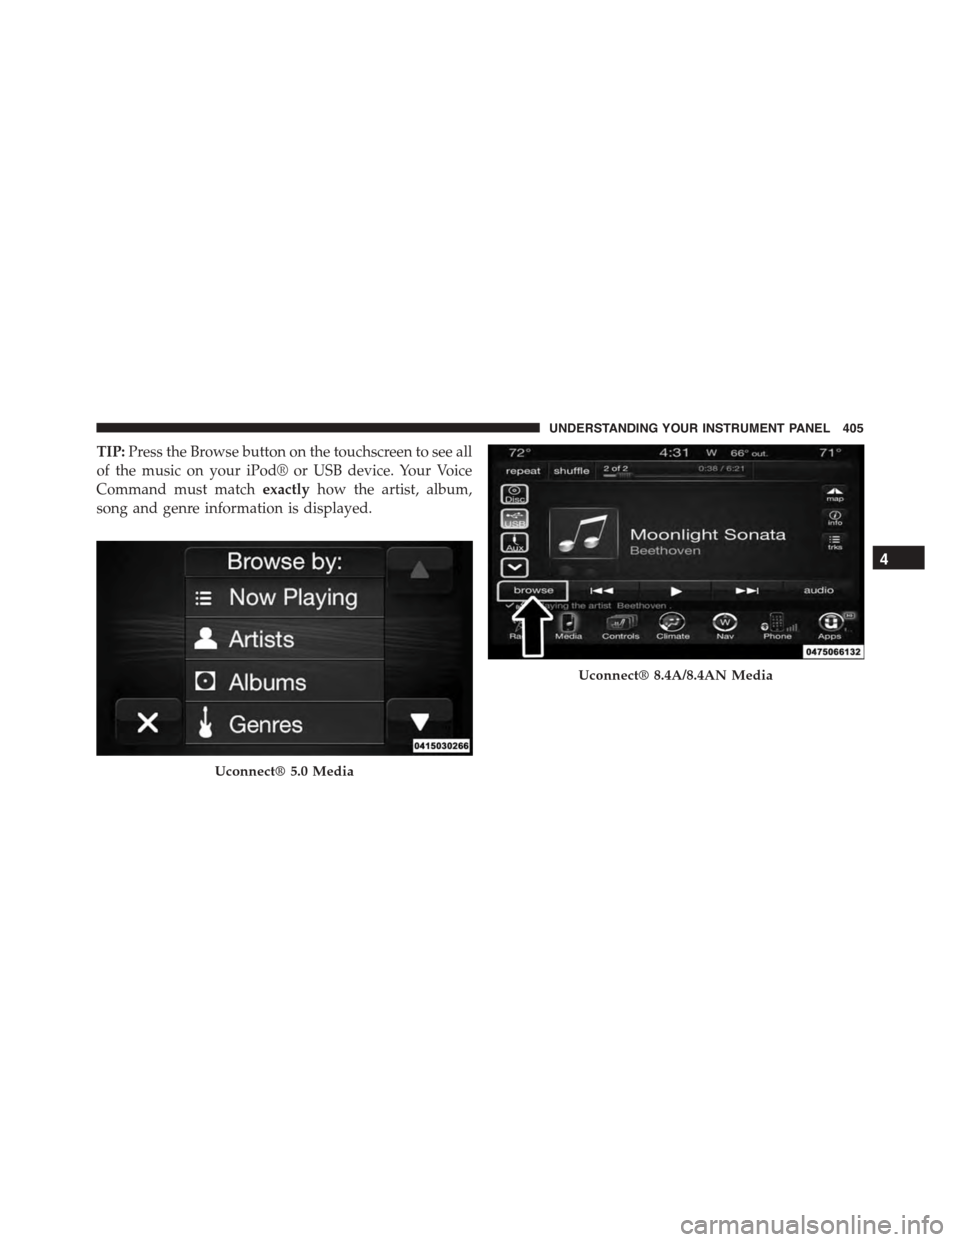
TIP:Press the Browse button on the touchscreen to see all
of the music on your iPod® or USB device. Your Voice
Command must matchexactlyhow the artist, album,
song and genre information is displayed.
Uconnect® 5.0 Media
Uconnect® 8.4A/8.4AN Media
4
UNDERSTANDING YOUR INSTRUMENT PANEL 405
Page 416 of 689
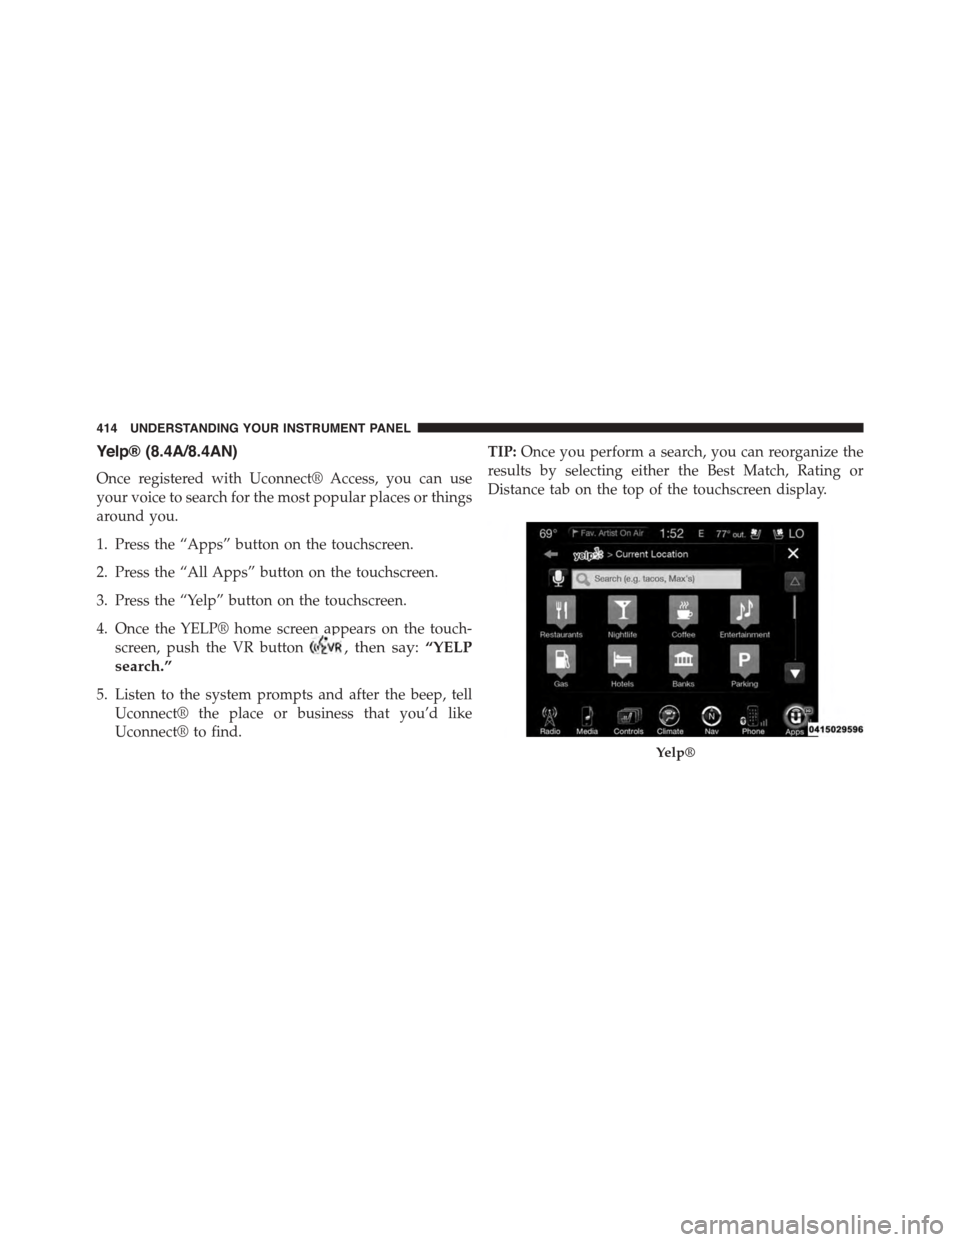
Yelp® (8.4A/8.4AN)
Once registered with Uconnect® Access, you can use
your voice to search for the most popular places or things
around you.
1. Press the “Apps” button on the touchscreen.
2. Press the “All Apps” button on the touchscreen.
3. Press the “Yelp” button on the touchscreen.
4. Once the YELP® home screen appears on the touch-
screen, push the VR button, then say:“YELP
search.”
5. Listen to the system prompts and after the beep, tell
Uconnect® the place or business that you’d like
Uconnect® to find.
TIP:Once you perform a search, you can reorganize the
results by selecting either the Best Match, Rating or
Distance tab on the top of the touchscreen display.
Yelp®
414 UNDERSTANDING YOUR INSTRUMENT PANEL
Page 427 of 689
position. If the shift lever/gear selector is not in PARK
and the ENGINE START/STOP button is pressed
once, the DID will display a “Vehicle Not In Park”
message and the engine will remain running. Never
leave a vehicle out of the PARK position, or it could
roll.
NOTE:If the ignition switch is left in the ACC or RUN
(engine not running) position and the transmission is in
PARK, the system will automatically time out after 30
minutes of inactivity and the ignition will switch to the
OFF position.
ENGINE START/STOP Button Functions — With
Driver ’s Foot OFF The Brake Pedal (In PARK Or
NEUTRAL Position)
The ENGINE START/STOP button operates similar to an
ignition switch. It has four positions, OFF, ACC, RUN
and START. To change the ignition positions without
starting the vehicle and use the accessories follow these
steps:
•Starting with the ignition in the OFF position.
•Press the ENGINE START/STOP button once to place
the ignition to the ACC position (DID will display
“ACC”).
•Press the ENGINE START/STOP button a second time
to place the ignition to the RUN position (DID will
display “ON/RUN”).
•Press the ENGINE START/STOP button a third time to
return the ignition to the OFF position (DID will
display “OFF”).
5
STARTING AND OPERATING 425