warning DODGE DURANGO 2015 3.G Owner's Manual
[x] Cancel search | Manufacturer: DODGE, Model Year: 2015, Model line: DURANGO, Model: DODGE DURANGO 2015 3.GPages: 236, PDF Size: 35.01 MB
Page 21 of 236
WARNING!
•SideAirBagsneedroomtoinflate.Donotleanagainstthedoororwindow.Sit
upright in the center of the seat.
•BeingtooclosetotheSideAirBagsduringdeploymentcouldcauseyoutobe
severely injured or killed.
•RelyingontheSideAirBagsalonecouldleadtomoresevereinjuriesinacollision.
The Side Air Bags work with your seat belt to restrain you properly. In some
collisions, Side Air Bags won’t deploy at all. Always wear your seat belt even though
you have Side Air Bags.
•ThisvehicleisequippedwithleftandrightSupplementalSideAirBagInflatable
Curtains (SABICs). Do not stack luggage or other cargo up high enough to block the
deployment of the SABICs. The trim covering above the side windows where the
SABIC and its deployment path are located should remain free from any obstruc-
tions.
•ThisvehicleisequippedwithSABICs.InorderfortheSABICstoworkasintended,
do not install any accessory items in your vehicle which could alter the roof. Do not
add an aftermarket sunroof to your vehicle. Do not add roof racks that require
permanent attachments (bolts or screws) for installation on the vehicle roof. Do not
drill into the roof of the vehicle for any reason.
•DonotuseaccessoryseatcoversorplaceobjectsbetweenyouandtheSideAir
Bags; the performance could be adversely affected and/or objects could be pushed
into you, causing serious injury.
CHILD RESTRAINTS
Children 12 years or younger should ride properly buckled up in a rear seat, if available.
According to crash statistics, children are safer when properly restrained in the rear seats
rather than in the front.
Every state in the United States and all Canadian provinces require that small children
ride in proper restraint systems. This is the law, and you can be prosecuted for ignoring it.
NOTE:
•Foradditionalinformation,refertowww.Seatcheck.orgorcall1-866-SEATCHECK.
•CanadianresidentsshouldrefertoTransportCanada’swebsiteforadditionalinforma-
tion: http://www.tc.gc.ca/eng/motorvehiclesafety/safedrivers-childsafety-index-53.htm
LATCH – Lower Anchors And Tethers For CHildren
•YourvehicleisequippedwiththechildrestraintanchoragesystemcalledLATCH,
which stands for Lower Anchors and Tethers for CHildren.
•Thesecondrowseatingpositionshaveloweranchorsandtoptetheranchors.The
second row center (60/40 bench seat only) and third row seating positions have a top
tether anchor only.
GETTING STARTED
19
Page 27 of 236
WARNING!
•Inacollision,anunrestrainedchild,evenatinybaby,canbecomeaprojectile
inside the vehicle. The force required to hold even an infant on your lap could
become so great that you could not hold the child, no matter how strong you are.
The child and others could be severely injured or killed. Any child riding in your
vehicle should be in a proper restraint for the child's size.
•Rearward-facingchildseatsmustneverbeusedinthefrontseatofavehiclewith
afrontpassengerairbag.Anairbagdeploymentcouldcausesevereinjuryordeath
to infants in this position.
•Onlyusearearward-facingchildrestraintinavehiclewitharearseat.
•ImproperinstallationofachildrestrainttotheLATCHanchoragescanleadto
failure of an infant or child restraint. The child could be severely injured or killed.
Follow the manufacturer’s directions exactly when installing an infant or child
restraint.
•Anincorrectlyanchoredtetherstrapcouldleadtoincreasedheadmotionand
possible injury to the child. Use only the anchor positions directly behind the child
seat to secure a child restraint top tether strap.
•Ifyourvehicleisequippedwithasplitrearseat,makesurethetetherstrapdoesnot
slip into the opening between the seatbacks as you remove slack in the strap.
HEAD RESTRAINTS
Head restraints are designed to reduce the risk of injury by restricting head movement in
the event of a rear-impact. Head restraints should be adjusted so that the top of the head
restraint is located above the top of your ear.
WARNING!
The head restraints for all occupants must be properly adjusted prior to operating the
vehicle or occupying a seat. Head restraints should never be adjusted while the vehicle
is in motion. Driving a vehicle with the head restraints improperly adjusted or removed
could cause serious injury or death in the event of a collision.
GETTING STARTED
25
Page 28 of 236
Active Head Restraints — Front Seats
Active Head Restraints are passive, deployable components, and vehicles with this
equipment cannot be readily identified by any markings, only through visual inspection of
the head restraint. The Active Head Restraints (AHR) will be split in two halves, with the
front half being soft foam and trim, the back half being decorative plastic.
When AHRs deploy during a rear impact, the front half of the head restraint extends
forward to minimize the gap between the back of the occupant’s head and the AHR. This
system is designed to help prevent or reduce the extent of injuries to the driver and front
passenger in certain types of rear impacts. Refer to “Occupant Restraints” in “Things To
Know Before Starting” in your Owner’s Manual on the DVD for further information.
To r a i s e t h e h e a d r e s t r a i n t , p u l l u p w a r d o n t h e h e a d r e s t r a i n t . To l o w e r t h e h e a d r e s t r a i n t ,
push the adjustment button, located at the base of the head restraint, and push downward
on the head restraint.
For comfort the Active Head Restraints can be tilted forward and rearward. To tilt the head
restraint closer to the back of your head, pull forward on the bottom of the head restraint.
Push rearward on the bottom of the head restraint to move the head restraint away from
your head.
NOTE:
•Theheadrestraintsshouldonlyberemovedbyqualifiedtechnicians,forservice
purposes only. If either of the head restraints require removal, see your authorized
dealer.
•IntheeventofdeploymentofanActiveHeadRestraint,referto“OccupantRestraints”
in “Things To Know Before Starting” in your Owner’s Manual on the DVD for further
information.
WARNING!
•Do not place items over the top of the Active Head Restraint, such as coats, seat covers
or portable DVD players. These items may interfere with the operation of the Active Head
Restraint in the event of a collision and could result in serious injury or death.
•ActiveHeadRestraintsmaybedeployediftheyarestruckbyanobjectsuchasa
hand, foot or loose cargo. To avoid accidental deployment of the Active Head
Restraint ensure that all cargo is secured, as loose cargo could contact the Active
Head Restraint during sudden stops. Failure to follow this warning could cause
personal injury if the Active Head Restraint is deployed.
GETTING STARTED
26
Page 29 of 236
Head Restraints — Rear Seats
The head restraints on the outboard seats are not adjustable. They automatically fold
forward when the rear seat is folded to a load floor position but do not return to their
normal position when the rear seat is raised. After returning either seat to its upright
position, raise the head restraint until it locks in place. The outboard head restraints are
not removable.
The center head restraint has limited adjustment. Lift upward on the head restraint to
raise it, or push downward on the head restraint to lower it.
WARNING!
Sitting in a seat with the head restraint in its lowered position could result in serious
injury or death in a collision. Always make sure the outboard head restraints are in their
upright positions when the seat is to be occupied.
NOTE:
For proper routing of a Child Seat Tether, refer to “Occupant Restraints” in “Things To
Know Before Starting” in your Owner’s Manual on the DVD for further information.
Power Folding Third Row Head Restraints
For improved visibility when in reverse, the third row head restraints can be folded using
the Uconnect®System.
Press the “Controls” button located on the bottom of the Uconnect®display.
Press the Headrest Fold buttonto power fold the third row head restraints.
NOTE:
•TheheadrestraintscanonlybefoldeddownwardusingtheHeadrestbutton.Thehead
restraints must be raised manually when occupying the third row.
•Donotfoldiftherearepassengersseatedinthethirdrowseats.
GETTING STARTED
27
Page 33 of 236
Fold-Flat Front Passenger Seat
The front passenger seat can be folded flat to allow for extended cargo space.
•Pulluponthereclinerleverandfoldtheseatbackforwardanddowntoaflatposition.
CAUTION!
Do not place any article under a power seat or impede its ability to move as it may cause
damage to the seat controls. Seat travel may become limited if movement is stopped
by an obstruction in the seat's path.
WARNING!
•Adjustingaseatwhilethevehicleismovingisdangerous.Thesuddenmovementof
the seat could cause you to lose control. The seat belt might not be properly
adjusted, and you could be severely injured or killed. Only adjust a seat while the
vehicle is parked.
•Donotridewiththeseatbackreclinedsothattheseatbeltisnolongerresting
against your chest. In a collision, you could slide under the seat belt and be severely
injured or killed. Use the recliner only when the vehicle is parked.
REAR SEATS
60/40 Split Rear Seat
The left or right side of the second row seatback can be folded flat to carry cargo. The left
and right side of the second row seat can also be tumbled forward to allow access to the
third row seat.
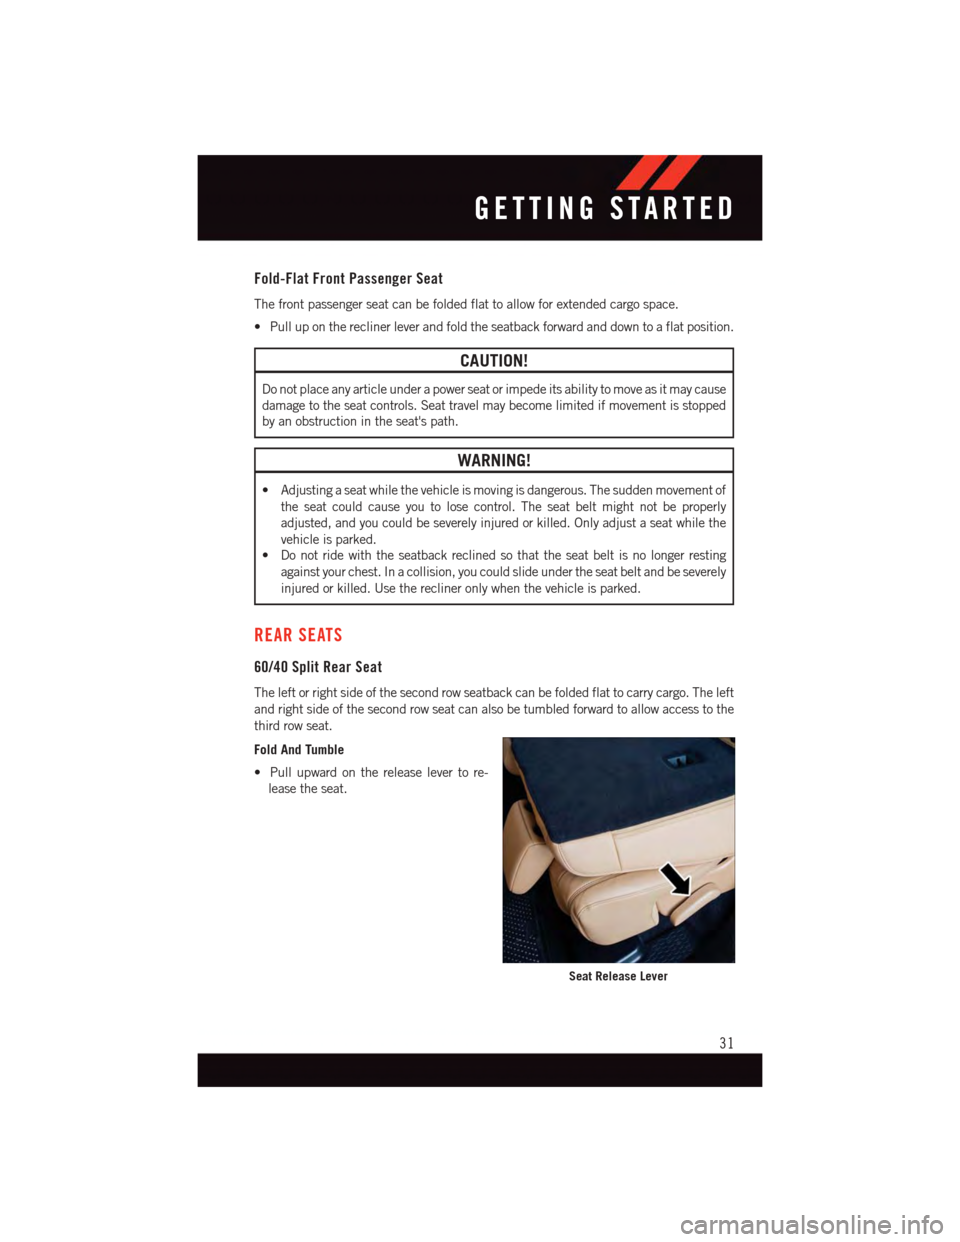
Fold And Tumble
•Pullupwardonthereleaselevertore-
lease the seat.
Seat Release Lever
GETTING STARTED
31
Page 35 of 236
NOTE:
If sitting in the third row seat, pull rearward on the tumble pull strap located at the rear of
the seat and tumble the seat forward.
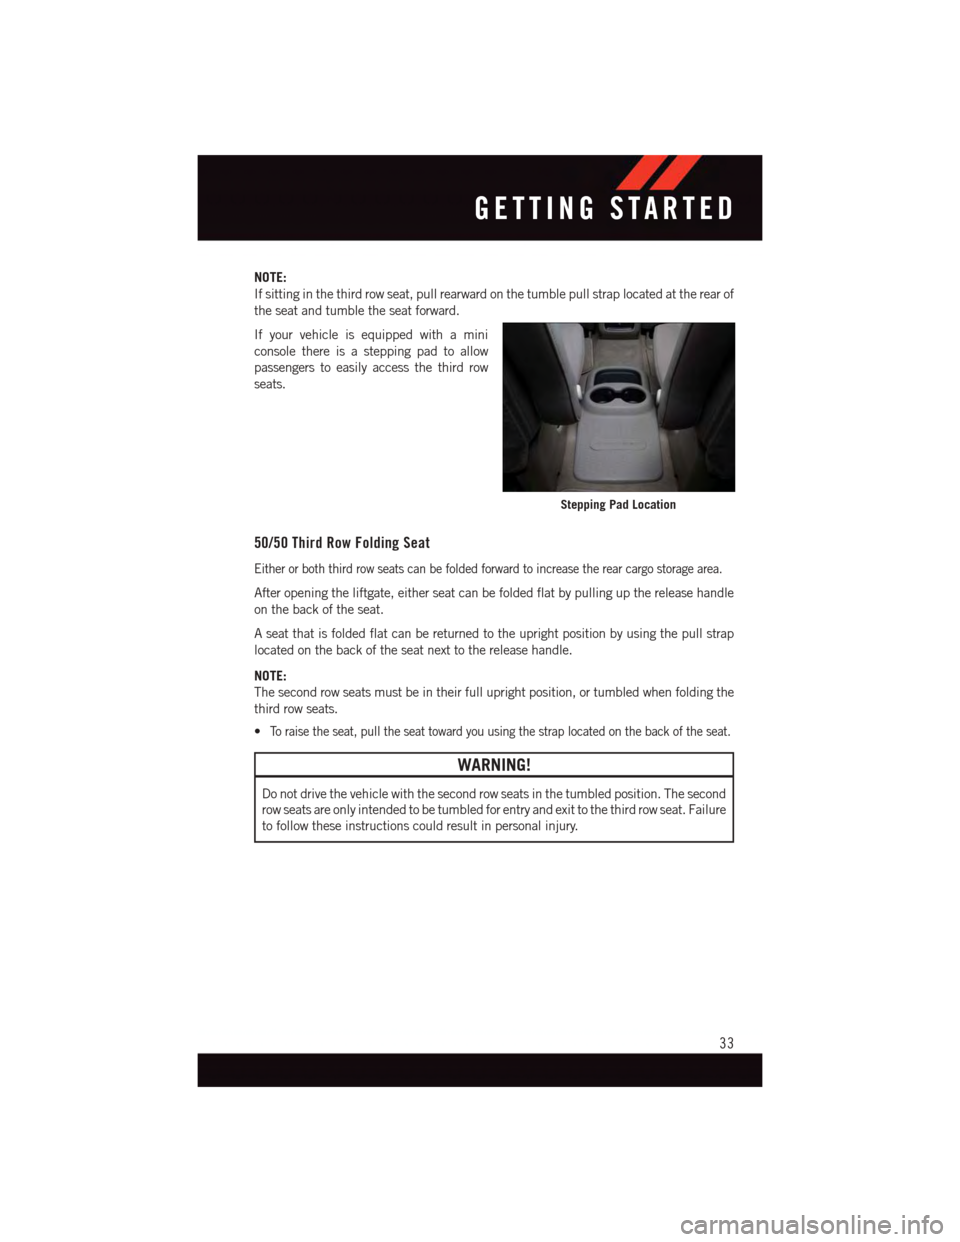
If your vehicle is equipped with a mini
console there is a stepping pad to allow
passengers to easily access the third row
seats.
50/50 Third Row Folding Seat
Either or both third row seats can be folded forward to increase the rear cargo storage area.
After opening the liftgate, either seat can be folded flat by pulling up the release handle
on the back of the seat.
Aseatthatisfoldedflatcanbereturnedtotheuprightpositionbyusingthepullstrap
located on the back of the seat next to the release handle.
NOTE:
The second row seats must be in their full upright position, or tumbled when folding the
third row seats.
•To r a i s e t h e s e a t , p u l l t h e s e a t t o w a r d y o u u s i n g t h e s t r a p l o c a t e d o n t h e b a c k o f t h e s e a t .
WARNING!
Do not drive the vehicle with the second row seats in the tumbled position. The second
row seats are only intended to be tumbled for entry and exit to the third row seat. Failure
to follow these instructions could result in personal injury.
Stepping Pad Location
GETTING STARTED
33
Page 36 of 236
HEATED/VENTILATED SEATS
Heated Seats
On some models, the front and rear seats may be equipped with heaters in both the seat
cushions and seatbacks.
The front driver and passenger heated seats are operated using the Uconnect®System.
WARNING!
•Personswhoareunabletofeelpaintotheskinbecauseofadvancedage,chronic
illness, diabetes, spinal cord injury, medication, alcohol use, exhaustion or other
physical condition must exercise care when using the seat heater. It may cause
burns even at low temperatures, especially if used for long periods of time.
•Donotplaceanythingontheseatorseatbackthatinsulatesagainstheat,suchas
ablanketorcushion.Thismaycausetheseatheatertooverheat.Sittinginaseat
that has been overheated could cause serious burns due to the increased surface
temperature of the seat.
Front Heated Seats
The front heated seats control buttons are located within the climate or controls screen of
the touchscreen.
Yo u c a n c h o o s e f r o m H I , L O o r O F F h e a t s e t t i n g s . T h e i n d i c a t o r l i g h t s i n e a c h s w i t c h
indicate the level of heat in use. Two indicator lights will illuminate for HI, one for LO and
none for OFF.
•Presstheheatedseatbuttononce to turn the HI setting ON.
•PresstheheatedseatbuttonasecondtimetoturntheLOsettingON.
•PresstheheatedseatbuttonathirdtimetoturntheheatingelementsOFF.
If the HI-level setting is selected, the system will automatically switch to LO-level after
approximately 60 minutes of continuous operation. At that time, the display will change
from HI to LO, indicating the change. The LO-level setting will turn OFF automatically
after approximately 45 minutes.
NOTE:
•Onceaheatsettingisselected,heatwillbefeltwithintwotofiveminutes.
•Theenginemustberunningfortheheatedseatstooperate.
Vehicles Equipped With Remote Start
On models that are equipped with remote start, the heated seats can be programed to
come on during a remote start.
This feature can be programmed through the Uconnect®system. Refer to “Uconnect®
Settings” in “Understanding Your Instrument Panel” in the Owner's Manual on the DVD.
GETTING STARTED
34
Page 38 of 236
HEATED STEERING WHEEL
The steering wheel contains a heating element that heats the steering wheel to one
temperature setting.
The heated steering wheel control button is located within the Uconnect®system. You can
gain access to the control buttons through the climate screen or the controls screen.
•Presstheheatedsteeringwheelbuttononce to turn the heating element ON.
•Presstheheatedsteeringwheelbuttonasecondtimetoturntheheatingelement
OFF.
Once the heated steering wheel has been turned on, it will operate for up to 80 minutes
before automatically shutting off. The heated steering wheel can shut off early or may not
turn on when the steering wheel is already warm.
NOTE:
On models that are equipped with Remote Start, this feature can be programmed to come
on during a Remote Start through the Uconnect®system. Refer to “Uconnect®Settings”
in “Understanding Your Instrument Panel” in the Owner's Manual on the DVD.
WARNING!
•Personswhoareunabletofeelpaintotheskinbecauseofadvancedage,chronic
illness, diabetes, spinal cord injury, medication, alcohol use, exhaustion, or other
physical conditions must exercise care when using the steering wheel heater. It may
cause burns even at low temperatures, especially if used for long periods.
•Donotplaceanythingonthesteeringwheelthatinsulatesagainstheat,suchasa
blanket or steering wheel covers of any type and material. This may cause the
steering wheel heater to overheat.
GETTING STARTED
36
Page 40 of 236
WARNING!
•Donotadjustthesteeringwheelwhiledriving.Thetilt/telescopingadjustmentmust
be locked while driving. Adjusting the steering wheel while driving or driving
without the tilt/telescoping adjustment locked could cause the driver to lose control
of the vehicle. Failure to follow this warning may result in you and others being
severely injured or killed.
•Movingthesteeringcolumnwhilethevehicleismovingisdangerous.Withouta
stable steering column, you could lose control of the vehicle and have a collision.
Adjust the column only while the vehicle is stopped.
GETTING STARTED
38
Page 46 of 236
Resume
•Toresumeapreviouslyselectedsetspeedinmemory,pushtheRESbuttonand
release.
Cancel
•PushtheCANCELbutton,orapplythebrakestocancelthesetspeedandmaintainthe
set speed memory.
•PushtheON/OFFbuttontoturnthesystemoffanderasethesetspeedmemory.
WARNING!
Leaving the Electronic Speed Control system on when not in use is dangerous. You
could accidentally set the system or cause it to go faster than you want. You could lose
control and have an accident. Always leave the system OFF when you are not using it.
ADAPTIVE CRUISE CONTROL (ACC)
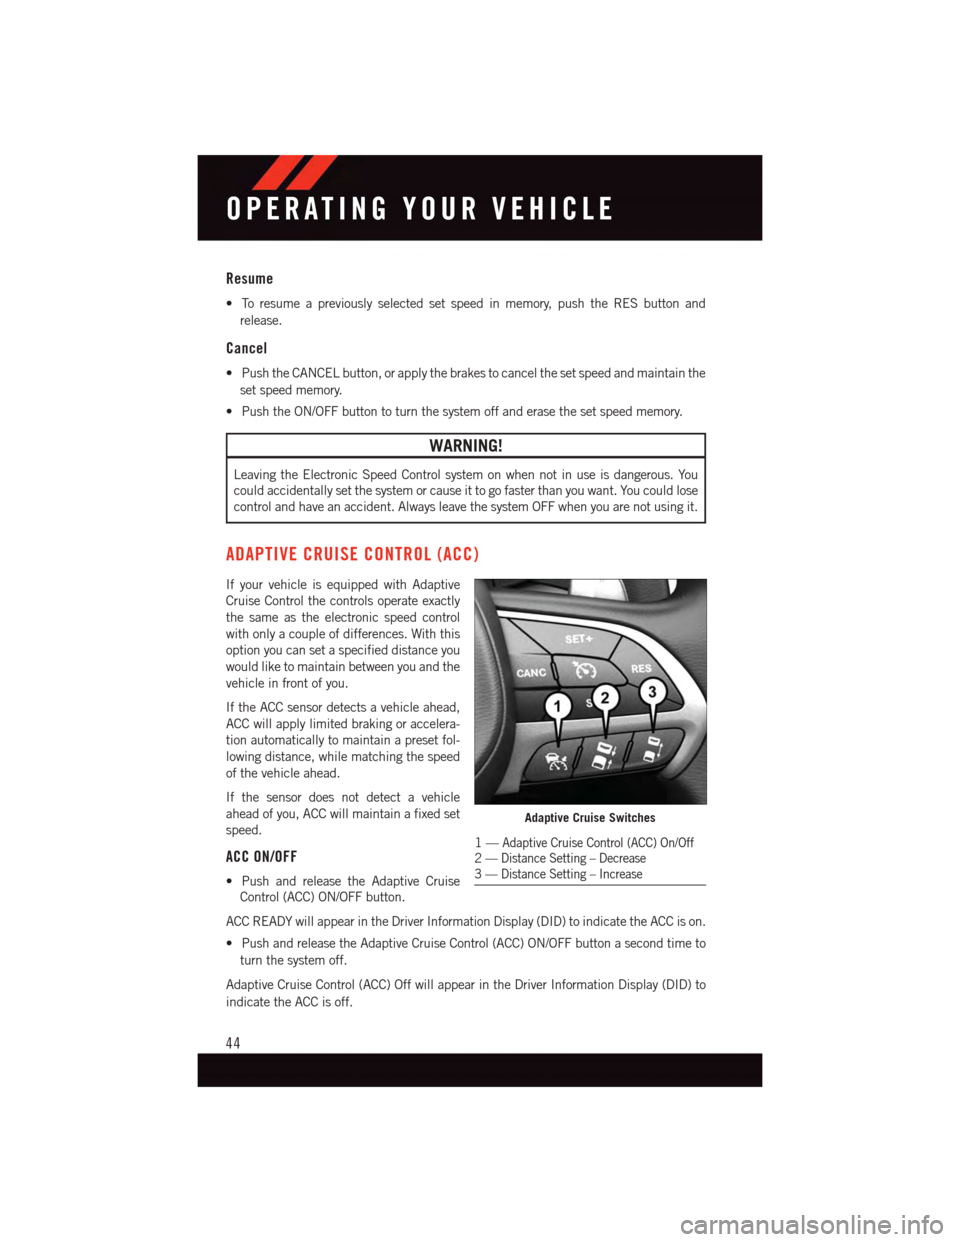
If your vehicle is equipped with Adaptive
Cruise Control the controls operate exactly
the same as the electronic speed control
with only a couple of differences. With this
option you can set a specified distance you
would like to maintain between you and the
vehicle in front of you.
If the ACC sensor detects a vehicle ahead,
ACC will apply limited braking or accelera-
tion automatically to maintain a preset fol-
lowing distance, while matching the speed
of the vehicle ahead.
If the sensor does not detect a vehicle
ahead of you, ACC will maintain a fixed set
speed.
ACC ON/OFF
•PushandreleasetheAdaptiveCruise
Control (ACC) ON/OFF button.
ACC READY will appear in the Driver Information Display (DID) to indicate the ACC is on.
•PushandreleasetheAdaptiveCruiseControl(ACC)ON/OFFbuttonasecondtimeto
turn the system off.
Adaptive Cruise Control (ACC) Off will appear in the Driver Information Display (DID) to
indicate the ACC is off.
Adaptive Cruise Switches
1—Adaptive Cruise Control (ACC) On/Off2—DistanceSetting–Decrease3—DistanceSetting–Increase
OPERATING YOUR VEHICLE
44