instrument panel DODGE DURANGO 2015 3.G Owner's Manual
[x] Cancel search | Manufacturer: DODGE, Model Year: 2015, Model line: DURANGO, Model: DODGE DURANGO 2015 3.GPages: 236, PDF Size: 35.01 MB
Page 158 of 236
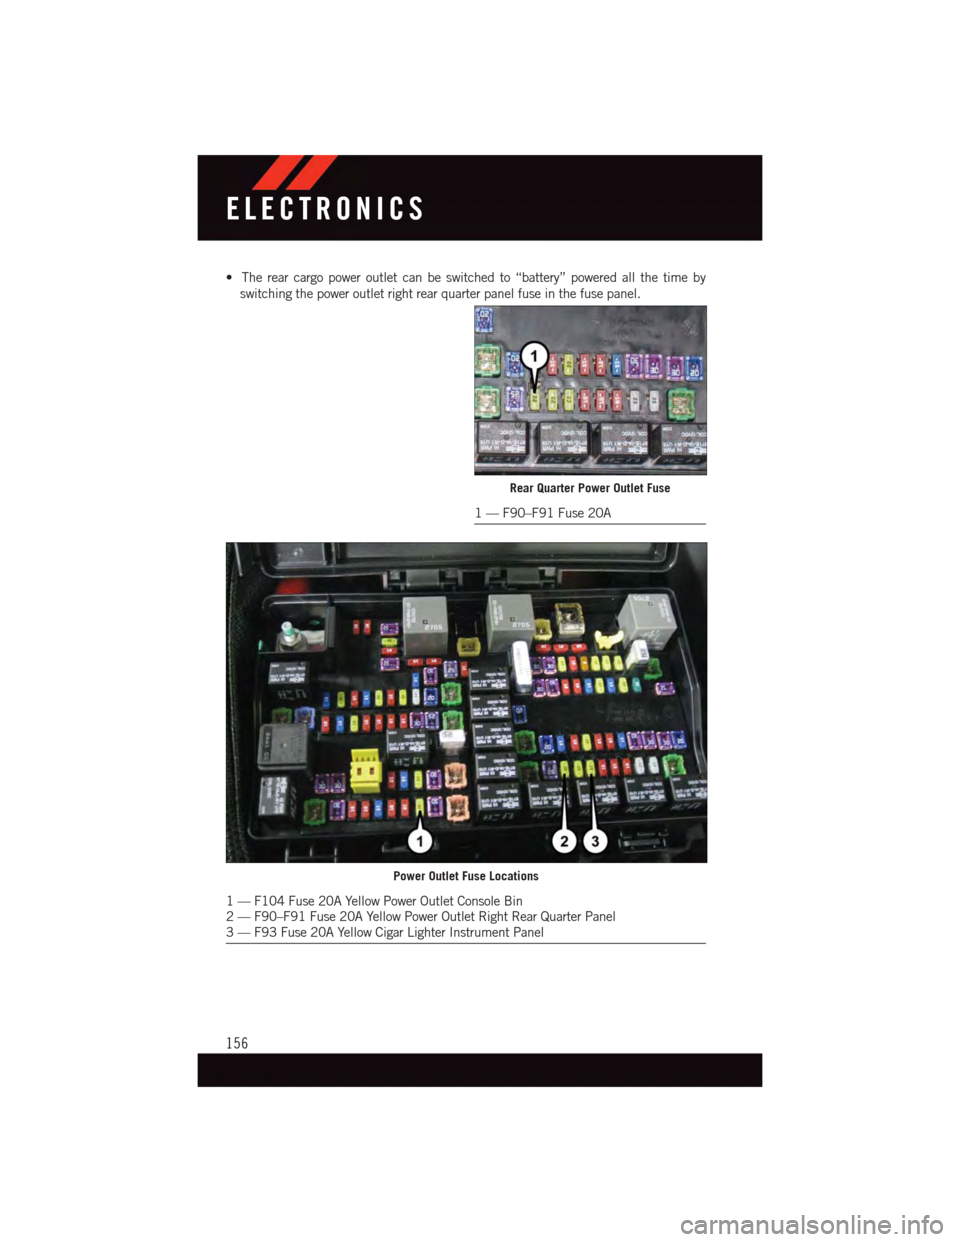
•Therearcargopoweroutletcanbeswitchedto“battery”poweredallthetimeby
switching the power outlet right rear quarter panel fuse in the fuse panel.
Rear Quarter Power Outlet Fuse
1—F90–F91Fuse20A
Power Outlet Fuse Locations
1—F104Fuse20AYellowPowerOutletConsoleBin2—F90–F91Fuse20AYellowPowerOutletRightRearQuarterPanel3—F93Fuse20AYellowCigarLighterInstrumentPanel
ELECTRONICS
156
Page 167 of 236
CAUTION!
•DONOTdollytowanyAWDvehicle.Towingwithonlyonesetofwheelsonthe
ground (front or rear) will cause severe transmission and/or transfer case damage.
To w w i t h a l l f o u r w h e e l s e i t h e r O N t h e g r o u n d , o r O F F t h e g r o u n d ( u s i n g a v e h i c l e
trailer).
•Towonlyintheforwarddirection.Towingthisvehiclebackwardscancausesevere
damage to the transfer case.
•ThetransmissionmustbeinPARKforrecreationaltowing.
•Beforerecreationaltowing,performtheprocedureoutlinedunder“ShiftingInto
NEUTRAL(N)” to be certain that the transfer case is fully in NEUTRAL (N).
Otherwise, internal damage will result.
•Towingthisvehicleinviolationoftheaboverequirementscancausesevere
transmission and/or transfer case damage. Damage from improper towing is not
covered under the New Vehicle Limited Warranty.
•Donotuseabumper-mountedclamp-ontowbaronyourvehicle.Thebumperface
bar will be damaged.
Shifting Into NEUTRAL (N)
WARNING!
Yo u o r o t h e r s c o u l d b e i n j u r e d o r k i l l e d i f y o u l e a v e t h e v e h i c l e u n a t t e n d e d w i t h t h e
transfer case in the NEUTRAL (N) position without first fully engaging the parking
brake. The transfer case NEUTRAL (N) position disengages both the front and rear
driveshafts from the powertrain and will allow the vehicle to roll, even if the transmis-
sion is in PARK. The parking brake should always be applied when the driver is not in
the vehicle.
Use the following procedure to prepare your vehicle for recreational towing.
CAUTION!
It is necessary to follow these steps to be certain that the transfer case is fully in
NEUTRAL (N) before recreational towing to prevent damage to internal parts.
1. Bring the vehicle to a complete stop, with the engine running.
2. Press and hold the brake pedal.
3. Shift the transmission into NEUTRAL.
4.Using a ballpoint pen or similar object, press and hold the recessed transfer case NEUTRAL
(N) button (located by the selector switch) for four seconds. The light behind the N symbol
will blink, indicating shift in progress. The light will stop blinking (stay on solid) when the
shift to NEUTRAL (N) is complete. A “FOUR WHEEL DRIVE SYSTEM IN NEUTRAL”
message will appear in the Driver Information Display (DID). Refer to “Driver Information
Display (DID)” in “Understanding Your Instrument Panel” for further information.
UTILITY
165
Page 173 of 236
WARNING!
Amalfunctioningcatalyticconverter,asreferencedabove,canreachhighertempera-
tures than in normal operating conditions. This can cause a fire if you drive slowly or
park over flammable substances such as dry plants, wood, cardboard, etc. This could
result in death or serious injury to the driver, occupants or others.
-ElectronicStabilityControl(ESC)Activation/MalfunctionIndicatorLight
The “ESC Activation/Malfunction Indicator Light” in the instrument cluster will come on
when the ignition switch is turned to the ON/RUN position. It should go out with the
engine running. If the “ESC Activation/Malfunction Indicator Light” comes on continu-
ously with the engine running, a malfunction has been detected in the ESC system. If this
light remains on after several ignition cycles, and the vehicle has been driven several miles
(kilometers) at speeds greater than 30 mph (48 km/h), see your authorized dealer as soon
as possible to have the problem diagnosed and corrected.
NOTE:
•The“ESCOffIndicatorLight”andthe“ESCActivation/MalfunctionIndicatorLight”
come on momentarily each time the ignition switch is turned to ON/RUN.
•EachtimetheignitionisturnedtoON/RUN,theESCsystemwillbeON,evenifitwas
turned off previously.
•TheESCsystemwillmakebuzzingorclickingsoundswhenitisactive.Thisisnormal;
the sounds will stop when ESC becomes inactive following the maneuver that caused
the ESC activation.
•Toimprovethevehicle'stractionwhenstartingoffindeepsnow,sandorgravel,itmay
be desirable to switch the ESC system to Partial Off mode by momentarily pressing the
ESC Offswitch located below the climate controls, on the switch panel.
-ChargingSystemLight
This light shows the status of the electrical charging system. If the charging system light
remains on, it means that the vehicle is experiencing a problem with the charging system.
We recommend you do not continue driving if the charging system light is on. Have the
vehicle serviced immediately.
-OilPressureWarningLight
This light indicates low engine oil pressure. If the light turns on while driving, stop the
vehicle and shut off the engine as soon as possible. A chime will sound for four minutes
when this light turns on.
We recommend you do not operate the vehicle or engine damage will occur. Have the
vehicle serviced immediately.
WHAT TO DO IN EMERGENCIES
171
Page 195 of 236
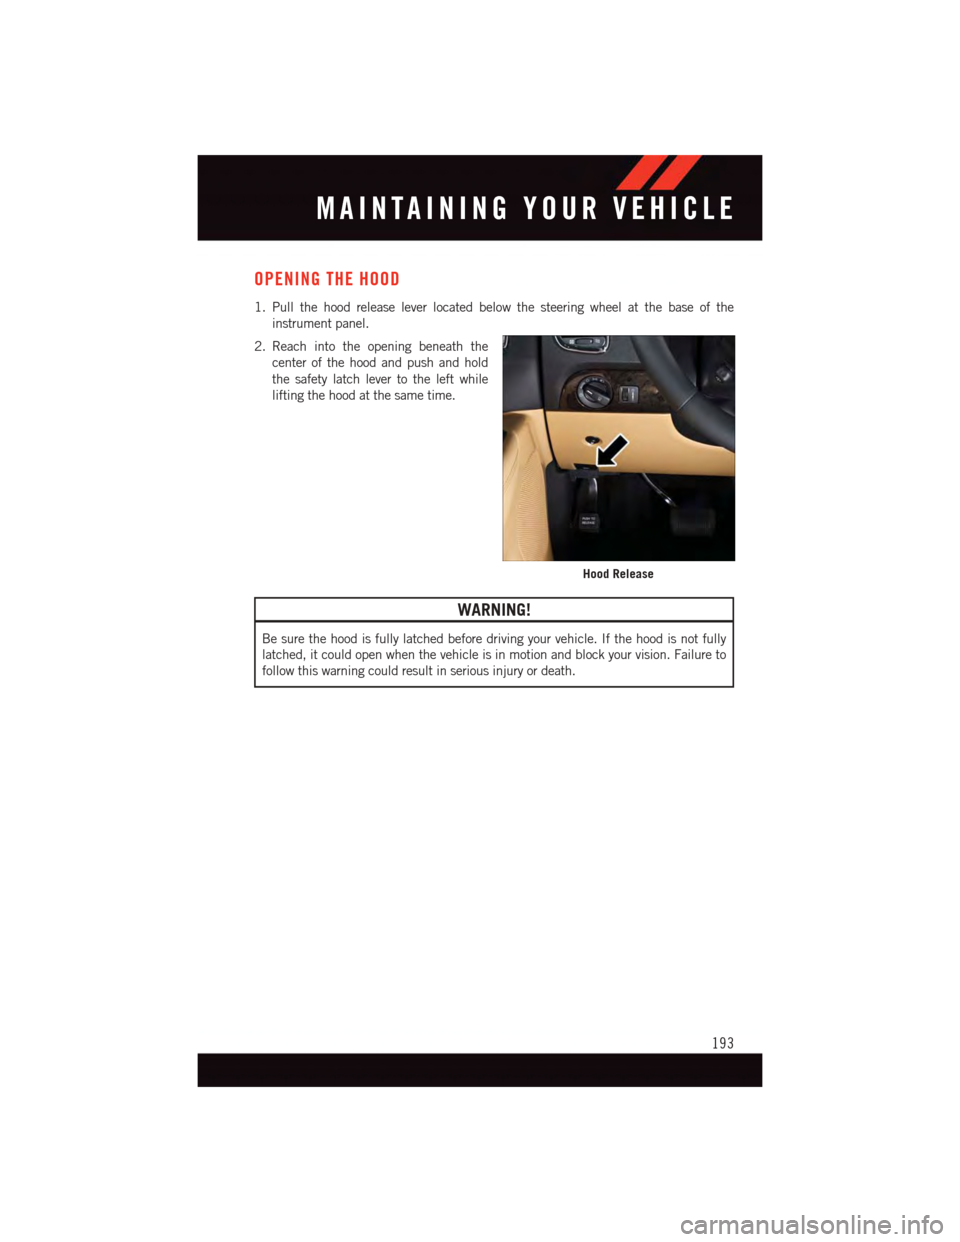
OPENING THE HOOD
1. Pull the hood release lever located below the steering wheel at the base of the
instrument panel.
2. Reach into the opening beneath the
center of the hood and push and hold
the safety latch lever to the left while
lifting the hood at the same time.
WARNING!
Be sure the hood is fully latched before driving your vehicle. If the hood is not fully
latched, it could open when the vehicle is in motion and block your vision. Failure to
follow this warning could result in serious injury or death.
Hood Release
MAINTAINING YOUR VEHICLE
193
Page 210 of 236
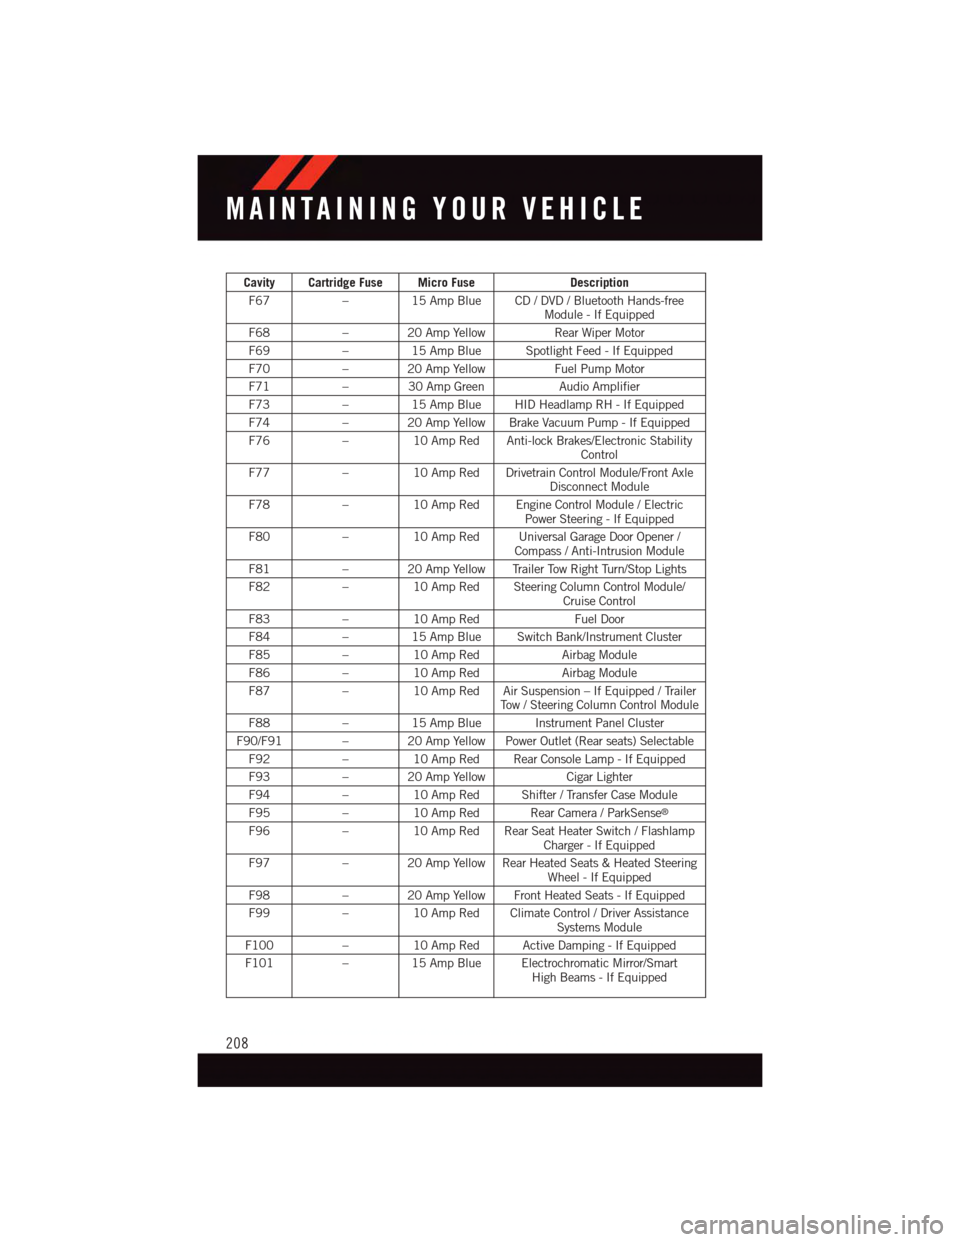
Cavity Cartridge Fuse Micro FuseDescription
F67–15 Amp Blue CD / DVD / Bluetooth Hands-freeModule - If Equipped
F68–20AmpYellowRear Wiper Motor
F69–15 Amp Blue Spotlight Feed - If Equipped
F70–20AmpYellowFuel Pump Motor
F71–30AmpGreenAudio Amplifier
F73–15 Amp Blue HID Headlamp RH - If Equipped
F74–20AmpYellowBrakeVacuumPump-IfEquipped
F76–10 Amp Red Anti-lock Brakes/Electronic StabilityControl
F77–10 Amp Red Drivetrain Control Module/Front AxleDisconnect Module
F78–10 Amp Red Engine Control Module / ElectricPower Steering - If Equipped
F80–10 Amp Red Universal Garage Door Opener /Compass / Anti-Intrusion Module
F81–20AmpYellowTrailerTowRightTurn/StopLights
F82–10 Amp Red Steering Column Control Module/Cruise Control
F83–10 Amp RedFuel Door
F84–15 Amp Blue Switch Bank/Instrument Cluster
F85–10 Amp RedAirbag Module
F86–10 Amp RedAirbag Module
F87–10 Amp Red Air Suspension – If Equipped / TrailerTo w / S t e e r i n g C o l u m n C o n t r o l M o d u l e
F88–15 Amp Blue Instrument Panel Cluster
F90/F91 – 20 Amp Yellow Power Outlet (Rear seats) Selectable
F92–10 Amp Red Rear Console Lamp - If Equipped
F93–20AmpYellowCigar Lighter
F94–10 Amp Red Shifter / Transfer Case Module
F95–10 Amp Red Rear Camera / ParkSense®
F96–10 Amp Red Rear Seat Heater Switch / FlashlampCharger - If Equipped
F97–20AmpYellowRearHeatedSeats&HeatedSteeringWheel - If Equipped
F98–20AmpYellowFrontHeatedSeats-IfEquipped
F99–10 Amp Red Climate Control / Driver AssistanceSystems Module
F100–10 Amp Red Active Damping - If Equipped
F101–15 Amp Blue Electrochromatic Mirror/SmartHigh Beams - If Equipped
MAINTAINING YOUR VEHICLE
208
Page 211 of 236
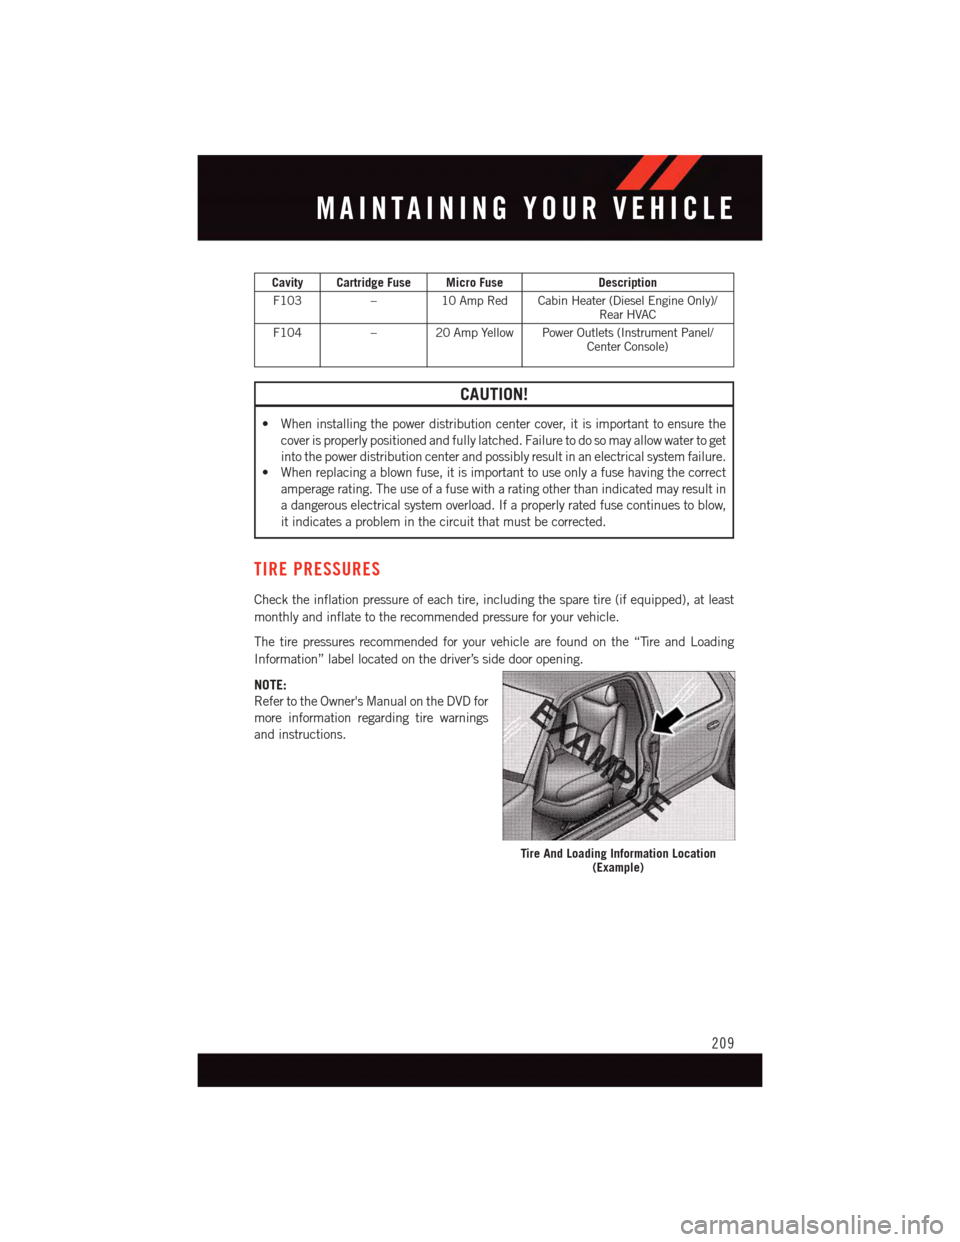
Cavity Cartridge Fuse Micro FuseDescription
F103–10 Amp Red Cabin Heater (Diesel Engine Only)/Rear HVAC
F104–20AmpYellowPowerOutlets(InstrumentPanel/Center Console)
CAUTION!
•Wheninstallingthepowerdistributioncentercover,itisimportanttoensurethe
cover is properly positioned and fully latched. Failure to do so may allow water to get
into the power distribution center and possibly result in an electrical system failure.•Whenreplacingablownfuse,itisimportanttouseonlyafusehavingthecorrect
amperage rating. The use of a fuse with a rating other than indicated may result in
adangerouselectricalsystemoverload.Ifaproperlyratedfusecontinuestoblow,
it indicates a problem in the circuit that must be corrected.
TIRE PRESSURES
Check the inflation pressure of each tire, including the spare tire (if equipped), at least
monthly and inflate to the recommended pressure for your vehicle.
The tire pressures recommended for your vehicle are found on the “Tire and Loading
Information” label located on the driver’s side door opening.
NOTE:
Refer to the Owner's Manual on the DVD for
more information regarding tire warnings
and instructions.
Tire And Loading Information Location(Example)
MAINTAINING YOUR VEHICLE
209
Page 216 of 236
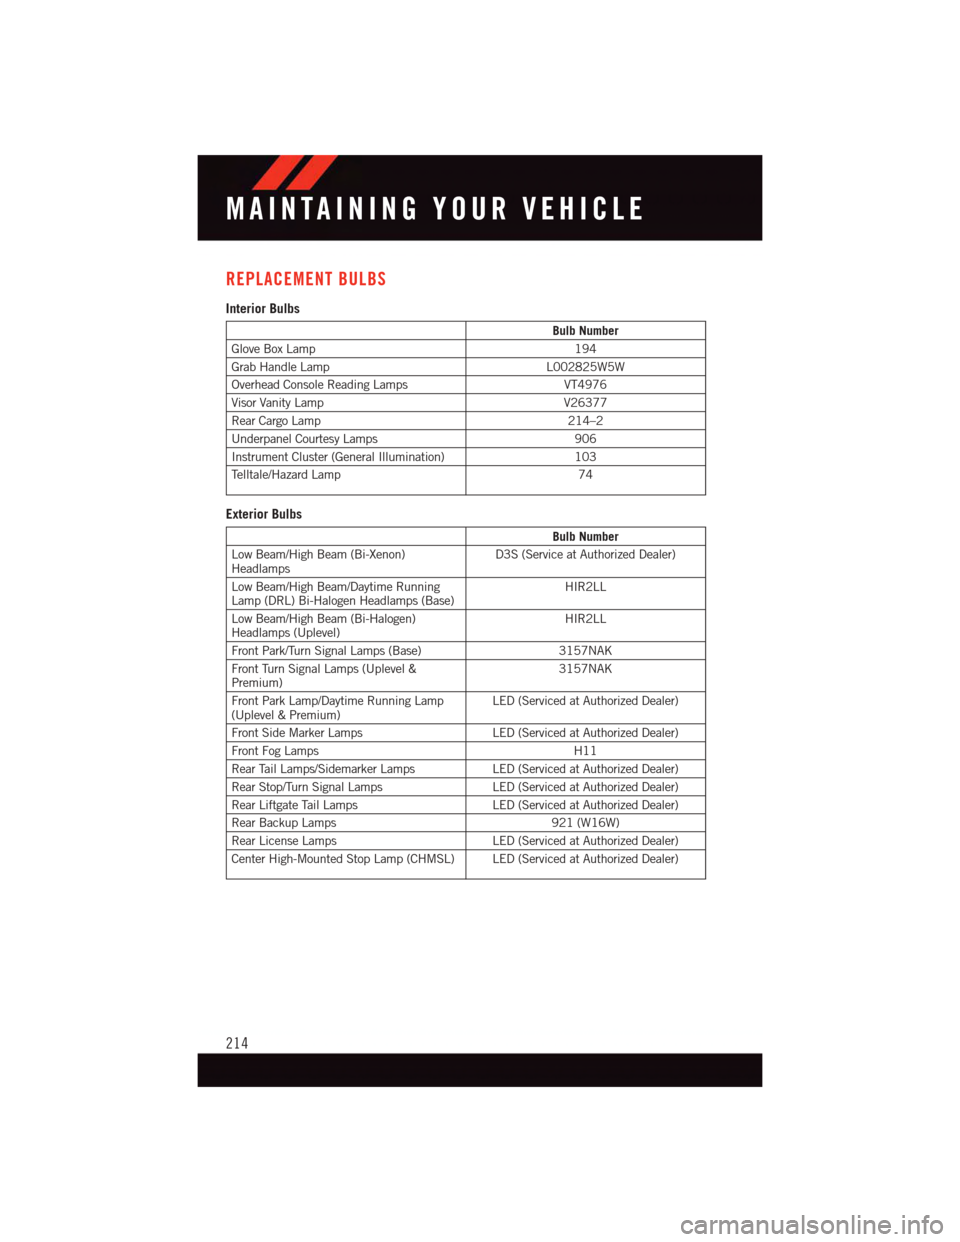
REPLACEMENT BULBS
Interior Bulbs
Bulb Number
Glove Box Lamp194
Grab Handle LampL002825W5W
Overhead Console Reading LampsVT4976
Visor Vanity LampV26377
Rear Cargo Lamp214–2
Underpanel Courtesy Lamps906
Instrument Cluster (General Illumination)103
Te l l t a l e / H a z a r d L a m p74
Exterior Bulbs
Bulb Number
Low Beam/High Beam (Bi-Xenon)HeadlampsD3S (Service at Authorized Dealer)
Low Beam/High Beam/Daytime RunningLamp (DRL) Bi-Halogen Headlamps (Base)HIR2LL
Low Beam/High Beam (Bi-Halogen)Headlamps (Uplevel)HIR2LL
Front Park/Turn Signal Lamps (Base) 3157NAK
Front Turn Signal Lamps (Uplevel &Premium)3157NAK
Front Park Lamp/Daytime Running Lamp(Uplevel & Premium)LED (Serviced at Authorized Dealer)
Front Side Marker Lamps LED (Serviced at Authorized Dealer)
Front Fog Lamps H11
Rear Tail Lamps/Sidemarker Lamps LED (Serviced at Authorized Dealer)
Rear Stop/Turn Signal Lamps LED (Serviced at Authorized Dealer)
Rear Liftgate Tail Lamps LED (Serviced at Authorized Dealer)
Rear Backup Lamps 921 (W16W)
Rear License Lamps LED (Serviced at Authorized Dealer)
Center High-Mounted Stop Lamp (CHMSL) LED (Serviced at Authorized Dealer)
MAINTAINING YOUR VEHICLE
214
Page 224 of 236
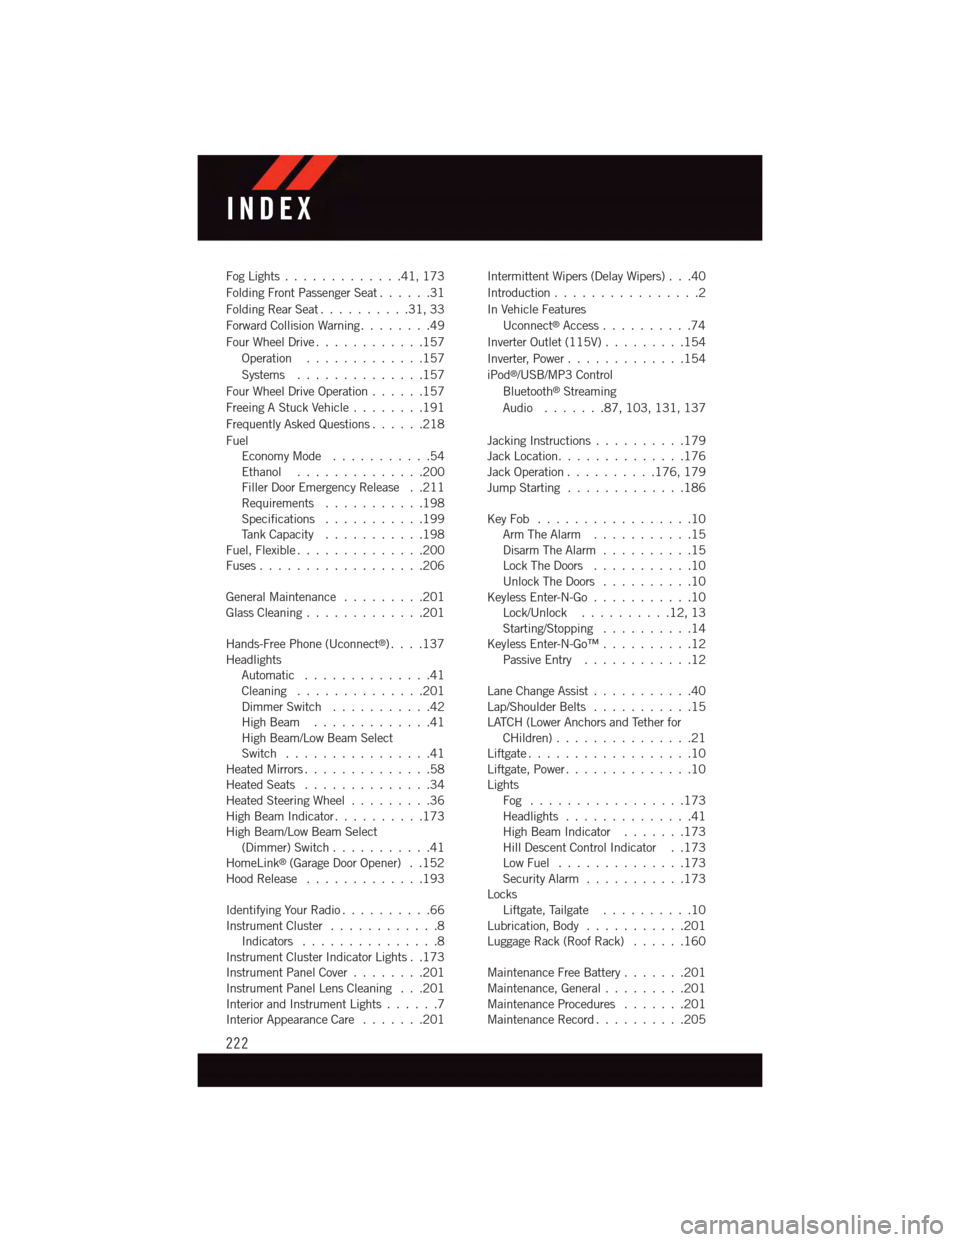
Fog Lights . . . . . . . . . . . . .41, 173
Folding Front Passenger Seat......31
Folding Rear Seat..........31,33
Forward Collision Warning........49
Four Wheel Drive............157
Operation.............157
Systems . . . . . . . . . . . . . .157
Four Wheel Drive Operation......157
Freeing A Stuck Vehicle . . . . . . . .191
Frequently Asked Questions......218
FuelEconomy Mode...........54Ethanol..............200Filler Door Emergency Release . .211Requirements...........198Specifications...........199Ta n k C a p a c i t y...........198Fuel, Flexible..............200Fuses . . . . . . . . . . . . . . . . . .206
General Maintenance.........201Glass Cleaning . . . . . . . . . . . . .201
Hands-Free Phone (Uconnect®). . . .137HeadlightsAutomatic . . . . . . . . . . . . . .41Cleaning..............201Dimmer Switch...........42High Beam . . . . . . . . . . . . .41High Beam/Low Beam SelectSwitch . . . . . . . . . . . . . . . .41Heated Mirrors..............58Heated Seats..............34Heated Steering Wheel.........36High Beam Indicator..........173High Beam/Low Beam Select(Dimmer) Switch...........41HomeLink®(Garage Door Opener) . .152Hood Release . . . . . . . . . . . . .193
Identifying Your Radio..........66Instrument Cluster............8Indicators . . . . . . . . . . . . . . .8Instrument Cluster Indicator Lights . .173Instrument Panel Cover........201Instrument Panel Lens Cleaning . . .201Interior and Instrument Lights......7Interior Appearance Care.......201
Intermittent Wipers (Delay Wipers) . . .40
Introduction................2
In Vehicle Features
Uconnect®Access..........74
Inverter Outlet (115V).........154
Inverter, Power.............154
iPod®/USB/MP3 Control
Bluetooth®Streaming
Audio.......87,103, 131, 137
Jacking Instructions..........179Jack Location..............176Jack Operation..........176, 179Jump Starting.............186
Key Fob . . . . . . . . . . . . . . . . .10Arm The Alarm . . . . . . . . . . .15Disarm The Alarm . . . . . . . . . .15Lock The Doors...........10Unlock The Doors..........10Keyless Enter-N-Go...........10Lock/Unlock..........12,13Starting/Stopping..........14Keyless Enter-N-Go™..........12Passive Entry............12
Lane Change Assist...........40Lap/Shoulder Belts...........15LATCH (Lower Anchors and Tether forCHildren) . . . . . . . . . . . . . . .21Liftgate . . . . . . . . . . . . . . . . . .10Liftgate, Power..............10LightsFog . . . . . . . . . . . . . . . . .173Headlights..............41High Beam Indicator.......173Hill Descent Control Indicator . .173Low Fuel..............173Security Alarm...........173LocksLiftgate, Tailgate . . . . . . . . . .10Lubrication, Body...........201Luggage Rack (Roof Rack)......160
Maintenance Free Battery.......201Maintenance, General.........201Maintenance Procedures.......201Maintenance Record..........205
INDEX
222