tow DODGE DURANGO 2015 3.G Owner's Manual
[x] Cancel search | Manufacturer: DODGE, Model Year: 2015, Model line: DURANGO, Model: DODGE DURANGO 2015 3.GPages: 236, PDF Size: 35.01 MB
Page 187 of 236
WARNING!
•Donotattempttochangeatireonthesideofthevehicleclosetomovingtraffic.
Pull far enough off the road to avoid the danger of being hit when operating the jack
or changing the wheel.
•Beingunderajacked-upvehicleisdangerous.Thevehiclecouldslipoffthejack
and fall on you. You could be crushed. Never put any part of your body under a
vehicle that is on a jack. If you need to get under a raised vehicle, take it to a service
center where it can be raised on a lift.
•Thejackisdesignedtobeusedasatoolforchangingtiresonly.Thejackshouldnot
be used to lift the vehicle for service purposes. The vehicle should be jacked on a
firm level surface only. Avoid ice or slippery areas.
•Alwaysparkonafirm,levelsurfaceasfarfromtheedgeoftheroadwayaspossible
before raising the vehicle.
•TurnontheHazardWarningflasher.
•Blockthewheeldiagonallyoppositethewheeltoberaised.
•SettheparkingbrakefirmlyandsettheautomatictransmissioninPARK.
•Neverstartorruntheenginewiththevehicleonajack.
•Donotletanyonesitinthevehiclewhenitisonajack.
•Donotgetunderthevehiclewhenitisonajack.
•Onlyusethejackinthepositionsindicatedandforliftingthisvehicleduringatire
change.
•Ifworkingonorneararoadway,beextremelycarefulofmotortraffic.
•Toassurethatsparetires,flatorinflated,aresecurelystowed,sparesmustbe
stowed with the valve stem facing the ground. Carefully follow these tire changing
warnings to help prevent personal injury or damage to your vehicle:
•Raisingthevehiclehigherthannecessarycanmakethevehiclelessstable.
It could slip off the jack and hurt someone near it. Raise the vehicle only
enough to remove the tire.
•Toavoidtheriskofforcingthevehicleoffthejack,donotfullytightenthe
wheel nuts until the vehicle has been lowered. Failure to follow this warning
may result in personal injury.
•Donotusepowertoolstowinchthetireupordown.Impact-typetoolsmay
damage the winch mechanism.
•Aloosetireorjack,thrownforwardinacollisionorhardstopcouldendanger
the occupants of the vehicle. Always stow the jack parts and the spare tire in
the places provided.
•Toavoidtheriskofforcingthevehicleoffthejack,donottightenthelug
nuts fully until the vehicle is lowered to the ground.
WHAT TO DO IN EMERGENCIES
185
Page 191 of 236
MANUAL PARK RELEASE
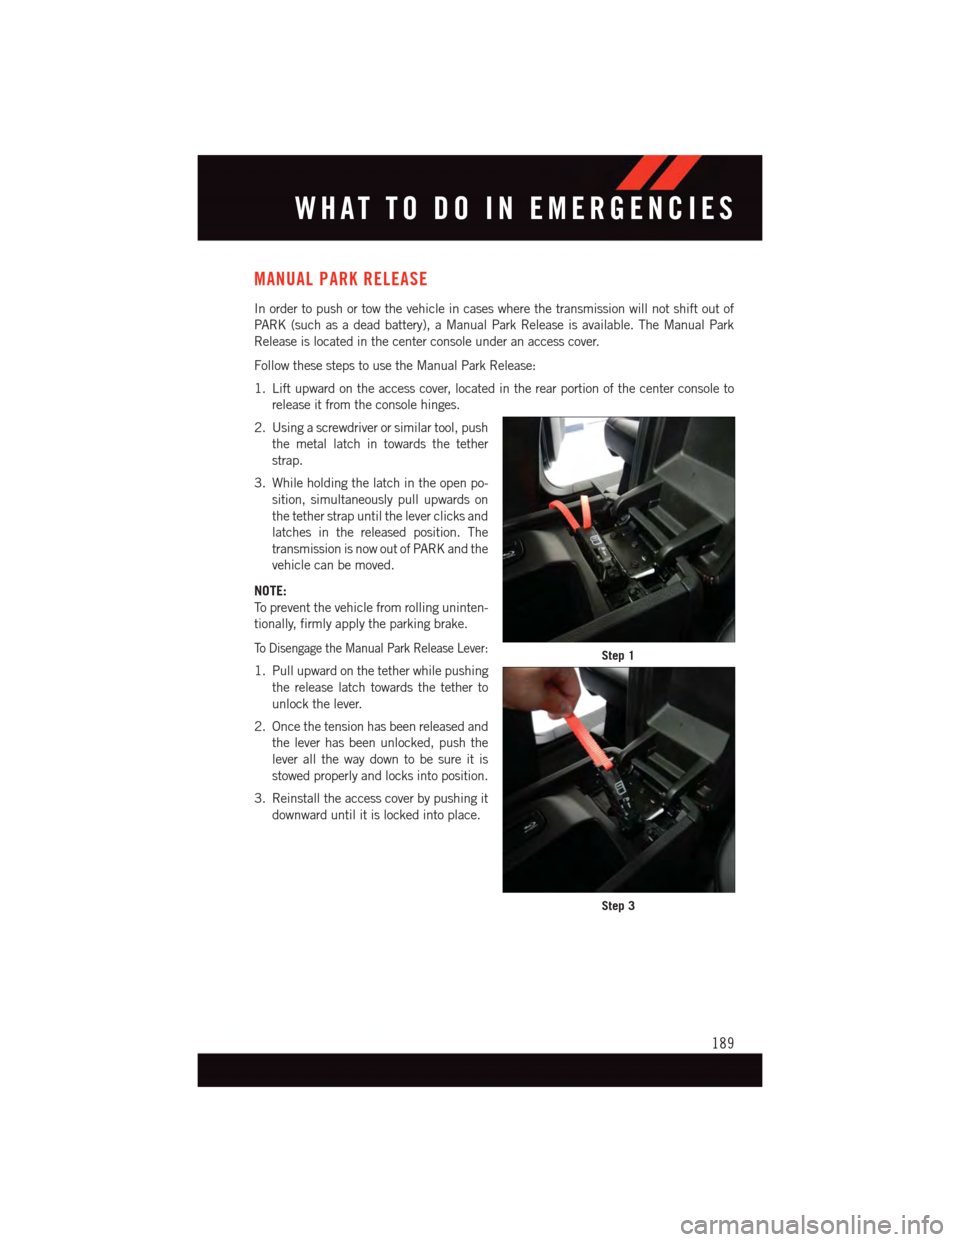
In order to push or tow the vehicle in cases where the transmission will not shift out of
PA R K ( s u c h a s a d e a d b a t t e r y ) , a M a n u a l P a r k R e l e a s e i s a v a i l a b l e . T h e M a n u a l P a r k
Release is located in the center console under an access cover.
Follow these steps to use the Manual Park Release:
1. Lift upward on the access cover, located in the rear portion of the center console to
release it from the console hinges.
2. Using a screwdriver or similar tool, push
the metal latch in towards the tether
strap.
3. While holding the latch in the open po-
sition, simultaneously pull upwards on
the tether strap until the lever clicks and
latches in the released position. The
transmission is now out of PARK and the
vehicle can be moved.
NOTE:
To p r e v e n t t h e v e h i c l e f r o m r o l l i n g u n i n t e n -
tionally, firmly apply the parking brake.
To D i s e n g a g e t h e M a n u a l P a r k R e l e a s e L e v e r :
1. Pull upward on the tether while pushing
the release latch towards the tether to
unlock the lever.
2. Once the tension has been released and
the lever has been unlocked, push the
lever all the way down to be sure it is
stowed properly and locks into position.
3. Reinstall the access cover by pushing it
downward until it is locked into place.
Step 1
Step 3
WHAT TO DO IN EMERGENCIES
189
Page 192 of 236
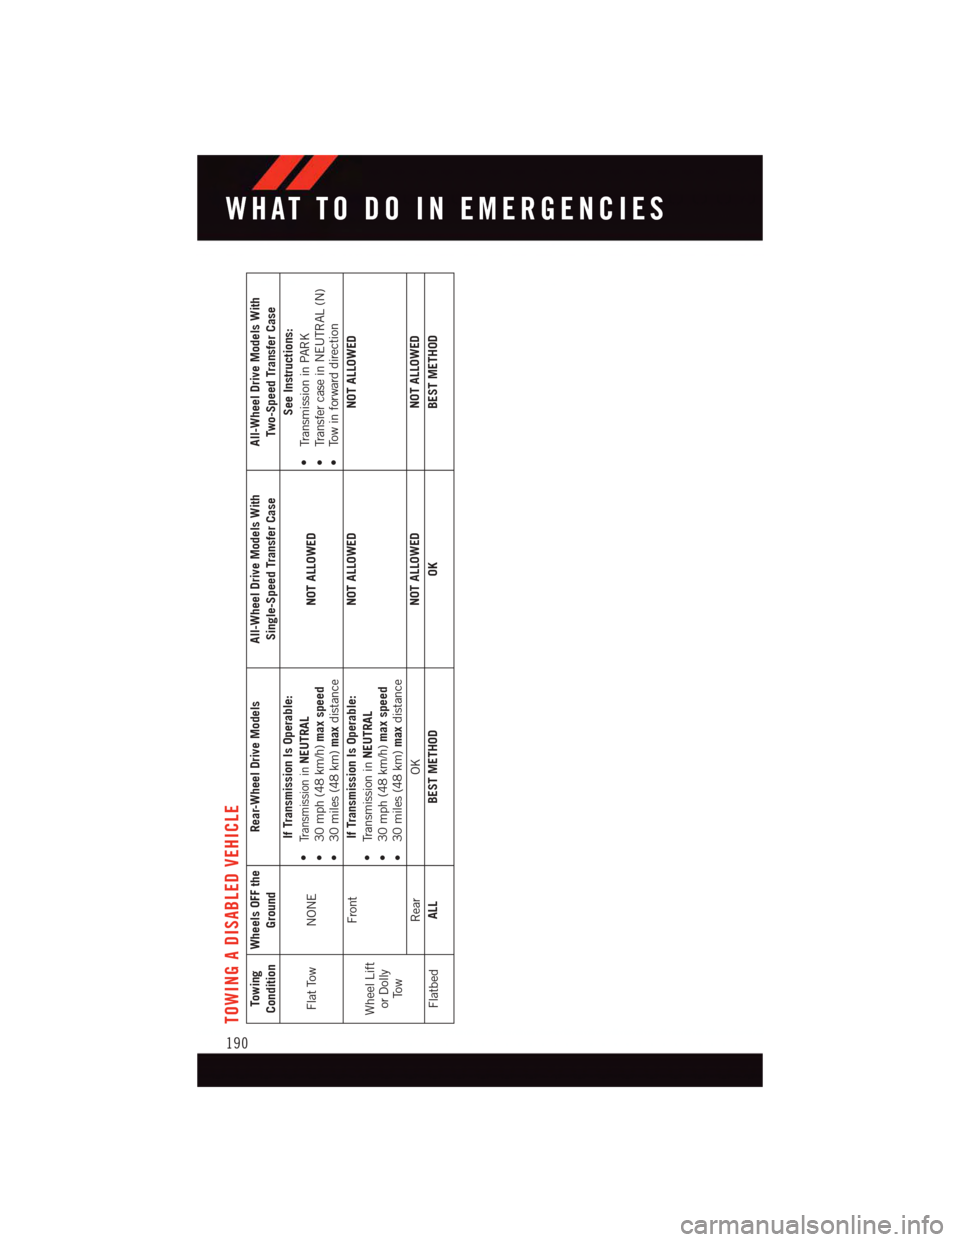
TOWING A DISABLED VEHICLE
TowingCondition
Wheels OFF the
Ground
Rear-Wheel Drive Models All-Wheel Drive Models With
Single-Speed Transfer Case
All-Wheel Drive Models WithTwo-Speed Transfer Case
Flat Tow NONE
If Transmission Is Operable:
•
Tr a n s m i s s i o n i n
NEUTRAL
•30mph(48km/h)
max speed
•30miles(48km)
max
distance
NOT ALLOWED
See Instructions:
•
Tr a n s m i s s i o n i n PA R K
•TransfercaseinNEUTRAL(N)•Towinforwarddirection
Wheel Liftor DollyTo w
Front
If Transmission Is Operable:
•
Tr a n s m i s s i o n i n
NEUTRAL
•30mph(48km/h)
max speed
•30miles(48km)
max
distance
NOT ALLOWED
NOT ALLOWED
Rear
OK
NOT ALLOWED
NOT ALLOWED
Flatbed
ALL
BEST METHOD
OK
BEST METHOD
WHAT TO DO IN EMERGENCIES
190
Page 200 of 236
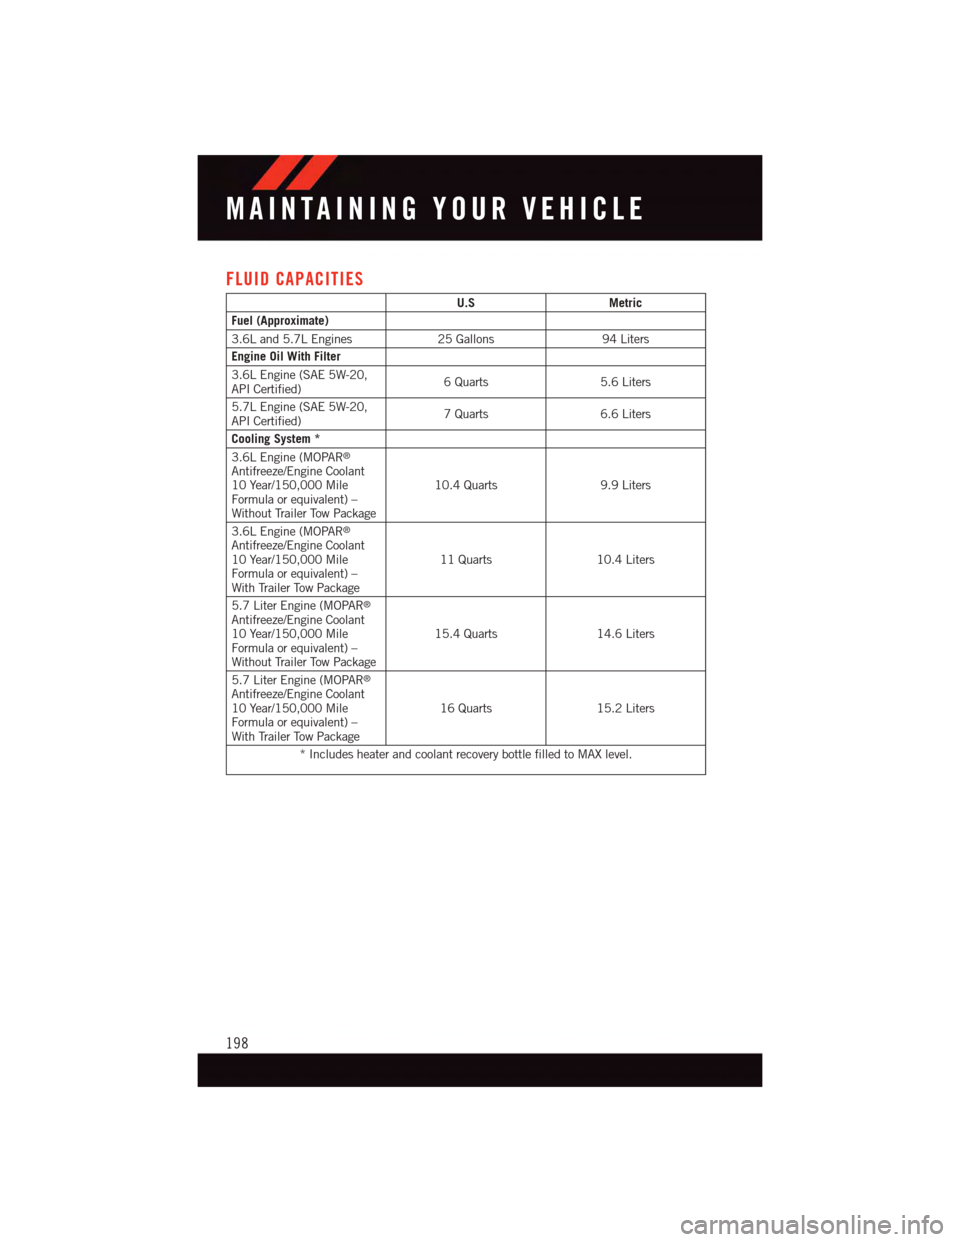
FLUID CAPACITIES
U.SMetric
Fuel (Approximate)
3.6L and 5.7L Engines 25 Gallons 94 Liters
Engine Oil With Filter
3.6L Engine (SAE 5W-20,API Certified)6Quarts5.6 Liters
5.7L Engine (SAE 5W-20,API Certified)7Quarts6.6 Liters
Cooling System *
3.6L Engine (MOPAR®
Antifreeze/Engine Coolant10 Year/150,000 MileFormula or equivalent) –Without Trailer Tow Package
10.4 Quarts 9.9 Liters
3.6L Engine (MOPAR®
Antifreeze/Engine Coolant10 Year/150,000 MileFormula or equivalent) –With Trailer Tow Package
11 Quarts10.4 Liters
5.7 Liter Engine (MOPAR®
Antifreeze/Engine Coolant10 Year/150,000 MileFormula or equivalent) –Without Trailer Tow Package
15.4 Quarts 14.6 Liters
5.7 Liter Engine (MOPAR®
Antifreeze/Engine Coolant10 Year/150,000 MileFormula or equivalent) –With Trailer Tow Package
16 Quarts15.2 Liters
*IncludesheaterandcoolantrecoverybottlefilledtoMAXlevel.
MAINTAINING YOUR VEHICLE
198
Page 203 of 236
MAINTENANCE PROCEDURES
For information on the maintenance procedures for your vehicle, please refer to “Main-
tenance Procedures” in “Maintaining Your Vehicle” in your Owner’s Manual or applicable
supplement on the DVD for further details.
MAINTENANCE SCHEDULE
Yo u r v e h i c l e i s e q u i p p e d w i t h a n a u t o m a t i c o i l c h a n g e i n d i c a t o r s y s t e m . T h e o i l c h a n g e
indicator system will remind you that it is time to take your vehicle in for scheduled
maintenance.
Based on engine operation conditions, the oil change indicator message will illuminate.
This means that service is required for your vehicle. Operating conditions such as frequent
short-trips, trailer tow, extremely hot or cold ambient temperatures, and E85 fuel usage
will influence when the “Oil Change Required” message is displayed. Severe Operating
Conditions can cause the change oil message to illuminate as early as 3,500 miles
(5,600 km) since last reset. Have your vehicle serviced as soon as possible, within the
next 500 miles (805 km).
Yo u r a u t h o r i z e d d e a l e r w i l l r e s e t t h e o i l c h a n g e i n d i c a t o r m e s s a g e a f t e r c o m p l e t i n g t h e
scheduled oil change.
NOTE:
Under no circumstances should oil change intervals exceed 10,000 miles (16,000 km)
or twelve months, whichever comes first.
Severe Duty All Models
•ChangeEngineOilat4000miles(6,500km)ifthevehicleisoperatedinadustyand
off road environment. This type of vehicle use is considered Severe Duty.
Once A Month Or Before A Long Trip:
•Checkengineoillevel
•Checkwindshieldwasherfluidlevel
•Checkthetireinflationpressuresandlookforunusualwearordamage
•Check the fluid levels of the coolant reservoir, brake master cylinder and power steering,
and fill as needed.
•Checkfunctionofallinteriorandexteriorlights
MAINTAINING YOUR VEHICLE
201
Page 205 of 236
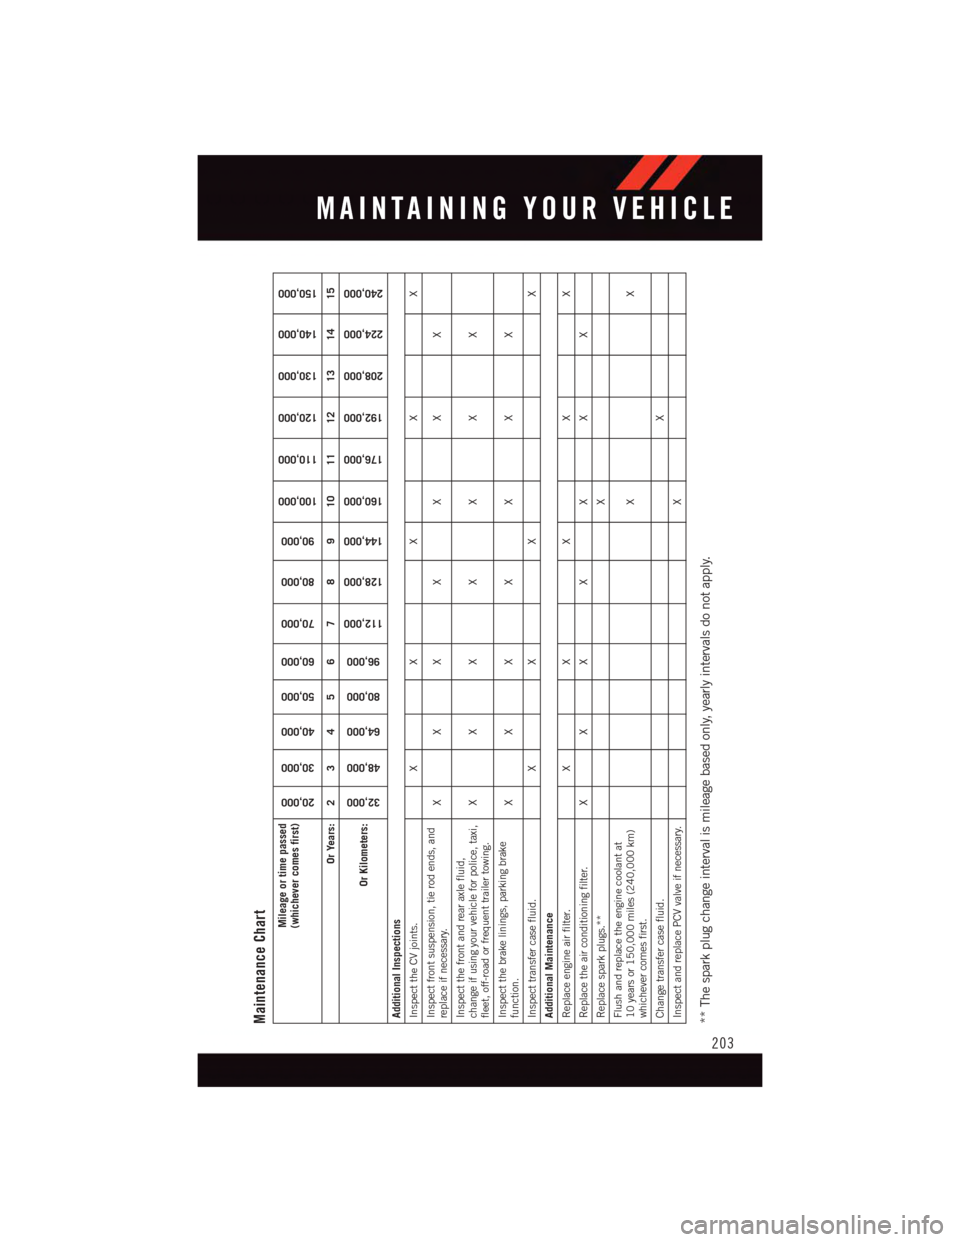
Maintenance Chart
Mileage or time passed(whichever comes first)
20,000
30,000
40,000
50,000
60,000
70,000
80,000
90,000
100,000
110,000
120,000
130,000
140,000
150,000
Or Years: 2 3 4 5 6 7 8 9 10 11 12 13 14 15
Or Kilometers:
32,000
48,000
64,000
80,000
96,000
112,000
128,000
144,000
160,000
176,000
192,000
208,000
224,000
240,000
Additional InspectionsInspect the CV joints. X X X X XInspect front suspension, tie rod ends, andreplace if necessary.
XXX X X X X
Inspect the front and rear axle fluid,change if using your vehicle for police, taxi,fleet, off-road or frequent trailer towing.
XXX X X X X
Inspect the brake linings, parking brakefunction.
XXX X X X X
Inspect transfer case fluid. X X X XAdditional MaintenanceReplace engine air filter. X X X X XReplace the air conditioning filter. X X X X X X XReplace spark plugs.**
X
Flush and replace the engine coolant at10 years or 150,000 miles (240,000 km)whichever comes first.
XX
Change transfer case fluid.
X
Inspect and replace PCV valve if necessary. X** The spark plug change interval is mileage based only, yearly intervals do not apply.
MAINTAINING YOUR VEHICLE
203
Page 209 of 236
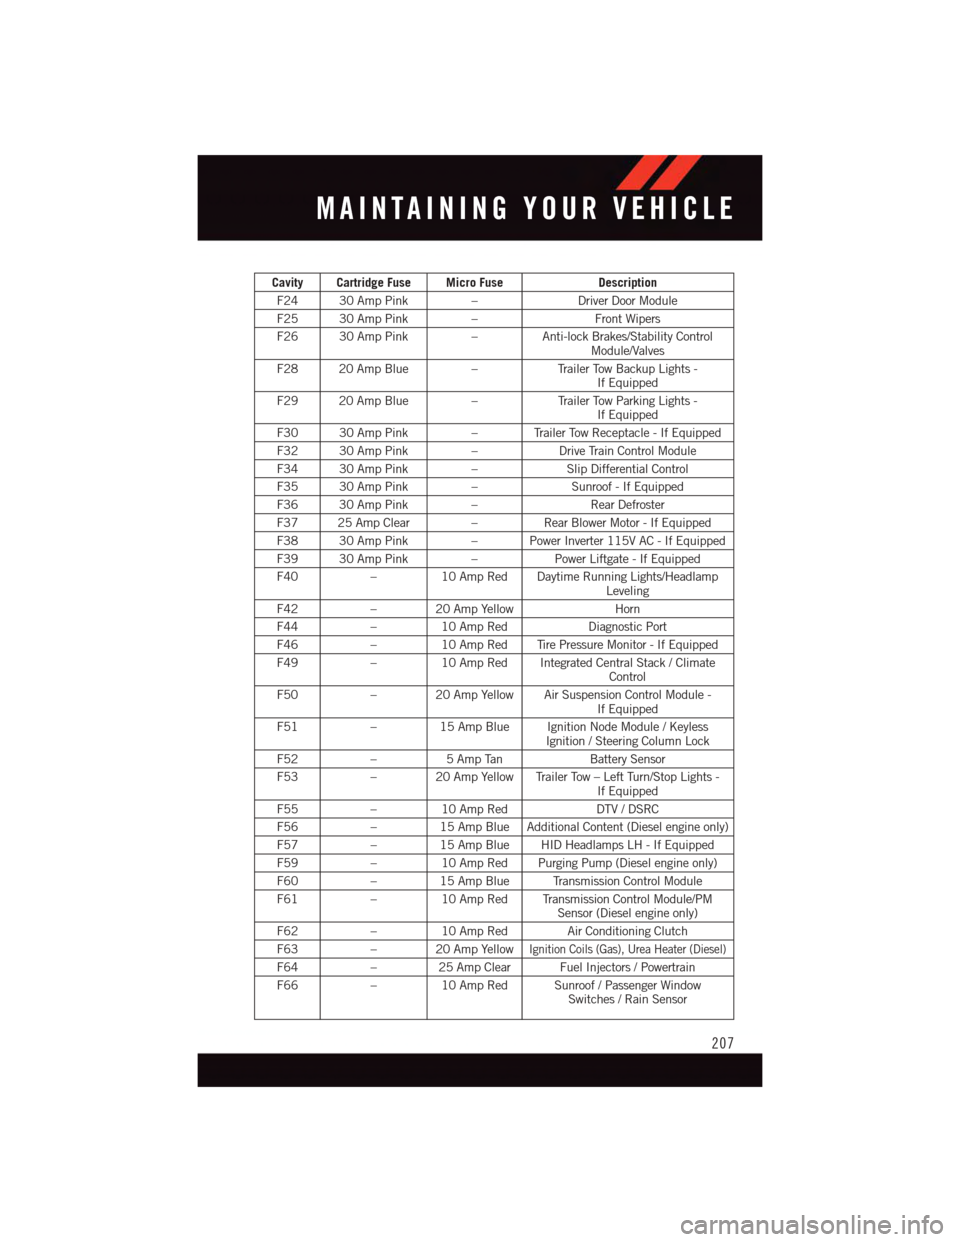
Cavity Cartridge Fuse Micro FuseDescription
F24 30 Amp Pink–Driver Door Module
F25 30 Amp Pink–Front Wipers
F26 30 Amp Pink–Anti-lock Brakes/Stability ControlModule/Valves
F28 20 Amp Blue–Tr a i l e r To w B a c k u p L i g h t s -If Equipped
F29 20 Amp Blue–Tr a i l e r To w P a r k i n g L i g h t s -If Equipped
F30 30 Amp Pink–TrailerTowReceptacle-IfEquipped
F32 30 Amp Pink–Drive Train Control Module
F34 30 Amp Pink–Slip Differential Control
F35 30 Amp Pink–Sunroof - If Equipped
F36 30 Amp Pink–Rear Defroster
F37 25 Amp Clear –Rear Blower Motor - If Equipped
F38 30 Amp Pink–PowerInverter115VAC-IfEquipped
F39 30 Amp Pink–Power Liftgate - If Equipped
F40–10 Amp Red Daytime Running Lights/HeadlampLeveling
F42–20AmpYellowHorn
F44–10 Amp RedDiagnostic Port
F46–10 Amp Red Tire Pressure Monitor - If Equipped
F49–10 Amp Red Integrated Central Stack / ClimateControl
F50–20AmpYellowAirSuspensionControlModule-If Equipped
F51–15 Amp Blue Ignition Node Module / KeylessIgnition / Steering Column Lock
F52–5AmpTanBattery Sensor
F53–20AmpYellowTrailerTow–LeftTurn/StopLights-If Equipped
F55–10 Amp RedDTV / DSRC
F56–15 Amp Blue Additional Content (Diesel engine only)
F57–15 Amp Blue HID Headlamps LH - If Equipped
F59–10 Amp Red Purging Pump (Diesel engine only)
F60–15 Amp Blue Transmission Control Module
F61–10 Amp Red Transmission Control Module/PMSensor (Diesel engine only)
F62–10 Amp Red Air Conditioning Clutch
F63–20AmpYellowIgnition Coils (Gas), Urea Heater (Diesel)
F64–25AmpClearFuelInjectors/Powertrain
F66–10 Amp Red Sunroof / Passenger WindowSwitches / Rain Sensor
MAINTAINING YOUR VEHICLE
207
Page 210 of 236
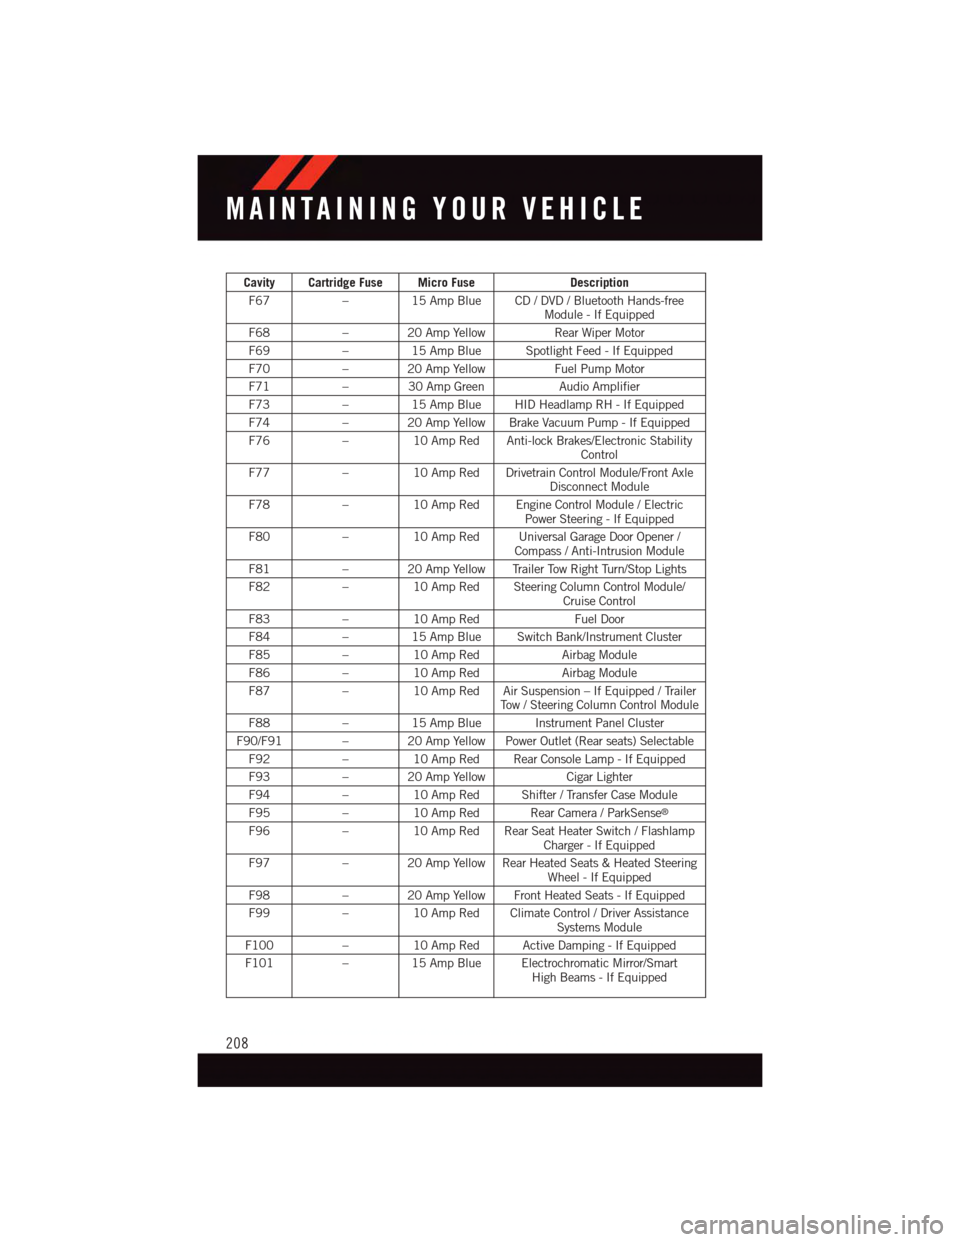
Cavity Cartridge Fuse Micro FuseDescription
F67–15 Amp Blue CD / DVD / Bluetooth Hands-freeModule - If Equipped
F68–20AmpYellowRear Wiper Motor
F69–15 Amp Blue Spotlight Feed - If Equipped
F70–20AmpYellowFuel Pump Motor
F71–30AmpGreenAudio Amplifier
F73–15 Amp Blue HID Headlamp RH - If Equipped
F74–20AmpYellowBrakeVacuumPump-IfEquipped
F76–10 Amp Red Anti-lock Brakes/Electronic StabilityControl
F77–10 Amp Red Drivetrain Control Module/Front AxleDisconnect Module
F78–10 Amp Red Engine Control Module / ElectricPower Steering - If Equipped
F80–10 Amp Red Universal Garage Door Opener /Compass / Anti-Intrusion Module
F81–20AmpYellowTrailerTowRightTurn/StopLights
F82–10 Amp Red Steering Column Control Module/Cruise Control
F83–10 Amp RedFuel Door
F84–15 Amp Blue Switch Bank/Instrument Cluster
F85–10 Amp RedAirbag Module
F86–10 Amp RedAirbag Module
F87–10 Amp Red Air Suspension – If Equipped / TrailerTo w / S t e e r i n g C o l u m n C o n t r o l M o d u l e
F88–15 Amp Blue Instrument Panel Cluster
F90/F91 – 20 Amp Yellow Power Outlet (Rear seats) Selectable
F92–10 Amp Red Rear Console Lamp - If Equipped
F93–20AmpYellowCigar Lighter
F94–10 Amp Red Shifter / Transfer Case Module
F95–10 Amp Red Rear Camera / ParkSense®
F96–10 Amp Red Rear Seat Heater Switch / FlashlampCharger - If Equipped
F97–20AmpYellowRearHeatedSeats&HeatedSteeringWheel - If Equipped
F98–20AmpYellowFrontHeatedSeats-IfEquipped
F99–10 Amp Red Climate Control / Driver AssistanceSystems Module
F100–10 Amp Red Active Damping - If Equipped
F101–15 Amp Blue Electrochromatic Mirror/SmartHigh Beams - If Equipped
MAINTAINING YOUR VEHICLE
208
Page 220 of 236
FREQUENTLY ASKED QUESTIONS
GETTING STARTED
How do I install my LATCH Equipped Child Seat? pg. 19
How do I program my Front Seat Memory? pg. 29
OPERATING YOUR VEHICLE
How does the Automatic Climate Control operate? pg. 55
ELECTRONICS
Which radio is in my vehicle?
•Uconnect®5.0 pg. 84
•Uconnect®8.4A pg. 96
•Uconnect®8.4AN pg. 124
How do I activate the Audio Jack?
•Uconnect®5.0 pg. 87
•Uconnect®8.4A/8.4AN pg. 103
How do I set the clock on my radio?
•Uconnect®5.0 pg. 84
•Uconnect®8.4A/8.4AN pg. 96
How do I use the Navigation feature?
•Uconnect®8.4A/8.4AN pg. 106
How do I pair my mobile phone via Bluetooth®with the UConnect®Hands-Free Voice
Activation System? pg. 139
How do I use my USB port to listen to audio through my touchscreen radio?
•Uconnect®5.0 pg. 87
•Uconnect®8.4A/8.4AN pg. 103
How do I configure my Universal Garage Door Opener (HomeLink)? pg. 152
How do I improve the Bluetooth®performance of my Uconnect®System? pg. 146
UTILITY
How do I know how much I can tow with my Dodge Durango? pg. 161
FREQUENTLY ASKED QUESTIONS
218
Page 222 of 236
Access
Uconnect®..............67
Access, Uconnect®...........67
Adaptive Cruise Control (ACC)
(Cruise Control) . . . . . . . . . . . .44
Adding Engine Coolant (Antifreeze)..201
Adding Fuel..............210
Adding Washer Fluid..........201
Air Bag
Advanced Front Air Bag.......16
Advance Front Air Bag.......16Air Bags . . . . . . . . . . . . . . .16Air Bag Warning Light . . . . .16, 172Driver Knee Air Bag.........18Front Air Bag . . . . . . . . . . . .16Passenger Knee Air Bag.......18Rollover . . . . . . . . . . . . . . .16Side Air Bags............18Side Impact Curtains........18Side Impacts.............16Air Bag, Side . . . . . . . . . . . . . . .16Air Cleaner, Engine(Engine Air Cleaner Filter).....201Air Conditioner Maintenance.....201Air Conditioning...........55,58Air Conditioning Refrigerant......201Air Conditioning System........201AlarmArm The System...........15Disarm The System.........15Vehicle Security Alarm.......15Alarm (Security Alarm)......15,173All Wheel Drive (AWD).........157Antifreeze (Engine Coolant) . . .198, 201Disposal . . . . . . . . . . . . . .201Anti-Lock Brake System (ABS)....172APPUconnect®Access..........70Appearance Care............201Arming System (Security Alarm)....15Assistance Towing...........168Automatic Dimming Mirror.......51Automatic Headlights..........41Automatic High Beams.........41Automatic Temperature Control (ATC)...55SYNC Temperature Button.....59Automatic TransmissionFluid Type . . . . . . . . . . . . .200
Axle Fluid . . . . . . . . . . . . . . . .200
Back-Up Camera............61Battery . . . . . . . . . . . . . .186, 201Charging System Light......171Blind Spot Monitoring..........61Body Mechanism Lubrication.....201Brake Fluid . . . . . . . . . . . . . . .200Brakes.................201Brake System.............201Master Cylinder..........201Warning Light . . . . . . . . . . .169Break-In Recommendations,New Vehicle . . . . . . . . . . . . .39Bulb Replacement...........214
Calibration, Compass.........148Capacities, Fluid............198Caps, FillerFuel................192Oil (Engine)............201Cargo CompartmentLuggage Carrier..........160Car Washes . . . . . . . . . . . . . . .201Change Oil Indicator..........174Changing A Flat Tire..........176Charging System Light.........171Check Engine Light(Malfunction Indicator Light). . . .170Child Restraint...........19,20Arm Rest Tether . . . . . . . . . . .22Child RestraintsCenter Seat LATCH.........21Child Restraints...........20Child Tether Anchorage Locations...22Locating The LATCH Anchorages...20Lower Anchors And TethersFor Children . . . . . . . . . .19, 20CleaningWheels...............201Windshield Wiper Blades.....201Climate Control . . . . . . . . . . . . .55Clock . . . . . . . . . . . . . . . . . . .84Clock Setting...............84Cluster Warning/Indicator LightsAir Bag Warning Light . . . . . . .172Brake Warning Light . . . . . . . .169
INDEX
220