child lock DODGE DURANGO 2015 3.G User Guide
[x] Cancel search | Manufacturer: DODGE, Model Year: 2015, Model line: DURANGO, Model: DODGE DURANGO 2015 3.GPages: 236, PDF Size: 35.01 MB
Page 5 of 236
VEHICLES SOLD IN CANADA
With respect to any vehicles sold in Canada, the name FCA US LLC shall be deemed to be
deleted and the name Chrysler Canada Inc. used in substitution (excluding legal lines).
WARNING!
•Pedalsthatcannotmovefreelycancauselossofvehiclecontrolandincreasethe
risk of serious personal injury.
•Alwaysmakesurethatobjectscannotfallintothedriverfootwellwhilethevehicle
is moving. Objects can become trapped under the brake pedal and accelerator
pedal causing a loss of vehicle control.
•Failuretoproperlyfollowfloormatinstallationormountingcancauseinterference
with the brake pedal and accelerator pedal operation causing loss of control of the
vehicle.
•Neverleavechildrenaloneinavehicle,orwithaccesstoanunlockedvehicle.
Allowing children to be in a vehicle unattended is dangerous for a number of
reasons. A child or others could be seriously or fatally injured. Children should be
warned not to touch the parking brake, brake pedal or the shift lever/transmission
gear selector.
•Donotleavethekeyfobinornearthevehicle,orinalocationaccessibleto
children, and do not leave the ignition of a vehicle equipped with Keyless
Enter-N-Go in the ACC or ON/RUN mode. A child could operate power windows,
other controls, or move the vehicle.
•Neverusethe“PARK”positionasasubstitutefortheparkingbrake.Alwaysapply
the parking brake fully when parked to guard against vehicle movement and
possible injury or damage.
•RefertoyourOwner'sManualontheDVDforfurtherdetails.
INTRODUCTION/WELCOME
3
Page 13 of 236
REMOTE START
•PushtheREMOTESTARTbuttonx2on the Key Fob twice within five seconds.
Pushing the REMOTE START button a third time shuts the engine off.
•Todrivethevehicle,withavalidKeylessEnter-N-Go™KeyFobwithin5ft(1.5m)of
the driver's side of the vehicle, grab the front driver door handle to unlock the driver's
door automatically and then push the Start/Stop switch, or push the UNLOCK button,
insert the Key Fob in the ignition and turn to the ON/RUN position.
•Withremotestart,theenginewillonlyrunfor15minutes(timeout)unlesstheignition
is placed in the ON/RUN position.
•ThevehiclemustbestartedwiththeKeyFobaftertwoconsecutivetimeouts.
WARNING!
•Do not start or run an engine in a closed garage or confined area. Exhaust gas contains
Carbon Monoxide (CO) which is odorless and colorless. Carbon Monoxide is poisonous
and can cause you or others to be severely injured or killed when inhaled.
•KeepKeyFobtransmittersawayfromchildren.OperationoftheRemoteStart
System, windows, door locks or other controls could cause you and others to be
severely injured or killed.
GETTING STARTED
11
Page 21 of 236
WARNING!
•SideAirBagsneedroomtoinflate.Donotleanagainstthedoororwindow.Sit
upright in the center of the seat.
•BeingtooclosetotheSideAirBagsduringdeploymentcouldcauseyoutobe
severely injured or killed.
•RelyingontheSideAirBagsalonecouldleadtomoresevereinjuriesinacollision.
The Side Air Bags work with your seat belt to restrain you properly. In some
collisions, Side Air Bags won’t deploy at all. Always wear your seat belt even though
you have Side Air Bags.
•ThisvehicleisequippedwithleftandrightSupplementalSideAirBagInflatable
Curtains (SABICs). Do not stack luggage or other cargo up high enough to block the
deployment of the SABICs. The trim covering above the side windows where the
SABIC and its deployment path are located should remain free from any obstruc-
tions.
•ThisvehicleisequippedwithSABICs.InorderfortheSABICstoworkasintended,
do not install any accessory items in your vehicle which could alter the roof. Do not
add an aftermarket sunroof to your vehicle. Do not add roof racks that require
permanent attachments (bolts or screws) for installation on the vehicle roof. Do not
drill into the roof of the vehicle for any reason.
•DonotuseaccessoryseatcoversorplaceobjectsbetweenyouandtheSideAir
Bags; the performance could be adversely affected and/or objects could be pushed
into you, causing serious injury.
CHILD RESTRAINTS
Children 12 years or younger should ride properly buckled up in a rear seat, if available.
According to crash statistics, children are safer when properly restrained in the rear seats
rather than in the front.
Every state in the United States and all Canadian provinces require that small children
ride in proper restraint systems. This is the law, and you can be prosecuted for ignoring it.
NOTE:
•Foradditionalinformation,refertowww.Seatcheck.orgorcall1-866-SEATCHECK.
•CanadianresidentsshouldrefertoTransportCanada’swebsiteforadditionalinforma-
tion: http://www.tc.gc.ca/eng/motorvehiclesafety/safedrivers-childsafety-index-53.htm
LATCH – Lower Anchors And Tethers For CHildren
•YourvehicleisequippedwiththechildrestraintanchoragesystemcalledLATCH,
which stands for Lower Anchors and Tethers for CHildren.
•Thesecondrowseatingpositionshaveloweranchorsandtoptetheranchors.The
second row center (60/40 bench seat only) and third row seating positions have a top
tether anchor only.
GETTING STARTED
19
Page 25 of 236
Installing The Child Restraint Using The Vehicle Seat Belts
The seat belts in the passenger seating positions are equipped with a Switchable
Automatic Locking Retractor (ALR) that is designed to keep the lap portion of the seat belt
tight around the child restraint. Any seat belt system will loosen with time, so check the
belt occasionally, and pull it tight if necessary.
Tether Anchorage Weight Limit
Always use the tether anchor when using the seat belt to install a forward facing child
restraint, up to the recommended weight limit of the child restraint.
To Install A Child Seat Using An ALR:
1. Pull enough of the seat belt webbing from the retractor to pass it through the belt path
of the child restraint. Do not twist the belt webbing in the belt path.
2. Slide the latch plate into the buckle until you hear a “click.”
3. Pull on the webbing to make the lap portion tight against the child seat.
4. To lock the seat belt, pull down on the shoulder part of the belt until you have pulled
all the seat belt webbing out of the retractor. Then, allow the webbing to retract back
into the retractor. As the webbing retracts, you will hear a clicking sound. This means
the seat belt is now in the Automatic Locking mode.
5. Try to pull the webbing out of the retractor. If it is locked, you should not be able to pull
out any webbing. If the retractor is not locked, repeat the last step.
6. Finally, pull up on any extra webbing to tighten the lap portion around the child
restraint while you push the child restraint rearward and downward into the vehicle
seat.
7. If the child restraint has a top tether strap and the seating position has a top tether
anchorage, connect the tether strap to the anchorage and tighten the tether strap. See
below for directions to attach a tether anchor.
8. Test that the child restraint is installed tightly by pulling back and forth on the child
seat at the belt path. It should not move more than 1 inch (25.4 mm) in any direction.
Installing The Top Tether Strap (With Either Lower Anchors Or Vehicle Seat Belt):
When installing a forward-facing child restraint, always secure the top tether strap, up to
the tether anchor weight limit, whether the child restraint is installed with the lower
anchors or the vehicle seat belt.
GETTING STARTED
23
Page 29 of 236
Head Restraints — Rear Seats
The head restraints on the outboard seats are not adjustable. They automatically fold
forward when the rear seat is folded to a load floor position but do not return to their
normal position when the rear seat is raised. After returning either seat to its upright
position, raise the head restraint until it locks in place. The outboard head restraints are
not removable.
The center head restraint has limited adjustment. Lift upward on the head restraint to
raise it, or push downward on the head restraint to lower it.
WARNING!
Sitting in a seat with the head restraint in its lowered position could result in serious
injury or death in a collision. Always make sure the outboard head restraints are in their
upright positions when the seat is to be occupied.
NOTE:
For proper routing of a Child Seat Tether, refer to “Occupant Restraints” in “Things To
Know Before Starting” in your Owner’s Manual on the DVD for further information.
Power Folding Third Row Head Restraints
For improved visibility when in reverse, the third row head restraints can be folded using
the Uconnect®System.
Press the “Controls” button located on the bottom of the Uconnect®display.
Press the Headrest Fold buttonto power fold the third row head restraints.
NOTE:
•TheheadrestraintscanonlybefoldeddownwardusingtheHeadrestbutton.Thehead
restraints must be raised manually when occupying the third row.
•Donotfoldiftherearepassengersseatedinthethirdrowseats.
GETTING STARTED
27
Page 54 of 236
WARNING!
•NeverusethePARKpositionasasubstitutefortheparkingbrake.Alwaysapplythe
parking brake fully when parked to guard against vehicle movement and possible
injury or damage.
•YourvehiclecouldmoveandinjureyouandothersifitisnotinPARK.Makesure
the transmission is in PARK before leaving the vehicle.
•ItisdangeroustoshiftoutofPARKorNEUTRALiftheenginespeedishigherthan
idle speed. If your foot is not firmly pressing the brake pedal, the vehicle could
accelerate quickly forward or in reverse. You could lose control of the vehicle and hit
someone or something. Only shift into gear when the engine is idling normally and
your foot is firmly pressing the brake pedal.
•Unintendedmovementofavehiclecouldinjurethoseinornearthevehicle.Aswith
all vehicles, you should never exit a vehicle while the engine is running. Before
exiting a vehicle, always apply the parking brake, shift the transmission into PARK,
turn the engine OFF, and remove the key fob. When the ignition is in the OFF
position, the transmission is locked in PARK, securing the vehicle against un-
wanted movement.
•Whenleavingthevehicle,alwaysmakesuretheignitionisintheOFFposition,
remove the key fob from the vehicle, and lock the vehicle.
•Neverleavechildrenaloneinavehicle,orwithaccesstoanunlockedvehicle.
Allowing children to be in a vehicle unattended is dangerous for a number of
reasons. A child or others could be seriously or fatally injured. Children should be
warned not to touch the parking brake, brake pedal or the transmission gear
selector.
•Donotleavethekeyfobinornearthevehicle(orinalocationaccessibleto
children), and do not leave the ignition in the ACC or ON/RUN position. A child
could operate power windows, other controls, or move the vehicle.
AUTOSTICK
AutoStick is a driver-interactive transmission feature providing manual shift control,
giving you more control of the vehicle. AutoStick allows you to maximize engine braking,
eliminate undesirable upshifts and downshifts, and improve overall vehicle performance.
This system can also provide you with more control during passing, city driving, cold
slippery conditions, mountain driving, trailer towing, and many other situations.
AutoStick Shift Paddles
OPERATING YOUR VEHICLE
52
Page 65 of 236
WARNING!
•Donotletchildrenplaywiththesunroof.Neverleavechildrenunattendedina
vehicle, or with access to an unlocked vehicle. Do not leave the Key Fob in or near
the vehicle, and do not leave the ignition of a vehicle equipped with Keyless
Enter-N-Go™ in the ACC or ON/RUN mode. Occupants, particularly unattended
children, can become entrapped by the power sunroof while operating the power
sunroof switch. Such entrapment may result in serious injury or death.
•Inacollision,thereisagreaterriskofbeingthrownfromavehiclewithanopen
sunroof. You could also be severely injured or killed. Always fasten your seat belt
properly and make sure all passengers are properly secured.
•Do not allow small children to operate the sunroof. Never allow your fingers, other body
parts, or any object to project through the sunroof opening. Injury may result.
WIND BUFFETING
Wind buffeting can be described as a helicopter-type percussion sound. If buffeting
occurs with the rear windows open, adjust the front and rear windows together.
If buffeting occurs with the sunroof open, adjust the sunroof opening, or adjust any
window. This will minimize buffeting.
OPERATING YOUR VEHICLE
63
Page 220 of 236
FREQUENTLY ASKED QUESTIONS
GETTING STARTED
How do I install my LATCH Equipped Child Seat? pg. 19
How do I program my Front Seat Memory? pg. 29
OPERATING YOUR VEHICLE
How does the Automatic Climate Control operate? pg. 55
ELECTRONICS
Which radio is in my vehicle?
•Uconnect®5.0 pg. 84
•Uconnect®8.4A pg. 96
•Uconnect®8.4AN pg. 124
How do I activate the Audio Jack?
•Uconnect®5.0 pg. 87
•Uconnect®8.4A/8.4AN pg. 103
How do I set the clock on my radio?
•Uconnect®5.0 pg. 84
•Uconnect®8.4A/8.4AN pg. 96
How do I use the Navigation feature?
•Uconnect®8.4A/8.4AN pg. 106
How do I pair my mobile phone via Bluetooth®with the UConnect®Hands-Free Voice
Activation System? pg. 139
How do I use my USB port to listen to audio through my touchscreen radio?
•Uconnect®5.0 pg. 87
•Uconnect®8.4A/8.4AN pg. 103
How do I configure my Universal Garage Door Opener (HomeLink)? pg. 152
How do I improve the Bluetooth®performance of my Uconnect®System? pg. 146
UTILITY
How do I know how much I can tow with my Dodge Durango? pg. 161
FREQUENTLY ASKED QUESTIONS
218
Page 222 of 236
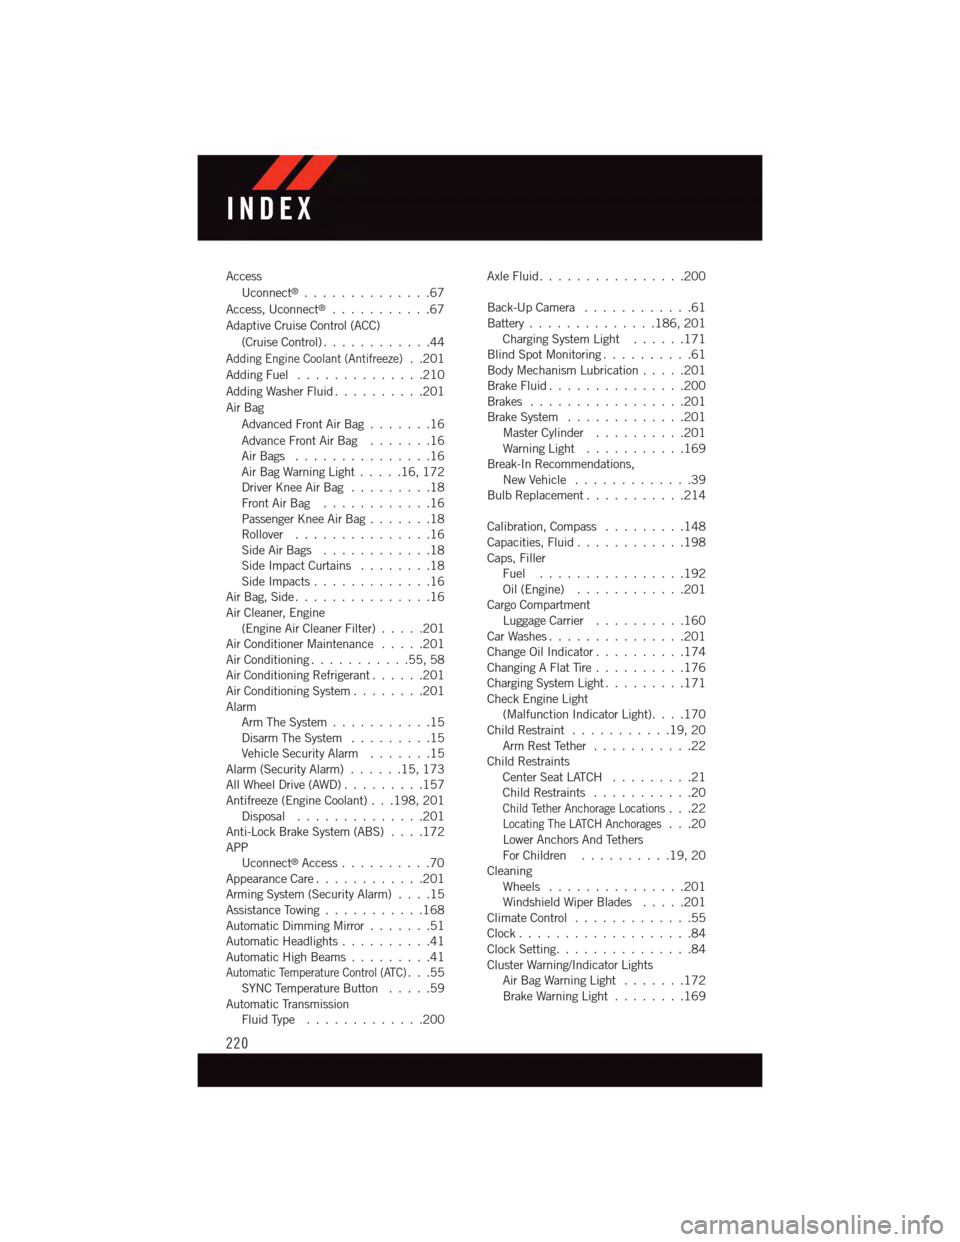
Access
Uconnect®..............67
Access, Uconnect®...........67
Adaptive Cruise Control (ACC)
(Cruise Control) . . . . . . . . . . . .44
Adding Engine Coolant (Antifreeze)..201
Adding Fuel..............210
Adding Washer Fluid..........201
Air Bag
Advanced Front Air Bag.......16
Advance Front Air Bag.......16Air Bags . . . . . . . . . . . . . . .16Air Bag Warning Light . . . . .16, 172Driver Knee Air Bag.........18Front Air Bag . . . . . . . . . . . .16Passenger Knee Air Bag.......18Rollover . . . . . . . . . . . . . . .16Side Air Bags............18Side Impact Curtains........18Side Impacts.............16Air Bag, Side . . . . . . . . . . . . . . .16Air Cleaner, Engine(Engine Air Cleaner Filter).....201Air Conditioner Maintenance.....201Air Conditioning...........55,58Air Conditioning Refrigerant......201Air Conditioning System........201AlarmArm The System...........15Disarm The System.........15Vehicle Security Alarm.......15Alarm (Security Alarm)......15,173All Wheel Drive (AWD).........157Antifreeze (Engine Coolant) . . .198, 201Disposal . . . . . . . . . . . . . .201Anti-Lock Brake System (ABS)....172APPUconnect®Access..........70Appearance Care............201Arming System (Security Alarm)....15Assistance Towing...........168Automatic Dimming Mirror.......51Automatic Headlights..........41Automatic High Beams.........41Automatic Temperature Control (ATC)...55SYNC Temperature Button.....59Automatic TransmissionFluid Type . . . . . . . . . . . . .200
Axle Fluid . . . . . . . . . . . . . . . .200
Back-Up Camera............61Battery . . . . . . . . . . . . . .186, 201Charging System Light......171Blind Spot Monitoring..........61Body Mechanism Lubrication.....201Brake Fluid . . . . . . . . . . . . . . .200Brakes.................201Brake System.............201Master Cylinder..........201Warning Light . . . . . . . . . . .169Break-In Recommendations,New Vehicle . . . . . . . . . . . . .39Bulb Replacement...........214
Calibration, Compass.........148Capacities, Fluid............198Caps, FillerFuel................192Oil (Engine)............201Cargo CompartmentLuggage Carrier..........160Car Washes . . . . . . . . . . . . . . .201Change Oil Indicator..........174Changing A Flat Tire..........176Charging System Light.........171Check Engine Light(Malfunction Indicator Light). . . .170Child Restraint...........19,20Arm Rest Tether . . . . . . . . . . .22Child RestraintsCenter Seat LATCH.........21Child Restraints...........20Child Tether Anchorage Locations...22Locating The LATCH Anchorages...20Lower Anchors And TethersFor Children . . . . . . . . . .19, 20CleaningWheels...............201Windshield Wiper Blades.....201Climate Control . . . . . . . . . . . . .55Clock . . . . . . . . . . . . . . . . . . .84Clock Setting...............84Cluster Warning/Indicator LightsAir Bag Warning Light . . . . . . .172Brake Warning Light . . . . . . . .169
INDEX
220
Page 224 of 236
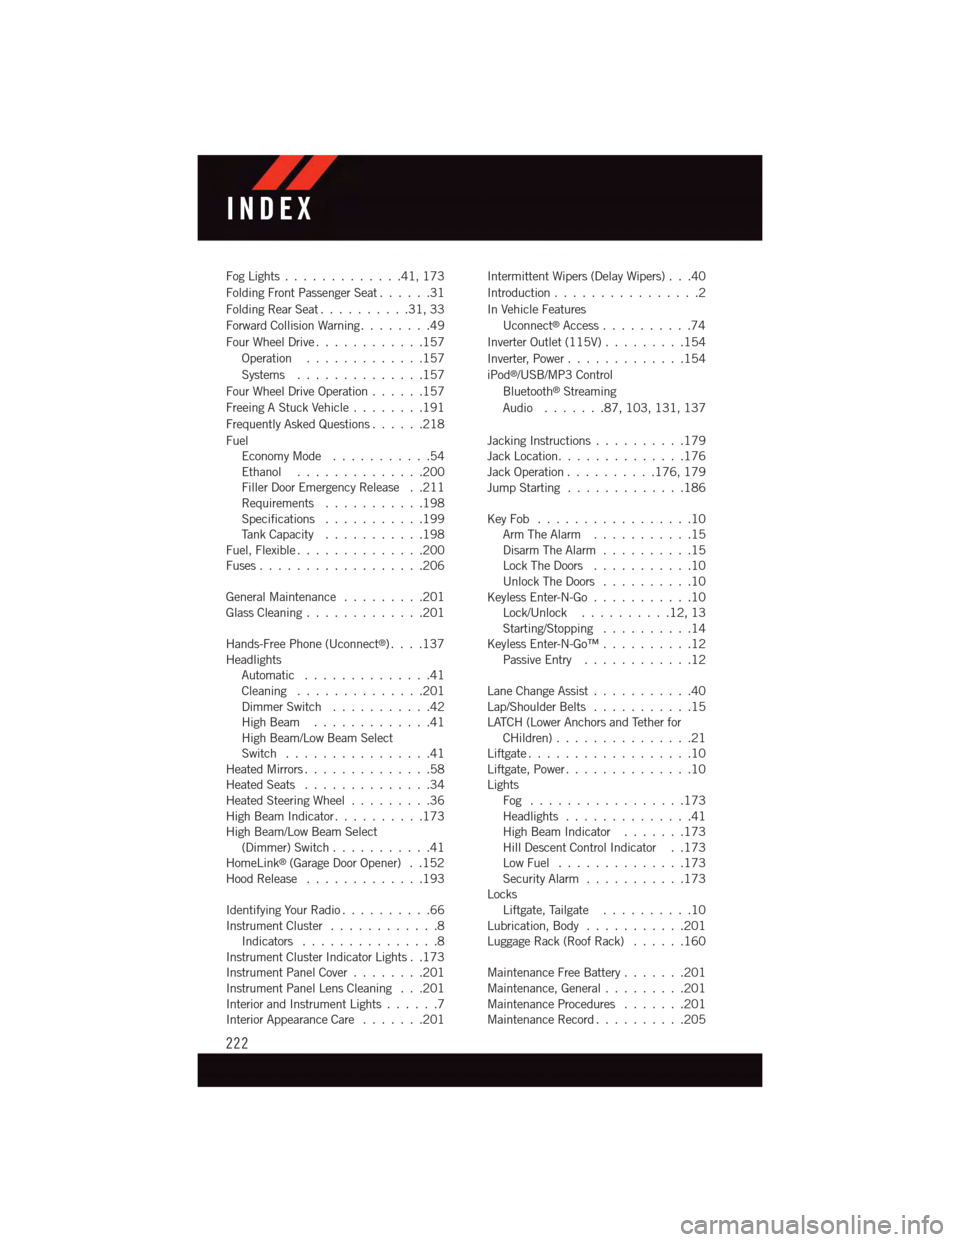
Fog Lights . . . . . . . . . . . . .41, 173
Folding Front Passenger Seat......31
Folding Rear Seat..........31,33
Forward Collision Warning........49
Four Wheel Drive............157
Operation.............157
Systems . . . . . . . . . . . . . .157
Four Wheel Drive Operation......157
Freeing A Stuck Vehicle . . . . . . . .191
Frequently Asked Questions......218
FuelEconomy Mode...........54Ethanol..............200Filler Door Emergency Release . .211Requirements...........198Specifications...........199Ta n k C a p a c i t y...........198Fuel, Flexible..............200Fuses . . . . . . . . . . . . . . . . . .206
General Maintenance.........201Glass Cleaning . . . . . . . . . . . . .201
Hands-Free Phone (Uconnect®). . . .137HeadlightsAutomatic . . . . . . . . . . . . . .41Cleaning..............201Dimmer Switch...........42High Beam . . . . . . . . . . . . .41High Beam/Low Beam SelectSwitch . . . . . . . . . . . . . . . .41Heated Mirrors..............58Heated Seats..............34Heated Steering Wheel.........36High Beam Indicator..........173High Beam/Low Beam Select(Dimmer) Switch...........41HomeLink®(Garage Door Opener) . .152Hood Release . . . . . . . . . . . . .193
Identifying Your Radio..........66Instrument Cluster............8Indicators . . . . . . . . . . . . . . .8Instrument Cluster Indicator Lights . .173Instrument Panel Cover........201Instrument Panel Lens Cleaning . . .201Interior and Instrument Lights......7Interior Appearance Care.......201
Intermittent Wipers (Delay Wipers) . . .40
Introduction................2
In Vehicle Features
Uconnect®Access..........74
Inverter Outlet (115V).........154
Inverter, Power.............154
iPod®/USB/MP3 Control
Bluetooth®Streaming
Audio.......87,103, 131, 137
Jacking Instructions..........179Jack Location..............176Jack Operation..........176, 179Jump Starting.............186
Key Fob . . . . . . . . . . . . . . . . .10Arm The Alarm . . . . . . . . . . .15Disarm The Alarm . . . . . . . . . .15Lock The Doors...........10Unlock The Doors..........10Keyless Enter-N-Go...........10Lock/Unlock..........12,13Starting/Stopping..........14Keyless Enter-N-Go™..........12Passive Entry............12
Lane Change Assist...........40Lap/Shoulder Belts...........15LATCH (Lower Anchors and Tether forCHildren) . . . . . . . . . . . . . . .21Liftgate . . . . . . . . . . . . . . . . . .10Liftgate, Power..............10LightsFog . . . . . . . . . . . . . . . . .173Headlights..............41High Beam Indicator.......173Hill Descent Control Indicator . .173Low Fuel..............173Security Alarm...........173LocksLiftgate, Tailgate . . . . . . . . . .10Lubrication, Body...........201Luggage Rack (Roof Rack)......160
Maintenance Free Battery.......201Maintenance, General.........201Maintenance Procedures.......201Maintenance Record..........205
INDEX
222