clock DODGE DURANGO 2015 3.G User Guide
[x] Cancel search | Manufacturer: DODGE, Model Year: 2015, Model line: DURANGO, Model: DODGE DURANGO 2015 3.GPages: 236, PDF Size: 35.01 MB
Page 86 of 236
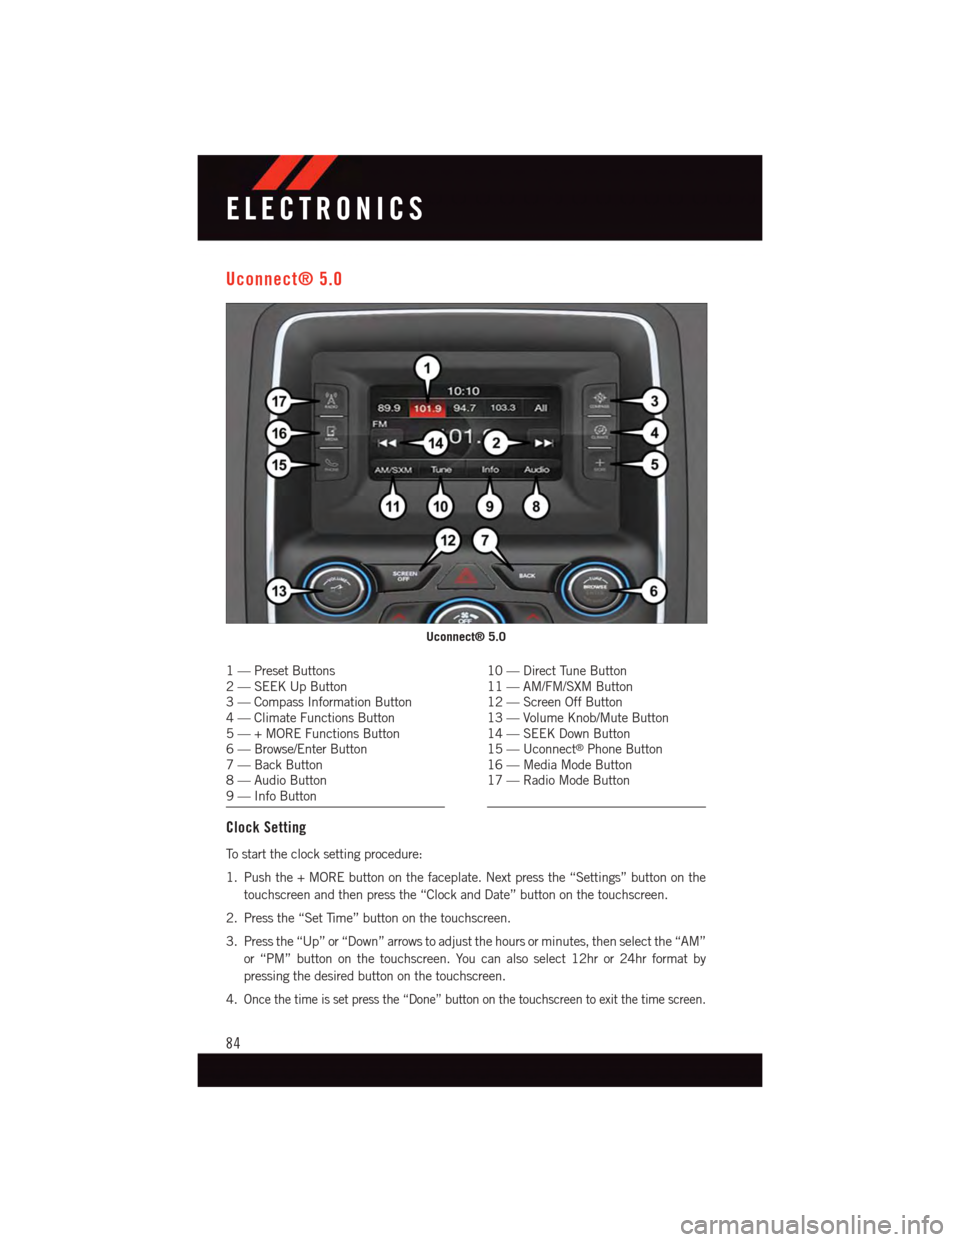
Uconnect® 5.0
1—PresetButtons2—SEEKUpButton3—CompassInformationButton4—ClimateFunctionsButton5—+MOREFunctionsButton6—Browse/EnterButton7—BackButton8—AudioButton9—InfoButton
10 — Direct Tune Button11 — AM/FM/SXM Button12 — Screen Off Button13 — Volume Knob/Mute Button14 — SEEK Down Button15 — Uconnect®Phone Button16 — Media Mode Button17 — Radio Mode Button
Clock Setting
To s t a r t t h e c l o c k s e t t i n g p r o c e d u r e :
1. Push the + MORE button on the faceplate. Next press the “Settings” button on the
touchscreen and then press the “Clock and Date” button on the touchscreen.
2. Press the “Set Time” button on the touchscreen.
3. Press the “Up” or “Down” arrows to adjust the hours or minutes, then select the “AM”
or “PM” button on the touchscreen. You can also select 12hr or 24hr format by
pressing the desired button on the touchscreen.
4.Once the time is set press the “Done” button on the touchscreen to exit the time screen.
Uconnect® 5.0
ELECTRONICS
84
Page 87 of 236
NOTE:
In the Clock Setting Menu you can also select Display Clock. Display Clock turns the clock
display in the status bar on or off.
Equalizer, Balance And Fade
To a d j u s t t h e A u d i o s e t t i n g s :
1. Push the + MORE button on the faceplate, then press the “Settings” button on the
touchscreen.
2. Scroll down and press the “Audio” button on the touchscreen to open the Audio menu.
The Audio Menu shows the following options for you to customize your audio settings.
Equalizer
•Pressthe“Equalizer”buttononthetouchscreentoadjusttheBass,MidandTreble.
Use the “+” or “–” button on the touchscreen to adjust the equalizer to your desired
settings. Press the “back arrow” button on the touchscreen when done.
Balance/Fade
•Pressthe“Balance/Fade”buttononthetouchscreentoadjustthesoundfromthe
speakers. Use the “arrow” button on the touchscreen to adjust the sound level from the
front and rear or right and left side speakers. Press the Center “C” button on the
touchscreen to reset the balance and fade to the factory setting. Press the “back arrow”
button on the touchscreen when done.
Speed Adjustable
•Pressthe“SpeedAdjustedVolume”buttononthetouchscreentoselectbetweenOFF,
1, 2 or 3. This will decrease the radio volume relative to a decrease in vehicle speed.
Press the “back arrow” button on the touchscreen when done.
Loudness
•Pressthe“Loudness”buttononthetouchscreentoselecttheLoudnessfeature.When
this feature is activated it improves sound quality at lower volumes. Press the “back
arrow” button on the touchscreen when done.
Radio Operation
Seek Up/Seek Down
•PresstoseekthroughradiostationsinAM,FMorSXMbands.
•Holdeitherbuttontobypassstationswithoutstopping.
ELECTRONICS
85
Page 98 of 236
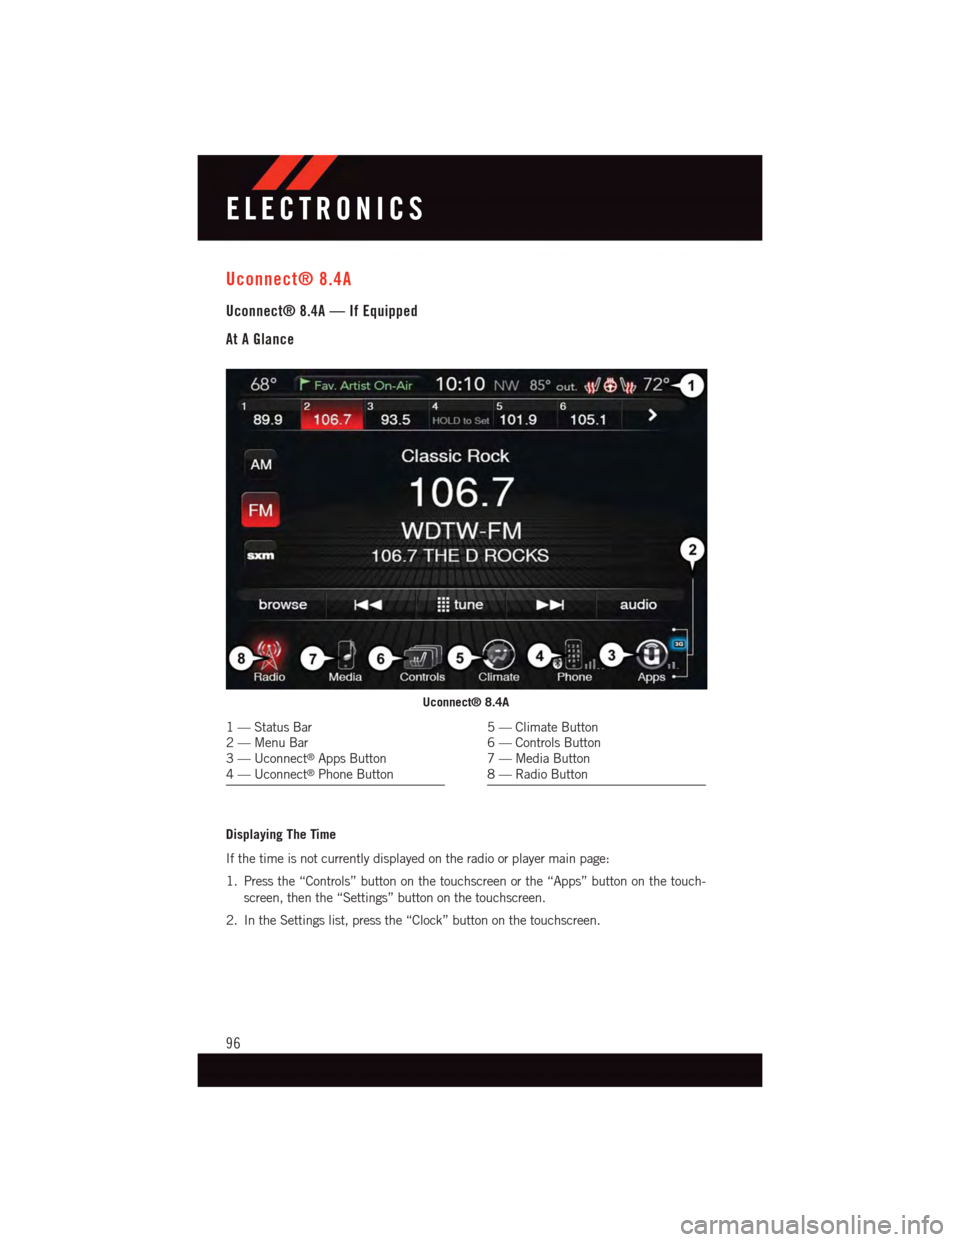
Uconnect® 8.4A
Uconnect® 8.4A — If Equipped
At A Glance
Displaying The Time
If the time is not currently displayed on the radio or player main page:
1. Press the “Controls” button on the touchscreen or the “Apps” button on the touch-
screen, then the “Settings” button on the touchscreen.
2. In the Settings list, press the “Clock” button on the touchscreen.
Uconnect® 8.4A
1—StatusBar2—MenuBar3—Uconnect®Apps Button4—Uconnect®Phone Button
5—ClimateButton6—ControlsButton7—MediaButton8—RadioButton
ELECTRONICS
96
Page 99 of 236
Setting The Time
Model 8.4AN synchronizes time automatically via GPS, so it should not require any time
adjustment. If you do need to set the time manually, follow the instructions below for
Model 8.4A.
1. Turn the unit on, then press the “Time Display” at the top of the screen. Press “Yes.”
NOTE:
If the time is not displayed at the top of the screen, press the “Controls” or the “Apps”
button on the touchscreen, then the “Settings” button on the touchscreen. In the Settings
screen, press the “Clock” button on the touchscreen.
2. Press “+” or “–” next to Set Time Hours and Set Time Minutes to adjust the time.
3. If these features are not available, uncheck the Sync with GPS box.
4. Press “X” to save your settings and exit out of the Clock Setting screen.
Audio Settings
To a d j u s t t h e A u d i o s e t t i n g s :
1. Press the “Media” or “Radio” button on the touchscreen.
2. Press the “Audio” button on the touchscreen to activate the Audio settings screen to
adjust Balance/Fade, Equalizer and Speed Adjusted Volume.
3. You can return to the Radio screen by pressing the “X” located at the top right.
Balance/Fade
To a d j u s t t h e B a l a n c e / F a d e s e t t i n g s :
1. Press the “Media” or “Radio” button on the touchscreen.
2. Press the “Audio” button on the touchscreen to activate the Audio settings screen to
adjust Balance/Fade, Equalizer and Speed Adjusted Volume.
3. Press the “Balance/Fade” button on the touchscreen to Balance audio between the
front speakers or fade the audio between the rear and front speakers.
4. Pressing the “Front,” “Rear,” “Left” or “Right” button on the touchscreens or press
and drag the Speaker Icon to adjust the Balance/Fade.
ELECTRONICS
97
Page 126 of 236
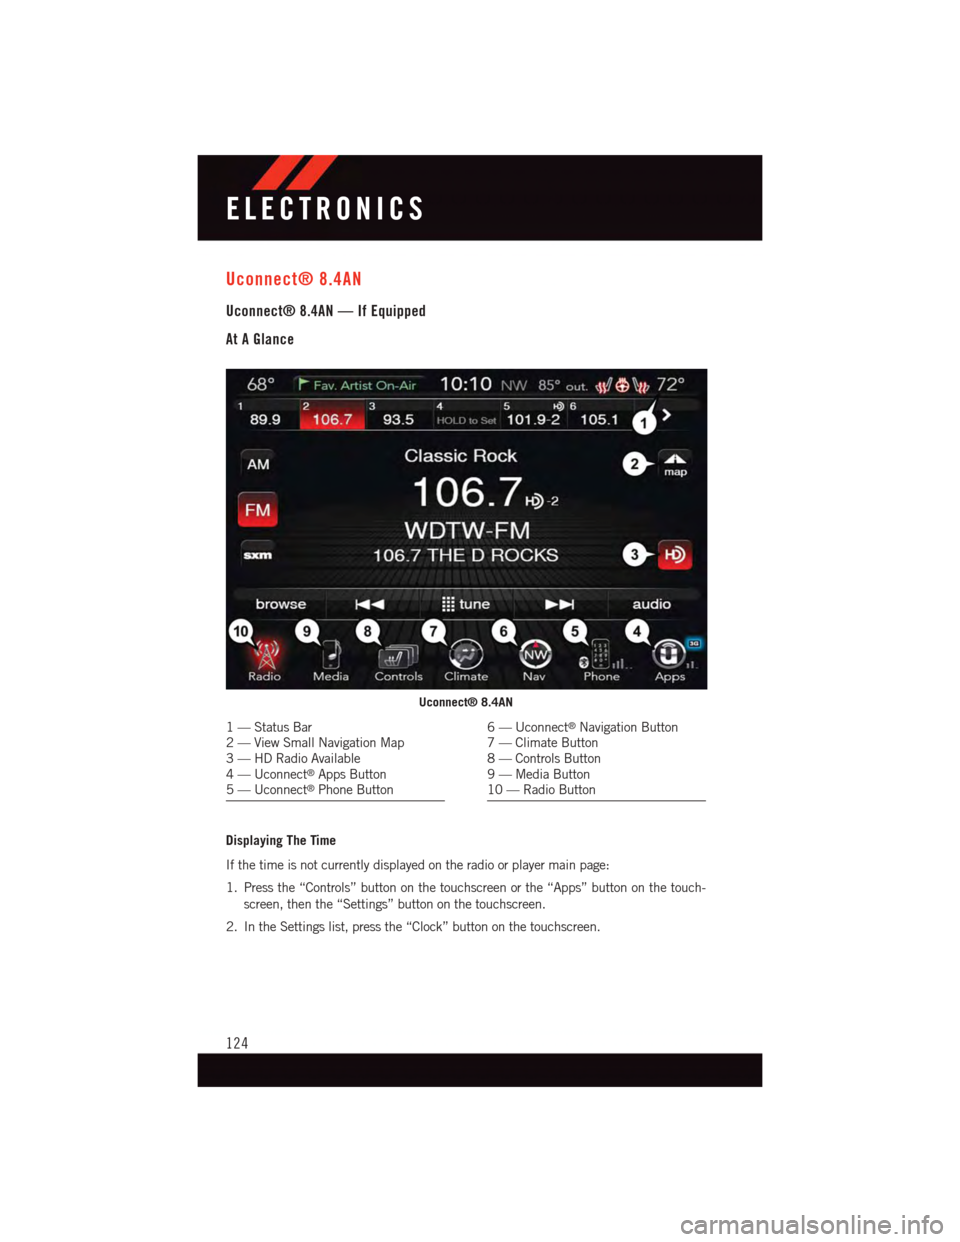
Uconnect® 8.4AN
Uconnect® 8.4AN — If Equipped
At A Glance
Displaying The Time
If the time is not currently displayed on the radio or player main page:
1. Press the “Controls” button on the touchscreen or the “Apps” button on the touch-
screen, then the “Settings” button on the touchscreen.
2. In the Settings list, press the “Clock” button on the touchscreen.
Uconnect® 8.4AN
1—StatusBar2—ViewSmallNavigationMap3—HDRadioAvailable4—Uconnect®Apps Button5—Uconnect®Phone Button
6—Uconnect®Navigation Button7—ClimateButton8—ControlsButton9—MediaButton10 — Radio Button
ELECTRONICS
124
Page 127 of 236
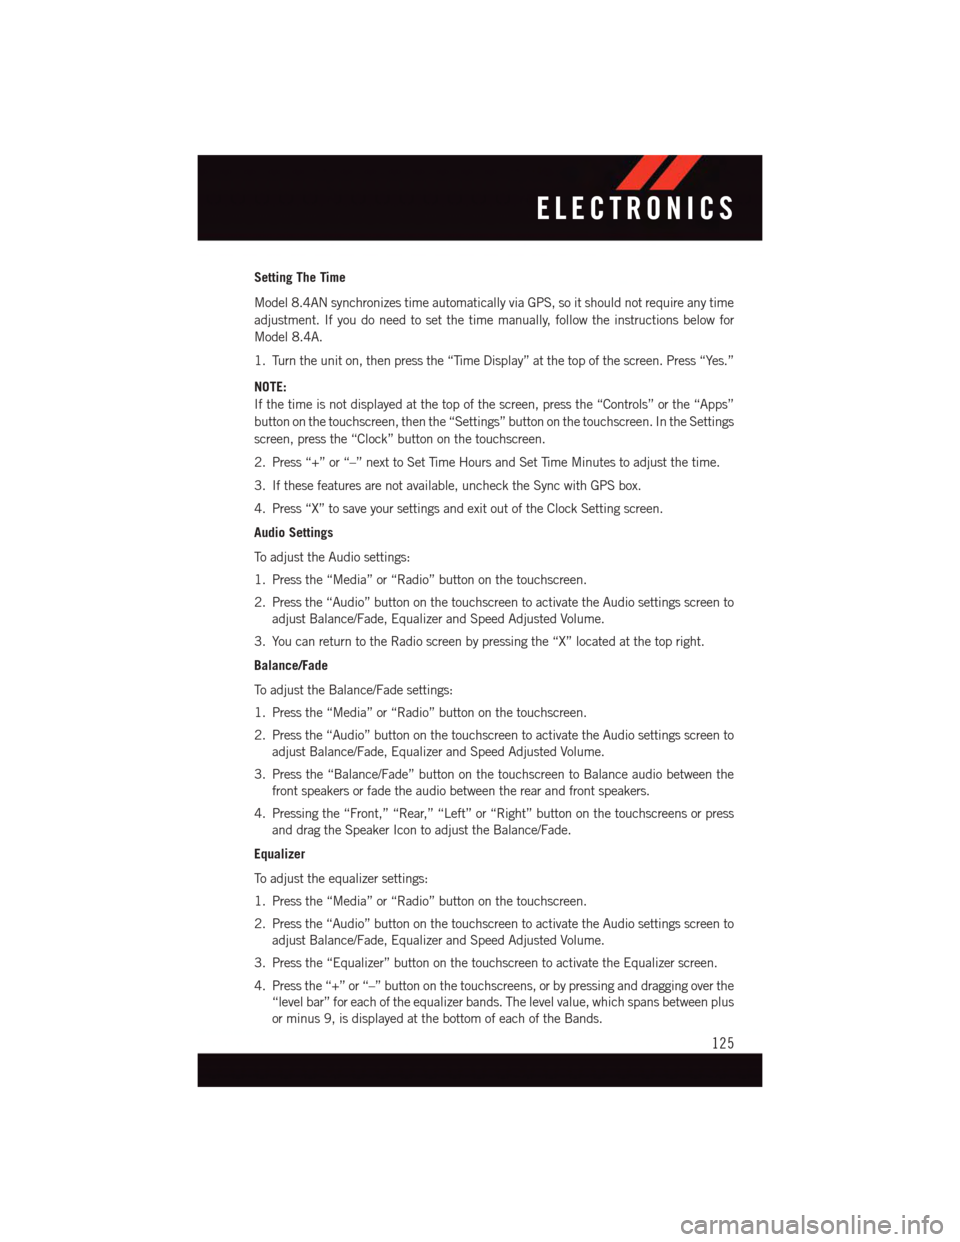
Setting The Time
Model 8.4AN synchronizes time automatically via GPS, so it should not require any time
adjustment. If you do need to set the time manually, follow the instructions below for
Model 8.4A.
1. Turn the unit on, then press the “Time Display” at the top of the screen. Press “Yes.”
NOTE:
If the time is not displayed at the top of the screen, press the “Controls” or the “Apps”
button on the touchscreen, then the “Settings” button on the touchscreen. In the Settings
screen, press the “Clock” button on the touchscreen.
2. Press “+” or “–” next to Set Time Hours and Set Time Minutes to adjust the time.
3. If these features are not available, uncheck the Sync with GPS box.
4. Press “X” to save your settings and exit out of the Clock Setting screen.
Audio Settings
To a d j u s t t h e A u d i o s e t t i n g s :
1. Press the “Media” or “Radio” button on the touchscreen.
2. Press the “Audio” button on the touchscreen to activate the Audio settings screen to
adjust Balance/Fade, Equalizer and Speed Adjusted Volume.
3. You can return to the Radio screen by pressing the “X” located at the top right.
Balance/Fade
To a d j u s t t h e B a l a n c e / F a d e s e t t i n g s :
1. Press the “Media” or “Radio” button on the touchscreen.
2. Press the “Audio” button on the touchscreen to activate the Audio settings screen to
adjust Balance/Fade, Equalizer and Speed Adjusted Volume.
3. Press the “Balance/Fade” button on the touchscreen to Balance audio between the
front speakers or fade the audio between the rear and front speakers.
4. Pressing the “Front,” “Rear,” “Left” or “Right” button on the touchscreens or press
and drag the Speaker Icon to adjust the Balance/Fade.
Equalizer
To a d j u s t t h e e q u a l i z e r s e t t i n g s :
1. Press the “Media” or “Radio” button on the touchscreen.
2. Press the “Audio” button on the touchscreen to activate the Audio settings screen to
adjust Balance/Fade, Equalizer and Speed Adjusted Volume.
3. Press the “Equalizer” button on the touchscreen to activate the Equalizer screen.
4. Press the “+” or “–” button on the touchscreens, or by pressing and dragging over the
“level bar” for each of the equalizer bands. The level value, which spans between plus
or minus 9, is displayed at the bottom of each of the Bands.
ELECTRONICS
125
Page 152 of 236
PROGRAMMABLE FEATURES
DID Programmable Features
The EVIC can be used to view the following main menu items:
NOTE:
Depending on the vehicles options, feature settings may vary.
•Speedometer•Trip
•MPHtokm/h•Audio
•VehicleInfo•StoredMessages
•DriverAssist•ScreenSetup
•FuelEconomy•SpeedWarning-IfEquipped
NOTE:
Refer to your Owner's Manual on the DVD for further information.
Uconnect® Customer Programmable Features
The Uconnect®system allows you to access Customer Programmable feature settings such
as Display, Voice, Clock, Safety & Driving Assistance, Lights, Doors & Locks, Auto-On Comfort
&RemoteStart,EngineOffOptions,CompassSettings,Audio,Phone/Bluetooth®,SiriusXM
Setup and System Information through buttons on the touchscreen.
•PushtheMOREorSETTINGSbutton(Uconnect®5.0), or press the “Apps” button
(Uconnect®8.4) located near the bottom of the touchscreen, then press the “Settings”
button on the touchscreen to access the Settings screen. When making a selection,
scroll up or down until the preferred setting is highlighted, then press and release the
preferred setting until a check-mark appears next to the setting, showing that setting
has been selected. The following feature settings are available:
•Display•EngineOffOptions
•Voice•Audio
•Clock•Phone/Bluetooth®
•Safety&DrivingAssistance•SiriusXMSetup
•Lights•RestoreSettings
•Compass(Uconnect®5.0)•ClearPersonalData
•Doors&Locks•SystemInformation
•Auto-OnComfort
NOTE:
Depending on the vehicles options, feature settings may vary.
ELECTRONICS
150
Page 164 of 236
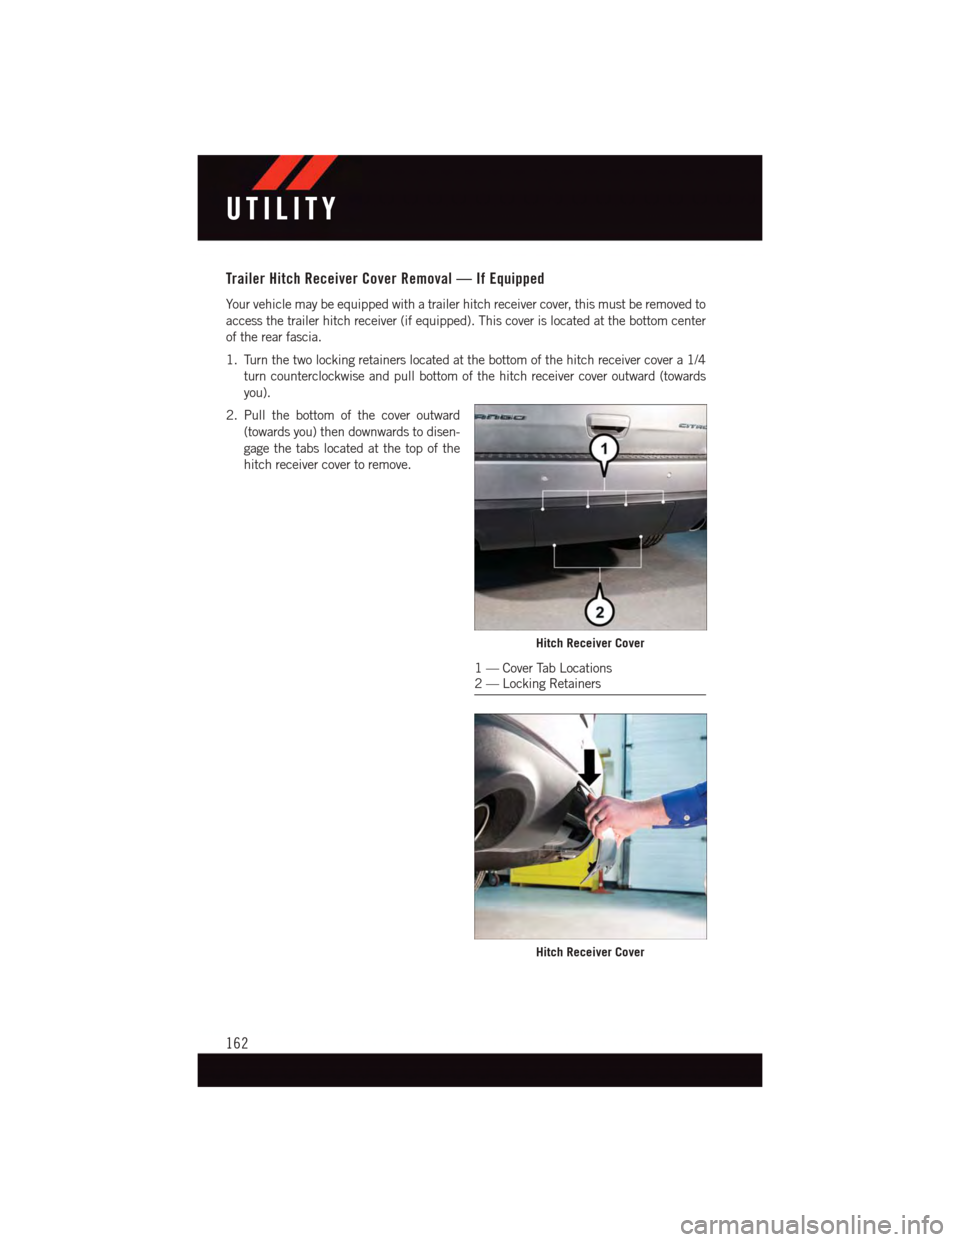
Trailer Hitch Receiver Cover Removal — If Equipped
Yo u r v e h i c l e m a y b e e q u i p p e d w i t h a t r a i l e r h i t c h r e c e i v e r c o v e r, t h i s m u s t b e r e m o v e d t o
access the trailer hitch receiver (if equipped). This cover is located at the bottom center
of the rear fascia.
1. Turn the two locking retainers located at the bottom of the hitch receiver cover a 1/4
turn counterclockwise and pull bottom of the hitch receiver cover outward (towards
you).
2. Pull the bottom of the cover outward
(towards you) then downwards to disen-
gage the tabs located at the top of the
hitch receiver cover to remove.
Hitch Receiver Cover
1—CoverTabLocations2—LockingRetainers
Hitch Receiver Cover
UTILITY
162
Page 183 of 236
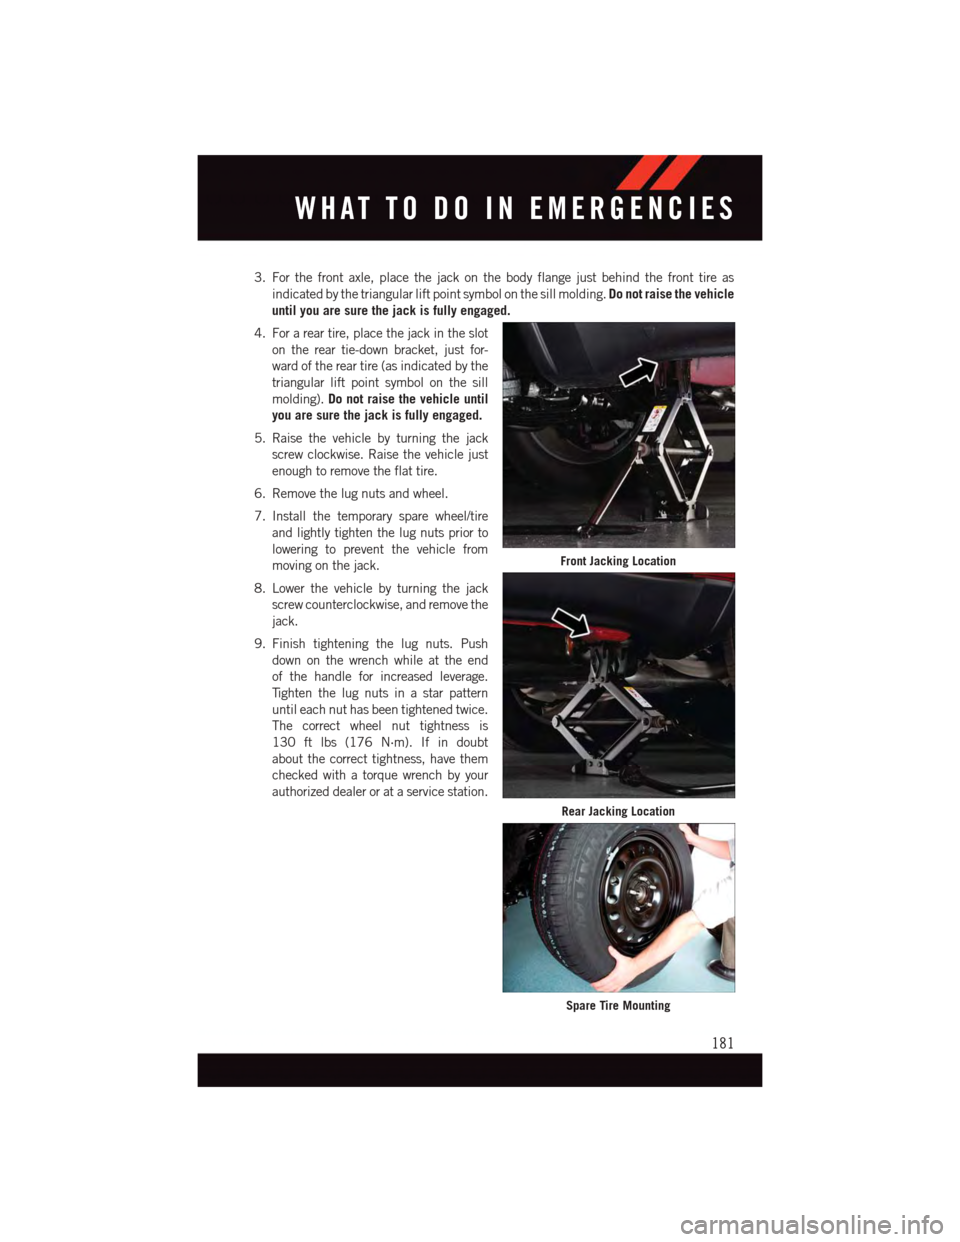
3. For the front axle, place the jack on the body flange just behind the front tire as
indicated by the triangular lift point symbol on the sill molding.Do not raise the vehicle
until you are sure the jack is fully engaged.
4. For a rear tire, place the jack in the slot
on the rear tie-down bracket, just for-
ward of the rear tire (as indicated by the
triangular lift point symbol on the sill
molding).Do not raise the vehicle until
you are sure the jack is fully engaged.
5. Raise the vehicle by turning the jack
screw clockwise. Raise the vehicle just
enough to remove the flat tire.
6. Remove the lug nuts and wheel.
7. Install the temporary spare wheel/tire
and lightly tighten the lug nuts prior to
lowering to prevent the vehicle from
moving on the jack.
8. Lower the vehicle by turning the jack
screw counterclockwise, and remove the
jack.
9. Finish tightening the lug nuts. Push
down on the wrench while at the end
of the handle for increased leverage.
Ti g h t e n t h e l u g n u t s i n a s t a r p a t t e r n
until each nut has been tightened twice.
The correct wheel nut tightness is
130 ft lbs (176 N·m). If in doubt
about the correct tightness, have them
checked with a torque wrench by your
authorized dealer or at a service station.
Front Jacking Location
Rear Jacking Location
Spare Tire Mounting
WHAT TO DO IN EMERGENCIES
181
Page 184 of 236
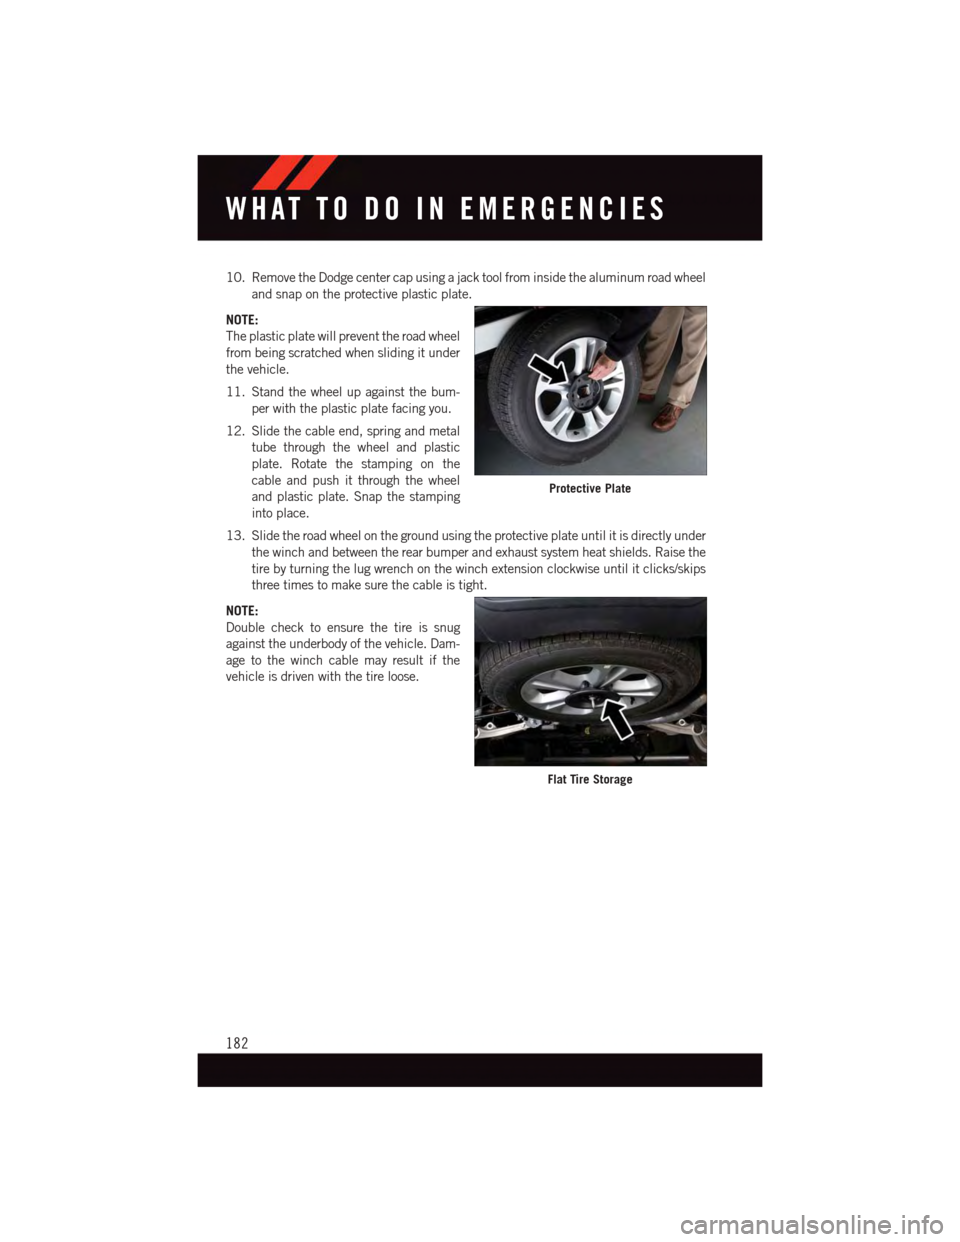
10. Remove the Dodge center cap using a jack tool from inside the aluminum road wheel
and snap on the protective plastic plate.
NOTE:
The plastic plate will prevent the road wheel
from being scratched when sliding it under
the vehicle.
11. Stand the wheel up against the bum-
per with the plastic plate facing you.
12. Slide the cable end, spring and metal
tube through the wheel and plastic
plate. Rotate the stamping on the
cable and push it through the wheel
and plastic plate. Snap the stamping
into place.
13. Slide the road wheel on the ground using the protective plate until it is directly under
the winch and between the rear bumper and exhaust system heat shields. Raise the
tire by turning the lug wrench on the winch extension clockwise until it clicks/skips
three times to make sure the cable is tight.
NOTE:
Double check to ensure the tire is snug
against the underbody of the vehicle. Dam-
age to the winch cable may result if the
vehicle is driven with the tire loose.
Protective Plate
Flat Tire Storage
WHAT TO DO IN EMERGENCIES
182