headlamp DODGE DURANGO 2015 3.G User Guide
[x] Cancel search | Manufacturer: DODGE, Model Year: 2015, Model line: DURANGO, Model: DODGE DURANGO 2015 3.GPages: 236, PDF Size: 35.01 MB
Page 208 of 236
FUSES
WARNING!
•Whenreplacingablownfuse,alwaysuseanappropriatereplacementfusewiththe
same amp rating as the original fuse. Never replace a fuse with another fuse of
higher amp rating. Never replace a blown fuse with metal wires or any other
material. Failure to use proper fuses may result in serious personal injury, fire and/or
property damage.
•Beforereplacingafuse,makesurethattheignitionisoffandthatalltheother
services are switched off and/or disengaged.
•Ifthereplacedfuseblowsagain,contactanauthorizeddealer.
•Ifageneralprotectionfuseforsafetysystems(airbagsystem,brakingsystem),
power unit systems (engine system, gearbox system) or steering system blows,
contact an authorized dealer.
Power Distribution Center
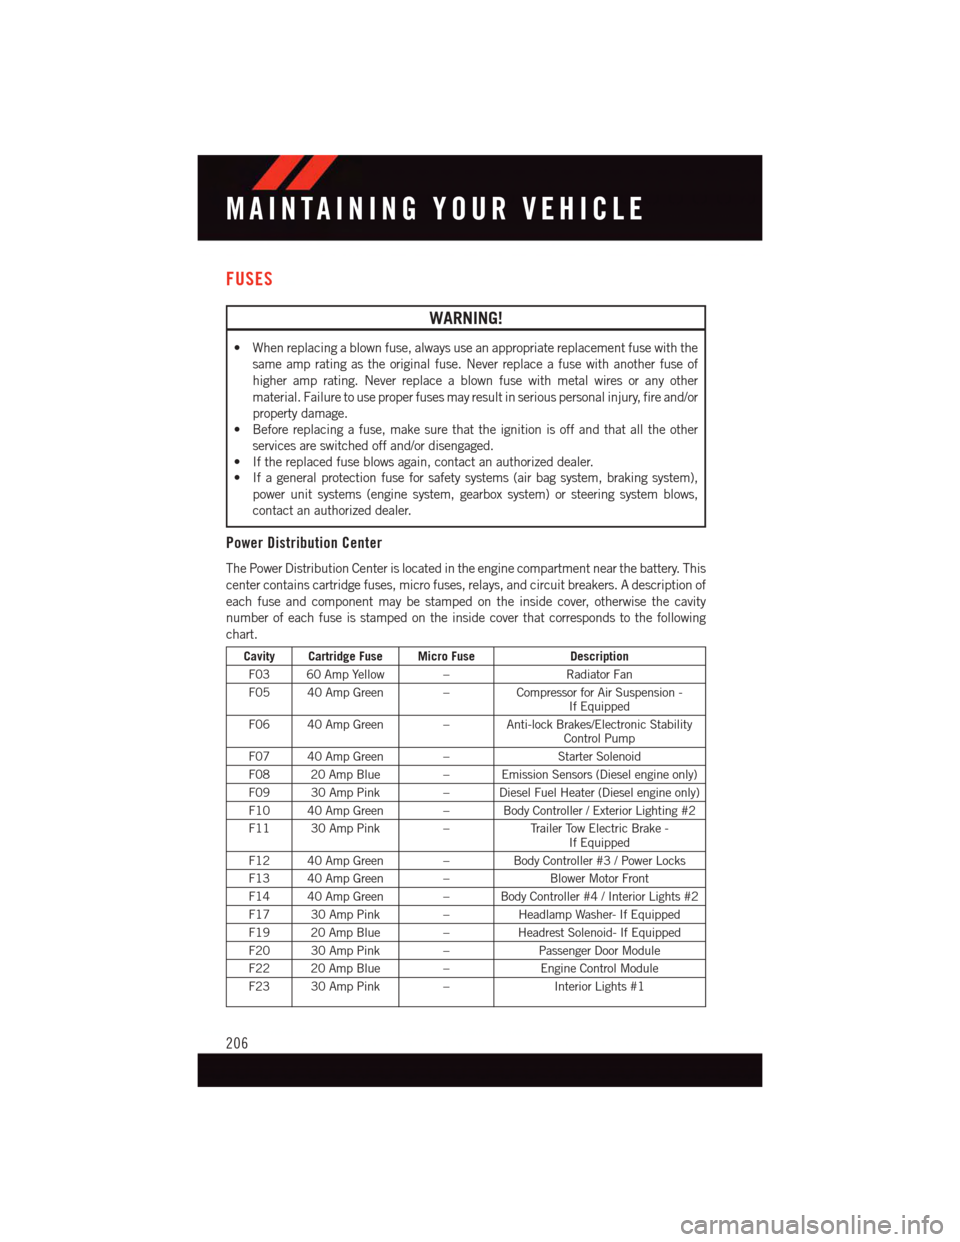
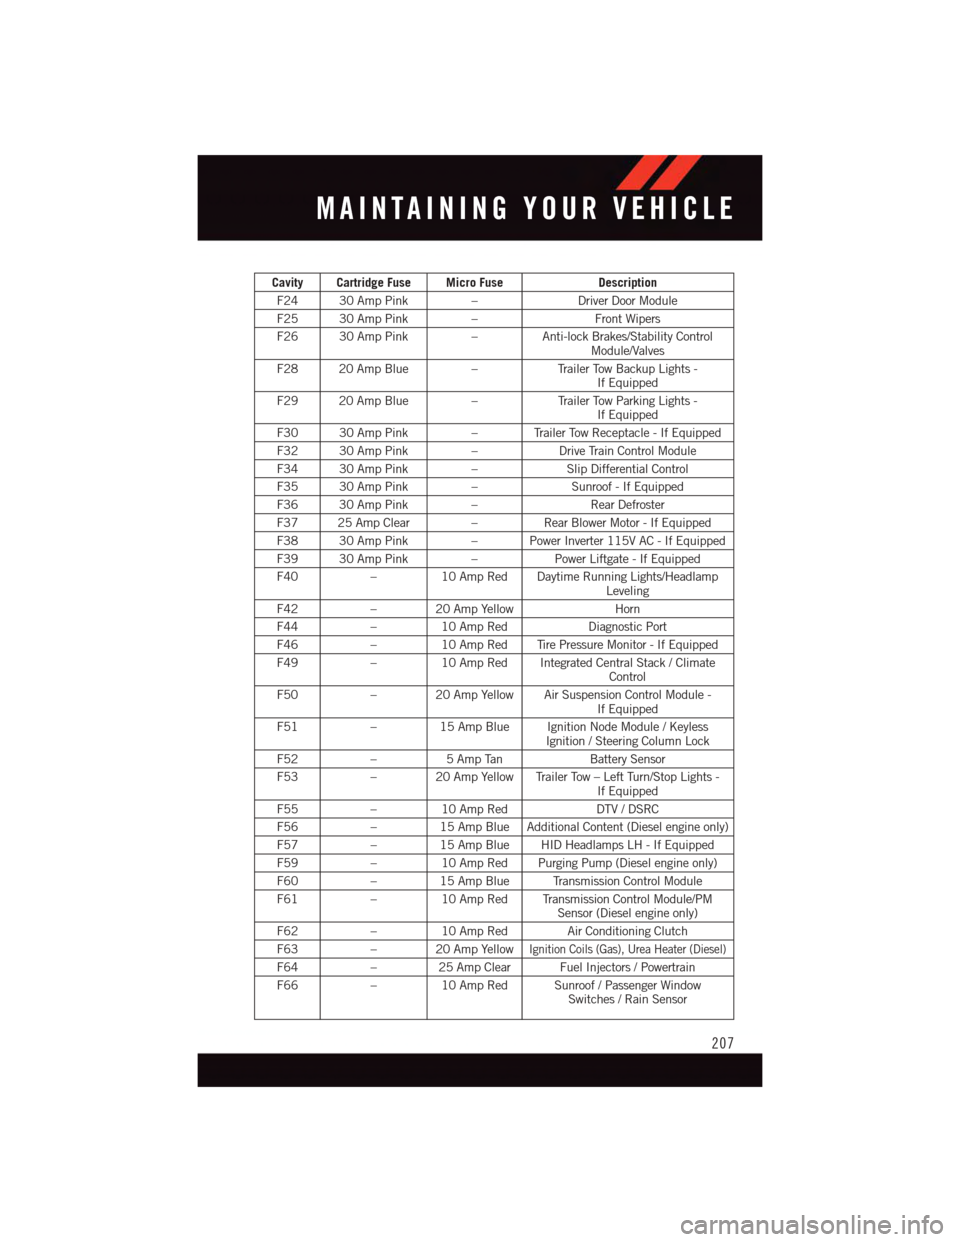
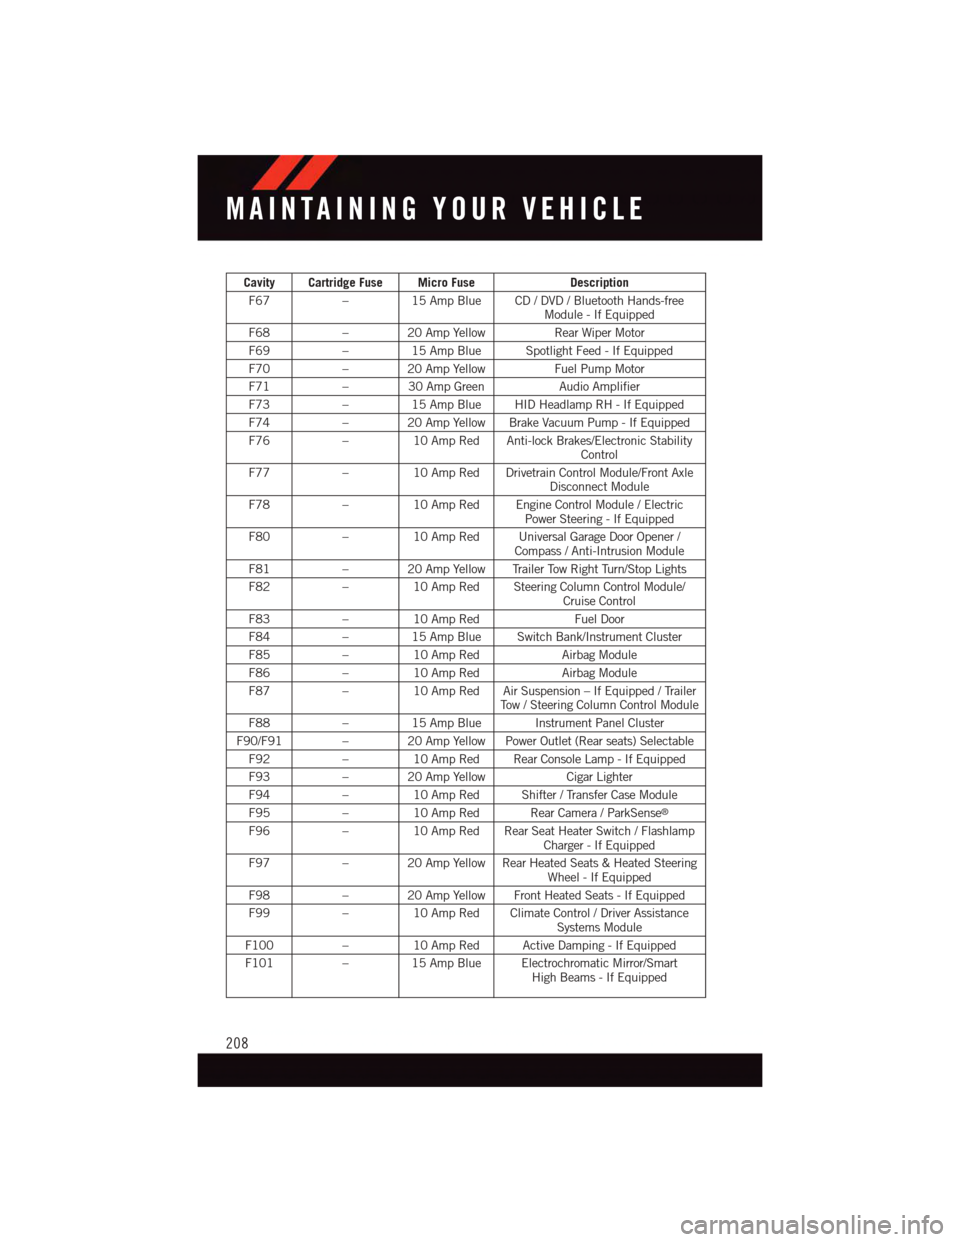
The Power Distribution Center is located in the engine compartment near the battery. This
center contains cartridge fuses, micro fuses, relays, and circuit breakers. A description of
each fuse and component may be stamped on the inside cover, otherwise the cavity
number of each fuse is stamped on the inside cover that corresponds to the following
chart.
Cavity Cartridge Fuse Micro FuseDescription
F03 60 Amp Yellow –Radiator Fan
F05 40 Amp Green –Compressor for Air Suspension -If Equipped
F06 40 Amp Green – Anti-lock Brakes/Electronic StabilityControl Pump
F07 40 Amp Green –Starter Solenoid
F08 20 Amp Blue–EmissionSensors(Dieselengineonly)
F09 30 Amp Pink–DieselFuelHeater(Dieselengineonly)
F10 40 Amp Green – Body Controller / Exterior Lighting #2
F11 30 Amp Pink–Tr a i l e r To w E l e c t r i c B r a k e -If Equipped
F12 40 Amp Green –Body Controller #3 / Power Locks
F13 40 Amp Green –Blower Motor Front
F14 40 Amp Green – Body Controller #4 / Interior Lights #2
F17 30 Amp Pink–Headlamp Washer- If Equipped
F19 20 Amp Blue–Headrest Solenoid- If Equipped
F20 30 Amp Pink–Passenger Door Module
F22 20 Amp Blue–Engine Control Module
F23 30 Amp Pink–Interior Lights #1
MAINTAINING YOUR VEHICLE
206
Page 209 of 236
Cavity Cartridge Fuse Micro FuseDescription
F24 30 Amp Pink–Driver Door Module
F25 30 Amp Pink–Front Wipers
F26 30 Amp Pink–Anti-lock Brakes/Stability ControlModule/Valves
F28 20 Amp Blue–Tr a i l e r To w B a c k u p L i g h t s -If Equipped
F29 20 Amp Blue–Tr a i l e r To w P a r k i n g L i g h t s -If Equipped
F30 30 Amp Pink–TrailerTowReceptacle-IfEquipped
F32 30 Amp Pink–Drive Train Control Module
F34 30 Amp Pink–Slip Differential Control
F35 30 Amp Pink–Sunroof - If Equipped
F36 30 Amp Pink–Rear Defroster
F37 25 Amp Clear –Rear Blower Motor - If Equipped
F38 30 Amp Pink–PowerInverter115VAC-IfEquipped
F39 30 Amp Pink–Power Liftgate - If Equipped
F40–10 Amp Red Daytime Running Lights/HeadlampLeveling
F42–20AmpYellowHorn
F44–10 Amp RedDiagnostic Port
F46–10 Amp Red Tire Pressure Monitor - If Equipped
F49–10 Amp Red Integrated Central Stack / ClimateControl
F50–20AmpYellowAirSuspensionControlModule-If Equipped
F51–15 Amp Blue Ignition Node Module / KeylessIgnition / Steering Column Lock
F52–5AmpTanBattery Sensor
F53–20AmpYellowTrailerTow–LeftTurn/StopLights-If Equipped
F55–10 Amp RedDTV / DSRC
F56–15 Amp Blue Additional Content (Diesel engine only)
F57–15 Amp Blue HID Headlamps LH - If Equipped
F59–10 Amp Red Purging Pump (Diesel engine only)
F60–15 Amp Blue Transmission Control Module
F61–10 Amp Red Transmission Control Module/PMSensor (Diesel engine only)
F62–10 Amp Red Air Conditioning Clutch
F63–20AmpYellowIgnition Coils (Gas), Urea Heater (Diesel)
F64–25AmpClearFuelInjectors/Powertrain
F66–10 Amp Red Sunroof / Passenger WindowSwitches / Rain Sensor
MAINTAINING YOUR VEHICLE
207
Page 210 of 236
Cavity Cartridge Fuse Micro FuseDescription
F67–15 Amp Blue CD / DVD / Bluetooth Hands-freeModule - If Equipped
F68–20AmpYellowRear Wiper Motor
F69–15 Amp Blue Spotlight Feed - If Equipped
F70–20AmpYellowFuel Pump Motor
F71–30AmpGreenAudio Amplifier
F73–15 Amp Blue HID Headlamp RH - If Equipped
F74–20AmpYellowBrakeVacuumPump-IfEquipped
F76–10 Amp Red Anti-lock Brakes/Electronic StabilityControl
F77–10 Amp Red Drivetrain Control Module/Front AxleDisconnect Module
F78–10 Amp Red Engine Control Module / ElectricPower Steering - If Equipped
F80–10 Amp Red Universal Garage Door Opener /Compass / Anti-Intrusion Module
F81–20AmpYellowTrailerTowRightTurn/StopLights
F82–10 Amp Red Steering Column Control Module/Cruise Control
F83–10 Amp RedFuel Door
F84–15 Amp Blue Switch Bank/Instrument Cluster
F85–10 Amp RedAirbag Module
F86–10 Amp RedAirbag Module
F87–10 Amp Red Air Suspension – If Equipped / TrailerTo w / S t e e r i n g C o l u m n C o n t r o l M o d u l e
F88–15 Amp Blue Instrument Panel Cluster
F90/F91 – 20 Amp Yellow Power Outlet (Rear seats) Selectable
F92–10 Amp Red Rear Console Lamp - If Equipped
F93–20AmpYellowCigar Lighter
F94–10 Amp Red Shifter / Transfer Case Module
F95–10 Amp Red Rear Camera / ParkSense®
F96–10 Amp Red Rear Seat Heater Switch / FlashlampCharger - If Equipped
F97–20AmpYellowRearHeatedSeats&HeatedSteeringWheel - If Equipped
F98–20AmpYellowFrontHeatedSeats-IfEquipped
F99–10 Amp Red Climate Control / Driver AssistanceSystems Module
F100–10 Amp Red Active Damping - If Equipped
F101–15 Amp Blue Electrochromatic Mirror/SmartHigh Beams - If Equipped
MAINTAINING YOUR VEHICLE
208
Page 212 of 236
WARNING!
•Overloadingofyourtiresisdangerous.Overloadingcancausetirefailure,affect
vehicle handling, and increase your stopping distance. Use tires of the recom-
mended load capacity for your vehicle. Never overload them.
•Improperly inflated tires are dangerous and can cause collisions. Under-inflation in-
creases tire flexing and can result in over-heating and tire failure. Over-inflation reduces
atire’sabilitytocushionshock.Objectsontheroadandchuckholescancausedamage
that results in tire failure. Unequal tire pressures can cause steering problems. You could
lose control of your vehicle. Over-inflated or under-inflated tires can affect vehicle
handling and can fail suddenly, resulting in loss of vehicle control. Always drive with each
tire inflated to the recommended cold tire inflation pressure.
ADDING FUEL
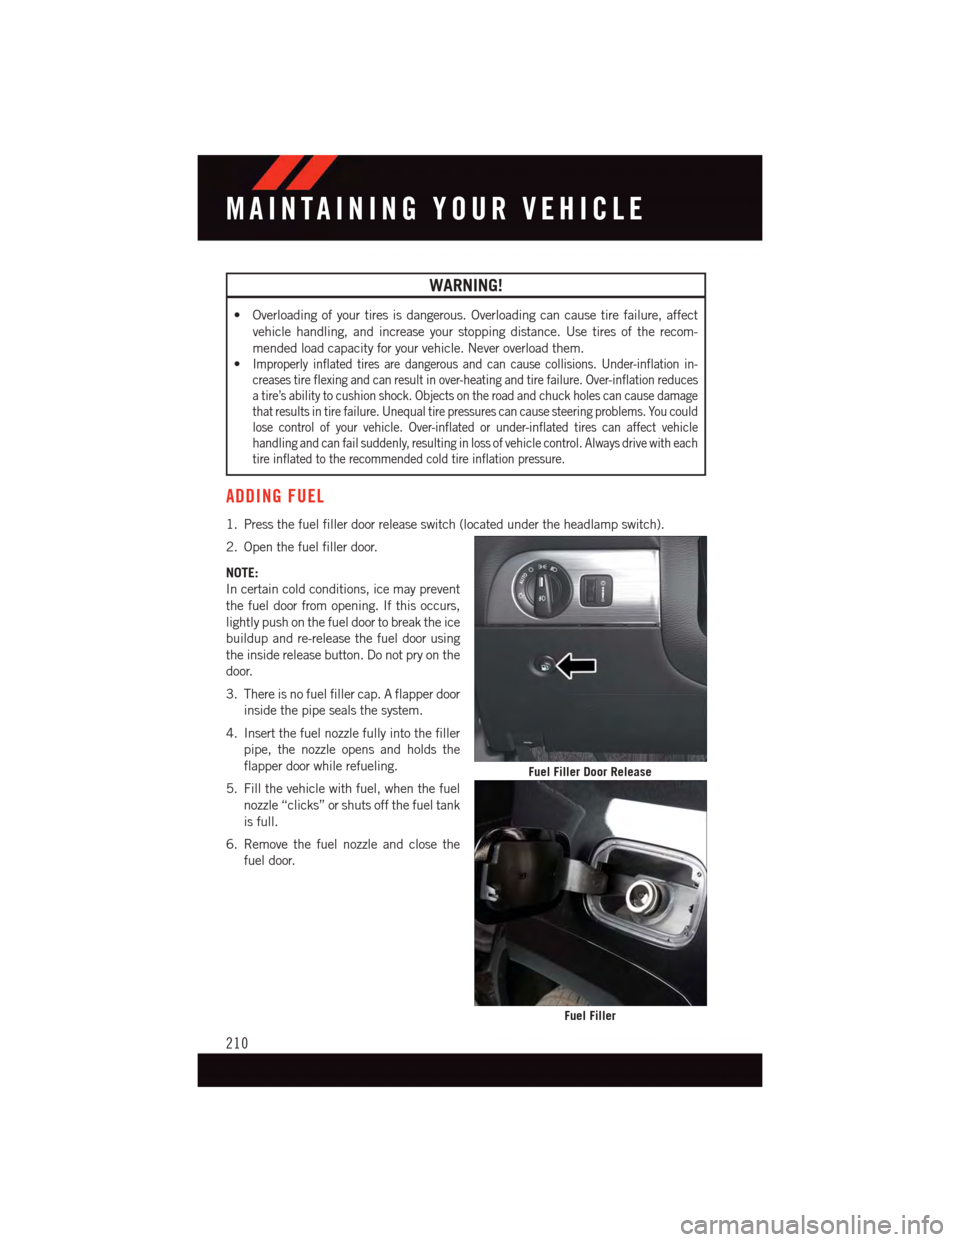
1. Press the fuel filler door release switch (located under the headlamp switch).
2. Open the fuel filler door.
NOTE:
In certain cold conditions, ice may prevent
the fuel door from opening. If this occurs,
lightly push on the fuel door to break the ice
buildup and re-release the fuel door using
the inside release button. Do not pry on the
door.
3. There is no fuel filler cap. A flapper door
inside the pipe seals the system.
4. Insert the fuel nozzle fully into the filler
pipe, the nozzle opens and holds the
flapper door while refueling.
5. Fill the vehicle with fuel, when the fuel
nozzle “clicks” or shuts off the fuel tank
is full.
6. Remove the fuel nozzle and close the
fuel door.
Fuel Filler Door Release
Fuel Filler
MAINTAINING YOUR VEHICLE
210
Page 216 of 236
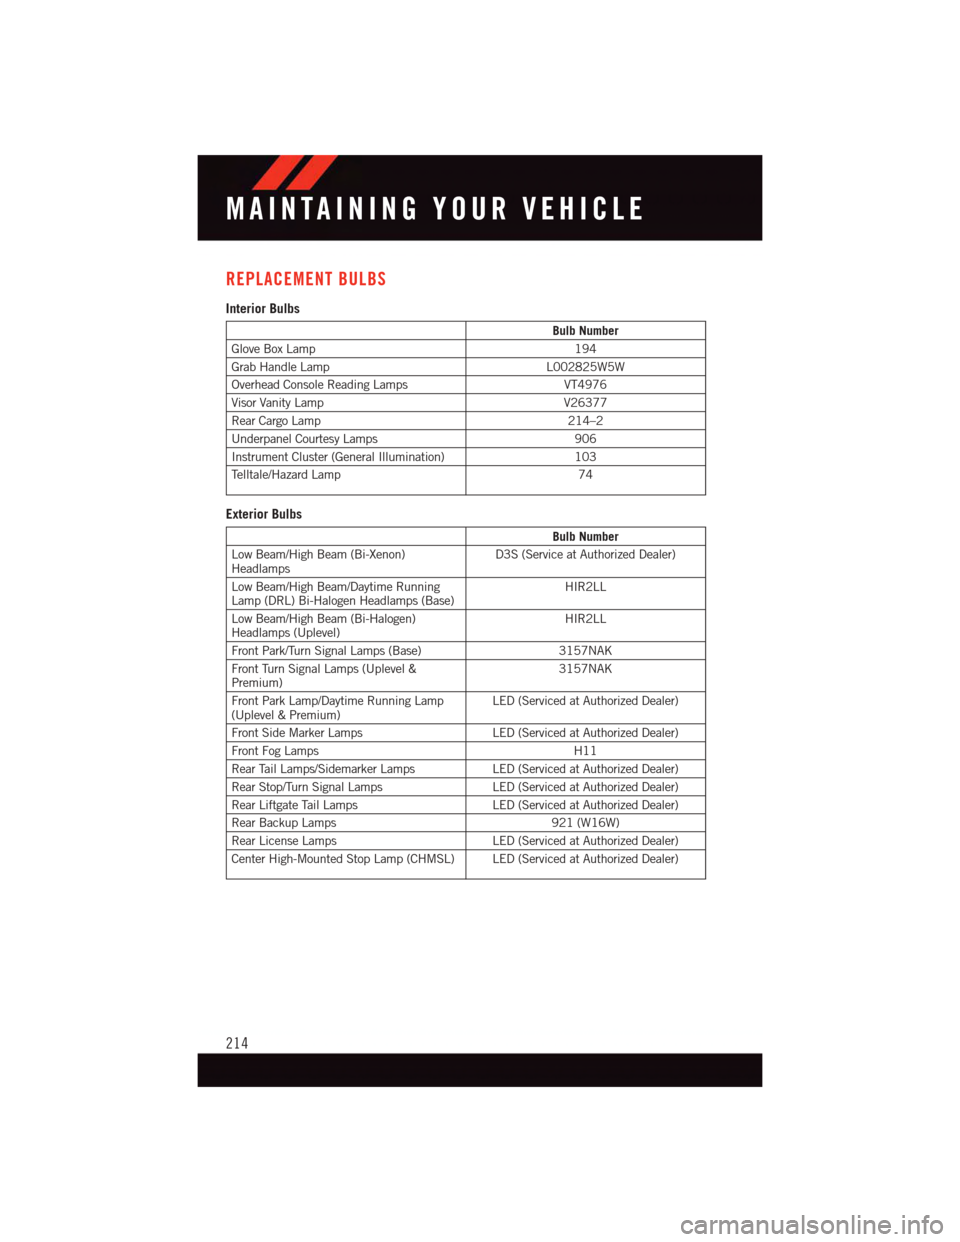
REPLACEMENT BULBS
Interior Bulbs
Bulb Number
Glove Box Lamp194
Grab Handle LampL002825W5W
Overhead Console Reading LampsVT4976
Visor Vanity LampV26377
Rear Cargo Lamp214–2
Underpanel Courtesy Lamps906
Instrument Cluster (General Illumination)103
Te l l t a l e / H a z a r d L a m p74
Exterior Bulbs
Bulb Number
Low Beam/High Beam (Bi-Xenon)HeadlampsD3S (Service at Authorized Dealer)
Low Beam/High Beam/Daytime RunningLamp (DRL) Bi-Halogen Headlamps (Base)HIR2LL
Low Beam/High Beam (Bi-Halogen)Headlamps (Uplevel)HIR2LL
Front Park/Turn Signal Lamps (Base) 3157NAK
Front Turn Signal Lamps (Uplevel &Premium)3157NAK
Front Park Lamp/Daytime Running Lamp(Uplevel & Premium)LED (Serviced at Authorized Dealer)
Front Side Marker Lamps LED (Serviced at Authorized Dealer)
Front Fog Lamps H11
Rear Tail Lamps/Sidemarker Lamps LED (Serviced at Authorized Dealer)
Rear Stop/Turn Signal Lamps LED (Serviced at Authorized Dealer)
Rear Liftgate Tail Lamps LED (Serviced at Authorized Dealer)
Rear Backup Lamps 921 (W16W)
Rear License Lamps LED (Serviced at Authorized Dealer)
Center High-Mounted Stop Lamp (CHMSL) LED (Serviced at Authorized Dealer)
MAINTAINING YOUR VEHICLE
214