engine DODGE DURANGO 2018 User Guide
[x] Cancel search | Manufacturer: DODGE, Model Year: 2018, Model line: DURANGO, Model: DODGE DURANGO 2018Pages: 592, PDF Size: 6.57 MB
Page 49 of 592
Driver Memory Seat — If Equipped
This feature allows the driver to store up to two different
memory profiles for easy recall through a memory switch.
Each memory profile contains desired position settings for
the driver seat, side mirrors, and power tilt and telescopic
steering column (if equipped) and a set of desired radio
station presets. Your key fob can also be programmed to
recall the same positions when the unlock button is
pushed.
NOTE:Your vehicle is equipped with two key fobs, one
key fob can be linked to memory position 1 and the other
key fob can be linked to memory position 2.
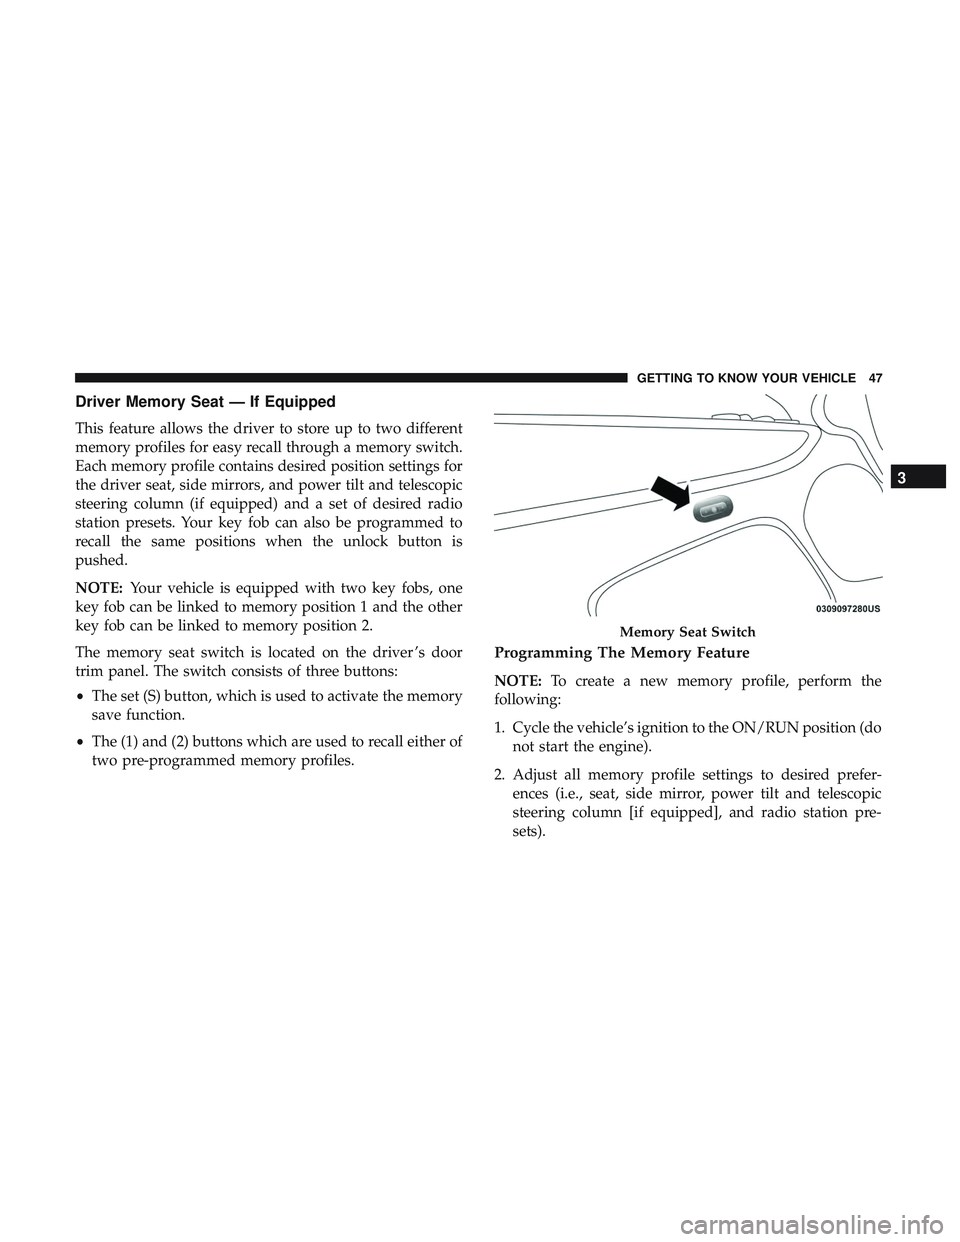
The memory seat switch is located on the driver ’s door
trim panel. The switch consists of three buttons:
• The set (S) button, which is used to activate the memory
save function.
• The (1) and (2) buttons which are used to recall either of
two pre-programmed memory profiles.
Programming The Memory Feature
NOTE: To create a new memory profile, perform the
following:
1. Cycle the vehicle’s ignition to the ON/RUN position (do not start the engine).
2. Adjust all memory profile settings to desired prefer- ences (i.e., seat, side mirror, power tilt and telescopic
steering column [if equipped], and radio station pre-
sets).
Memory Seat Switch
3
GETTING TO KNOW YOUR VEHICLE 47
Page 53 of 592
If the HI-level setting is selected, the system will automati-
cally switch to LO-level after approximately 60 minutes of
continuous operation. At that time, the display will change
from HI to LO, indicating the change. The LO-level setting
will turn off automatically after approximately 45 minutes.
NOTE:
•Once a heat setting is selected, heat will be felt within
two to five minutes.
• The engine must be running for the heated seats to
operate.
Vehicles Equipped With Remote Start
On models that are equipped with remote start, the heated
seats can be programmed to come on during a remote start.
This feature can be programmed through the Uconnect
system. Refer to “Uconnect Settings” in “Multimedia” for
further information.
WARNING!
• Persons who are unable to feel pain to the skin
because of advanced age, chronic illness, diabetes,
(Continued)
WARNING! (Continued)
spinal cord injury, medication, alcohol use, exhaus-
tion or other physical condition must exercise care
when using the seat heater. It may cause burns even
at low temperatures, especially if used for long
periods of time.
• Do not place anything on the seat or seatback that
insulates against heat, such as a blanket or cushion.
This may cause the seat heater to overheat. Sitting in
a seat that has been overheated could cause serious
burns due to the increased surface temperature of the
seat.
Rear Heated Seats — If Equipped
On some models, the two rear outboard seats may be
equipped with heated seats. There are two heated seat
switches that allow the rear passengers to operate the seats
independently. The heated seat switches for each heater are
located on the rear of the center console.
3
GETTING TO KNOW YOUR VEHICLE 51
Page 55 of 592
Front Ventilated Seats — If Equipped
Located in the seat cushion and seat back are fans that
draw the air from the passenger compartment and move
air through fine perforations in the seat cover to help keep
the driver and front passenger cooler in higher ambient
temperatures. The fans operate at two speeds, HI and LO.
The front ventilated seats control buttons are located
within the Uconnect system. You can gain access to the
control buttons through the climate screen or the controls
screen.
•Press the ventilated seat button
once to choose HI.
•Press the ventilated seat buttona second time to
choose LO.
• Press the ventilated seat buttona third time to turn
the ventilated seat off.
NOTE: The engine must be running for the ventilated seats
to operate.
Vehicles Equipped With Remote Start
On models that are equipped with remote start, the venti-
lated seats can be programmed to come on during a remote
start. This feature can be programmed through the Uconnect
system. Refer to “Uconnect Settings” in “Multimedia” for
further information.
60/40 Split Rear Seat
Second Row Fold Flat Seat
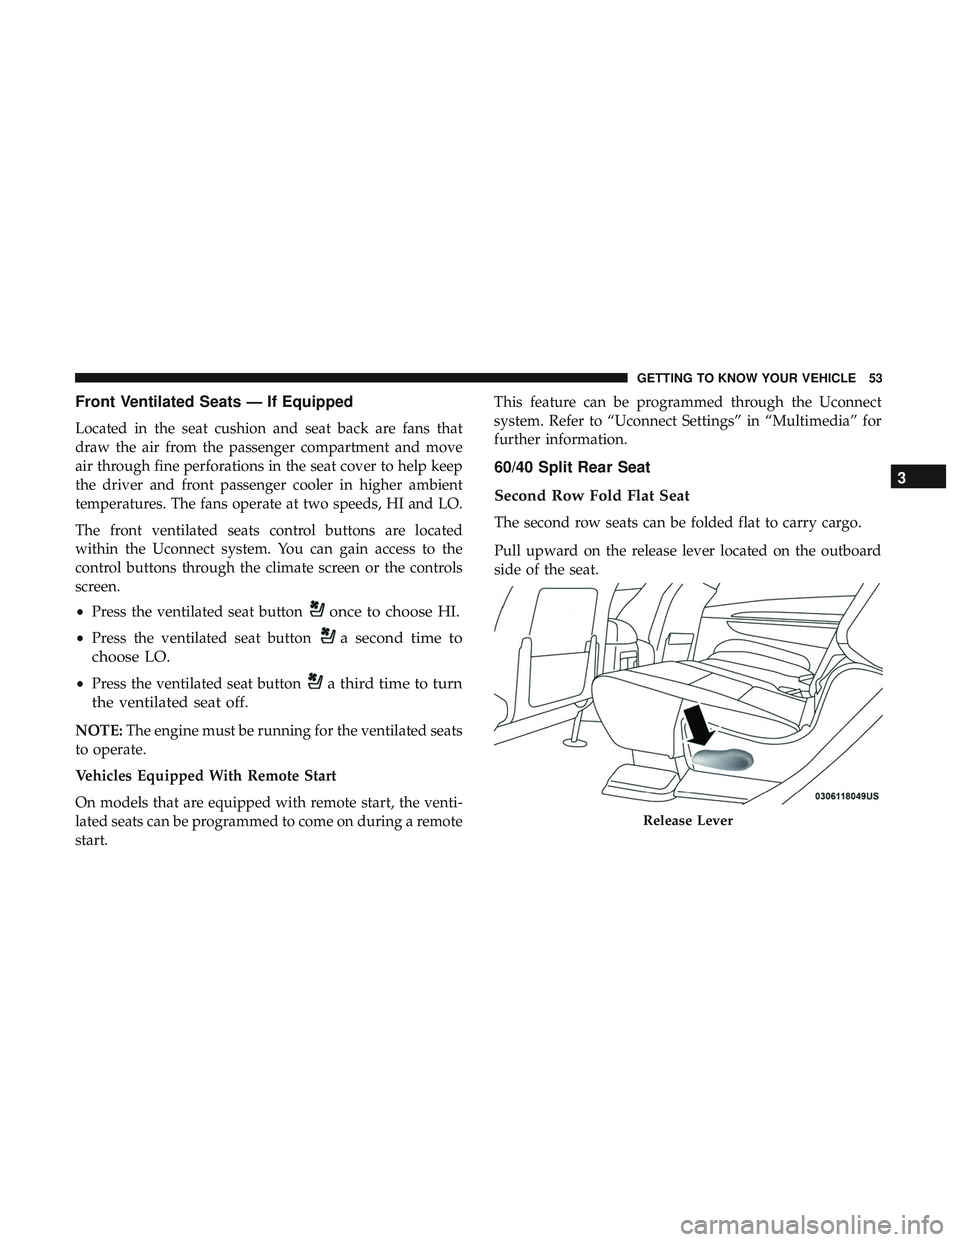
The second row seats can be folded flat to carry cargo.
Pull upward on the release lever located on the outboard
side of the seat.
Release Lever
3
GETTING TO KNOW YOUR VEHICLE 53
Page 69 of 592
WARNING!
Do not adjust the steering column while driving.
Adjusting the steering column while driving or driv-
ing with the steering column unlocked, could cause the
driver to lose control of the vehicle. Failure to follow
this warning may result in serious injury or death.
Heated Steering Wheel — If Equipped
The steering wheel contains a heating element that helps
warm your hands in cold weather. The heated steering
wheel has only one temperature setting. Once the heated
steering wheel has been turned on, it will stay on for an
average of 80 minutes or more before automatically shut-
ting off. This time will vary based on environmental
temperatures. The heated steering wheel can shut off early
or may not turn on when the steering wheel is already
warm.
The heated steering wheel control button is located within
the Uconnect system. You can gain access to the control
button through the climate screen or the controls screen.
•Press the heated steering wheel button
once to turn
the heating element on.
• Press the heated steering wheel buttona second time
to turn the heating element off.
NOTE: The engine must be running for the heated steering
wheel to operate.
Vehicles Equipped With Remote Start
On models that are equipped with remote start, the heated
steering wheel can be programmed to come on during a
remote start through the Uconnect system. Refer to
“Uconnect Settings” in “Multimedia” for further informa-
tion.
WARNING!
• Persons who are unable to feel pain to the skin
because of advanced age, chronic illness, diabetes,
spinal cord injury, medication, alcohol use, exhaus-
tion, or other physical conditions must exercise care
when using the steering wheel heater. It may cause
burns even at low temperatures, especially if used
for long periods.
• Do not place anything on the steering wheel that
insulates against heat, such as a blanket or steering
wheel covers of any type and material. This may
cause the steering wheel heater to overheat.
3
GETTING TO KNOW YOUR VEHICLE 67
Page 77 of 592
To turn the automatic system off, move the headlight
switch out of the AUTO position.
NOTE:The engine must be running before the headlights
will come on in the automatic mode.
Parking Lights And Panel Lights
To turn on the parking lights and instrument panel
lights, rotate the headlight switch clockwise. To turn
off the parking lights, rotate the headlight switch back to
the O (off) position.
Headlights On Automatically With Wipers
If your vehicle is equipped with Automatic Headlights, it
also has this customer-programmable feature. When your
headlights are in the automatic mode and the engine is
running, they will automatically turn on when the wiper
system is on. This feature is programmable through the
Uconnect system. Refer to “Uconnect Settings” in “Multi-
media” for further information.
NOTE: When your headlights come on during the day-
time, the vehicle will monitor outside brightness and
decide if the instrument panel needs to be dimmed or not.
Refer to “Interior Lights” in “Getting To Know Your
Vehicle” for further information.
Headlight Delay
To aid in your exit, your vehicle is equipped with a
headlight delay that will leave the headlights on for
approximately 90 seconds. This delay is initiated when the
ignition is turned OFF while the headlight switch is on, and
then the headlight switch is cycled off. Headlight delay can
be cancelled by either turning the headlight switch on then
off, or by turning the ignition ON.
NOTE: The headlight delay time is programmable through
the Uconnect System. Refer to “Uconnect Settings” in
“Multimedia” for further information.
Lights-On Reminder
If the headlights, parking lights, or cargo lights are left on
after the ignition is turned OFF, a chime will sound when
the driver ’s door is opened.
3
GETTING TO KNOW YOUR VEHICLE 75
Page 101 of 592
temperatures. Once the desired temperature is dis-
played, the system will achieve and automatically main-
tain that comfort level.
3. When the system is set up for your comfort level, it is not necessary to change the settings. You will experience
the greatest efficiency by simply allowing the system to
function automatically.
NOTE:
• It is not necessary to move the temperature settings. The
system automatically adjusts the temperature, mode and
fan speed to provide comfort as quickly as possible.
To provide you with maximum comfort in the automatic
mode, during cold start-ups, the blower fan will remain on
low until the engine warms up. The fan will engage
immediately if the Defrost mode is selected, or by changing
the front blower knob setting.
Manual Operation Override
This system offers a full complement of manual override
features. The AUTO symbol in the front ATC display will
be turned off when the system is being used in the manual
mode. NOTE:
The system will not automatically sense the pres-
ence of fog, mist or ice on the windshield. DEFROST mode
must be manually selected to clear the windshield and side
glass.
Rear Blower Control
The rear blower control can be manually set to off, or any
fixed blower speed by pushing the blower control buttons.
This allows the rear seat occupants to control the volume of
air circulated in the rear of the vehicle. Turn the control
knob to increase or decrease the fan speed.
CAUTION!
Interior air enters the Rear Automatic Temperature
Control System through an intake grille, located in the
right side trim panel behind the third row seats. The
heater outlets are located in the right side trim panel,
just behind the sliding door. Do not block or place
objects directly in front of the inlet grille or heater
outlets. The electrical system could overload causing
damage to the blower motor.
3
GETTING TO KNOW YOUR VEHICLE 99
Page 102 of 592
Rear Temperature Control
To change the temperature in the rear of the vehicle, push
the temperature buttons. The rear temperature settings are
displayed in the rear ATC panel.
When rear controls are locked by the front system, the Rear
Temperature Lock symbol on the ATC panel is illuminated
and any rear overhead adjustments are ignored.
When the Sync feature is active, the rear temperature is
synchronized to the driver ’s temperature setting. If the rear
temperature is changed, the Sync feature will deactivate.
Operating Tips
NOTE:Refer to the chart at the end of this section for
suggested control settings for various weather conditions.
Summer Operation
The engine cooling system must be protected with a
high-quality antifreeze coolant to provide proper corrosion
protection and to protect against engine overheating. A
solution of 50% OAT (Organic Additive Technology) cool-
ant that meets the requirements of FCA Material Standard
MS.90032 and 50% water is recommended. Refer to “Fluids
and Lubricants” in “Technical Specifications” for proper
coolant selection.
Winter Operation
Use of the Air Recirculation mode during winter months is
not recommended because it may cause window fogging.
Vacation/Storage
Before you store your vehicle, or keep it out of service (i.e.,
vacation) for two weeks or more, run the air conditioning
system at idle for about five minutes, in fresh air with the
blower setting on high. This will ensure adequate system
lubrication to minimize the possibility of compressor dam-
age when the system is started again.
Window Fogging
Interior fogging on the windshield can be quickly removed
by turning the mode selector to Defrost. The Defrost/Floor
mode can be used to maintain a clear windshield and
provide sufficient heating. If side window fogging be-
comes objectionable, increase blower speed to improve
airflow and clearing of the side windows. Vehicle windows
tend to fog on the inside in mild but rainy or humid
weather.
100 GETTING TO KNOW YOUR VEHICLE
Page 117 of 592
To erase the channels, place the ignition in the ON/RUN
position and push and hold the two outside HomeLink
buttons (I and III) for up 20 seconds or until the red
indicator flashes.
NOTE:
•Erasing all channels should only be performed when
programming HomeLink for the first time. Do not erase
channels when programming additional buttons.
• If you have any problems, or require assistance, please
call toll-free 1-800-355-3515 or, on the Internet at
HomeLink.com for information or assistance.
Programming A Rolling Code
For programming garage door openers that were manufac-
tured after 1995:
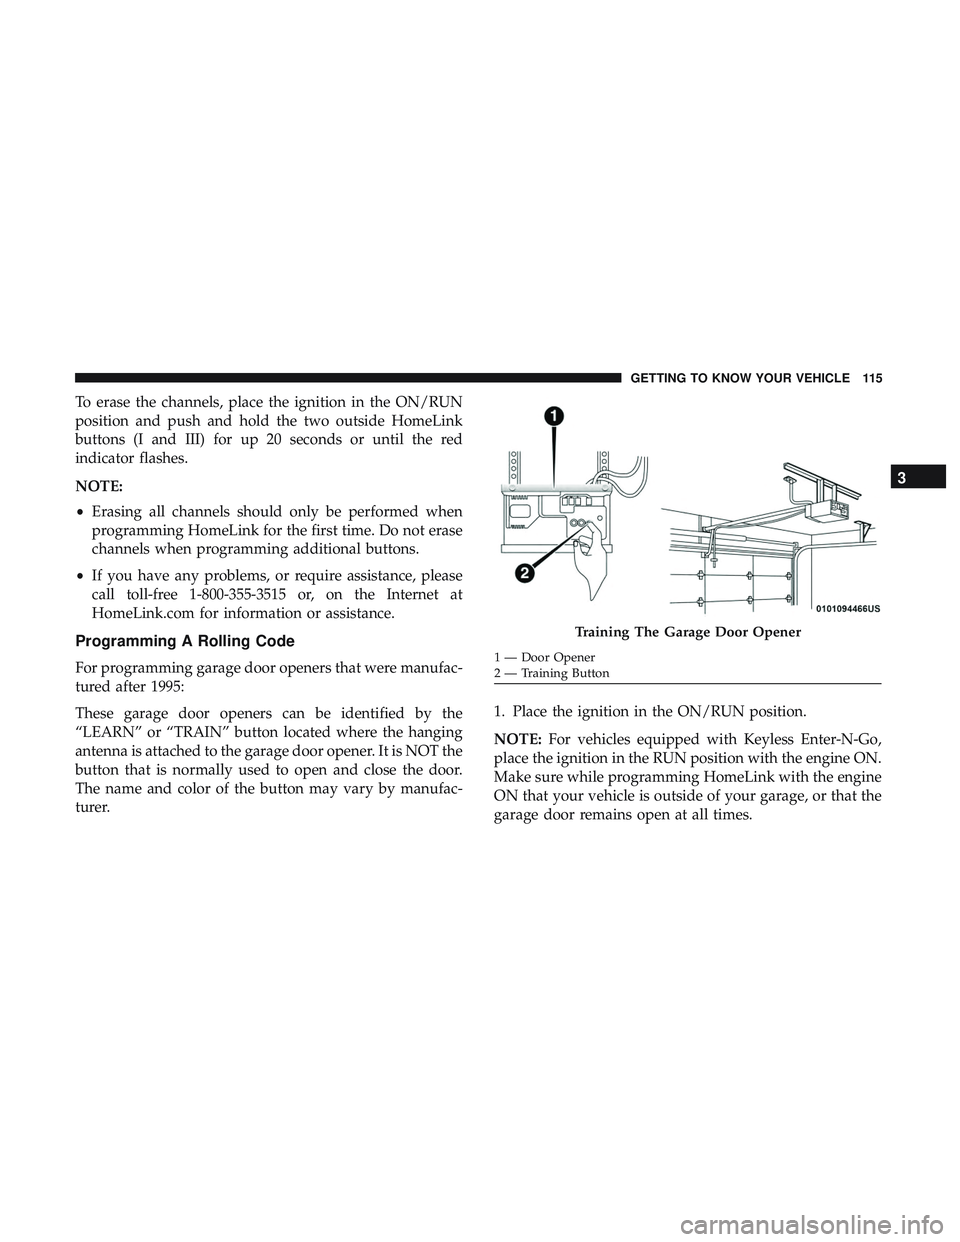
These garage door openers can be identified by the
“LEARN” or “TRAIN” button located where the hanging
antenna is attached to the garage door opener. It is NOT the
button that is normally used to open and close the door.
The name and color of the button may vary by manufac-
turer. 1. Place the ignition in the ON/RUN position.
NOTE:
For vehicles equipped with Keyless Enter-N-Go,
place the ignition in the RUN position with the engine ON.
Make sure while programming HomeLink with the engine
ON that your vehicle is outside of your garage, or that the
garage door remains open at all times.
Training The Garage Door Opener
1 — Door Opener
2 — Training Button
3
GETTING TO KNOW YOUR VEHICLE 115
Page 118 of 592
2. Place the hand-held transmitter 1 to 3 inches (3 to 8 cm)away from the HomeLink button you wish to program
while keeping the HomeLink indicator light in view.
3. Push and hold the HomeLink button you want to program while you push and hold the hand-held trans-
mitter button.
4. Continue to hold both buttons and observe the indicator light. The HomeLink indicator will flash slowly and
then rapidly after HomeLink has received the frequency
signal from the hand-held transmitter. Release both
buttons after the indicator light changes from slow to
rapid.
5. At the garage door opener motor (in the garage), locate the “LEARN” or “TRAINING” button. This can usually
be found where the hanging antenna wire is attached to
the garage door opener/device motor. Firmly push and
release the “LEARN” or “TRAINING” button. On some
garage door openers/devices there may be a light that
blinks when the garage door opener/device is in the
LEARN/TRAIN mode.
NOTE: You have 30 seconds in which to initiate the next
step after the LEARN button has been pushed. 6. Return to the vehicle and push the programmed
HomeLink button twice (holding the button for two
seconds each time). If the garage door opener/device
activates, programming is complete.
NOTE: If the garage door opener/device does not activate,
push the button a third time (for two seconds) to complete
the training.
To program the remaining two HomeLink buttons, repeat
each step for each remaining button. DO NOT erase the
channels.
Programming A Non-Rolling Code
For programming Garage Door Openers manufactured
before 1995:
1. Place the ignition in the ON/RUN position.
NOTE: For vehicles equipped with Keyless Enter-N-Go,
place the ignition in the RUN position with the engine ON.
Make sure while programming HomeLink with the engine
ON that your vehicle is outside of your garage, or that the
garage door remains open at all times.
2. Place the hand-held transmitter 1 to 3 inches (3 to 8 cm) away from the HomeLink button you wish to program
while keeping the HomeLink indicator light in view.
116 GETTING TO KNOW YOUR VEHICLE
Page 119 of 592
3. Push and hold the Homelink button you want toprogram while you push and hold the hand-held trans-
mitter button.
4. Continue to hold both buttons and observe the indicator light. The Homelink indicator will flash slowly and then
rapidly after HomeLink has received the frequency
signal from the hand-held transmitter. Release both
buttons after the indicator light changes from slow to
rapid.
5. Push and hold the programmed HomeLink button and observe the indicator light.
• If the indicator light stays on constantly, programming
is complete and the garage door/device should acti-
vate when the HomeLink button is pushed.
• To program the two remaining HomeLink buttons,
repeat each step for each remaining button. DO NOT
erase the channels.
Canadian/Gate Operator Programming
For programming transmitters in Canada/United States
that require the transmitter signals to “time-out” after
several seconds of transmission:
Canadian radio frequency laws require transmitter signals
to time-out (or quit) after several seconds of transmission, which may not be long enough for HomeLink to pick up
the signal during programming. Similar to this Canadian
law, some U.S. gate operators are designed to time-out in
the same manner.
It may be helpful to unplug the device during the cycling
process to prevent possible overheating of the garage door
or gate motor.
1. Cycle the ignition to the ON/RUN position.
NOTE:
For vehicles equipped with Keyless Enter-N-Go,
place the ignition in the RUN position with the engine ON.
Make sure while programming HomeLink with the engine
ON that your vehicle is outside of your garage, or that the
garage door remains open at all times.
2. Place the hand-held transmitter 1 to 3 inches (3 to 8 cm) away from the HomeLink button you wish to program
while keeping the HomeLink indicator light in view.
3. Continue to push and hold the HomeLink button while you push and release (“cycle”) your hand-held trans-
mitter every two seconds until HomeLink has success-
fully accepted the frequency signal. The indicator light
will flash slowly and then rapidly when fully trained.
3
GETTING TO KNOW YOUR VEHICLE 117