Radio DODGE DURANGO 2018 Owners Manual
[x] Cancel search | Manufacturer: DODGE, Model Year: 2018, Model line: DURANGO, Model: DODGE DURANGO 2018Pages: 592, PDF Size: 6.57 MB
Page 2 of 592

INSTALLATION OF RADIO TRANSMITTING
EQUIPMENT
Special design considerations are incorporated into this
vehicle’s electronic system to provide immunity to radio
frequency signals. Mobile two-way radios and telephone
equipment must be installed properly by trained person-
nel. The following must be observed during installation.
The positive power connection should be made directly
to the battery and fused as close to the battery as possible.
The negative power connection should be made to body
sheet metal adjacent to the negative battery connection.
This connection should not be fused.
Antennas for two-way radios should be mounted on the
roof or the rear area of the vehicle. Care should be used
in mounting antennas with magnet bases. Magnets may
affect the accuracy or operation of the compass on
vehicles so equipped.
The antenna cable should be as short as practical and
routed away from the vehicle wiring when possible. Use
only fully shielded coaxial cable.
Carefully match the antenna and cable to the radio to
ensure a low Standing Wave Ratio (SWR).Mobile radio equipment with output power greater than
normal may require special precautions.
All installations should be checked for possible interfer-
ence between the communications equipment and the
vehicle’s electronic systems.
WARNING:
Operating, servicing and maintaining a
passenger vehicle or off-road highway
motor vehicle can expose you to chemicals
including engine exhaust, carbon monoxide,
phthalates, and lead, which are known to
the State of California to cause cancer and
birth defects or other reproductive harm.
To minimize exposure, avoid breathing
exhaust, do not idle the engine except as
necessary, service your vehicle in a
well-ventilated area and wear gloves or
wash your hands frequently when servicing
your vehicle. For more information go to
www.P65Warnings.ca.gov/passenger-vehicle.
VEHICLES SOLD IN CANADA
With respect to any Vehicles Sold in Canada, the name
FCA US LLC shall be deemed to be deleted and the name
FCA Canada Inc. used in substitution therefore.
DRIVING AND ALCOHOL
Drunken driving is one of the most frequent causes of
accidents.
Your driving ability can be seriously impaired with blood
alcohol levels far below the legal minimum. If you are
drinking, don’t drive. Ride with a designated non-
drinking driver, call a cab, a friend, or use public trans-
portation.
WARNING!
Driving after drinking can lead to an accident.
Your perceptions are less sharp, your reflexes are
slower, and your judgment is impaired when you
have been drinking. Never drink and then drive.
This manual illustrates and describes the operation of
features and equipment that are either standard or op-
tional on this vehicle. This manual may also include a
description of features and equipment that are no longer
available or were not ordered on this vehicle. Please
disregard any features and equipment described in this
manual that are not on this vehicle.
FCA US LLC reserves the right to make changes in design
and specifications, and/or make additions to or improve-
ments to its products without imposing any obligation
upon itself to install them on products previously manu-
factured.
Copyright © 2018 FCA US LLC
DID_3636012_18e_Durango_OM_EN_071018.indd 27/10/18 3:13 PM
Page 24 of 592
Programming Additional Key Fobs
Programming the key fob may be performed by an autho-
rized dealer.
NOTE:Once a key fob is programmed to a vehicle, it
cannot be repurposed and reprogrammed to another ve-
hicle.
Request For Additional Remote Controls
NOTE: Only key fobs that are programmed to the vehicle
electronics can be used to start and operate the vehicle.
Once a key fob is programmed to a vehicle, it cannot be
programmed to any other vehicle.
WARNING!
• Always remove the key fobs from the vehicle and
lock all doors when leaving the vehicle unattended.
• For vehicles equipped with Keyless Enter-N-Go —
Ignition, always remember to place the ignition in
the OFF mode.
Duplication of key fobs may be performed at an authorized
dealer. This procedure consists of programming a blank
key fob to the vehicle electronics. A blank key fob is one
that has never been programmed. NOTE:
When having the Sentry Key Immobilizer System
serviced, bring all vehicle keys with you to an authorized
dealer.
General Information
The following regulatory statement applies to all radio
frequency (RF) devices equipped in this vehicle:
This device complies with Part 15 of the FCC Rules and
with Industry Canada license-exempt RSS standard(s).
Operation is subject to the following two conditions:
1. This device may not cause harmful interference, and
2. This device must accept any interference received, in- cluding interference that may cause undesired opera-
tion.
NOTE: Changes or modifications not expressly approved
by the party responsible for compliance could void the
user ’s authority to operate the equipment.
IGNITION SWITCH
Keyless Push Button Ignition
This feature allows the driver to operate the ignition with
the push of a button, as long as the key fob is in the
passenger compartment.
22 GETTING TO KNOW YOUR VEHICLE
Page 25 of 592
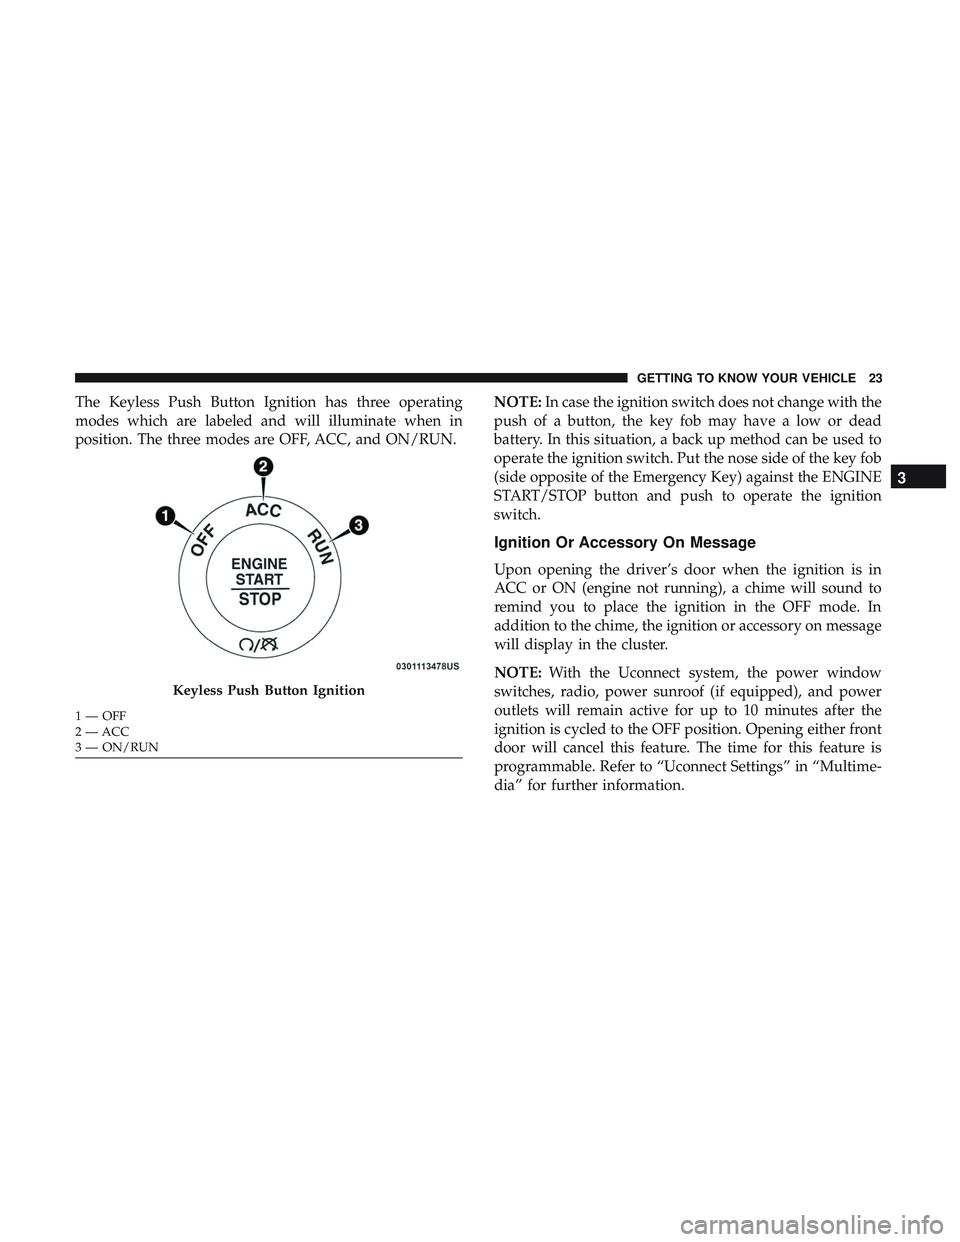
The Keyless Push Button Ignition has three operating
modes which are labeled and will illuminate when in
position. The three modes are OFF, ACC, and ON/RUN.NOTE:
In case the ignition switch does not change with the
push of a button, the key fob may have a low or dead
battery. In this situation, a back up method can be used to
operate the ignition switch. Put the nose side of the key fob
(side opposite of the Emergency Key) against the ENGINE
START/STOP button and push to operate the ignition
switch.
Ignition Or Accessory On Message
Upon opening the driver’s door when the ignition is in
ACC or ON (engine not running), a chime will sound to
remind you to place the ignition in the OFF mode. In
addition to the chime, the ignition or accessory on message
will display in the cluster.
NOTE: With the Uconnect system, the power window
switches, radio, power sunroof (if equipped), and power
outlets will remain active for up to 10 minutes after the
ignition is cycled to the OFF position. Opening either front
door will cancel this feature. The time for this feature is
programmable. Refer to “Uconnect Settings” in “Multime-
dia” for further information.
Keyless Push Button Ignition
1 — OFF
2 — ACC
3 — ON/RUN
3
GETTING TO KNOW YOUR VEHICLE 23
Page 29 of 592
To Exit Remote Start Mode Without Driving The
Vehicle
Push and release the remote start button one time or allow
the engine to run for the entire 15-minute cycle.
NOTE:To avoid unintentional shutdowns, the system will
disable with a one time push of the remote start button for
two seconds after receiving a valid remote start request.
To Exit Remote Start Mode And Drive The Vehicle
Before the end of 15-minute cycle, push and release the
unlock button on the key fob to unlock the doors, or unlock
the vehicle using Keyless Enter-N-Go — Passive Entry via
the door handles, and disarm the vehicle security alarm (if
equipped). Then, prior to the end of the 15-minute cycle,
push and release the START/STOP button.
NOTE: For vehicles equipped with the Keyless Enter-
N-Go — Passive Entry feature, the message “Remote Start
Active — Push Start Button” will display in the instrument
cluster display until you push the ignition START button.
Remote Start Comfort Systems — If Equipped
When Remote Start is activated, the heated steering wheel
and driver heated seat features will automatically turn on
in cold weather. In warm weather, the driver vented seat feature will automatically turn on when the remote start is
activated. These features will stay on through the duration
of Remote Start or until the ignition switch is placed in the
ON/RUN mode.
NOTE:
The Remote Start Comfort System can be activated
and deactivated through the Uconnect System. Refer to
“Uconnect Settings” in “Multimedia” for further informa-
tion on Remote Start Comfort System operation.
General Information
The following regulatory statement applies to all radio
frequency (RF) devices equipped in this vehicle:
This device complies with Part 15 of the FCC Rules and
with Industry Canada license-exempt RSS standard(s).
Operation is subject to the following two conditions:
1. This device may not cause harmful interference, and
2. This device must accept any interference received, in- cluding interference that may cause undesired opera-
tion.
NOTE: Changes or modifications not expressly approved
by the party responsible for compliance could void the
user ’s authority to operate the equipment.
3
GETTING TO KNOW YOUR VEHICLE 27
Page 31 of 592
CAUTION!
•Always remove the key fobs from the vehicle and
lock all doors when leaving the vehicle unattended.
• For vehicles equipped with Keyless Enter-N-Go —
Ignition, always remember to place the ignition in
the OFF position.
NOTE: Duplication of key fobs may be performed at an
authorized dealer. This procedure consists of programming
a blank key fob to the vehicle electronics. A blank key fob
is one that has never been programmed.
When having the Sentry Key Immobilizer System serviced,
bring all vehicle keys with you to an authorized dealer.
General Information
The following regulatory statement applies to all radio
frequency (RF) devices equipped in this vehicle:
This device complies with Part 15 of the FCC Rules and
with Industry Canada license-exempt RSS standard(s).
Operation is subject to the following two conditions:
1. This device may not cause harmful interference, and 2. This device must accept any interference received, in-
cluding interference that may cause undesired opera-
tion.
NOTE: Changes or modifications not expressly approved
by the party responsible for compliance could void the
user ’s authority to operate the equipment.
VEHICLE SECURITY ALARM — IF EQUIPPED
The vehicle security alarm monitors the vehicle doors for
unauthorized entry and the Keyless Enter-N-Go — Ignition
for unauthorized operation. While the vehicle security
alarm is armed, interior switches for door locks and liftgate
release are disabled. If something triggers the alarm, the
vehicle security alarm will provide the following audible
and visible signals: the horn will pulse, the park lamps
and/or turn signals will flash, and the vehicle security light
in the instrument cluster will flash.
3
GETTING TO KNOW YOUR VEHICLE 29
Page 40 of 592
NOTE:
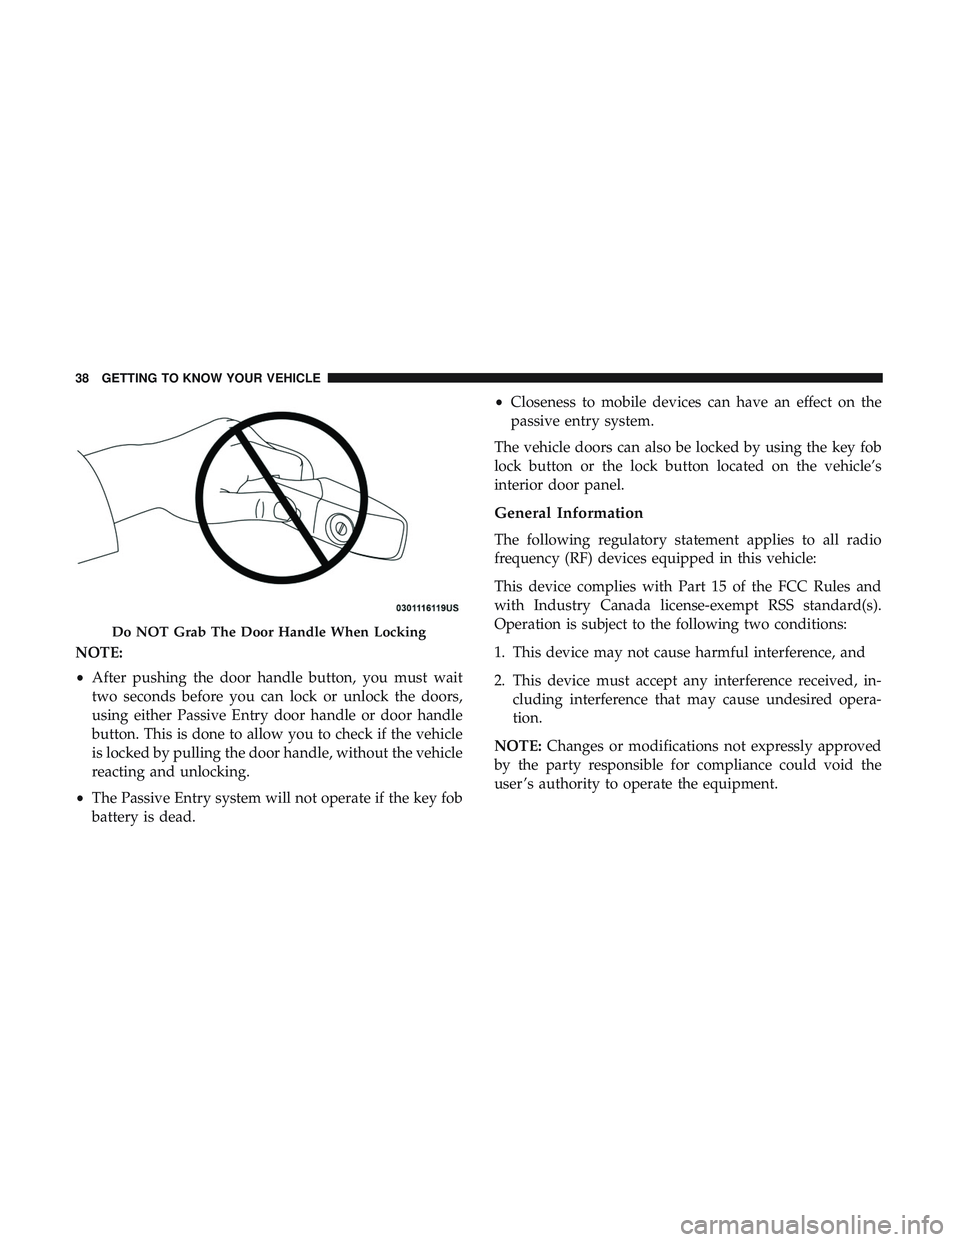
•After pushing the door handle button, you must wait
two seconds before you can lock or unlock the doors,
using either Passive Entry door handle or door handle
button. This is done to allow you to check if the vehicle
is locked by pulling the door handle, without the vehicle
reacting and unlocking.
• The Passive Entry system will not operate if the key fob
battery is dead. •
Closeness to mobile devices can have an effect on the
passive entry system.
The vehicle doors can also be locked by using the key fob
lock button or the lock button located on the vehicle’s
interior door panel.
General Information
The following regulatory statement applies to all radio
frequency (RF) devices equipped in this vehicle:
This device complies with Part 15 of the FCC Rules and
with Industry Canada license-exempt RSS standard(s).
Operation is subject to the following two conditions:
1. This device may not cause harmful interference, and
2. This device must accept any interference received, in- cluding interference that may cause undesired opera-
tion.
NOTE: Changes or modifications not expressly approved
by the party responsible for compliance could void the
user ’s authority to operate the equipment.
Do NOT Grab The Door Handle When Locking
38 GETTING TO KNOW YOUR VEHICLE
Page 41 of 592
Automatic Unlock On Exit Feature — If Equipped
If Auto Unlock is enabled, this feature will unlock all the
doors when any door is opened if the vehicle is stopped
and in PARK.
Refer to “Uconnect Settings” in “Multimedia” for further
information.
Automatic Door Locks — If Equipped
When enabled, the door locks will lock automatically when
the vehicle’s speed exceeds 15 MPH (24 km/h). Auto door
lock feature is enabled/disabled in the Uconnect Settings
sections in the radio. Refer to “Uconnect Settings” in
“Multimedia” for further information.
Child-Protection Door Lock System — Rear Doors
To provide a safer environment for small children riding in
the rear seats, the rear doors are equipped with Child-
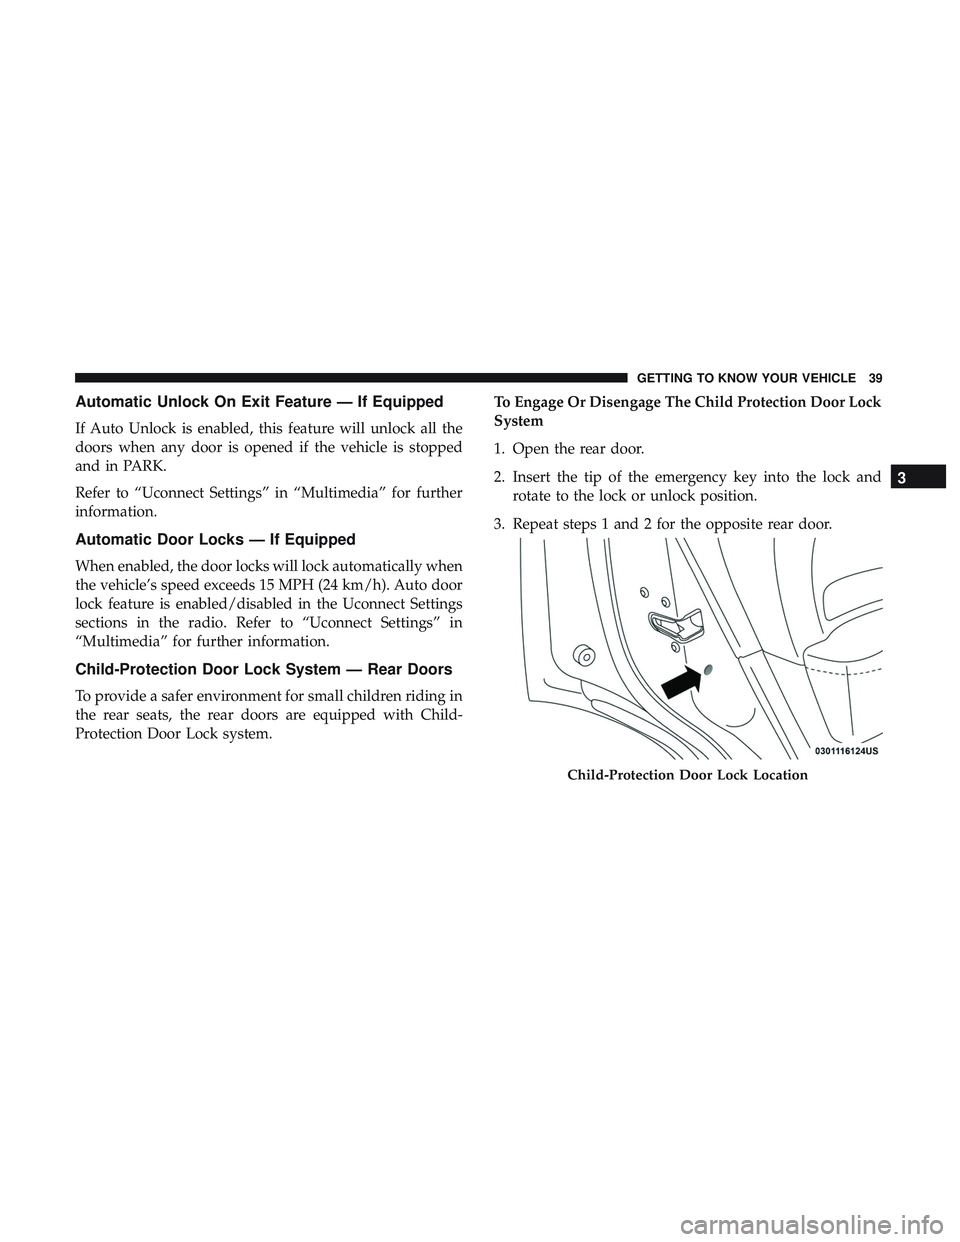
Protection Door Lock system.To Engage Or Disengage The Child Protection Door Lock
System
1. Open the rear door.
2. Insert the tip of the emergency key into the lock and
rotate to the lock or unlock position.
3. Repeat steps 1 and 2 for the opposite rear door.
Child-Protection Door Lock Location
3
GETTING TO KNOW YOUR VEHICLE 39
Page 49 of 592
Driver Memory Seat — If Equipped
This feature allows the driver to store up to two different
memory profiles for easy recall through a memory switch.
Each memory profile contains desired position settings for
the driver seat, side mirrors, and power tilt and telescopic
steering column (if equipped) and a set of desired radio
station presets. Your key fob can also be programmed to
recall the same positions when the unlock button is
pushed.
NOTE:Your vehicle is equipped with two key fobs, one
key fob can be linked to memory position 1 and the other
key fob can be linked to memory position 2.
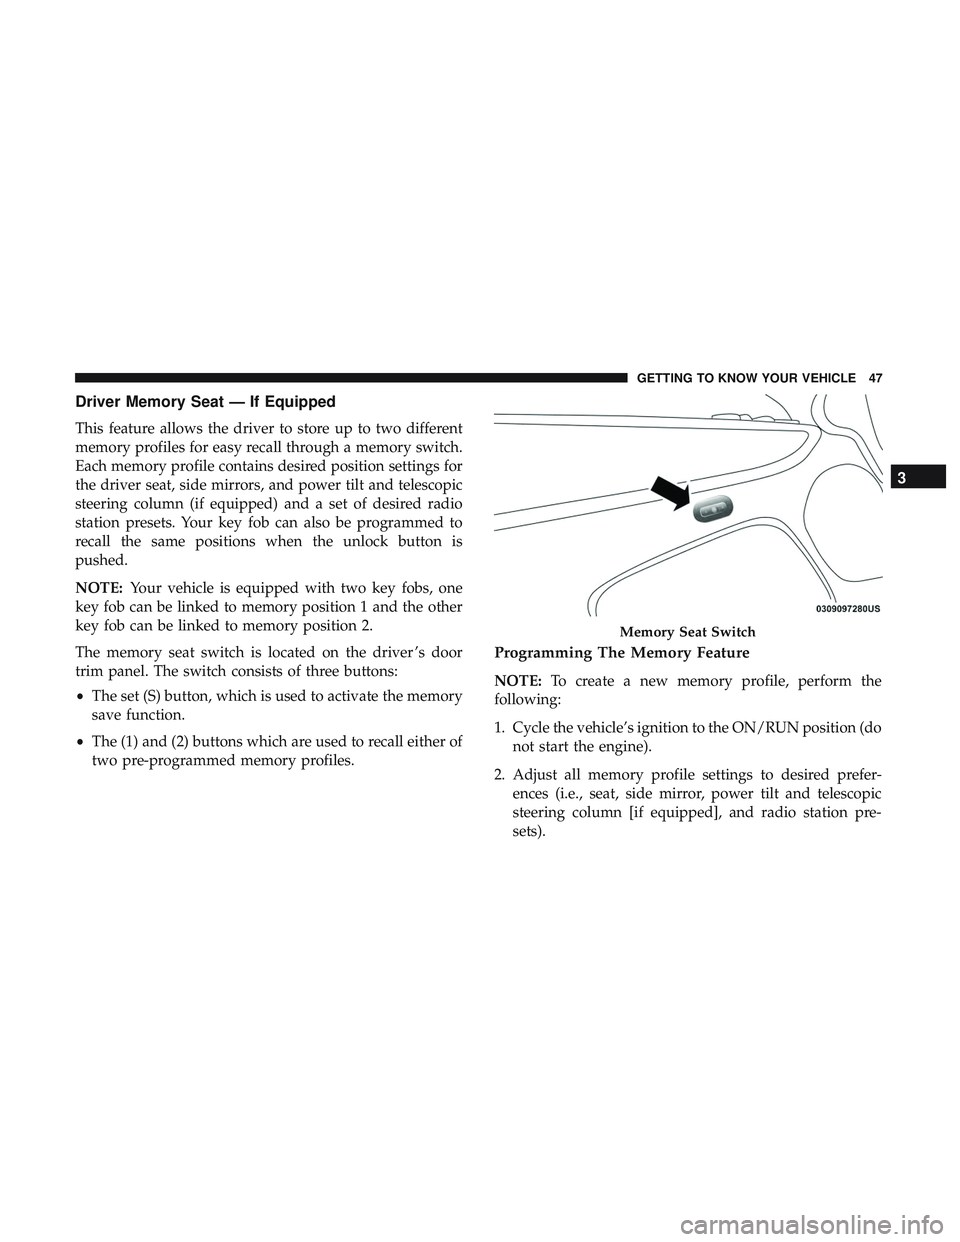
The memory seat switch is located on the driver ’s door
trim panel. The switch consists of three buttons:
• The set (S) button, which is used to activate the memory
save function.
• The (1) and (2) buttons which are used to recall either of
two pre-programmed memory profiles.
Programming The Memory Feature
NOTE: To create a new memory profile, perform the
following:
1. Cycle the vehicle’s ignition to the ON/RUN position (do not start the engine).
2. Adjust all memory profile settings to desired prefer- ences (i.e., seat, side mirror, power tilt and telescopic
steering column [if equipped], and radio station pre-
sets).
Memory Seat Switch
3
GETTING TO KNOW YOUR VEHICLE 47
Page 52 of 592
Each stored memory setting will have an associated Easy
Entry and Easy Exit position.
NOTE:The Easy Entry/Exit feature is not enabled when
the vehicle is delivered from the factory. The Easy Entry/
Exit feature is enabled (or later disabled) through the
programmable features in the Uconnect system. Refer to
“Uconnect Settings” in “Multimedia”.
Heated Seats — If Equipped
On some models, the front and rear seats may be equipped
with heaters located in the seat cushions and seat backs.
WARNING!
• Persons who are unable to feel pain to the skin
because of advanced age, chronic illness, diabetes,
spinal cord injury, medication, alcohol use, exhaus-
tion or other physical condition must exercise care
when using the seat heater. It may cause burns even
at low temperatures, especially if used for long
periods of time.
(Continued)
WARNING! (Continued)
•Do not place anything on the seat or seatback that
insulates against heat, such as a blanket or cushion.
This may cause the seat heater to overheat. Sitting in
a seat that has been overheated could cause serious
burns due to the increased surface temperature of the
seat.
Front Heated Seats
The front heated seat control buttons are located within the
climate or controls screen of the touchscreen.
You can choose from HI, LO, or OFF heat settings. The
indicator arrows in touchscreen buttons indicate the level
of heat in use. Two indicator arrows will illuminate for HI,
and one for LO. Turning the heating elements off will
return the user to the radio screen.
• Press the heated seat button
once to turn the HI
setting on.
• Press the heated seat buttona second time to turn
the LO setting on.
• Press the heated seat buttona third time to turn the
heating elements off.
50 GETTING TO KNOW YOUR VEHICLE
Page 82 of 592
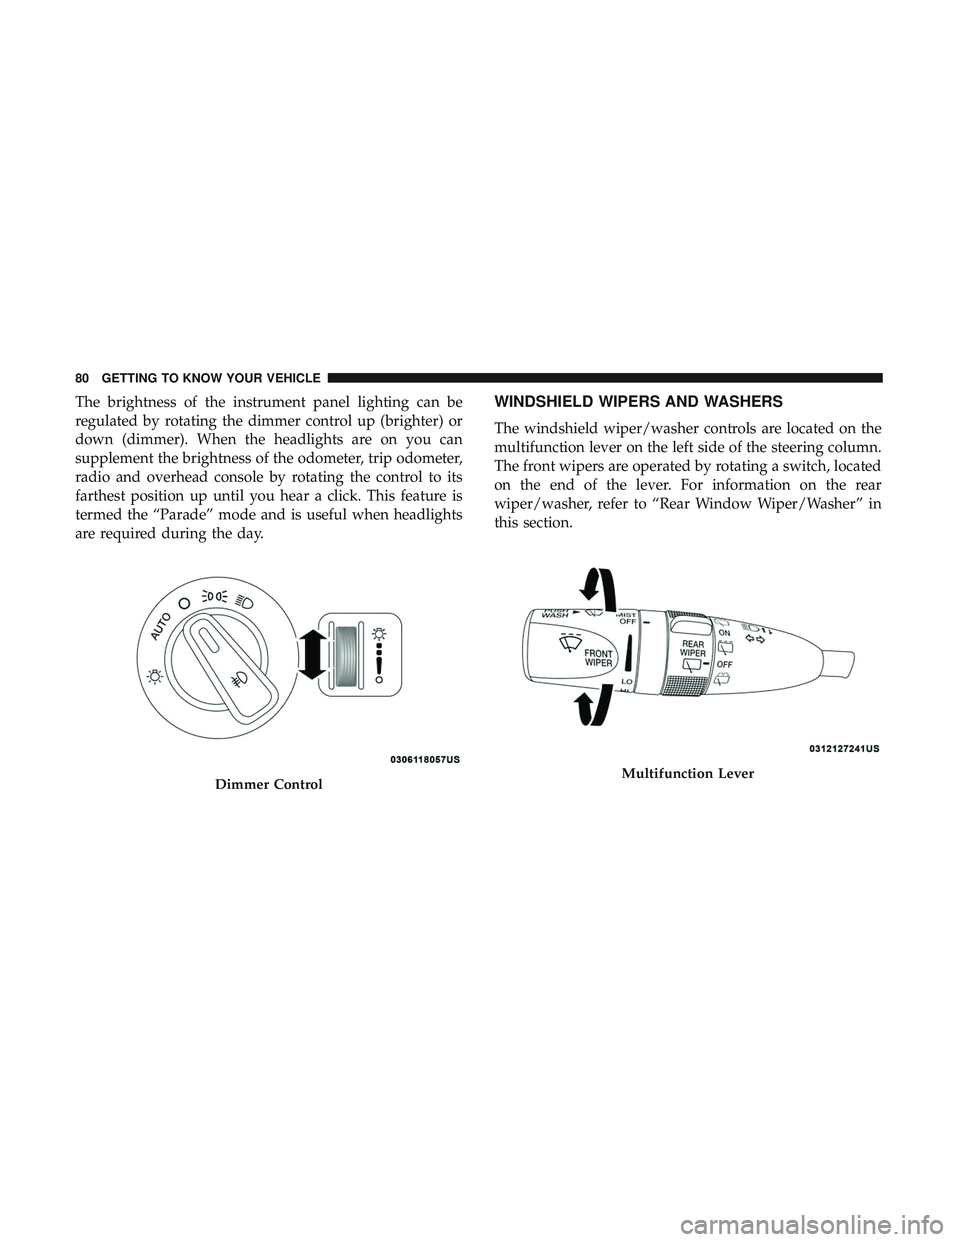
The brightness of the instrument panel lighting can be
regulated by rotating the dimmer control up (brighter) or
down (dimmer). When the headlights are on you can
supplement the brightness of the odometer, trip odometer,
radio and overhead console by rotating the control to its
farthest position up until you hear a click. This feature is
termed the “Parade” mode and is useful when headlights
are required during the day.WINDSHIELD WIPERS AND WASHERS
The windshield wiper/washer controls are located on the
multifunction lever on the left side of the steering column.
The front wipers are operated by rotating a switch, located
on the end of the lever. For information on the rear
wiper/washer, refer to “Rear Window Wiper/Washer” in
this section.
Dimmer ControlMultifunction Lever
80 GETTING TO KNOW YOUR VEHICLE