audio DODGE DURANGO 2018 Owners Manual
[x] Cancel search | Manufacturer: DODGE, Model Year: 2018, Model line: DURANGO, Model: DODGE DURANGO 2018Pages: 592, PDF Size: 6.57 MB
Page 147 of 592

•Trip
• Stop/Start — If Equipped
• Audio
• Stored Messages
• Screen Setup
The system allows the driver to select information by
pushing the following buttons mounted on the steering
wheel: •
Up Arrow Button
Push and release the uparrow button to scroll
upward through the main menu.
• Down Arrow Button
Push and release the downarrow button to scroll
downward through the main menu.
• Right Arrow Button
Push and release the rightarrow button to access
the information screens or submenu screens of a
main menu item.
• Left Arrow Button
Push the leftarrow button to return to the main
menu from an info screen or submenu item.
• OK Button
Push the OKbutton to access/select the information
screens or submenu screens of a main menu item. Push and
hold the OKbutton for one second to reset displayed/
selected features that can be reset.
Instrument Cluster Display Control Buttons
4
GETTING TO KNOW YOUR INSTRUMENT PANEL 145
Page 153 of 592
Fuel Economy
Push and release theupordown arrow button until the
Fuel Economy Menu icon/title is highlighted. Push the left
or right arrow button to scroll the submenus, one with
current fuel economy display and one without it.
• Range
• Current MPG, L/100 km, or km/L
• Average MPG, L/100 km, or km/L
• Press the OKbutton to reset the average fuel economy
NOTE: The Range feature is not able to be reset through
the instrument cluster display controls.
Trip
Push and release the upordown arrow button until the
Trip icon/title is highlighted in the instrument cluster
display, then push and release the leftorright arrow
button to select Trip A or Trip B.
The Trip A and Trip B information will display the following:
• Distance
• Average Fuel Economy
• Elapsed Time Hold the
OKbutton to reset all the information.
Stop/Start — If Equipped
Push and release the upordown arrow button until the
Stop/Start icon/title is highlighted in the instrument clus-
ter display. The screen will display the Stop/Start status.
Audio
Push and release the upordown arrow button until the
Audio Menu icon/title is highlighted in the instrument
cluster display. This menu will display the audio source
information, including the Song name, Artist name, and
audio source with an accompanying graphic.
Stored Messages
Push and release the upordown arrow button until the
Messages Menu item is highlighted. This feature shows the
number of stored warning messages. Pushing the right
arrow button will allow you to see what the stored
messages are.
When no messages are present, main menu icon will be a
closed envelope.
4
GETTING TO KNOW YOUR INSTRUMENT PANEL 151
Page 154 of 592
Screen Setup
Push and release theupordown arrow button until the
Screen Setup Menu icon/title is highlighted in the instru-
ment cluster display. Push and release the OKbutton to
enter the submenus and follow the prompts on the screen
as needed. The Screen Setup feature allows you to change
what information is displayed in the instrument cluster as
well as the location that information is displayed.
Screen Setup Driver Selectable Items
Current Gear
• On
• Off (default setting)
Gear Display
• Full (default setting)
• Single
Favorite Menus
• Speedometer
• Vehicle Info
• Driver Assist (Show/Hide)
• Fuel Economy (Show/Hide) •
Trip (Show/Hide)
• Stop/Start
• Audio (Show/Hide)
• Stored Messages
• Screen Setup
NOTE: Menus with (show/hide) can push the OKbutton
to choose whether to show or hide this menu on the
instrument cluster display.
Upper Left
• None
• Compass (default setting)
• Outside Temp
• Time
• Range To Empty (RTE)
• Fuel Economy Average
• Fuel Economy Current
• Trip A
• Trip B
152 GETTING TO KNOW YOUR INSTRUMENT PANEL
Page 156 of 592
NOTE:
•The charging system is independent from load reduc-
tion. The charging system performs a diagnostic on the
charging system continuously.
• If the Battery Charge Warning Light is on it may indicate
a problem with the charging system. Refer to “Battery
Charge Warning Light” in “Getting To Know Your
Instrument Panel” for further information.
The electrical loads that may be switched off (if equipped),
and vehicle functions which can be affected by load
reduction:
• Heated Seat/Vented Seats/Heated Wheel
• Rear Defroster And Heated Mirrors
• HVAC System
• 115V AC Power Inverter System
• Audio and Telematics System
Loss of the battery charge may indicate one or more of the
following conditions:
• The charging system cannot deliver enough electrical
power to the vehicle system because the electrical loads
are larger than the capability of charging system. The
charging system is still functioning properly. •
Turning on all possible vehicle electrical loads (e.g.
HVAC to max settings, exterior and interior lights,
overloaded power outlets +12V, 115V AC, USB ports)
during certain driving conditions (city driving, towing,
frequent stopping, etc.).
• Installing options like additional lights, upfitter electri-
cal accessories, audio systems, alarms and similar de-
vices.
• Unusual driving cycles (short trips separated by long
parking periods).
• The vehicle was parked for an extended period of time
(weeks, months).
• The battery was recently replaced and was not charged
completely.
• The battery was discharged by an electrical load left on
when the vehicle was parked.
• The battery was used for an extended period with the
engine not running to supply radio, lights, chargers,
+12V portable appliances like vacuum cleaners, game
consoles and similar devices.
154 GETTING TO KNOW YOUR INSTRUMENT PANEL
Page 157 of 592
What to do when an electrical load reduction action
message is present (“Battery Saver On” or “Battery Saver
Mode”)
During a trip:
•Reduce power to unnecessary loads if possible:
– Turn off redundant lights (interior or exterior)
– Check what may be plugged in to power outlets +12V, 115V AC, USB ports
– Check HVAC settings (blower, temperature)
– Check the audio settings (volume)
After a trip:
• Check if any aftermarket equipment was installed (ad-
ditional lights, upfitter electrical accessories, audio sys-
tems, alarms) and review specifications if any (load and
Ignition Off Draw currents).
• Evaluate the latest driving cycles (distance, driving time
and parking time).
• The vehicle should have service performed if the mes-
sage is still present during consecutive trips, and if the
evaluation and driving pattern of the vehicle did not
help to identify the cause.WARNING LIGHTS AND MESSAGES
The warning/indicator lights will illuminate in the instru-
ment panel together with a dedicated message and/or
acoustic signal when applicable. These indications are
indicative and precautionary and as such must not be
considered as exhaustive and/or alternative to the infor-
mation contained in the Owner ’s Manual, which you are
advised to read carefully in all cases. Always refer to the
information in this chapter in the event of a failure indica-
tion. All active telltales will display first if applicable. The
system check menu may appear different based upon
equipment options and current vehicle status. Some tell-
tales are optional and may not appear.
Red Warning Lights
— Seat Belt Reminder Warning Light
This warning light indicates when the driver or passenger
seat belt is unbuckled. When the ignition is first placed in
the ON/RUN or ACC/ON/RUN position and if the
driver ’s seat belt is unbuckled, a chime will sound and the
light will turn on. When driving, if the driver or front
passenger seat belt remains unbuckled, the Seat Belt Re-
minder Light will flash or remain on continuously and a
chime will sound.
Refer to “Occupant Restraint Systems” in “Safety” for
further information.
4
GETTING TO KNOW YOUR INSTRUMENT PANEL 155
Page 320 of 592
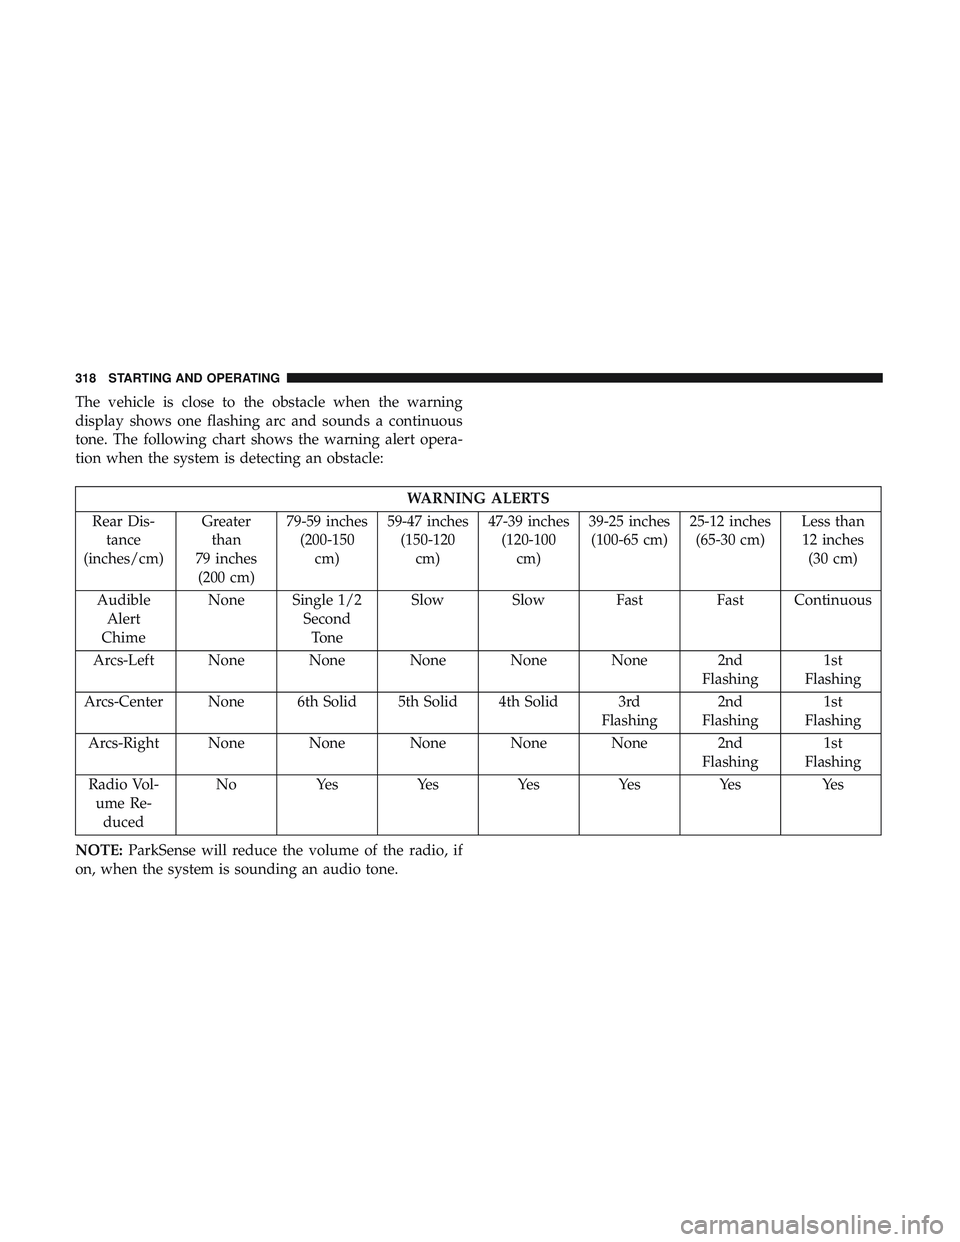
The vehicle is close to the obstacle when the warning
display shows one flashing arc and sounds a continuous
tone. The following chart shows the warning alert opera-
tion when the system is detecting an obstacle:
WARNING ALERTS
Rear Dis- tance
(inches/cm) Greater
than
79 inches (200 cm) 79-59 inches
(200-150 cm) 59-47 inches
(150-120 cm) 47-39 inches
(120-100 cm) 39-25 inches
(100-65 cm) 25-12 inches
(65-30 cm) Less than
12 inches (30 cm)
Audible Alert
Chime None Single 1/2
SecondTone Slow Slow Fast Fast Continuous
Arcs-Left None None None None None 2nd Flashing1st
Flashing
Arcs-Center None 6th Solid 5th Solid 4th Solid 3rd Flashing2nd
Flashing 1st
Flashing
Arcs-Right None None None None None 2nd Flashing1st
Flashing
Radio Vol- ume Re- duced No
Yes YesYesYesYes Yes
NOTE: ParkSense will reduce the volume of the radio, if
on, when the system is sounding an audio tone.
318 STARTING AND OPERATING
Page 330 of 592
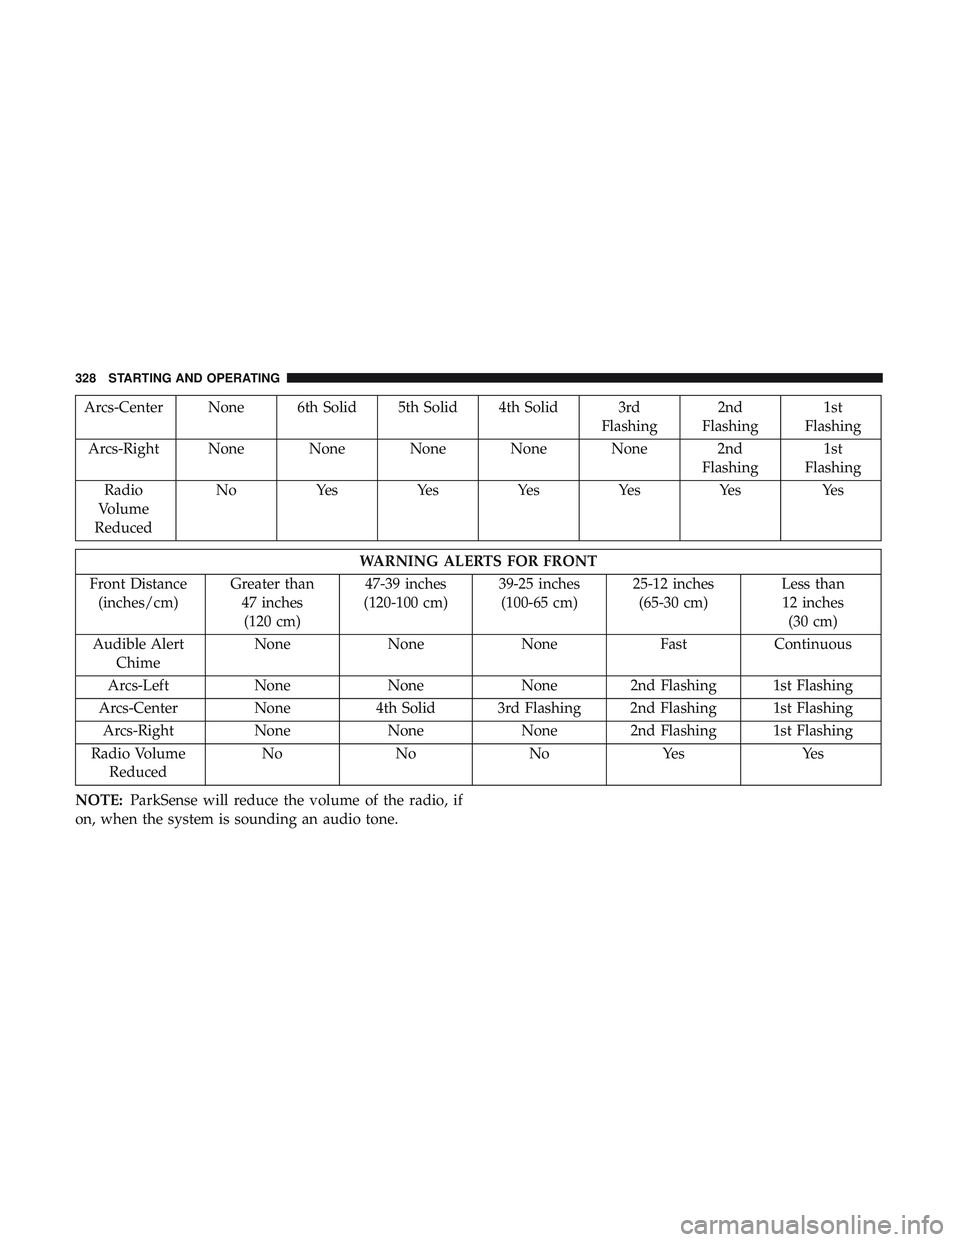
Arcs-Center None 6th Solid 5th Solid 4th Solid 3rdFlashing2nd
Flashing 1st
Flashing
Arcs-Right None None None None None 2nd Flashing1st
Flashing
Radio
Volume
Reduced No
Yes YesYesYesYes Yes
WARNING ALERTS FOR FRONT
Front Distance (inches/cm) Greater than
47 inches(120 cm) 47-39 inches
(120-100 cm) 39-25 inches
(100-65 cm) 25-12 inches
(65-30 cm) Less than
12 inches (30 cm)
Audible Alert Chime None
NoneNone FastContinuous
Arcs-Left NoneNoneNone 2nd Flashing 1st Flashing
Arcs-Center None4th Solid 3rd Flashing 2nd Flashing 1st Flashing
Arcs-Right NoneNoneNone 2nd Flashing 1st Flashing
Radio Volume Reduced No
NoNoYes Yes
NOTE: ParkSense will reduce the volume of the radio, if
on, when the system is sounding an audio tone.
328 STARTING AND OPERATING
Page 339 of 592
Changing LaneSense Status
The LaneSense system has settings to adjust the intensity of
the torque warning and the warning zone sensitivity
(early/late) that you can configure through the Uconnect
system screen. Refer to “Uconnect Settings” in “Multime-
dia” for further information.
NOTE:
•When enabled the system operates above 37 mph
(60 km/h) and below 112 mph (180 km/h).
• Use of the turn signal suppresses the warnings.
• The system will not apply torque to the steering wheel
whenever a safety system engages (anti-lock brakes,
traction control system, electronic stability control, for-
ward collision warning, etc.).
PARKVIEW REAR BACK UP CAMERA
Your vehicle is equipped with the ParkView Rear Back Up
Camera that allows you to see an on-screen image of the
rear surroundings of your vehicle whenever the gear
selector is put into REVERSE. The image will be displayed on the Navigation/Multimedia radio display screen along
with a caution note to “check entire surroundings” across
the top of the screen. After five seconds this note will
disappear. The ParkView camera is located on the rear of
the vehicle above the rear license plate.
When the vehicle is shifted out of REVERSE (with camera
delay turned off), the rear camera mode is exited and the
navigation or audio screen appears again.
When the vehicle is shifted out of REVERSE (with camera
delay turned on), the rear view image with dynamic grid
lines will be displayed for up to 10 seconds after shifting
out of REVERSE unless the forward vehicle speed exceeds
8 mph (13 km/h), the transmission is shifted into PARK or
the ignition is switched to the OFF position or can also exit
out from the image defeat [X] button.
NOTE:
The ParkView Rear Back Up Camera has program-
mable modes of operation that may be selected through the
Uconnect System. Refer to “Uconnect Settings” in “Multi-
media” for further information.
6
STARTING AND OPERATING 337
Page 370 of 592
2. The LED light located between the ASSIST and SOSbuttons on the Rearview Mirror will turn green once a
connection to a SOS operator has been made.
3.
Once a connection between the vehicle and a SOS operator
is made, the SOS Call system may transmit the following
important vehicle information to a SOS operator:
• Indication that the occupant placed a SOS Call.
• The vehicle brand.
• The last known GPS coordinates of the vehicle.
4. You should be able to speak with the SOS operator through the vehicle audio system to determine if addi-
tional help is needed.
WARNING!
ALWAYS obey traffic laws and pay attention to the
road. ALWAYS drive safely with your hands on the
steering wheel. You have full responsibility and as-
sume all risks related to the use of the features and
applications in this vehicle. Only use the features and
applications when it is safe to do so. Failure to do so
may result in an accident involving serious injury or
death. NOTE:
•Your vehicle may be transmitting data as authorized
by the subscriber.
• Once a connection is made between the vehicle’s SOS
Call system and the SOS operator, the SOS operator
may be able to open a voice connection with the
vehicle to determine if additional help is needed. Once
the SOS operator opens a voice connection with the
vehicle’s SOS Call system, the operator should be able
to speak with you or other vehicle occupants and hear
sounds occurring in the vehicle. The vehicle’s SOS Call
system will attempt to remain connected with the SOS
operator until the SOS operator terminates the connec-
tion.
5. The SOS operator may attempt to contact appropriate emergency responders and provide them with impor-
tant vehicle information and GPS coordinates.
WARNING!
•If anyone in the vehicle could be in danger (e.g., fire
or smoke is visible, dangerous road conditions or
location), do not wait for voice contact from an
(Continued)
368 IN CASE OF EMERGENCY
Page 371 of 592
WARNING!(Continued)
Emergency Services Agent. All occupants should exit
the vehicle immediately and move to a safe location.
•
Never place anything on or near the vehicle’s operable
network and GPS antennas. You could prevent oper-
able network and GPS signal reception, which can
prevent your vehicle from placing an emergency call.
An operable network and GPS signal reception is
required for the SOS Call system to function properly.
• The SOS Call system is embedded into the vehicle’s
electrical system. Do not add aftermarket electrical
equipment to the vehicle’s electrical system. This
may prevent your vehicle from sending a signal to
initiate an emergency call. To avoid interference that
can cause the SOS Call system to fail, never add
aftermarket equipment (e.g., two-way mobile radio,
CB radio, data recorder, etc.) to your vehicle’s electri-
cal system or modify the antennas on your vehicle. IF
YOUR VEHICLE LOSES BATTERY POWER FOR
ANY REASON (INCLUDING DURING OR AFTER
AN ACCIDENT), THE UCONNECT FEATURES,
APPS AND SERVICES, AMONG OTHERS, WILL
NOT OPERATE.
(Continued)
WARNING! (Continued)
•Modifications to any part of the SOS Call system
could cause the air bag system to fail when you need
it. You could be injured if the air bag system is not
there to help protect you.
SOS Call System Limitations
Vehicles sold in Mexico DO NOThave SOS Call system
capabilities.
SOS or other emergency line operators in Mexico may not
answer or respond to SOS system calls.
If the SOS Call system detects a malfunction, any of the
following may occur at the time the malfunction is de-
tected, and at the beginning of each ignition cycle:
• The Rearview Mirror light located between the ASSIST
and SOS buttons will continuously be illuminated red.
• The Device Screen will display the following message
“Vehicle device requires service. Please contact your
dealer.”
• An In-Vehicle Audio message will state “Vehicle device
requires service. Please contact your dealer.”
7
IN CASE OF EMERGENCY 369