remove seats DODGE DURANGO 2018 Owners Manual
[x] Cancel search | Manufacturer: DODGE, Model Year: 2018, Model line: DURANGO, Model: DODGE DURANGO 2018Pages: 592, PDF Size: 6.57 MB
Page 62 of 592
WARNING!
Be certain that the seatback is securely locked into
position. If the seatback is not securely locked into
position the seat will not provide the proper stability
for child seats and/or passengers. An improperly
latched seat could cause serious injury.
HEAD RESTRAINTS
Head restraints are designed to reduce the risk of injury by
restricting head movement in the event of a rear impact.
Head restraints should be adjusted so that the top of the
head restraint is located above the top of your ear.
WARNING!
•All occupants, including the driver, should not oper-
ate a vehicle or sit in a vehicle’s seat until the head
restraints are placed in their proper positions in
order to minimize the risk of neck injury in the event
of a crash.
• Head restraints should never be adjusted while the
vehicle is in motion. Driving a vehicle with the head
restraints improperly adjusted or removed could
(Continued)
WARNING! (Continued)
cause serious injury or death in the event of a
collision.
Supplemental Active Head Restraints — Front
Seats
Active Head Restraints are passive, deployable compo-
nents, and vehicles with this equipment cannot be readily
identified by any markings, only through visual inspection
of the head restraint. The Active Head Restraints (AHR)
will be split in two halves, with the front half being soft
foam and trim, the back half being decorative plastic.
When AHRs deploy during a rear impact, the front half of
the head restraint extends forward to reduce the gap
between the back of the occupant’s head and the AHR. This
system is design to reduce the risk of injury to the driver or
front passenger in certain types of rear impacts. Refer to
“Occupant Restraints” in “Safety” for further information.
To raise the head restraint, pull upward on the head
restraint. To lower the head restraint, push the adjustment
button, located at the base of the head restraint, and push
downward on the head restraint.
60 GETTING TO KNOW YOUR VEHICLE
Page 65 of 592
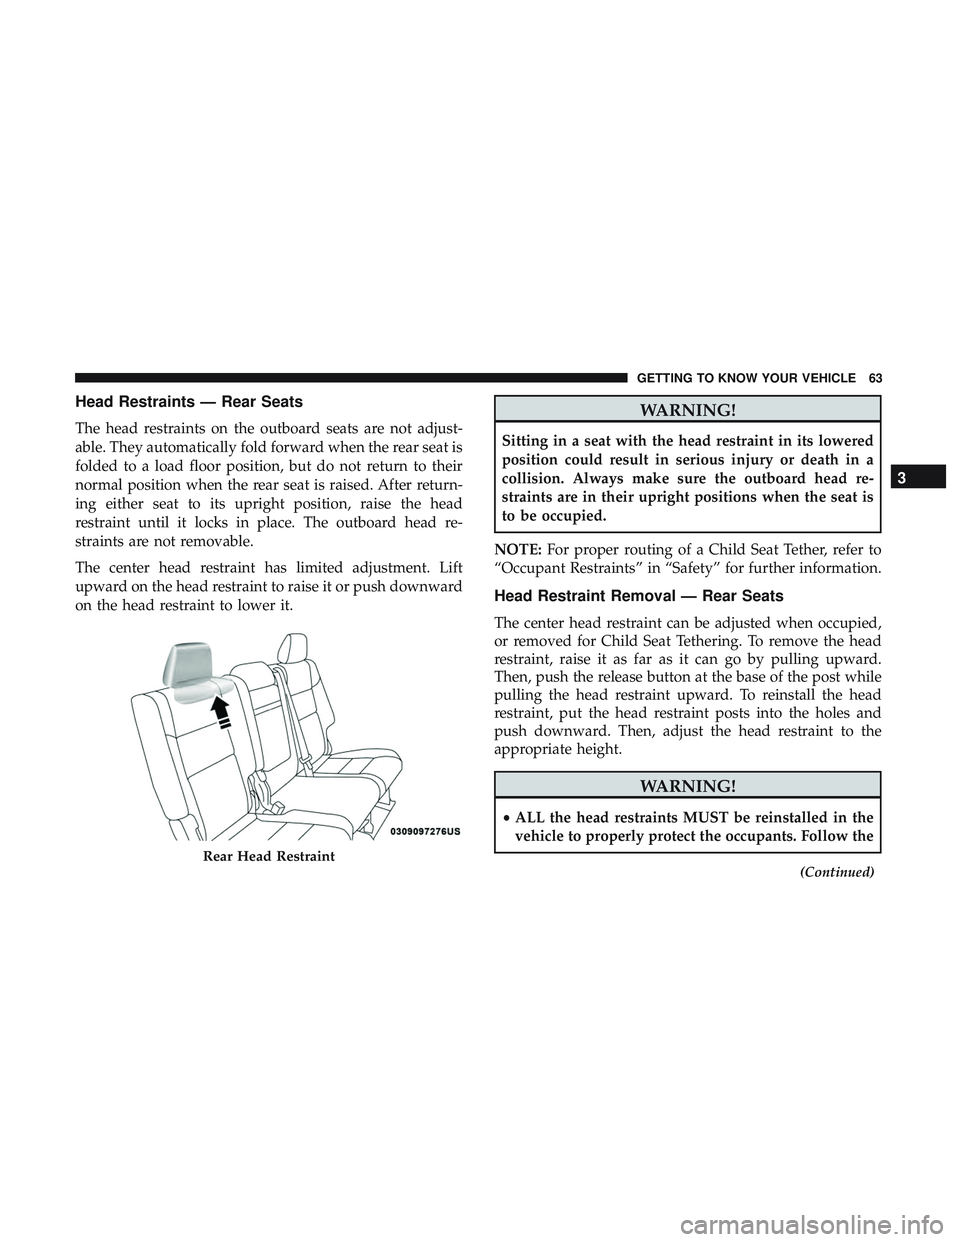
Head Restraints — Rear Seats
The head restraints on the outboard seats are not adjust-
able. They automatically fold forward when the rear seat is
folded to a load floor position, but do not return to their
normal position when the rear seat is raised. After return-
ing either seat to its upright position, raise the head
restraint until it locks in place. The outboard head re-
straints are not removable.
The center head restraint has limited adjustment. Lift
upward on the head restraint to raise it or push downward
on the head restraint to lower it.
WARNING!
Sitting in a seat with the head restraint in its lowered
position could result in serious injury or death in a
collision. Always make sure the outboard head re-
straints are in their upright positions when the seat is
to be occupied.
NOTE: For proper routing of a Child Seat Tether, refer to
“Occupant Restraints” in “Safety” for further information.
Head Restraint Removal — Rear Seats
The center head restraint can be adjusted when occupied,
or removed for Child Seat Tethering. To remove the head
restraint, raise it as far as it can go by pulling upward.
Then, push the release button at the base of the post while
pulling the head restraint upward. To reinstall the head
restraint, put the head restraint posts into the holes and
push downward. Then, adjust the head restraint to the
appropriate height.
WARNING!
• ALL the head restraints MUST be reinstalled in the
vehicle to properly protect the occupants. Follow the
(Continued)
Rear Head Restraint
3
GETTING TO KNOW YOUR VEHICLE 63
Page 212 of 592
In Automatic Locking Mode, the shoulder belt is automati-
cally pre-locked. The seat belt will still retract to remove
any slack in the shoulder belt. Use the Automatic Locking
Mode anytime a child restraint is installed in a seating
position that has a seat belt with this feature. Children 12
years old and under should always be properly restrained
in the rear seat of a vehicle with a rear seat.
WARNING!
•Never place a rear-facing child restraint in front of an
air bag. A deploying passenger front air bag can
cause death or serious injury to a child 12 years or
younger, including a child in a rear-facing child
restraint.
• Only use a rear-facing child restraint in the rear seat
of a vehicle with a rear seat.
How To Engage The Automatic Locking Mode
1. Buckle the combination lap and shoulder belt.
2. Grasp the shoulder portion and pull downward until the entire seat belt is extracted. 3. Allow the seat belt to retract. As the seat belt retracts,
you will hear a clicking sound. This indicates the seat
belt is now in the Automatic Locking Mode.
How To Disengage The Automatic Locking Mode
Unbuckle the combination lap/shoulder belt and allow it
to retract completely to disengage the Automatic Locking
Mode and activate the vehicle sensitive (emergency) lock-
ing mode.WARNING!
• The seat belt assembly must be replaced if the
switchable Automatic Locking Retractor (ALR) fea-
ture or any other seat belt function is not working
properly when checked according to the procedures
in the Service Manual.
• Failure to replace the seat belt assembly could in-
crease the risk of injury in collisions.
• Do not use the Automatic Locking Mode to restrain
occupants who are wearing the seat belt or children
who are using booster seats. The locked mode is only
used to install rear-facing or forward-facing child
restraints that have a harness for restraining the
child.
210 SAFETY
Page 232 of 592
WARNING!(Continued)
Remove the child restraint before adjusting the ve-
hicle seat position. When the vehicle seat has been
adjusted, reinstall the child restraint.
• When your child restraint is not in use, secure it in
the vehicle with the seat belt or LATCH anchorages,
or remove it from the vehicle. Do not leave it loose in
the vehicle. In a sudden stop or accident, it could
strike the occupants or seatbacks and cause serious
personal injury.
Children Too Large For Booster Seats
Children who are large enough to wear the shoulder belt
comfortably, and whose legs are long enough to bend over
the front of the seat when their back is against the seatback,
should use the seat belt in a rear seat. Use this simple 5-step
test to decide whether the child can use the vehicle’s seat
belt alone:
1. Can the child sit all the way back against the back of the
vehicle seat?
2. Do the child’s knees bend comfortably over the front of the vehicle seat – while the child is still sitting all the
way back? 3. Does the shoulder belt cross the child’s shoulder be-
tween their neck and arm?
4. Is the lap part of the belt as low as possible, touching the child’s thighs and not the stomach?
5. Can the child stay seated like this for the whole trip?
If the answer to any of these questions was “no,” then the
child still needs to use a booster seat in this vehicle. If the
child is using the lap/shoulder belt, check seat belt fit
periodically and make sure the seat belt buckle is latched.
A child’s squirming or slouching can move the belt out of
position. If the shoulder belt contacts the face or neck,
move the child closer to the center of the vehicle, or use a
booster seat to position the seat belt on the child correctly.
WARNING!
Never allow a child to put the shoulder belt under an
arm or behind their back. In a crash, the shoulder belt
will not protect a child properly, which may result in
serious injury or death. A child must always wear both
the lap and shoulder portions of the seat belt correctly.
230 SAFETY
Page 244 of 592
1. Loosen the adjusters on the lower straps and on thetether strap of the child seat so that you can more easily
attach the hooks or connectors to the vehicle anchor-
ages.
2. Place the child seat between the lower anchorages for that seating position. For some second row seats, you
may need to recline the seat and / or raise the head
restraint to get a better fit. If the rear seat can be moved
forward and rearward in the vehicle, you may wish to
move it to its rear-most position to make room for the
child seat. You may also move the front seat forward to
allow more room for the child seat.
3. Attach the lower hooks or connectors of the child restraint to the lower anchorages in the selected seating
position.
4. If the child restraint has a tether strap, connect it to the top tether anchorage. See the section “Installing Child
Restraints Using the Top Tether Anchorage” for direc-
tions to attach a tether anchor.
5. Tighten all of the straps as you push the child restraint rearward and downward into the seat. Remove slack in
the straps according to the child restraint manufactur-
er ’s instructions. 6. Test that the child restraint is installed tightly by pulling
back and forth on the child seat at the belt path. It
should not move more than 1 inch (25.4 mm) in any
direction.
How To Stow An Unused Switchable-ALR (ALR)
Seat Belt:
When using the LATCH attaching system to install a child
restraint, stow all ALR seat belts that are not being used by
other occupants or being used to secure child restraints. An
unused belt could injure a child if they play with it and
accidentally lock the seat belt retractor. Before installing a
child restraint using the LATCH system, buckle the seat
belt behind the child restraint and out of the child’s reach.
If the buckled seat belt interferes with the child restraint
installation, instead of buckling it behind the child re-
straint, route the seat belt through the child restraint belt
path and then buckle it. Do not lock the seat belt. Remind
all children in the vehicle that the seat belts are not toys and
that they should not play with them.
242 SAFETY
Page 248 of 592
Frequently Asked Questions About Installing Child Restraints With Seat Belts
Can the rear-facing child restraint
touch the back of the front passenger seat? Yes Contact between the front passenger
seat and the child restraint is al-
lowed, if the child restraint manufac- turer also allows contact.
Can the head restraints be removed? Yes — 5 Passenger
No — 6 Passenger
Yes — 7 Passenger 5 Passenger: Only the head restraint
in the center position may be removed.
7 Passenger: The head restraint in the center position may be removed in the second row.
Can the buckle stalk be twisted to
tighten the seat belt against the belt path of the child restraint? No
Do not twist the buckle stalk in a
seating position with an ALR retractor.
Installing A Child Restraint With A Switchable
Automatic Locking Retractor (ALR):
Child restraint systems are designed to be secured in
vehicle seats by lap belts or the lap belt portion of a
lap/shoulder belt.
WARNING!
•Improper installation or failure to properly secure a
child restraint can lead to failure of the restraint. The
child could be badly injured or killed.
• Follow the child restraint manufacturer ’s directions
exactly when installing an infant or child restraint.
246 SAFETY
Page 253 of 592
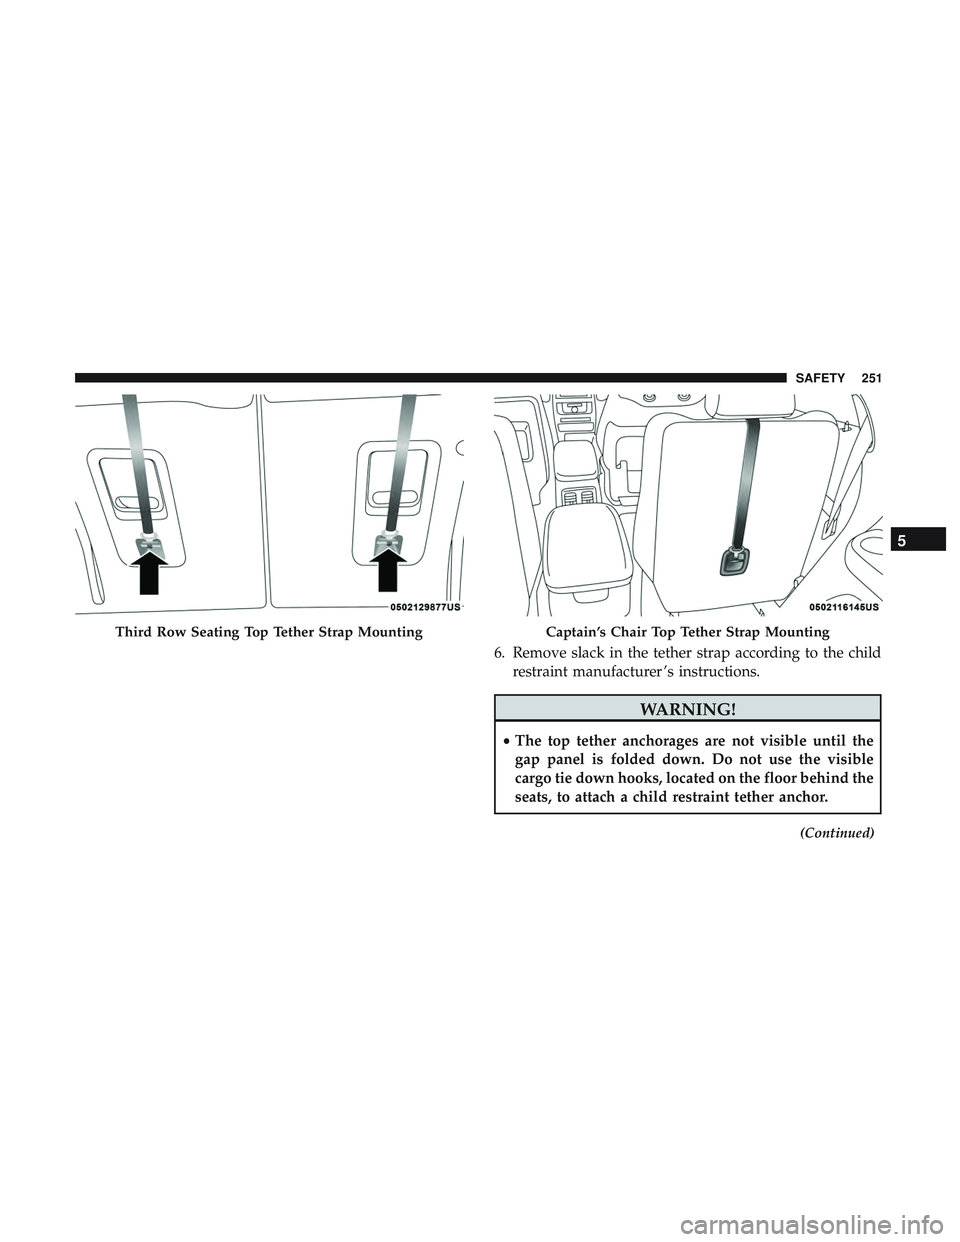
6. Remove slack in the tether strap according to the childrestraint manufacturer ’s instructions.
WARNING!
•The top tether anchorages are not visible until the
gap panel is folded down. Do not use the visible
cargo tie down hooks, located on the floor behind the
seats, to attach a child restraint tether anchor.
(Continued)
Third Row Seating Top Tether Strap MountingCaptain’s Chair Top Tether Strap Mounting
5
SAFETY 251
Page 254 of 592
WARNING!(Continued)
•An incorrectly anchored tether strap could lead to
increased head motion and possible injury to the
child. Use only the anchorage position directly be-
hind the child seat to secure a child restraint top
tether strap.
• If your vehicle is equipped with a split rear seat,
make sure the tether strap does not slip into the
opening between the seatbacks as you remove slack
in the strap.
Transporting Pets
Air Bags deploying in the front seat could harm your pet.
An unrestrained pet will be thrown about and possibly
injured, or injure a passenger during panic braking or in a
collision.
Pets should be restrained in the rear seat (if equipped) in
pet harnesses or pet carriers that are secured by seat belts.
SAFETY TIPS
Transporting Passengers
NEVER TRANSPORT PASSENGERS IN THE CARGO
AREA.
WARNING!
•Do not leave children or animals inside parked
vehicles in hot weather. Interior heat build-up may
cause serious injury or death.
• It is extremely dangerous to ride in a cargo area,
inside or outside of a vehicle. In a collision, people
riding in these areas are more likely to be seriously
injured or killed.
• Do not allow people to ride in any area of your
vehicle that is not equipped with seats and seat belts.
• Be sure everyone in your vehicle is in a seat and
using a seat belt properly.
252 SAFETY
Page 468 of 592
Special Care
•If you drive on salted or dusty roads or if you drive near
the ocean, hose off the undercarriage at least once a
month.
• It is important that the drain holes in the lower edges of
the doors, rocker panels, and trunk be kept clear and
open.
• If you detect any stone chips or scratches in the paint,
touch them up immediately. The cost of such repairs is
considered the responsibility of the owner.
• If your vehicle is damaged due to a collision or similar
cause that destroys the paint and protective coating,
have your vehicle repaired as soon as possible. The cost
of such repairs is considered the responsibility of the
owner.
• If you carry special cargo such as chemicals, fertilizers,
de-icer salt, etc., be sure that such materials are well
packaged and sealed.
• If a lot of driving is done on gravel roads, consider mud
or stone shields behind each wheel.
• Use Mopar Touch Up Paint on scratches as soon as
possible. An authorized dealer has touch up paint to
match the color of your vehicle.
INTERIORS
Seats And Fabric Parts
Use Mopar Total Clean to clean fabric upholstery and
carpeting.
WARNING!
Do not use volatile solvents for cleaning purposes.
Many are potentially flammable, and if used in closed
areas they may cause respiratory harm.
Seat Belt Maintenance
Do not bleach, dye or clean the belts with chemical solvents
or abrasive cleaners. This will weaken the fabric. Sun
damage can also weaken the fabric.
If the belts need cleaning, use a mild soap solution or
lukewarm water. Do not remove the belts from the vehicle
to wash them. Dry with a soft cloth.
Replace the belts if they appear frayed or worn or if the
buckles do not work properly.
466 SERVICING AND MAINTENANCE