display DODGE DURANGO 2019 Owners Manual
[x] Cancel search | Manufacturer: DODGE, Model Year: 2019, Model line: DURANGO, Model: DODGE DURANGO 2019Pages: 598, PDF Size: 4.32 MB
Page 340 of 598
Changing LaneSense Status
The LaneSense system has settings to adjust the intensity of
the torque warning and the warning zone sensitivity
(early/late) that you can configure through the Uconnect
system screen. Refer to “Uconnect Settings” in “Multime-
dia” for further information.
NOTE:
•When enabled the system operates above 37 mph
(60 km/h) and below 112 mph (180 km/h).
• Use of the turn signal suppresses the warnings.
• The system will not apply torque to the steering wheel
whenever a safety system engages (anti-lock brakes,
traction control system, electronic stability control, for-
ward collision warning, etc.).
PARKVIEW REAR BACK UP CAMERA
Your vehicle is equipped with the ParkView Rear Back Up
Camera that allows you to see an on-screen image of the
rear surroundings of your vehicle whenever the gear
selector is put into REVERSE. The image will be displayed
on the Navigation/Multimedia radio display screen along
with a caution note to “check entire surroundings” across the top of the screen. After five seconds this note will
disappear. The ParkView camera is located on the rear of
the vehicle above the rear license plate.
When the vehicle is shifted out of REVERSE (with camera
delay turned off), the rear camera mode is exited and the
navigation or audio screen appears again.
Manual Activation Of The Rear View Camera
1. Press the “Controls” button located on the bottom of the
Uconnect display.
2. Press the “Backup Camera” button to turn the Rear View Camera system on.
NOTE: The ParkView Rear Back Up Camera has program-
mable modes of operation that may be selected through the
Uconnect System.
Refer to “Uconnect Settings” in “Multimedia” for further
information.
When the vehicle is shifted out of REVERSE (with camera
delay turned off), the rear camera mode is exited and the
previous screen appears again. When the vehicle is shifted
out of REVERSE (with camera delay turned on), the camera
image will continue to be displayed for up to ten seconds
after shifting out of REVERSE unless the vehicle speed
338 STARTING AND OPERATING
Page 341 of 598
![DODGE DURANGO 2019 Owners Manual exceeds 8 mph (13 km/h), the vehicle is shifted into PARK,
the vehicle’s ignition is cycled to the OFF position, or the
user presses image defeat [X] to exit out of the camera
video display.
When en DODGE DURANGO 2019 Owners Manual exceeds 8 mph (13 km/h), the vehicle is shifted into PARK,
the vehicle’s ignition is cycled to the OFF position, or the
user presses image defeat [X] to exit out of the camera
video display.
When en](/img/12/40504/w960_40504-340.png)
exceeds 8 mph (13 km/h), the vehicle is shifted into PARK,
the vehicle’s ignition is cycled to the OFF position, or the
user presses image defeat [X] to exit out of the camera
video display.
When enabled, active guide lines are overlaid on the image
to illustrate the width of the vehicle and its projected
backup path based on the steering wheel position. Adashed center line overlay indicates the center of the
vehicle to assist with parking or aligning to a hitch/
receiver. Different colored zones indicate the distance to the
rear of the vehicle.
The following table shows the approximate distances for
each zone:
Zone
Distance To The Rear Of The Vehicle
Red 0-1ft(0-30cm)
Yellow 1 ft - 6.5 ft (30 cm-2m)
Green 6.5 ft or greater (2 m or greater)
WARNING!
Drivers must be careful when backing up even when
using the ParkView Rear Back Up Camera. Always
check carefully behind your vehicle, and be sure to
check for pedestrians, animals, other vehicles, obstruc-
tions, or blind spots before backing up. You are re-
sponsible for the safety of your surroundings and must
continue to pay attention while backing up. Failure to
do so can result in serious injury or death.
CAUTION!
•To avoid vehicle damage, ParkView should only be
used as a parking aid. The ParkView camera is
unable to view every obstacle or object in your drive
path.
• To avoid vehicle damage, the vehicle must be driven
slowly when using ParkView to be able to stop in
time when an obstacle is seen. It is recommended
that the driver look frequently over his/her shoulder
when using ParkView.
6
STARTING AND OPERATING 339
Page 356 of 598
NOTE:This module has been designed and verified with
electric trailer brakes and new electric over hydraulic
systems. Some previous EOH systems may not be compat-
ible with ITBM. The user interface consists of the following:
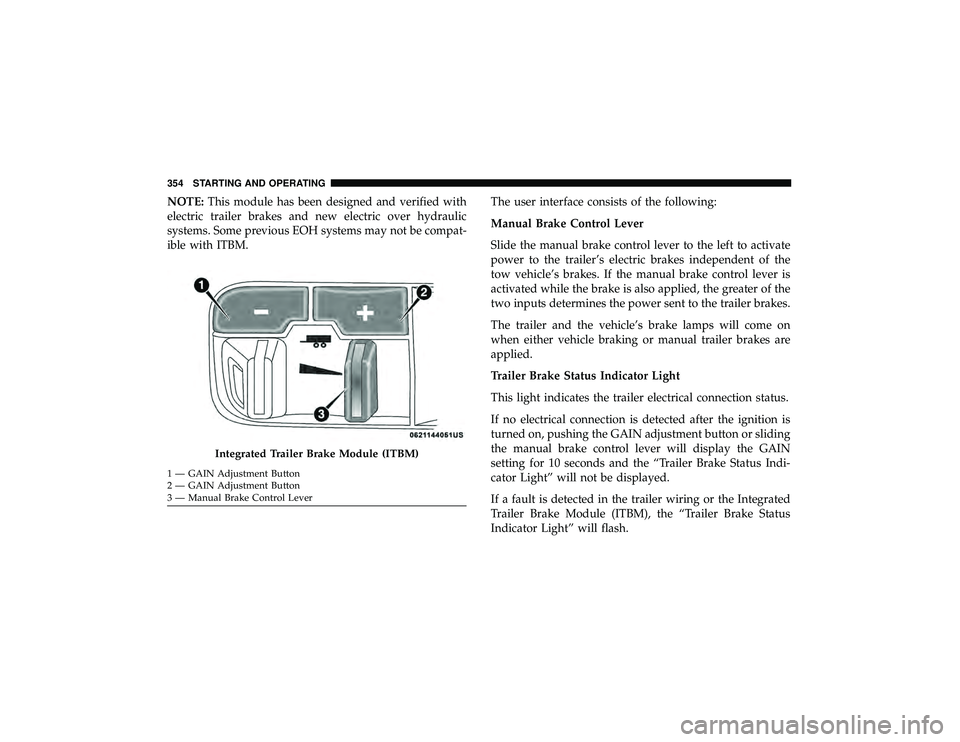
Manual Brake Control Lever
Slide the manual brake control lever to the left to activate
power to the trailer’s electric brakes independent of the
tow vehicle’s brakes. If the manual brake control lever is
activated while the brake is also applied, the greater of the
two inputs determines the power sent to the trailer brakes.
The trailer and the vehicle’s brake lamps will come on
when either vehicle braking or manual trailer brakes are
applied.
Trailer Brake Status Indicator Light
This light indicates the trailer electrical connection status.
If no electrical connection is detected after the ignition is
turned on, pushing the GAIN adjustment button or sliding
the manual brake control lever will display the GAIN
setting for 10 seconds and the “Trailer Brake Status Indi-
cator Light” will not be displayed.
If a fault is detected in the trailer wiring or the Integrated
Trailer Brake Module (ITBM), the “Trailer Brake Status
Indicator Light” will flash.
Integrated Trailer Brake Module (ITBM)
1 — GAIN Adjustment Button
2 — GAIN Adjustment Button
3 — Manual Brake Control Lever 354 STARTING AND OPERATING
Page 357 of 598
GAIN Adjustment Buttons (+/-)
Pushing these buttons will adjust the brake control power
output to the trailer brakes in 0.5 increments. The GAIN
setting can be increased to a maximum of 10 or decreased
to a minimum of 0 (no trailer braking).
GAIN
The GAIN setting is used to set the trailer brake control for
the specific towing condition and should be changed as
towing conditions change. Changes to towing conditions
include trailer load, vehicle load, road conditions and
weather.
Adjusting GAIN
NOTE:This should only be performed in a traffic free
environment at speeds of approximately 20–25 mph
(30–40 km/h).
1. Make sure the trailer brakes are in good working condition, functioning normally and properly adjusted.
See your trailer dealer if necessary.
2. Hook up the trailer and make the electrical connections according to the trailer manufacturer’s instructions. 3. When a trailer with electric/EOH brakes is plugged in,
the trailer connected message should appear in the
instrument cluster display (if the connection is not
recognized by the ITBM, braking functions will not be
available), the GAIN setting will illuminate and the
correct type of trailer must be selected from the instru-
ment cluster display options.
4. Push the UP or DOWN button on the steering wheel until “TRAILER TOW” appears on the screen.
5. Push the RIGHT arrow on the steering wheel to enter “TRAILER TOW”.
6. Push the UP or DOWN buttons until the Trailer Brake Type appears on the screen.
7. Push the RIGHT arrow and then push the UP or DOWN buttons until the proper Trailer Brake Type appears on
the screen.
8. In a traffic-free environment, tow the trailer on a dry, level surface at a speed of 20–25 mph (30–40 km/h) and
squeeze the manual brake control lever completely.
9. If the trailer wheels lockup (indicated by squealing tires), reduce the GAIN setting; if the trailer wheels turn
freely, increase the GAIN setting.
6
STARTING AND OPERATING 355
Page 358 of 598
Repeat steps 8 and 9 until the GAIN setting is at a point just
below trailer wheel lockup. If towing a heavier trailer,
trailer wheel lockup may not be attainable even with the
maximum GAIN setting of 10.
Display Messages
The trailer brake control interacts with the instrument
cluster display. Display messages, along with a single
chime, will be displayed when a malfunction is determined
in the trailer connection, trailer brake control, or on the
trailer. Refer to “Instrument Cluster Display” in “Getting
To Know Your Instrument Panel” for further information.
WARNING!
Connecting a trailer that is not compatible with the
ITBM system may result in reduced or complete loss of
trailer braking. There may be a increase in stopping
distance or trailer instability which could result in
personal injury.
CAUTION!
Connecting a trailer that is not compatible with the
ITBM system may result in reduced or complete loss of
trailer braking. There may be a increase in stopping
distance or trailer instability which could result in
damage to your vehicle, trailer, or other property.
NOTE:
• An aftermarket controller may be available for use with
trailers with air or electric-over-hydraulic trailer brake
systems. To determine the type of brakes on your trailer
and the availability of controllers, check with your
trailer manufacturer or dealer.
• Removal of the ITBM will cause errors and it may cause
damage to the electrical system and electronic modules
of the vehicle. See your authorized dealer if an aftermar-
ket module is to be installed.
Towing Requirements — Trailer Lights And Wiring
Whenever you pull a trailer, regardless of the trailer size,
stoplights and turn signals on the trailer are required for
motoring safety.
356 STARTING AND OPERATING
Page 377 of 598
WARNING!
•If anyone in the vehicle could be in danger (e.g., fire
or smoke is visible, dangerous road conditions or
location), do not wait for voice contact from an
Emergency Services Agent. All occupants should exit
the vehicle immediately and move to a safe location.
• Never place anything on or near the vehicle’s oper-
able network and GPS antennas. You could prevent
operable network and GPS signal reception, which
can prevent your vehicle from placing an emergency
call. An operable network and GPS signal reception
is required for the SOS Call system to function
properly.
• The SOS Call system is embedded into the vehicle’s
electrical system. Do not add aftermarket electrical
equipment to the vehicle’s electrical system. This
may prevent your vehicle from sending a signal to
initiate an emergency call. To avoid interference that
can cause the SOS Call system to fail, never add
aftermarket equipment (e.g., two-way mobile radio,
CB radio, data recorder, etc.) to your vehicle’s electri-
cal system or modify the antennas on your vehicle. IF
YOUR VEHICLE LOSES BATTERY POWER FOR
(Continued)
WARNING! (Continued)
ANY REASON (INCLUDING DURING OR AFTER
AN ACCIDENT), THE UCONNECT FEATURES,
APPS AND SERVICES, AMONG OTHERS, WILL
NOT OPERATE.
• Modifications to any part of the SOS Call system
could cause the air bag system to fail when you need
it. You could be injured if the air bag system is not
there to help protect you.
SOS Call System Limitations
Vehicles sold in Mexico DO NOThave SOS Call system
capabilities.
SOS or other emergency line operators in Mexico may not
answer or respond to SOS system calls.
If the SOS Call system detects a malfunction, any of the
following may occur at the time the malfunction is de-
tected, and at the beginning of each ignition cycle:
• The Rearview Mirror light located between the ASSIST
and SOS buttons will continuously be illuminated red.
• The Device Screen will display the following message
“Vehicle device requires service. Please contact your
dealer.”
7
IN CASE OF EMERGENCY 375
Page 419 of 598
SCHEDULED SERVICING
Your vehicle is equipped with an automatic oil change
indicator system. The oil change indicator system will
remind you that it is time to take your vehicle in for
scheduled maintenance.
Based on engine operation conditions, the oil change
indicator message will illuminate. This means that service
is required for your vehicle. Operating conditions such as
frequent short-trips, trailer tow, extremely hot or cold
ambient temperatures, and E85 fuel usage will influence
when the “Oil Change Required” message is displayed.
Severe Operating Conditions can cause the change oil
message to illuminate as early as 3,500 miles (5,600 km)
since last reset. Have your vehicle serviced as soon as
possible, within the next 500 miles (800 km).
Your authorized dealer will reset the oil change indicator
message after completing the scheduled oil change.
NOTE:Under no circumstances should oil change inter-
vals exceed 10,000 miles (16,000 km), twelve months or 350
hours of engine run time, whichever comes first. The 350
hours of engine run or idle time is generally only a concern
for fleet customers. Severe Duty All Models
Change Engine Oil at 4,000 miles (6,500 km) or 350 hours of
engine run time if the vehicle is operated in a dusty and off
road environment or is operated predominately at idle or
only very low engine RPM’s. This type of vehicle use is
considered Severe Duty.
Once A Month Or Before A Long Trip:
•
Check engine oil level
• Check windshield washer fluid level
• Check the tire inflation pressures and look for unusual
wear or damage
• Check the fluid levels of the coolant reservoir, brake
master cylinder and fill as needed.
• Check function of all interior and exterior lights
Maintenance Plan
Required Maintenance
Refer to the Maintenance Plans on the following pages for
required maintenance.
8
SERVICING AND MAINTENANCE 417
Page 426 of 598
Checking Oil Level
To assure proper lubrication of your vehicle’s engine, the
engine oil must be maintained at the correct level. Check
the oil level at regular intervals, such as every fuel stop.
The best time to check the engine oil level is about five
minutes after a fully warmed up engine is shut off.
Checking the oil while the vehicle is on level ground will
improve the accuracy of the oil level readings. Always
maintain the oil level within the SAFE zone on the dipstick.
Adding one quart of oil when the reading is at the bottom
of the SAFE zone will result in a reading at the top of the
safe zone on these engines.
CAUTION!
Overfilling or underfilling will cause oil aeration or
loss of oil pressure. This could damage your engine.
Adding Washer Fluid
The instrument cluster display will indicate when the
washer fluid level is low. When the sensor detects a low
fluid level, the windshield will light on the vehicle graphic
outline and the “WASHER FLUID LOW” message will be
displayed.The fluid reservoir for the windshield washers and the rear
window washer is shared. The fluid reservoir is located in
the engine compartment, be sure to check the fluid level at
regular intervals. Fill the reservoir with windshield washer
solvent only (not radiator antifreeze). When refilling the
washer fluid reservoir, take some washer fluid and apply it
to a cloth or towel and wipe clean the wiper blades, this
will help blade performance. To prevent freeze-up of your
windshield washer system in cold weather, select a solu-
tion or mixture that meets or exceeds the temperature
range of your climate. This rating information can be found
on most washer fluid containers.
WARNING!
Commercially available windshield washer solvents
are flammable. They could ignite and burn you. Care
must be exercised when filling or working around the
washer solution.
Maintenance-Free Battery
Your vehicle is equipped with a maintenance-free battery.
You will never have to add water, nor is periodic mainte-
nance required.
424 SERVICING AND MAINTENANCE
Page 472 of 598
CAUTION!(Continued)
•Observe the traction device manufacturer ’s instruc-
tions on the method of installation, operating speed,
and conditions for use. Always use the suggested
operating speed of the device manufacturer ’s if it is
less than 30 mph (48 km/h).
• Do not use traction devices on a compact spare tire.
Tire Rotation Recommendations
The tires on the front and rear of your vehicle operate at
different loads and perform different steering, handling,
and braking functions. For these reasons, they wear at
unequal rates.
These effects can be reduced by timely rotation of tires. The
benefits of rotation are especially worthwhile with aggres-
sive tread designs such as those on On/Off-Road type tires.
Rotation will increase tread life, help to maintain mud,
snow, and wet traction levels, and contribute to a smooth,
quiet ride.
Refer to the “Maintenance Plan” for the proper mainte-
nance intervals. More frequent rotation is permissible if
desired. The reasons for any rapid or unusual wear should
be corrected prior to rotation being performed. NOTE:
The premium Tire Pressure Monitor System will
automatically locate the pressure values displayed in the
correct vehicle position following a tire rotation.
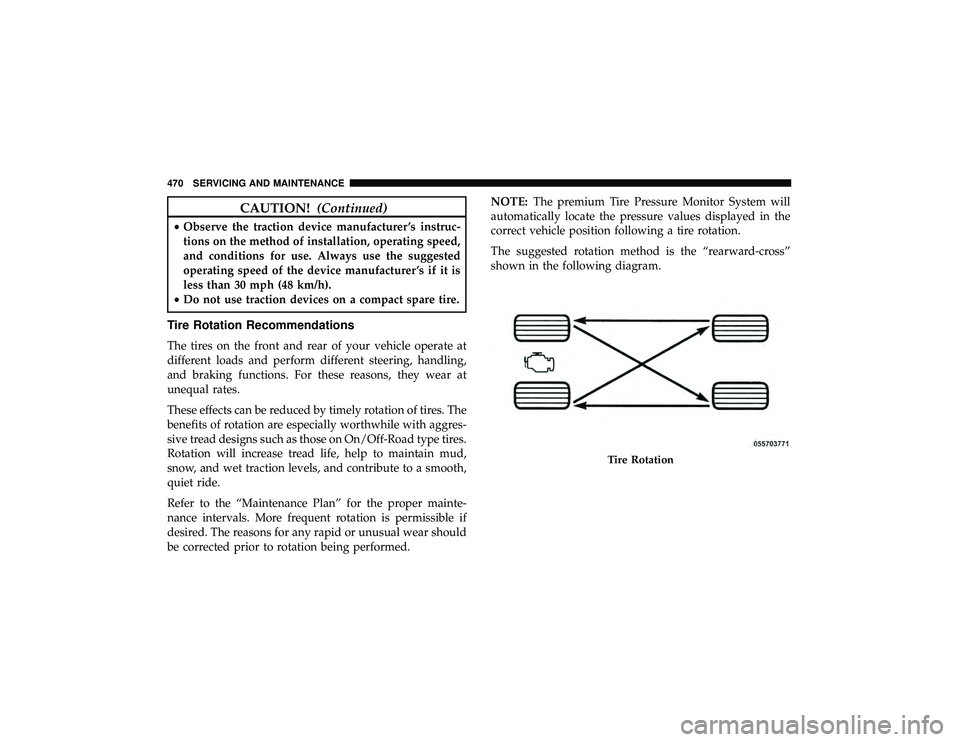
The suggested rotation method is the “rearward-cross”
shown in the following diagram.
Tire Rotation
470 SERVICING AND MAINTENANCE
Page 498 of 598
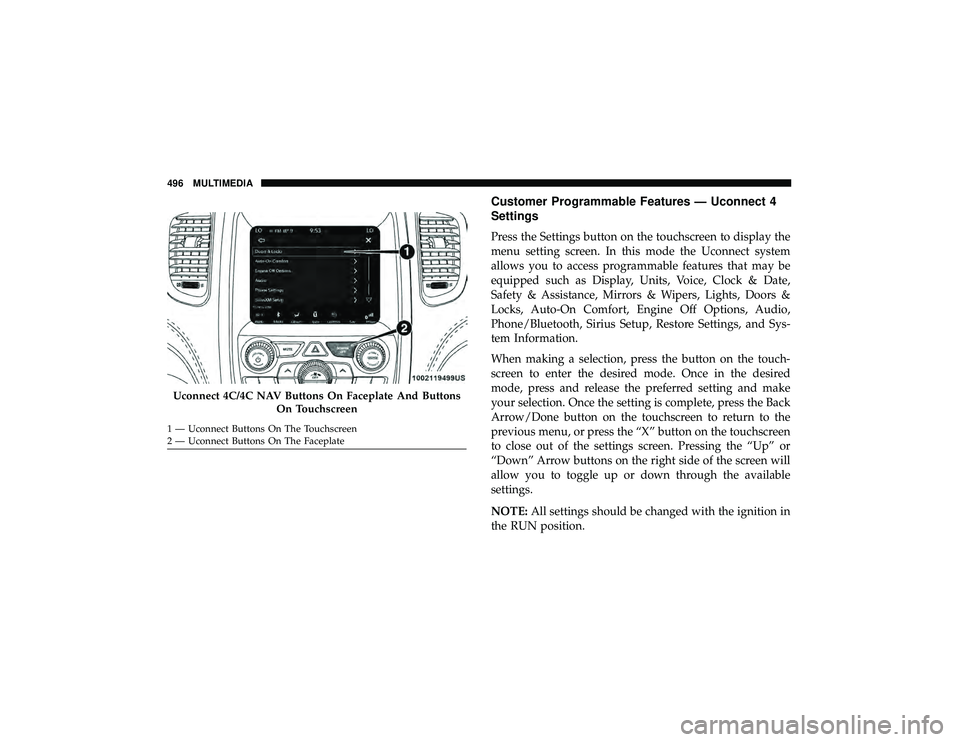
Customer Programmable Features — Uconnect 4
Settings
Press the Settings button on the touchscreen to display the
menu setting screen. In this mode the Uconnect system
allows you to access programmable features that may be
equipped such as Display, Units, Voice, Clock & Date,
Safety & Assistance, Mirrors & Wipers, Lights, Doors &
Locks, Auto-On Comfort, Engine Off Options, Audio,
Phone/Bluetooth, Sirius Setup, Restore Settings, and Sys-
tem Information.
When making a selection, press the button on the touch-
screen to enter the desired mode. Once in the desired
mode, press and release the preferred setting and make
your selection. Once the setting is complete, press the Back
Arrow/Done button on the touchscreen to return to the
previous menu, or press the “X” button on the touchscreen
to close out of the settings screen. Pressing the “Up” or
“Down” Arrow buttons on the right side of the screen will
allow you to toggle up or down through the available
settings.
NOTE:All settings should be changed with the ignition in
the RUN position.
Uconnect 4C/4C NAV Buttons On Faceplate And Buttons
On Touchscreen
1 — Uconnect Buttons On The Touchscreen
2 — Uconnect Buttons On The Faceplate 496 MULTIMEDIA