heating DODGE DURANGO 2019 Owners Manual
[x] Cancel search | Manufacturer: DODGE, Model Year: 2019, Model line: DURANGO, Model: DODGE DURANGO 2019Pages: 598, PDF Size: 4.32 MB
Page 61 of 598
WARNING!
•Persons who are unable to feel pain to the skin
because of advanced age, chronic illness, diabetes,
spinal cord injury, medication, alcohol use, exhaus-
tion or other physical condition must exercise care
when using the seat heater. It may cause burns even
at low temperatures, especially if used for long
periods of time.
• Do not place anything on the seat or seatback that
insulates against heat, such as a blanket or cushion.
This may cause the seat heater to overheat. Sitting in
a seat that has been overheated could cause serious
burns due to the increased surface temperature of the
seat.
Front Heated Seats
The front heated seat control buttons are located within the
climate or controls screen of the touchscreen.
You can choose from HI, LO, or OFF heat settings. The
indicator arrows in touchscreen buttons indicate the level
of heat in use. Two indicator arrows will illuminate for HI,
and one for LO. Turning the heating elements off will
return the user to the radio screen. •
Press the heated seat button
once to turn the HI
setting on.
• Press the heated seat buttona second time to turn
the LO setting on.
• Press the heated seat buttona third time to turn the
heating elements off.
NOTE:
• Once a heat setting is selected, heat will be felt within
two to five minutes.
• The engine must be running for the heated seats to
operate.
• The level of heat selected will stay on until the operator
changes it.
Vehicles Equipped With Remote Start
On models that are equipped with remote start, the heated
seats can be programmed to come on during a remote start.
This feature can be programmed through the Uconnect
system. Refer to “Uconnect Settings” in “Multimedia” for
further information.
3
GETTING TO KNOW YOUR VEHICLE 59
Page 62 of 598
WARNING!
•Persons who are unable to feel pain to the skin
because of advanced age, chronic illness, diabetes,
spinal cord injury, medication, alcohol use, exhaus-
tion or other physical condition must exercise care
when using the seat heater. It may cause burns even
at low temperatures, especially if used for long
periods of time.
• Do not place anything on the seat or seatback that
insulates against heat, such as a blanket or cushion.
This may cause the seat heater to overheat. Sitting in
a seat that has been overheated could cause serious
burns due to the increased surface temperature of the
seat.
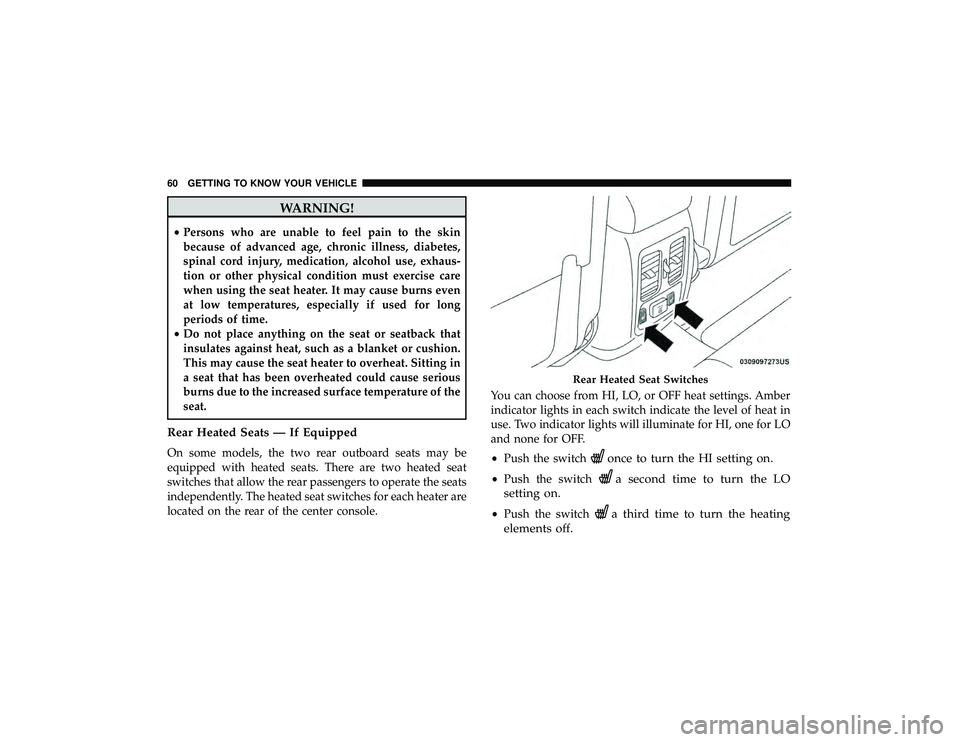
Rear Heated Seats — If Equipped
On some models, the two rear outboard seats may be
equipped with heated seats. There are two heated seat
switches that allow the rear passengers to operate the seats
independently. The heated seat switches for each heater are
located on the rear of the center console. You can choose from HI, LO, or OFF heat settings. Amber
indicator lights in each switch indicate the level of heat in
use. Two indicator lights will illuminate for HI, one for LO
and none for OFF.
•
Push the switchonce to turn the HI setting on.
•Push the switcha second time to turn the LO
setting on.
• Push the switcha third time to turn the heating
elements off.
Rear Heated Seat Switches
60 GETTING TO KNOW YOUR VEHICLE
Page 71 of 598
WARNING!
Do not adjust the steering column while driving.
Adjusting the steering column while driving or driv-
ing with the steering column unlocked, could cause the
driver to lose control of the vehicle. Failure to follow
this warning may result in serious injury or death.
Heated Steering Wheel — If Equipped
The steering wheel contains a heating element that helps
warm your hands in cold weather. The heated steering
wheel has only one temperature setting. Once the heated
steering wheel has been turned on, it will stay on until the
operator turns it off. The heated steering wheel may not
turn on when it is already warm.
The heated steering wheel control button is located on the
center of the instrument panel below the touchscreen and
within the climate or controls screen of the touchscreen.
•Push the heated steering wheel button
once to turn
the heating element on.
• Push the heated steering wheel buttona second time
to turn the heating element off.
NOTE: The engine must be running for the heated steering
wheel to operate.
Vehicles Equipped With Remote Start
On models that are equipped with remote start, the heated
steering wheel can be programmed to come on during a
remote start.
This feature can be programmed through the Uconnect
system. Refer to “Uconnect Settings” in “Multimedia” for
further information.
WARNING!
• Persons who are unable to feel pain to the skin
because of advanced age, chronic illness, diabetes,
spinal cord injury, medication, alcohol use, exhaus-
tion, or other physical conditions must exercise care
when using the steering wheel heater. It may cause
burns even at low temperatures, especially if used
for long periods.
• Do not place anything on the steering wheel that
insulates against heat, such as a blanket or steering
wheel covers of any type and material. This may
cause the steering wheel heater to overheat.
3
GETTING TO KNOW YOUR VEHICLE 69
Page 104 of 598
CAUTION!
Interior air enters the Rear Automatic Temperature
Control System through an intake grille, located in the
right side trim panel behind the third row seats. The
heater outlets are located in the right side trim panel,
just behind the sliding door. Do not block or place
objects directly in front of the inlet grille or heater
outlets. The electrical system could overload causing
damage to the blower motor.
Rear Temperature Control
To change the temperature in the rear of the vehicle, push
the temperature buttons. The rear temperature settings are
displayed in the rear ATC panel.
When rear controls are locked by the front system, the Rear
Temperature Lock symbol on the ATC panel is illuminated
and any rear overhead adjustments are ignored.
When the Sync feature is active, the rear temperature is
synchronized to the driver ’s temperature setting. If the rear
temperature is changed, the Sync feature will deactivate.
Operating Tips
NOTE:Refer to the chart at the end of this section for
suggested control settings for various weather conditions.
Summer Operation
The engine cooling system must be protected with a
high-quality antifreeze coolant to provide proper corrosion
protection and to protect against engine overheating. A
solution of 50% OAT (Organic Additive Technology) cool-
ant that meets the requirements of FCA Material Standard
MS.90032 and 50% water is recommended. Refer to “Fluids
and Lubricants” in “Technical Specifications” for proper
coolant selection.
Winter Operation
Use of the Air Recirculation mode during winter months is
not recommended because it may cause window fogging.
Vacation/Storage
Before you store your vehicle, or keep it out of service (i.e.,
vacation) for two weeks or more, run the air conditioning
system at idle for about five minutes, in fresh air with the
blower setting on high. This will ensure adequate system
lubrication to minimize the possibility of compressor dam-
age when the system is started again.
102 GETTING TO KNOW YOUR VEHICLE
Page 105 of 598
Window Fogging
Interior fogging on the windshield can be quickly removed by
turning the mode selector to Defrost. The Defrost/Floor mode
can be used to maintain a clear windshield and provide
sufficient heating. If side window fogging becomes objection-
able, increase blower speed to improve airflow and clearing of
the side windows. Vehicle windows tend to fog on the inside
in mild but rainy or humid weather.
NOTE:
•Recirculate without A/C should not be used for long
periods, as fogging may occur.
• Automatic Temperature Controls (ATC) will automati-
cally adjust the climate control settings to reduce or
eliminate window fogging on the front windshield.
When this occurs, recirculation will be unavailable.
CAUTION!
Failure to follow these cautions can cause damage to
the heating elements:
•Use care when washing the inside of the rear win-
dow. Do not use abrasive window cleaners on the
(Continued)
CAUTION! (Continued)
interior surface of the window. Use a soft cloth and a
mild washing solution, wiping parallel to the heat-
ing elements. Labels can be peeled off after soaking
with warm water.
• Do not use scrapers, sharp instruments, or abrasive
window cleaners on the interior surface of the win-
dow.
• Keep all objects a safe distance from the window.
Outside Air Intake
Make sure the air intake, located directly in front of the
windshield, is free of obstructions, such as leaves. Leaves
collected in the air intake may reduce airflow, and if they
enter the plenum, they could plug the water drains. In
Winter months, make sure the air intake is clear of ice,
slush, and snow.
A/C Air Filter
The climate control system filters outside air containing
dust, pollen and some odors. Strong odors cannot be totally
filtered out. Refer to “Dealer Service” in “Servicing And
Maintenance” for filter replacement instructions.
3
GETTING TO KNOW YOUR VEHICLE 103
Page 121 of 598
3. Push and hold the Homelink button you want toprogram while you push and hold the hand-held trans-
mitter button.
4. Continue to hold both buttons and observe the indicator light. The Homelink indicator will flash slowly and then
rapidly after HomeLink has received the frequency
signal from the hand-held transmitter. Release both
buttons after the indicator light changes from slow to
rapid.
5. Push and hold the programmed HomeLink button and observe the indicator light.
• If the indicator light stays on constantly, programming
is complete and the garage door/device should acti-
vate when the HomeLink button is pushed.
• To program the two remaining HomeLink buttons,
repeat each step for each remaining button. DO NOT
erase the channels.
Canadian/Gate Operator Programming
For programming transmitters in Canada/United States
that require the transmitter signals to “time-out” after
several seconds of transmission: Canadian radio frequency laws require transmitter signals
to time-out (or quit) after several seconds of transmission,
which may not be long enough for HomeLink to pick up
the signal during programming. Similar to this Canadian
law, some U.S. gate operators are designed to time-out in
the same manner.
It may be helpful to unplug the device during the cycling
process to prevent possible overheating of the garage door
or gate motor.
1. Cycle the ignition to the ON/RUN position.
NOTE:
For vehicles equipped with Keyless Enter-N-Go,
place the ignition in the RUN position with the engine ON.
Make sure while programming HomeLink with the engine
ON that your vehicle is outside of your garage, or that the
garage door remains open at all times.
2. Place the hand-held transmitter 1 to 3 inches (3 to 8 cm) away from the HomeLink button you wish to program
while keeping the HomeLink indicator light in view.
3. Continue to push and hold the HomeLink button while you push and release (“cycle”) your hand-held trans-
mitter every two seconds until HomeLink has success-
fully accepted the frequency signal. The indicator light
will flash slowly and then rapidly when fully trained.
3
GETTING TO KNOW YOUR VEHICLE 119
Page 256 of 598
SAFETY TIPS
Transporting Passengers
NEVER TRANSPORT PASSENGERS IN THE CARGO
AREA.
WARNING!
•Do not leave children or animals inside parked
vehicles in hot weather. Interior heat build-up may
cause serious injury or death.
• It is extremely dangerous to ride in a cargo area,
inside or outside of a vehicle. In a collision, people
riding in these areas are more likely to be seriously
injured or killed.
• Do not allow people to ride in any area of your
vehicle that is not equipped with seats and seat belts.
• Be sure everyone in your vehicle is in a seat and
using a seat belt properly.
Exhaust Gas
WARNING!
Exhaust gases can injure or kill. They contain carbon
monoxide (CO), which is colorless and odorless.
Breathing it can make you unconscious and can even-
tually poison you. To avoid breathing (CO), follow
these safety tips:
•Do not run the engine in a closed garage or in
confined areas any longer than needed to move your
vehicle in or out of the area.
• If you are required to drive with the trunk/liftgate/
rear doors open, make sure that all windows are
closed and the climate control BLOWER switch is set
at high speed. DO NOT use the recirculation mode.
• If it is necessary to sit in a parked vehicle with the
engine running, adjust your heating or cooling con-
trols to force outside air into the vehicle. Set the
blower at high speed.
The best protection against carbon monoxide entry into the
vehicle body is a properly maintained engine exhaust
system.
254 SAFETY
Page 291 of 598
To Activate The Autostop Mode, The Following Must
Occur:
•The system must be in STOP/START READY state. A
STOP/START READY message will be displayed in the
instrument cluster display within the Stop/Start section.
Refer to “Instrument Cluster” in “Getting To Know Your
Instrument Panel” for further information.
• The vehicle must be completely stopped.
• The shifter must be in a forward gear and the brake
pedal depressed.
The engine will shut down, the tachometer will move to
the zero position and the Stop/Start telltale will illuminate
indicating you are in Autostop. Customer settings will be
maintained upon return to an engine running condition.
Refer to the “Stop/Start System” in the “Starting And
Operating” section for further information.
Possible Reasons The Engine Does Not Autostop
Prior to engine shut down, the system will check many safety
and comfort conditions to see if they are fulfilled. Detailed
information about the operation of the Stop/Start system may
be viewed in the instrument cluster display Stop/Start Screen.
In the following situations, the engine will not stop:
• Driver ’s seat belt is not buckled. •
Driver ’s door is not closed.
• Battery temperature is too warm or cold.
• Battery charge is low.
• The vehicle is on a steep grade.
• Cabin heating or cooling is in process and an acceptable
cabin temperature has not been achieved.
• HVAC is set to full defrost mode at a high blower speed.
• HVAC set to MAX A/C.
• Engine has not reached normal operating temperature.
• The transmission is not in a forward gear.
• Hood is open.
• Brake pedal is not pressed with sufficient pressure.
Other Factors Which Can Inhibit Autostop Include:
• Accelerator pedal input.
• Engine temp too high.
• 5 mph (8 km/h) threshold not achieved from previous
AUTOSTOP.
• Steering angle beyond threshold.
• ACC is on and speed is set.
6
STARTING AND OPERATING 289
Page 406 of 598
5. Start the engine in the vehicle that has the boosterbattery, let the engine idle a few minutes, and then start
the engine in the vehicle with the discharged battery.
CAUTION!
Do not run the booster vehicle engine above 2,000 rpm
since it provides no charging benefit, wastes fuel, and
can damage booster vehicle engine.
6. Once the engine is started, remove the jumper cables in the reverse sequence:
Disconnecting The Jumper Cables
1. Disconnect the negative (-)end of the jumper cable from
the remote negative (-)post of the discharged vehicle.
2. Disconnect the opposite end of the negative (-)jumper
cable from the negative (-)post of the booster battery.
3. Disconnect the positive (+)end of the jumper cable from
the positive (+)post of the booster battery.
4. Disconnect the opposite end of the positive (+)jumper
cable from the remote positive (+)post of the discharged
vehicle. 5. Reinstall the protective cover over the remote positive
(+) post of the discharged vehicle.
If frequent jump starting is required to start your vehicle
you should have the battery and charging system tested at
an authorized dealer.CAUTION!
Accessories plugged into the vehicle power outlets
draw power from the vehicle’s battery, even when not
in use (i.e., cellular devices, etc.). Eventually, if plugged
in long enough without engine operation, the vehicle’s
battery will discharge sufficiently to degrade battery
life and/or prevent the engine from starting.
IF YOUR ENGINE OVERHEATS
In any of the following situations, you can reduce the
potential for overheating by taking the appropriate action.
• On the highways — slow down.
• In city traffic — while stopped, place the transmission in
NEUTRAL, but do not increase the engine idle speed
while preventing vehicle motion with the brakes.
404 IN CASE OF EMERGENCY
Page 411 of 598
WARNING!
Fast spinning tires can be dangerous. Forces generated
by excessive wheel speeds may cause damage, or even
failure, of the axle and tires. A tire could explode and
injure someone. Do not spin your vehicle’s wheels
faster than 30 mph (48 km/h) or for longer than 30
seconds continuously without stopping when you are
stuck and do not let anyone near a spinning wheel, no
matter what the speed.
CAUTION!
•Racing the engine or spinning the wheels may lead
to transmission overheating and failure. Allow the
engine to idle with the transmission in NEUTRAL
for at least one minute after every five rocking-
motion cycles. This will minimize overheating and
(Continued)
CAUTION! (Continued)
reduce the risk of transmission failure during pro-
longed efforts to free a stuck vehicle.
• When “rocking” a stuck vehicle by shifting between
DRIVE and REVERSE, do not spin the wheels faster
than 15 mph (24 km/h), or drivetrain damage may
result.
• Revving the engine or spinning the wheels too fast
may lead to transmission overheating and failure. It
can also damage the tires. Do not spin the wheels
above 30 mph (48 km/h) while in gear (no transmis-
sion shifting occurring).
TOWING A DISABLED VEHICLE
This section describes procedures for towing a disabled
vehicle using a commercial towing service. If the transmis-
sion and drivetrain are operable, disabled vehicles may
also be towed as described under “Recreational Towing” in
“Starting And Operating”.
7
IN CASE OF EMERGENCY 409