remote control DODGE DURANGO 2020 Owners Manual
[x] Cancel search | Manufacturer: DODGE, Model Year: 2020, Model line: DURANGO, Model: DODGE DURANGO 2020Pages: 464, PDF Size: 22.14 MB
Page 10 of 464

8
UCONNECT REAR SEAT ENTERTAINMENT
(RSE) SYSTEM — IF EQUIPPED......................... 425 Getting Started........................................... 425
Dual Video Screen ..................................... 426Blu-ray™ Disc Player ..................................427Play Video Games ......................................428
Play A DVD/Blu-ray™ Disc Using The
Touchscreen Radio ....................................428 Important Notes For Dual Video Screen
System ........................................................ 430 Blu-ray™ Disc Player Remote Control —
If Equipped .................................................430 Headphones Operation .............................431Controls ......................................................431
Replacing The Headphone Batteries........432Accessibility — If Equipped ........................ 432Stereo Headphone Lifetime Limited
Warranty .....................................................432
RADIO OPERATION AND MOBILE PHONES.... 436
Regulatory And Safety Information........... 436 UCONNECT VOICE RECOGNITION
QUICK TIPS ..........................................................438
Introducing Uconnect ................................ 438
Get Started ................................................. 438
Basic Voice Commands............................. 439Radio .......................................................... 439
Media.......................................................... 439
Phone ......................................................... 439Voice Text Reply — If Equipped ................. 440
Climate ....................................................... 440Navigation (4C NAV) .................................. 441Siri® Eyes Free — If Equipped ................. 441
Do Not Disturb .......................................... 441Android Auto™ — If Equipped ................... 442
Apple CarPlay® — If Equipped ................. 442
General Information .................................. 443Additional Information ............................... 443
CUSTOMER ASSISTANCE
SUGGESTIONS FOR OBTAINING SERVICE
FOR YOUR VEHICLE .......................................... 444
Prepare For The Appointment................... 444
Prepare A List............................................. 444
Be Reasonable With Requests ................. 444 IF YOU NEED ASSISTANCE ............................... 444
FCA US LLC Customer Center ................... 445
FCA Canada Inc. Customer Center ........... 445
In Mexico Contact ...................................... 445
Puerto Rico And US Virgin Islands ............ 445
Customer Assistance For The Hearing
Or Speech Impaired
(TDD/TTY) ................................................... 445 Service Contract ....................................... 445
WARRANTY INFORMATION .............................. 446
MOPAR PARTS................................................... 446
REPORTING SAFETY DEFECTS ........................ 446
In The 50 United States And
Washington, D.C. ....................................... 446 In Canada ................................................... 447
PUBLICATION ORDER FORMS ......................... 447
20_WD_OM_EN_USC_t.book Page 8
Page 17 of 464
GETTING TO KNOW YOUR VEHICLE15
1st Push Of Key Fob Unlock Button
This feature lets you program the system to
unlock either the driver's door or all doors on
the first push of the unlock button on the key
fob. To change the current setting, refer to
“Uconnect Settings” in “Multimedia” for further
information.
NOTE:
If the vehicle is equipped with Passive Entry,
refer to “Keyless Enter-N-Go — Passive Entry” in
“Doors” in this chapter for further information.
To Lock The Doors And Liftgate
Push and release the lock button on the key fob
to lock all doors and liftgate.
The turn signal lights will flash and the horn will
chirp to acknowledge the signal. Refer to
“Uconnect Settings” in “Multimedia” for further
programmable information.
If the vehicle is equipped with Passive Entry,
refer to “Keyless Enter-N-Go — Passive Entry” in
“Doors” in this chapter for further information. Vehicles Equipped With Keyless Enter-N-Go —
Passive Entry
If one or more doors are open, or the liftgate is
open, the doors will lock. The doors will unlock
again automatically if the key is left inside the
passenger compartment, otherwise the doors
will stay locked.
Replacing The Battery In The Key With
Remote Control
The recommended replacement battery is one
CR2032 battery.
NOTE:
Perchlorate Material — special handling may
apply. See www.dtsc.ca.gov/hazard
-
ouswaste/perchlorate for further informa -
tion.
Do not touch the battery terminals that are
on the back housing or the printed circuit
board.
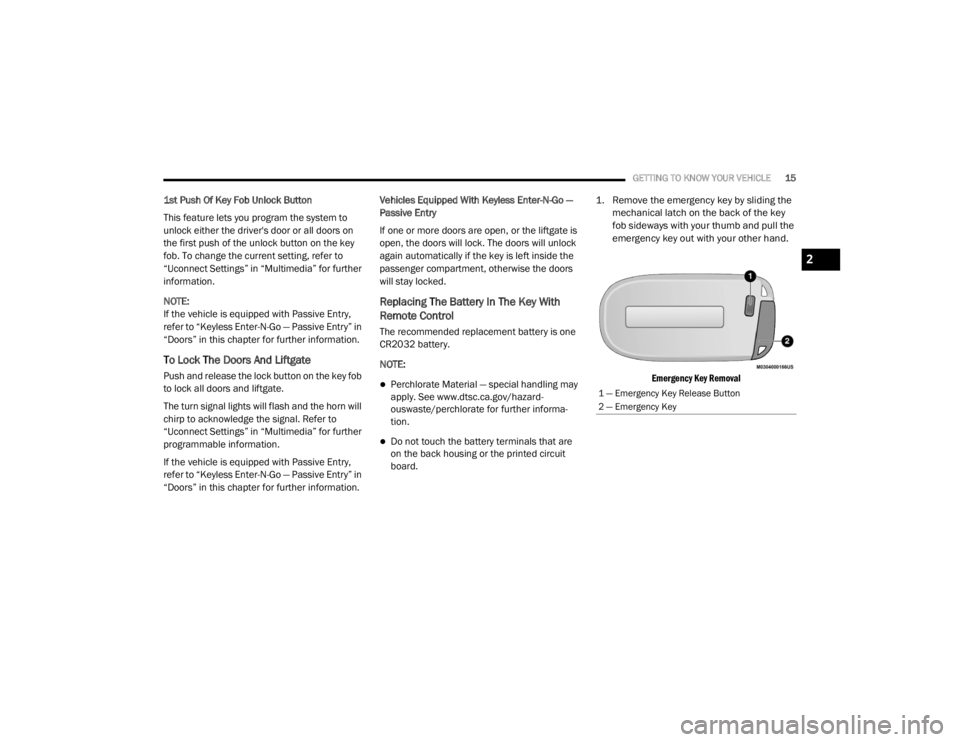
1. Remove the emergency key by sliding the
mechanical latch on the back of the key
fob sideways with your thumb and pull the
emergency key out with your other hand.
Emergency Key Removal
1 — Emergency Key Release Button
2 — Emergency Key
2
20_WD_OM_EN_USC_t.book Page 15
Page 18 of 464
16GETTING TO KNOW YOUR VEHICLE
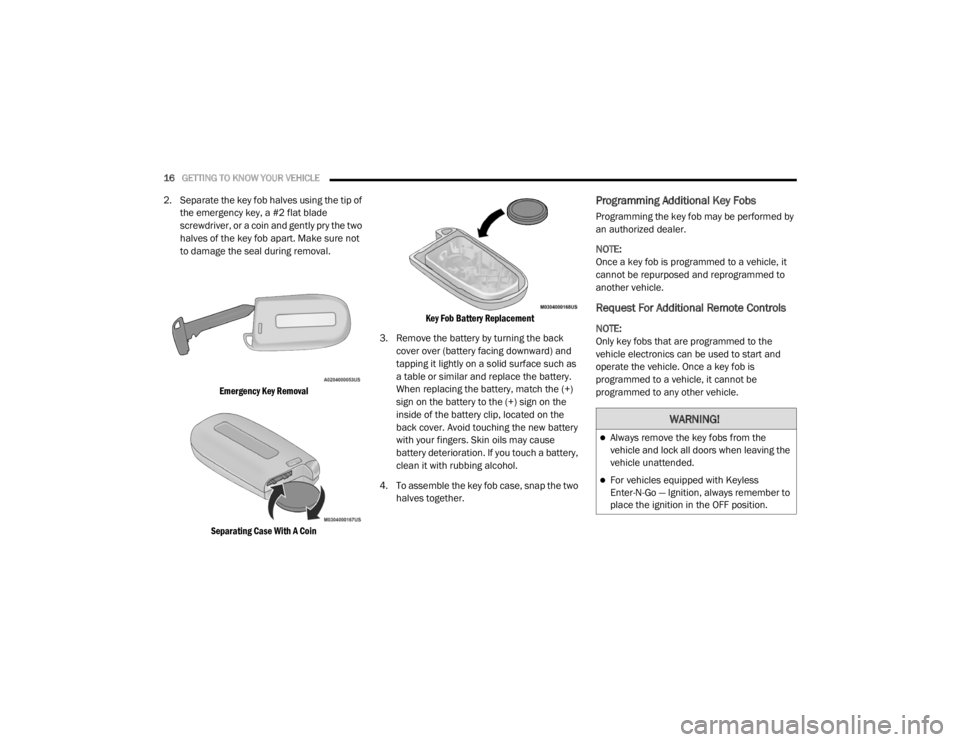
2. Separate the key fob halves using the tip of
the emergency key, a #2 flat blade
screwdriver, or a coin and gently pry the two
halves of the key fob apart. Make sure not
to damage the seal during removal.
Emergency Key Removal
Separating Case With A Coin Key Fob Battery Replacement
3. Remove the battery by turning the back cover over (battery facing downward) and
tapping it lightly on a solid surface such as
a table or similar and replace the battery.
When replacing the battery, match the (+)
sign on the battery to the (+) sign on the
inside of the battery clip, located on the
back cover. Avoid touching the new battery
with your fingers. Skin oils may cause
battery deterioration. If you touch a battery,
clean it with rubbing alcohol.
4. To assemble the key fob case, snap the two halves together.Programming Additional Key Fobs
Programming the key fob may be performed by
an authorized dealer.
NOTE:
Once a key fob is programmed to a vehicle, it
cannot be repurposed and reprogrammed to
another vehicle.
Request For Additional Remote Controls
NOTE:
Only key fobs that are programmed to the
vehicle electronics can be used to start and
operate the vehicle. Once a key fob is
programmed to a vehicle, it cannot be
programmed to any other vehicle.
WARNING!
Always remove the key fobs from the
vehicle and lock all doors when leaving the
vehicle unattended.
For vehicles equipped with Keyless
Enter-N-Go — Ignition, always remember to
place the ignition in the OFF position.
20_WD_OM_EN_USC_t.book Page 16
Page 21 of 464
GETTING TO KNOW YOUR VEHICLE19
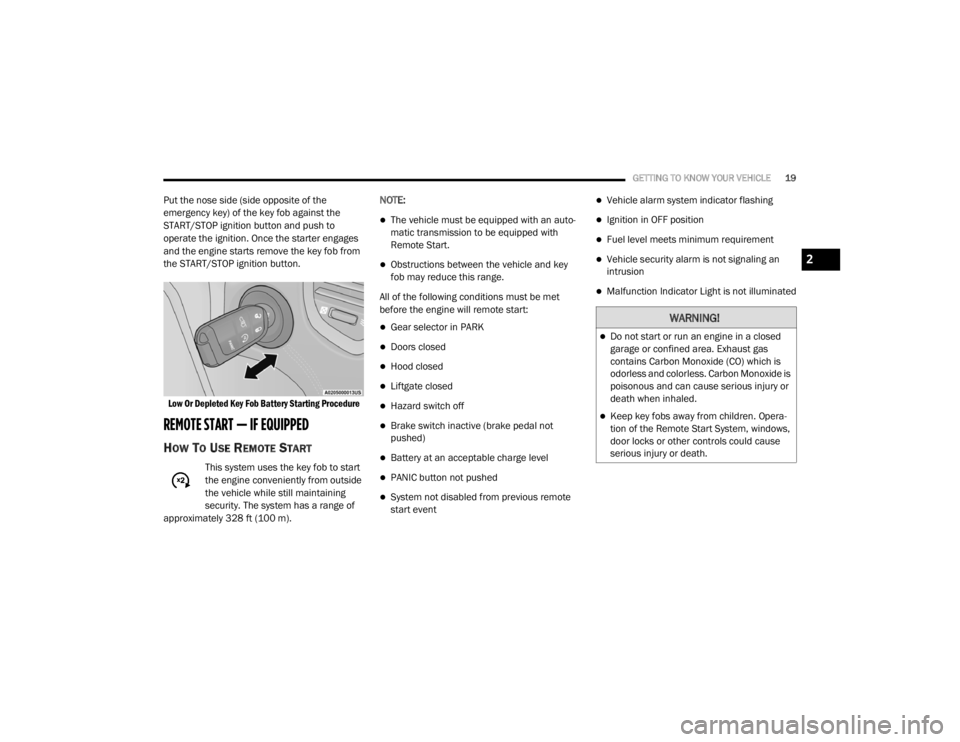
Put the nose side (side opposite of the
emergency key) of the key fob against the
START/STOP ignition button and push to
operate the ignition. Once the starter engages
and the engine starts remove the key fob from
the START/STOP ignition button.
Low Or Depleted Key Fob Battery Starting Procedure
REMOTE START — IF EQUIPPED
HOW TO USE REMOTE START
This system uses the key fob to start
the engine conveniently from outside
the vehicle while still maintaining
security. The system has a range of
approximately 328 ft (100 m). NOTE:
The vehicle must be equipped with an auto
-
matic transmission to be equipped with
Remote Start.
Obstructions between the vehicle and key
fob may reduce this range.
All of the following conditions must be met
before the engine will remote start:
Gear selector in PARK
Doors closed
Hood closed
Liftgate closed
Hazard switch off
Brake switch inactive (brake pedal not
pushed)
Battery at an acceptable charge level
PANIC button not pushed
System not disabled from previous remote
start event
Vehicle alarm system indicator flashing
Ignition in OFF position
Fuel level meets minimum requirement
Vehicle security alarm is not signaling an
intrusion
Malfunction Indicator Light is not illuminated
WARNING!
Do not start or run an engine in a closed
garage or confined area. Exhaust gas
contains Carbon Monoxide (CO) which is
odorless and colorless. Carbon Monoxide is
poisonous and can cause serious injury or
death when inhaled.
Keep key fobs away from children. Opera -
tion of the Remote Start System, windows,
door locks or other controls could cause
serious injury or death.
2
20_WD_OM_EN_USC_t.book Page 19
Page 44 of 464
42GETTING TO KNOW YOUR VEHICLE
FRONT VENTILATED SEATS — IF
E
QUIPPED
Located in the seat cushion and seatback are
fans that draw the air from the passenger
compartment and move air through fine
perforations in the seat cover to help keep the
driver and front passenger cooler in higher
ambient temperatures. The fans operate at two
speeds, HI and LO.
The front ventilated seats control buttons are
located within the Uconnect system. You can
gain access to the control buttons through the
climate screen or the controls screen.
Press the ventilated seat button once to
choose HI.
Press the ventilated seat button a second
time to choose LO.
Press the ventilated seat button a third
time to turn the ventilated seat off.
NOTE:
The engine must be running for the ventilated
seats to operate.
Vehicles Equipped With Remote Start
On models that are equipped with remote start,
the ventilated seats can be programmed to
come on during a remote start.
This feature can be programmed through the
Uconnect system. Refer to “Uconnect Settings”
in “Multimedia” for further information.
HEAD RESTRAINTS
Head restraints are designed to reduce the risk
of injury by restricting head movement in the
event of a rear impact. Head restraints should
be adjusted so that the top of the head restraint
is located above the top of your ear.
SUPPLEMENTAL ACTIVE HEAD
R
ESTRAINTS — FRONT SEATS
Active Head Restraints (AHR) are passive,
deployable components, and vehicles with this
equipment cannot be readily identified by any
markings, only through visual inspection of the
head restraint. The AHR will be split in two
halves, with the front half being soft foam and
trim, while the back half is decorative plastic.
Do not place anything on the seat or seat -
back that insulates against heat, such as a
blanket or cushion. This may cause the seat
heater to overheat. Sitting in a seat that has
been overheated could cause serious
burns due to the increased surface
temperature of the seat.
WARNING! (Continued)WARNING!
All occupants, including the driver, should
not operate a vehicle or sit in a vehicle’s
seat until the head restraints are placed in
their proper positions in order to minimize
the risk of neck injury in the event of a
crash.
Head restraints should never be adjusted
while the vehicle is in motion. Driving a
vehicle with the head restraints improperly
adjusted or removed could cause serious
injury or death in the event of a collision.
20_WD_OM_EN_USC_t.book Page 42
Page 49 of 464
GETTING TO KNOW YOUR VEHICLE47
HEATED STEERING WHEEL — IF
E
QUIPPED
The steering wheel contains a heating element
that helps warm your hands in cold weather.
The heated steering wheel has only one
temperature setting. Once the heated steering
wheel has been turned on, it will stay on until
the operator turns it off. The heated steering
wheel may not turn on when it is already warm. The heated steering wheel control button is
located on the center of the instrument panel
below the touchscreen and within the climate or
controls screen of the touchscreen.
Push the heated steering wheel button
once to turn the heating element on.
Push the heated steering wheel button a
second time to turn the heating element off.
NOTE:
The engine must be running for the heated
steering wheel to operate.
Vehicles Equipped With Remote Start
On models that are equipped with remote start,
the heated steering wheel can be programmed
to come on during a remote start.
This feature can be programmed through the
Uconnect system. Refer to “Uconnect Settings”
in “Multimedia” for further information.
MIRRORS
INSIDE DAY/NIGHT MIRROR — IF
E
QUIPPED
The mirror head can be adjusted up, down, left,
and right for various drivers. The mirror should
be adjusted to center on the view through the
rear window.
WARNING!
Do not adjust the steering column while
driving. Adjusting the steering column while
driving or driving with the steering column
unlocked, could cause the driver to lose
control of the vehicle. Failure to follow this
warning may result in serious injury or death.
WARNING!
Persons who are unable to feel pain to the
skin because of advanced age, chronic
illness, diabetes, spinal cord injury, medica -
tion, alcohol use, exhaustion, or other phys -
ical conditions must exercise care when
using the steering wheel heater. It may
cause burns even at low temperatures,
especially if used for long periods.
Do not place anything on the steering wheel
that insulates against heat, such as a
blanket or steering wheel covers of any type
and material. This may cause the steering
wheel heater to overheat.
2
20_WD_OM_EN_USC_t.book Page 47
Page 80 of 464
78GETTING TO KNOW YOUR VEHICLE
(Continued)
(Continued)
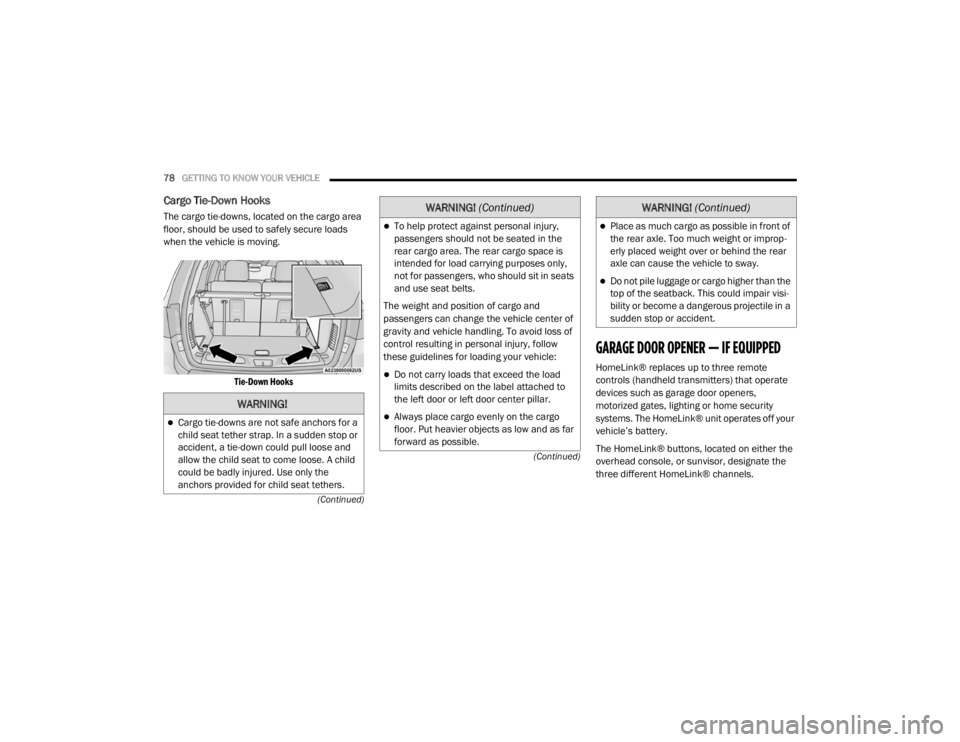
Cargo Tie-Down Hooks
The cargo tie-downs, located on the cargo area
floor, should be used to safely secure loads
when the vehicle is moving.
Tie-Down Hooks
GARAGE DOOR OPENER — IF EQUIPPED
HomeLink® replaces up to three remote
controls (handheld transmitters) that operate
devices such as garage door openers,
motorized gates, lighting or home security
systems. The HomeLink® unit operates off your
vehicle’s battery.
The HomeLink® buttons, located on either the
overhead console, or sunvisor, designate the
three different HomeLink® channels.
WARNING!
Cargo tie-downs are not safe anchors for a
child seat tether strap. In a sudden stop or
accident, a tie-down could pull loose and
allow the child seat to come loose. A child
could be badly injured. Use only the
anchors provided for child seat tethers.
To help protect against personal injury,
passengers should not be seated in the
rear cargo area. The rear cargo space is
intended for load carrying purposes only,
not for passengers, who should sit in seats
and use seat belts.
The weight and position of cargo and
passengers can change the vehicle center of
gravity and vehicle handling. To avoid loss of
control resulting in personal injury, follow
these guidelines for loading your vehicle:
Do not carry loads that exceed the load
limits described on the label attached to
the left door or left door center pillar.
Always place cargo evenly on the cargo
floor. Put heavier objects as low and as far
forward as possible.
WARNING! (Continued)
Place as much cargo as possible in front of
the rear axle. Too much weight or improp -
erly placed weight over or behind the rear
axle can cause the vehicle to sway.
Do not pile luggage or cargo higher than the
top of the seatback. This could impair visi-
bility or become a dangerous projectile in a
sudden stop or accident.
WARNING! (Continued)
20_WD_OM_EN_USC_t.book Page 78
Page 103 of 464

GETTING TO KNOW YOUR INSTRUMENT PANEL101
Five Second Stored Messages
When the appropriate conditions occur, this
type of message takes control of the main
display area for five seconds and then
returns to the previous screen. Most of the
messages of this type are then stored (as
long as the condition that activated it
remains active) and can be reviewed from
the “Messages” main menu item. Examples
of this message type are “Right Front Turn
Signal Lamp Out” and “Low Tire Pressure.”
Unstored Messages
This message type is displayed indefinitely or
until the condition that activated the
message is cleared. Examples of this
message type are “Turn Signal On” (if a turn
signal is left on) and “Lights On” (if driver
leaves the vehicle with the lights on).
Unstored Messages Until RUN
These messages deal primarily with the
Remote Start feature. This message type is
displayed until the ignition is in the RUN
state. Examples of this message type are
“Remote Start Canceled - Door Ajar” and
“Press Brake Pedal and Push Button to
Start.”
Five Second Unstored Messages
When the appropriate conditions occur, this
type of message takes control of the main
display area for five seconds and then
returns to the previous screen. An example of
this message type is “Automatic High Beams
On.”
ENGINE OIL LIFE RESET
Oil Change Required
Your vehicle is equipped with an engine oil
change indicator system. The “Oil Change
Required” message will display in the
instrument cluster display for five seconds after
a single chime has sounded, to indicate the next
scheduled oil change interval. The engine oil
change indicator system is duty cycle based,
which means the engine oil change interval may
fluctuate, dependent upon your personal
driving style.
Unless reset, this message will continue to
display each time the ignition is placed in the
ON/RUN position. To turn off the message
temporarily, push and release the OK or arrow
buttons. To reset the oil change indicator system (after
performing the scheduled maintenance), refer
to the following procedure.
Vehicles Equipped With Keyless Enter-N-Go —
Ignition
Use the steering wheel instrument cluster
display controls for the following procedure(s):
1. Without pressing the brake pedal, push the
ENGINE START/STOP button and place the
ignition in the ON/RUN position (do not
start the engine).
2. Push and release the down arrow button to
scroll downward through the main menu to
“Vehicle Info.”
3. Push and release the right arrow button to
access the ”Oil Life” screen.
4. Push and hold the OK button to reset oil life.
If conditions are met, the gauge and
numeric display will update to show 100%.
If conditions are not met a pop-up message
of “To reset oil life engine must be off with
ignition in run” will be displayed (for five
seconds), and the user will remain at the Oil
Life screen.
3
20_WD_OM_EN_USC_t.book Page 101
Page 104 of 464

102GETTING TO KNOW YOUR INSTRUMENT PANEL
5. Push and release the up or down arrow
button to exit the submenu screen.
NOTE:
If the indicator message illuminates when you
start the vehicle, the oil change indicator
system did not reset. If necessary, repeat this
procedure.
Secondary Method Of Resetting Engine Oil Life
1. Without pressing the brake pedal, push the ENGINE START/STOP button and place the
ignition to the ON/RUN position (do not
start the engine).
2. Fully press the accelerator pedal, slowly, three times within 10 seconds.
3. Without pushing the brake pedal, push the ENGINE START/STOP button once to return
the ignition to the OFF/LOCK position.
NOTE:
If the indicator message illuminates when you
start the vehicle, the oil change indicator
system did not reset. If necessary, repeat this
procedure.DISPLAY AND MESSAGES
Includes the following, but not limited to:
Front Seat Belts Unbuckled
Driver Seat Belt Unbuckled
Passenger Seat Belt Unbuckled
Traction Control Off
Washer Fluid Low
Oil Pressure Low
Oil Change Due
Fuel Low
Service Anti-lock Brake System
Service Electronic Throttle Control
Service Power Steering
Cruise Off
Cruise Ready
ACC Override
Cruise Set To XXX mph or km/h
Tire Pressure Screen With Low Tire(s)
Service Tire Pressure System
Park Brake Engaged
Brake Fluid Low
Engine Temperature Hot
Lights On
Right Front Turn Signal Light Out
Right Rear Turn Signal Light Out
Left Front Turn Signal Light Out
Left Rear Turn Signal Light Out
Ignition or Accessory On
Vehicle Not In Park
Remote Start Active Push Start Button
Remote Start Canceled Fuel Low
Remote Start Canceled Door Open
Remote Start Canceled Hood Open
Remote Start Canceled Liftgate Open
Remote Start Canceled Time Expired
Remote Start Disabled Start To Reset
20_WD_OM_EN_USC_t.book Page 102
Page 186 of 464
184 (Continued)
(Continued)
STARTING AND OPERATING
STARTING THE ENGINE
Before starting your vehicle, adjust your seat,
adjust the inside and outside mirrors, fasten
your seat belt, and if present, instruct all other
occupants to buckle their seat belts.
AUTOMATIC TRANSMISSION
The gear selector must be in the NEUTRAL (N) or
PARK (P) position before you can start the
engine. Apply the brakes before shifting into any
driving gear.
KEYLESS ENTER-N-GO — IGNITION
This feature allows the driver to operate the
ignition switch with the push of a button, as long
as the Remote Start/Keyless Enter-N-Go key
fob is in the passenger compartment.
WARNING!
Before exiting a vehicle, always come to a
complete stop, then shift the automatic
transmission into PARK and apply the
parking brake.
Always make sure the keyless ignition node
is in the OFF mode, key fob is removed from
the vehicle and vehicle is locked.
Never leave children alone in a vehicle, or
with access to an unlocked vehicle. Leaving
children in a vehicle unattended is
dangerous for a number of reasons. A child
or others could be seriously or fatally
injured. Children should be warned not to
touch the parking brake, brake pedal or the
gear selector.
Do not leave the key fob in or near the
vehicle, or in a location accessible to chil-
dren, and do not leave the ignition of a
vehicle equipped with Keyless Enter-N-Go
in the ACC or ON/RUN mode. A child could
operate power windows, other controls, or
move the vehicle.
Do not leave children or animals inside
parked vehicles in hot weather. Interior
heat build-up may cause serious injury or
death.
CAUTION!
Damage to the transmission may occur if the
following precautions are not observed:
WARNING!
(Continued)
Do not shift from REVERSE (R), PARK, or
NEUTRAL into any forward gear when the
engine is above idle speed.
Shift into PARK only after the vehicle has
come to a complete stop.
Shift into or out of REVERSE only after the
vehicle has come to a complete stop and
the engine is at idle speed.
Before shifting into any gear, make sure
your foot is firmly on the brake pedal.
CAUTION! (Continued)
20_WD_OM_EN_USC_t.book Page 184