heater DODGE DURANGO 2021 Owners Manual
[x] Cancel search | Manufacturer: DODGE, Model Year: 2021, Model line: DURANGO, Model: DODGE DURANGO 2021Pages: 340, PDF Size: 20.38 MB
Page 6 of 340
4
STARTING AND OPERATING
STARTING THE ENGINE ....................................... 101
Automatic Transmission ............................... 101
Normal Starting ............................................ 101
AutoPark ........................................................ 102If Engine Fails To Start ................................. 103Cold Weather Operation
(Below –22°F Or −30°C) ............................ 104
After Starting.................................................. 104
ENGINE BLOCK HEATER — IF EQUIPPED ......... 104
ENGINE BREAK-IN RECOMMENDATIONS ........ 104
PARKING BRAKE ................................................ 105
AUTOMATIC TRANSMISSION ........................... 106 Ignition Park Interlock ................................... 107Brake Transmission Shift Interlock (BTSI)
System ........................................................... 107Fuel Economy (ECO) Mode ........................... 107
8-Speed Automatic Transmission ................ 108
SPORT MODE — IF EQUIPPED ............................ 112
ALL-WHEEL DRIVE OPERATION .........................112
Single-Speed Operating Instructions/
Precautions — If Equipped ........................... 112
Electronically Shifted Transfer Case —
If Equipped..................................................... 112
Shifting Procedure......................................... 114 TOW N GO — IF EQUIPPED ................................. 115
Guidelines For Track Use.............................. 115
FUEL SAVER TECHNOLOGY 5.7L ONLY —
IF EQUIPPED ........................................................ 116
POWER STEERING .............................................. 117
STOP/START SYSTEM — IF EQUIPPED ............. 117
Autostop Mode .............................................. 117
Possible Reasons The Engine Does Not
Autostop......................................................... 118
To Start The Engine While In Autostop
Mode .............................................................. 118
To Manually Turn Off The
Stop/Start System......................................... 118
To Manually Turn On The Stop/Start
System ........................................................... 119
System Malfunction ...................................... 119
CRUISE CONTROL SYSTEMS —
IF EQUIPPED ....................................................... 119
Cruise Control — If Equipped ....................... 119
Adaptive Cruise Control (ACC) —
If Equipped .................................................. 121 PARKSENSE FRONT/REAR PARK ASSIST
SYSTEM — IF EQUIPPED .................................... 130
ParkSense Sensors ....................................... 131
ParkSense Display ........................................ 131
ParkSense Warning Display ......................... 134
Enabling And Disabling ParkSense.............. 134
Operation With A Trailer................................ 134Service The ParkSense Park Assist
System ........................................................... 135
Cleaning The ParkSense System ................. 135
ParkSense System Usage Precautions........ 135
LANESENSE — IF EQUIPPED .............................. 136
LaneSense Operation ................................... 136
Turning LaneSense On Or Off....................... 137
LaneSense Warning Message...................... 137
Changing LaneSense Status ........................ 139
PARKVIEW REAR BACK UP CAMERA .............. 139
REFUELING THE VEHICLE ................................... 140
VEHICLE LOADING ............................................... 141
Certification Label ......................................... 141
21_WD_OM_EN_USC_t.book Page 4
Page 30 of 340

28GETTING TO KNOW YOUR VEHICLE
The heated steering wheel control button is
located on the center stack below the radio screen,
or within the Uconnect system.
Push the heated steering wheel button once
to turn the heating element on.
Push the heated steering wheel button a
second time to turn the heating element off.
NOTE:The engine must be running for the heated
steering wheel to operate.
For information on use with the Remote Start
system, see Ú page 20.
DRIVER MEMORY SETTINGS — IF EQUIPPED
This feature allows the driver to save up to two
different memory profiles for easy recall through a
memory switch. Each memory profile saves
desired position settings for the following features:
Driver seat
Easy Entry/Exit seat operation (on/off)
(if equipped)
Side mirrors
Power tilt and telescopic steering column
(if equipped)
A set of desired radio station presets
NOTE:
Your vehicle is equipped with two key fobs, each
can be linked to either memory position 1 or 2.
Be sure to program the radio presets prior to
programming the memory settings.
The memory setting switch is located on the
driver’s door trim panel. The switch consists of
three buttons:
The set (S) button, which is used to activate the
memory save function.
The (1) and (2) buttons which are used to recall
either of two saved memory profiles.
Memory Setting Buttons
PROGRAMMING THE MEMORY FEATURE
To create a new memory profile, perform the
following:
NOTE:Saving a new memory profile will erase the
selected profile from memory.
1. Place the vehicle’s ignition in the ON/RUN
position (do not start the engine).
2. Adjust all memory profile settings to desired preferences (i.e., seat, side mirror, power tilt
and telescopic steering column [if equipped],
and radio station presets).
WARNING!
Persons who are unable to feel pain to the
skin because of advanced age, chronic illness,
diabetes, spinal cord injury, medication,
alcohol use, exhaustion, or other physical
conditions must exercise care when using the
steering wheel heater. It may cause burns
even at low temperatures, especially if used
for long periods.
Do not place anything on the steering wheel
that insulates against heat, such as a blanket
or steering wheel covers of any type and mate -
rial. This may cause the steering wheel heater
to overheat.
21_WD_OM_EN_USC_t.book Page 28
Page 39 of 340
GETTING TO KNOW YOUR VEHICLE37
Adjusting The Seat Forward Or Rearward
The seat can be adjusted both forward and
rearward by using the seat switch. The seat will
move in the direction of the switch. Release the
switch when the desired position has been
reached.
Adjusting The Seat Up Or Down
The height of the seats can be adjusted up or
down. Pull upward or push downward on the rear of
seat switch, the seat will move in the direction of
the switch. Release the switch when the desired
position has been reached.
Tilting The Seat Up Or Down
The angle of the seat cushion can be adjusted in
two directions. Pull upward or push downward on
the front of the seat switch, the front of the seat
cushion will move in the direction of the switch.
Release the switch when the desired position has
been reached.
Reclining The Seatback
The angle of the seatback can be adjusted forward
or rearward. Push the seatback switch forward or
rearward, the seat will move in the direction of the
switch. Release the switch when the desired
position is reached.
Power Lumbar — If Equipped
The power lumbar switch is located on the
outboard side of the power seat. Push the switch
forward to increase the lumbar support. Push the
switch rearward to decrease the lumbar support.
Pushing upward or downward on the switch will
raise and lower the position of the support.
HEATED SEATS — IF EQUIPPED
WARNING!
Adjusting a seat while driving may be
dangerous. Moving a seat while driving could
result in loss of control which could cause a
collision and serious injury or death.
Seats should be adjusted before fastening the
seat belts and while the vehicle is parked.
Serious injury or death could result from a
poorly adjusted seat belt.
Do not ride with the seatback reclined so that
the shoulder belt is no longer resting against
your chest. In a collision you could slide under
the seat belt, which could result in serious
injury or death.
CAUTION!
Do not place any article under a power seat or
impede its ability to move as it may cause
damage to the seat controls. Seat travel may
become limited if movement is stopped by an
obstruction in the seat's path.
WARNING!
Persons who are unable to feel pain to the
skin because of advanced age, chronic illness,
diabetes, spinal cord injury, medication,
alcohol use, exhaustion or other physical
condition must exercise care when using the
seat heater. It may cause burns even at low
temperatures, especially if used for long
periods of time.
Do not place anything on the seat or seatback
that insulates against heat, such as a blanket
or cushion. This may cause the seat heater to
overheat. Sitting in a seat that has been over -
heated could cause serious burns due to the
increased surface temperature of the seat.
2
21_WD_OM_EN_USC_t.book Page 37
Page 40 of 340
38GETTING TO KNOW YOUR VEHICLE
Front Heated Seats — If Equipped
The front heated seats control buttons are located
on the center stack below the radio screen, or
within the Uconnect system.
Push the heated seat switch once to turn the
HI setting on.
Push the heated seat switch a second time
to turn the MED setting on.
Push the heated seat switch a third time to
turn the LO setting on.
Push the heated seat switch a fourth time to
turn the heating elements off.
NOTE:
Once a heat setting is selected, heat will be felt
within two to five minutes.
The engine must be running for the heated
seats to operate.
The level of heat selected will stay on until the
operator changes it.
For information on use with the Remote Start
system, see Ú page 20.
Rear Heated Seats — If Equipped
The two second row outboard seats may be
equipped with heated seats. There are two heated
seat switches that allow the rear passengers to
operate the seats independently. The heated seat
switches for each heater are located on the rear of
the center console.
You can choose from HI, LO, or off heat settings.
Amber indicator lights in each switch indicate the
level of heat in use. Two indicator lights will
illuminate for HI, one for LO and none for off.
Push the switch once to turn the HI setting
on.
Push the switch a second time to turn the LO
setting on.
Push the switch a third time to turn the
heating elements off.
The level of heat selected will stay on until the
operator changes it.
NOTE:The engine must be running for the heated seats to
operate.
FRONT VENTILATED SEATS —
I
F EQUIPPED
The ventilated seats control buttons are located on
the center stack below the radio screen, or within
the Uconnect system. The fans operate at three
speeds: HI, MED, and LO.
Press the ventilated seat switch once to
choose HI.
Press the ventilated seat switch a second
time to choose MED.
Press the ventilated seat switch a third time
to choose LO.
Press the ventilated seat switch a fourth
time to turn the ventilation off.
NOTE:The engine must be running for the ventilated
seats to operate.
For information on use with the Remote Start
system, see Ú page 20.
21_WD_OM_EN_USC_t.book Page 38
Page 64 of 340
62GETTING TO KNOW YOUR VEHICLE
AUTOMATIC TEMPERATURE CONTROL
(ATC)
Automatic Operation
1. Push the AUTO button on the front Automatic
Temperature Control (ATC) Panel and the
word “AUTO” will illuminate in the front ATC
display, along with two temperatures for the
driver and front passenger. The system will
then automatically regulate the amount of
airflow.
2. Adjust the temperature you would like the system to maintain, by adjusting the driver,
passenger, and rear temperatures. Once the
desired temperature is displayed, the system
will achieve and automatically maintain that
comfort level.
3. When the system is set up for your comfort level, it is not necessary to change the
settings. You will experience the greatest
efficiency by simply allowing the system to
function automatically.
NOTE:It is not necessary to move the temperature
settings. The system automatically adjusts the
temperature, mode and fan speed to provide
comfort as quickly as possible. To provide you with maximum comfort in the
automatic mode, during cold start-ups, the blower
fan will remain on low until the engine warms up.
The fan will engage immediately if the Defrost
mode is selected, or by changing the front blower
knob setting.
Manual Operation Override
This system offers a full complement of manual
override features. The AUTO symbol in the front
ATC display will be turned off when the system is
being used in the manual mode.
NOTE:The system will not automatically sense the
presence of fog, mist or ice on the windshield.
Defrost mode must be manually selected to clear
the windshield and side glass.
CLIMATE VOICE RECOGNITION
Adjust vehicle temperatures hands-free and keep
everyone comfortable while you keep moving
ahead.
Push the VR button on the steering wheel. After the
beep, say one of the following commands:
“Set driver temperature to 70 degrees”
“Set passenger temperature to 70 degrees”
Did you know: Voice Command for Climate may
only be used to adjust the interior temperature of
your vehicle. Voice Command will not work to
adjust the heated seats or steering wheel if
equipped.
OPERATING TIPS
NOTE:Refer to the chart at the end of this section for
suggested control settings for various weather
conditions.
CAUTION!
Interior air enters the Rear Automatic
Temperature Control system through an intake
grille, located in the right side trim panel behind
the third row seats. The heater outlets are
located in the right side trim panel, just behind
the passenger second row door. Do not block or
place objects directly in front of the inlet grille or
heater outlets. The electrical system could
overload causing damage to the blower motor.
21_WD_OM_EN_USC_t.book Page 62
Page 65 of 340
GETTING TO KNOW YOUR VEHICLE63
Summer Operation
The engine cooling system must be protected with
a high-quality antifreeze coolant to provide proper
corrosion protection and to protect against engine
overheating. A solution of 50% OAT (Organic
Additive Technology) coolant that meets the
requirements of FCA Material Standard MS.90032
and 50% water is recommended Úpage 322.
Winter Operation
To ensure the best possible heater and defroster
performance, make sure the engine cooling
system is functioning properly and the proper
amount, type, and concentration of coolant is
used. Use of the Air Recirculation mode during
Winter months is not recommended, because it
may cause window fogging.
Vacation/Storage
For information on maintaining the Climate Control
system when the vehicle is being stored for an
extended period of time, see Úpage 313.
Window Fogging
Interior fogging on the windshield can be quickly
removed by turning the mode selector to Defrost.
The Defrost/Floor mode can be used to maintain a
clear windshield and provide sufficient heating. If
side window fogging becomes objectionable, increase blower speed to improve airflow and
clearing of the side windows. Vehicle windows tend
to fog on the inside in mild but rainy or humid
weather.
NOTE:
Recirculate without A/C should not be used for
long periods, as fogging may occur.
Automatic Temperature Controls (ATC) will auto
-
matically adjust the climate control settings to
reduce or eliminate window fogging on the front
windshield. When this occurs, recirculation will
be unavailable.
Outside Air Intake
Make sure the air intake, located directly in front of
the windshield, is free of obstructions, such as
leaves. Leaves collected in the air intake may
reduce airflow, and if they enter the air distribution
box, they could plug the water drains. In Winter
months, make sure the air intake is clear of ice,
slush, and snow.
Cabin Air Filter
The Climate Control system filters out dust and
pollen from the air. Contact an authorized dealer to
service your cabin air filter, and to have it replaced
when needed Ú page 271.
Stop/Start System — If Equipped
While in an Autostop, the Climate Control system
may automatically adjust airflow to maintain cabin
comfort. Customer settings will be maintained
upon return to an engine running condition.
Windshield Wiper De-Icer — If Equipped
The Windshield Wiper De-Icer is a heating element
located at the base of the windshield.
It operates automatically once the following
conditions are met:
Activation By Front Defrost
The Windshield Wiper De-Icer activates auto -
matically during a cold weather manual start
with full defrost, and when the ambient
temperature is below 33°F (0.6°C) .
Activation By Rear Defrost
The Windshield Wiper De-Icer activates auto -
matically when the Rear Defrost is operating
and the ambient temperature is below 33°F
(0.6°C) .
Activation By Remote Start Operation
When the Remote Start is activated and the
outside ambient temperature is less than 33°F
(0.6°C) the Windshield Wiper De-Icer is acti-
vated. Exiting Remote Start will resume its
previous operation. If the Windshield Wiper
De-Icer was active, the timer and operation will
continue.
2
21_WD_OM_EN_USC_t.book Page 63
Page 106 of 340
104STARTING AND OPERATING
COLD WEATHER OPERATION
(B
ELOW –22°F OR −30°C)
To ensure reliable starting at these temperatures,
use of an externally powered electric engine block
heater (available from an authorized dealer) is
recommended.
AFTER STARTING
The idle speed is controlled automatically, and it
will decrease as the engine warms up.
ENGINE BLOCK HEATER — IF EQUIPPED
The engine block heater warms the engine, and
permits quicker starts in cold weather. Connect the
cord to a standard 110-115 Volt AC electrical
outlet with a grounded, three-wire extension cord.
The engine block heater must be plugged in at
least one hour to have an adequate warming effect
on the engine. The engine block heater cord is located:
3.6L Engine — Bundled and strapped behind the
engine air cleaner assembly.
5.7L Engine — Bundled and strapped in front of
the power distribution center.
ENGINE BREAK-IN RECOMMENDATIONS
A long break-in period is not required for the engine
and drivetrain (transmission and axle) in your
vehicle.
Drive moderately during the first 300 miles
(500 km). After the initial 60 miles (100 km),
speeds up to 50 or 55 mph (80 or 90 km/h) are
desirable.
Brief full-throttle acceleration within the limits of
local traffic laws contributes to a good break-in.
Wide-open throttle acceleration in low gear can be
detrimental and should be avoided.
WARNING!
Never pour fuel or other flammable liquid into
the throttle body air inlet opening in an
attempt to start the vehicle. This could result
in flash fire causing serious personal injury.
Do not attempt to push or tow your vehicle to
get it started. Vehicles equipped with an auto -
matic transmission cannot be started this
way. Unburned fuel could enter the catalytic
converter and once the engine has started,
ignite and damage the converter and vehicle.
If the vehicle has a discharged battery,
booster cables may be used to obtain a start
from a booster battery or the battery in
another vehicle. This type of start can be
dangerous if done improperly Ú page 255.
CAUTION!
To prevent damage to the starter, do not
continuously crank the engine for more than 25
seconds at a time. Wait 60 seconds before
trying again.
WARNING!
Remember to disconnect the engine block
heater cord before driving. Damage to the
110-115 Volt electrical cord could cause
electrocution.
21_WD_OM_EN_USC_t.book Page 104
Page 177 of 340
MULTIMEDIA175
SiriusXM® Setup
Accessibility
When the SiriusXM® Setup button is pressed on the touchscreen, the system displays options related to SiriusXM® satellite radio. These settings can be used
to skip specific radio channels and restart favorite songs from the beginning.
NOTE:
A subscription to SiriusXM® satellite radio is required for these settings to be functional.
Depending on the vehicle’s options, feature settings may vary.
Setting Name Description
SiriusXM® Account, Profiles, & SettingsThis setting will direct you to the SiriusXM® profile settings.
Block Explicit This setting will skip over content labeled as explicit. The available settings
are “On” and “Off”.
Tune Start This setting will play the current song from the beginning when you tune to a
music channel using one of the 12 presets.
Channel Skip This setting allows you to set channels that you wish to skip. A channel list will
display of the skipped channels.
Subscription Information This menu provides SiriusXM® subscription information.
When the Accessibility button is pressed on the touchscreen, the system will display the option related to the vehicle’s theater system.
NOTE:Depending on the vehicle’s options, feature settings may vary.
Setting Name Description
Video Button ReadbackThis setting will turn the Video Button Readback feature on or off.
5
21_WD_OM_EN_USC_t.book Page 175
Page 223 of 340
SAFETY221
Supplemental Knee Air Bags
Front and Side Impact Sensors
Seat Belt Pretensioners
Seat Track Position Sensors
Occupant Classification System
If A Deployment Occurs
The front air bags are designed to deflate
immediately after deployment.
NOTE:Front and/or side air bags will not deploy in all colli -
sions. This does not mean something is wrong with
the air bag system.
If you do have a collision which deploys the air
bags, any or all of the following may occur:
The air bag material may sometimes cause
abrasions and/or skin reddening to the occu -
pants as the air bags deploy and unfold. The
abrasions are similar to friction rope burns or
those you might get sliding along a carpet or
gymnasium floor. They are not caused by
contact with chemicals. They are not permanent
and normally heal quickly. However, if you
haven’t healed significantly within a few days, or
if you have any blistering, see your doctor imme -
diately.
As the air bags deflate, you may see some
smoke-like particles. The particles are a normal
by-product of the process that generates the
non-toxic gas used for air bag inflation. These
airborne particles may irritate the skin, eyes,
nose, or throat. If you have skin or eye irritation,
rinse the area with cool water. For nose or throat
irritation, move to fresh air. If the irritation
continues, see your doctor. If these particles
settle on your clothing, follow the garment
manufacturer’s instructions for cleaning.
Do not drive your vehicle after the air bags have
deployed. If you are involved in another collision,
the air bags will not be in place to protect you.
NOTE:
Air bag covers may not be obvious in the interior
trim, but they will open during air bag deploy -
ment.
After any collision, the vehicle should be taken
to an authorized dealer immediately.
Enhanced Accident Response System
In the event of an impact, if the communication
network remains intact, and the power remains
intact, depending on the nature of the event, the
Occupant Restraint Controller (ORC) will determine
whether to have the Enhanced Accident Response
System perform the following functions:
Cut off fuel to the engine (if equipped).
Cut off battery power to the electric motor (if
equipped).
Flash hazard lights as long as the battery has
power.
Turn on the interior lights, which remain on as
long as the battery has power or for 15 minutes
from the intervention of the Enhanced Accident
Response System.
Unlock the power door locks.
Your vehicle may also be designed to perform any
of these other functions in response to the
Enhanced Accident Response System:
Turn off the Fuel Filter Heater, Turn off the HVAC
Blower Motor, Close the HVAC Circulation Door
WARNING!
Deployed air bags and seat belt pretensioners
cannot protect you in another collision. Have the
air bags, seat belt pretensioners, and the seat
belt retractor assemblies replaced by an
authorized dealer immediately. Also, have the
Occupant Restraint Controller System serviced
as well.
6
21_WD_OM_EN_USC_t.book Page 221
Page 257 of 340
IN CASE OF EMERGENCY255
JUMP STARTING
If your vehicle has a discharged battery, it can be
jump started using a set of jumper cables and a
battery in another vehicle, or by using a portable
battery booster pack. Jump starting can be
dangerous if done improperly, so please follow the
procedures in this section carefully.
NOTE:When using a portable battery booster pack, follow
the manufacturer's operating instructions and
precautions.
PREPARATIONS FOR JUMP START
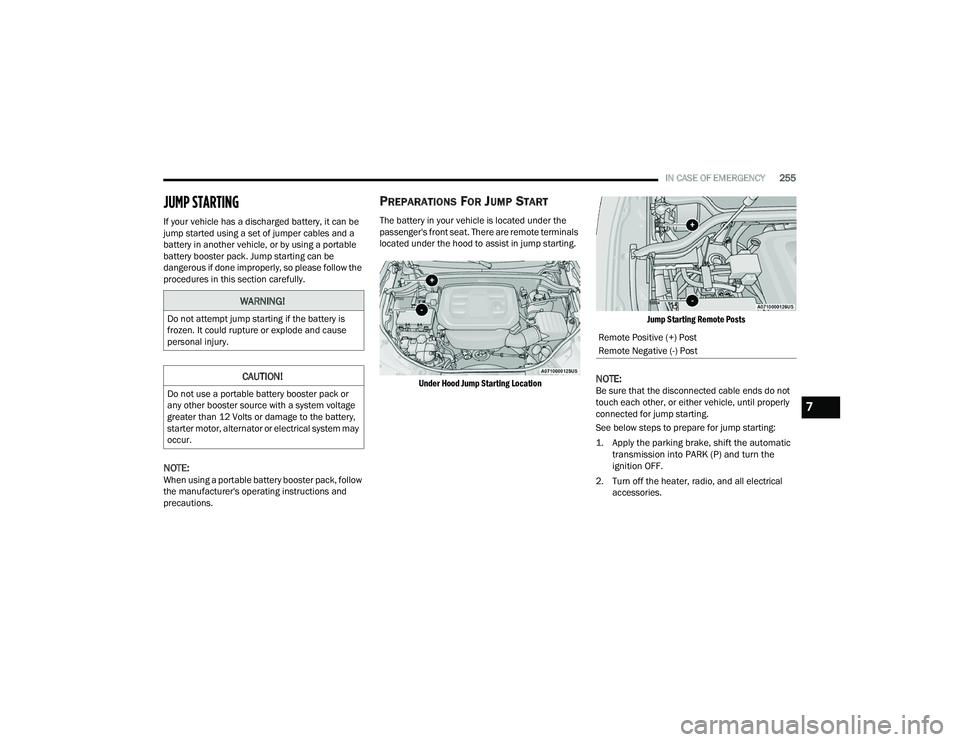
The battery in your vehicle is located under the
passenger's front seat. There are remote terminals
located under the hood to assist in jump starting.
Under Hood Jump Starting Location Jump Starting Remote Posts
NOTE:Be sure that the disconnected cable ends do not
touch each other, or either vehicle, until properly
connected for jump starting.
See below steps to prepare for jump starting:
1. Apply the parking brake, shift the automatic
transmission into PARK (P) and turn the
ignition OFF.
2. Turn off the heater, radio, and all electrical accessories.
WARNING!
Do not attempt jump starting if the battery is
frozen. It could rupture or explode and cause
personal injury.
CAUTION!
Do not use a portable battery booster pack or
any other booster source with a system voltage
greater than 12 Volts or damage to the battery,
starter motor, alternator or electrical system may
occur.
Remote Positive (+) Post
Remote Negative (-) Post
7
21_WD_OM_EN_USC_t.book Page 255