Fuel release button DODGE DURANGO 2022 Owners Manual
[x] Cancel search | Manufacturer: DODGE, Model Year: 2022, Model line: DURANGO, Model: DODGE DURANGO 2022Pages: 332, PDF Size: 19.82 MB
Page 21 of 332
GETTING TO KNOW YOUR VEHICLE19
NOTE:Obstructions between the vehicle and key fob may
reduce this range Úpage 316.
HOW TO USE REMOTE START
Push and release the Remote Start button on the
key fob twice within five seconds. The vehicle
doors will lock, the parking lights will flash, and the
horn will chirp twice (if programmed). Then, the
engine will start, and the vehicle will remain in the
Remote Start mode for a 15 minute cycle. Pushing
the Remote Start button a third time shuts the
engine off.
To drive the vehicle, push the unlock button, and
with a valid Keyless Enter ‘n Go™ key fob in the
vehicle, place the ignition in the ON/RUN position.
NOTE:
With Remote Start, the engine will only run for
15 minutes.
Remote Start can only be used twice.
If an engine fault is present or fuel level is low,
the vehicle will start and then shut down in
10 seconds.
The parking lights will turn on and remain on
during Remote Start mode.
For security, power window and sunroof
(if equipped) operation is disabled when the
vehicle is in the Remote Start mode.
The ignition must be placed in the ON/RUN posi -
tion before the Remote Start sequence can be
repeated for a third cycle.
All of the following conditions must be met before
the engine will remote start:
Gear selector in PARK
Doors closed
Hood closed
Liftgate closed
Hazard switch off
Brake pedal not pressed
Battery at an acceptable charge level
PANIC button not pressed
System not disabled from previous remote start
event
Vehicle Security system indicator flashing
Ignition in OFF position
Fuel level meets minimum requirement
Vehicle Security system is not signaling an intru -
sion
Malfunction Indicator Light (MIL) is not illumi -
nated
TO EXIT REMOTE START MODE
To drive the vehicle after starting the Remote Start
system, either push and release the unlock button
on the key fob to unlock the doors, or unlock the
vehicle using Keyless Enter ‘n Go™ — Passive
Entry via the door handles, and disarm the
WARNING!
Do not start or run an engine in a closed
garage or confined area. Exhaust gas contains
Carbon Monoxide (CO) which is odorless and
colorless. Carbon Monoxide is poisonous and
can cause serious injury or death when
inhaled.
Keep key fobs away from children. Operation
of the Remote Start system, windows, door
locks or other controls could cause serious
injury or death.WARNING!
Do not start or run an engine in a closed garage
or confined area. Exhaust gas contains Carbon
Monoxide (CO) which is odorless and colorless.
Carbon Monoxide is poisonous and can cause
serious injury or death when inhaled.
Keep key fobs away from children. Operation
of the Remote Start system, windows, door
locks or other controls could cause serious
injury or death.
2
22_WD_OM_EN_USC_t.book Page 19
Page 23 of 332
GETTING TO KNOW YOUR VEHICLE21
REMOTE START CANCEL MESSAGE —
I
F EQUIPPED
The following messages will display in the
instrument cluster display if the vehicle fails to
remote start or exits Remote Start prematurely:
Remote Start Cancelled — Door Open
Remote Start Cancelled — Hood Open
Remote Start Cancelled — Fuel Low
Remote Start Cancelled — Liftgate Open
Remote Start Cancelled — Timer Expired
Remote Start Disabled — Start Vehicle To Reset
The instrument cluster display message stays
active until the ignition is placed in the ON/RUN
position.
VEHICLE SECURITY SYSTEM — IF EQUIPPED
The Vehicle Security system monitors the vehicle
doors for unauthorized entry and the Keyless
Enter ‘n Go™ Ignition for unauthorized operation.
While the Vehicle Security system is armed, interior
switches for door locks and liftgate release are
disabled. If something triggers the alarm, the
Vehicle Security system will provide the following
audible and visible signals:
The horn will pulse
The parking lights and/or turn signals will flash
The Vehicle Security Light in the instrument
cluster will flash
TO ARM THE SYSTEM
Follow these steps to arm the Vehicle Security
system:
1. Make sure the vehicle’s ignition is placed in the OFF position.
For vehicles equipped with Keyless Entry,
make sure the vehicle’s keyless ignition
system is OFF.
2. Perform one of the following methods to lock the vehicle:
Push lock on the interior power door lock
switch with the driver and/or passenger
door open.
Push the lock button on the exterior Passive
Entry door handle with a valid key fob avail -
able in the same exterior zone Ú page 23.
Push the lock button on the key fob.
3. If any doors are open, close them.
TO DISARM THE SYSTEM
The Vehicle Security system can be disarmed using
any of the following methods:
Push the unlock button on the key fob.
Grab the Passive Entry unlock door handle
(if equipped) Ú page 23.
Cycle the vehicle ignition system out of the
OFF position.
NOTE:
The driver's door key cylinder cannot arm or
disarm the Vehicle Security system. Use of the
door key cylinder when the alarm is armed will
sound the alarm when the door is opened.
The Vehicle Security system remains armed
when the power liftgate is opened using the
liftgate button on the key fob. If someone enters
the vehicle through the opened liftgate, then
opens any door from the inside, the alarm will
sound.
If Passive Entry (if equipped) is used to unlock
the liftgate, the Vehicle Security system is
disarmed and the rest of the vehicle doors will
remain locked unless all doors are set to unlock
on first press within Uconnect Settings.
When the Vehicle Security system is armed, the
interior power door lock switches will not unlock
the doors.
2
22_WD_OM_EN_USC_t.book Page 21
Page 88 of 332
86GETTING TO KNOW YOUR INSTRUMENT PANEL
INSTRUMENT CLUSTER DISPLAY MENU
I
TEMS
The instrument cluster display can be used to view
the main menu items for several features. Use the
up and down arrow buttons to scroll through
the driver interactive display menu options until
the desired menu is reached.
NOTE:Depending on the vehicle’s options, feature
settings may vary.
Main Menu
Speedometer
Push and release the up or down arrow
button until the main gauge menu icon is displayed
in the instrument cluster display. Push and release
the left or right arrow button to select the
analog or digital type speedometer display. Push
and release the OK button to toggle units (mph or
km/h) of the speedometer.
Vehicle Info
Push and release the up or down arrow
button until the Vehicle Info icon/title is highlighted
in the instrument cluster display. Push the left
or right arrow button to scroll through the
information submenus. Tire Pressure Monitor System
If tire pressure is
OK for all tires a vehicle icon is
displayed with tire pressure values in each
corner of the icon.
If one or more tires have low pressure, “Inflate
Tire To XX” is displayed with the vehicle icon and
the tire pressure values in each corner of the
icon with the pressure value of the low tire are
displayed in a different color than the other tire
pressure value.
If the Tire Pressure system requires service,
“Service Tire Pressure System” is displayed.
Tire Pressure is an information only function, and
cannot be reset Ú page 193.
Transmission Temperature
Displays the actual transmission temperature.
Oil Temperature
Displays the actual oil temperature.
Oil Pressure
Displays the actual oil pressure.
Oil Life
Displays the current oil life of the vehicle.
Battery Voltage
Displays the current voltage level of the battery.
Driver Assist — If Equipped
Push and release the up or down arrow
button until the Driver Assist display icon/title is
highlighted in the instrument cluster display
Ú page 118.
Fuel Economy
Push and release the up or down arrow
button until the Fuel Economy Menu icon/title is
highlighted. Push the left or right arrow
button to scroll the submenus, one with current
fuel economy display and one without it.
Range
Current MPG, L/100 km, or km/L
Average MPG, L/100 km, or km/L
Press the OK button to reset the average fuel
economy
NOTE:The Range feature is not able to be reset through
the instrument cluster display controls.
22_WD_OM_EN_USC_t.book Page 86
Page 89 of 332
GETTING TO KNOW YOUR INSTRUMENT PANEL87
Trip
Push and release the up or down arrow
button until the Trip icon/title is highlighted in the
instrument cluster display, then push and release
the left or right arrow button to select Trip A
or Trip B.
The Trip A and Trip B information will display the
following:
Distance
Average Fuel Economy
Elapsed Time
Hold the OK button to reset all the information.
Trailer Tow — If Equipped
Push and release the up or down arrow
button until the Trailer Tow Menu icon/title is
highlighted in the instrument cluster display. Push
and release the left or right arrow button to
select Trailer Trip or Trailer Brake.
Trailer Trip will display the following:
Distance
NOTE:Press and hold the OK button to reset all the
information. Trailer Brake will display the following:
Output
Type
Gain
Stop/Start – If Equipped
Push and release the
up or down
arrow button on the steering wheel to
scroll to the Stop/Start menu in the driver
interactive display Ú page 114.
Audio
Push and release the up or down arrow
button until the Audio Menu icon/title is
highlighted in the instrument cluster display. This
menu will display the audio source information,
including the Song name, Artist name, and audio
source with an accompanying graphic.
Messages
Push and release the up or down arrow
button until the Messages Menu item is
highlighted. This feature shows the number of
stored warning messages. Pushing the left or
right arrow button will allow you to see what the
stored messages are.
When no messages are present, main menu icon
will be a closed envelope.
Screen Setup
Push and release the up or down arrow
button until the Screen Setup Menu icon/title is
highlighted in the instrument cluster display. Push
and release the OK button to enter the submenus
and follow the prompts on the screen as needed.
The Screen Setup feature allows you to change
what information is displayed in the instrument
cluster as well as the location that information is
displayed.
Current Gear
On
Off
Gear Display
Full
Single
Favorite Menus
Speedometer Driver Assist
(Show/Hide)Stop/Start
Vehicle Info Fuel Economy
(Show/Hide)Trailer Tow
(Show/Hide)
Performance
(Show/Hide) Trip
(Show/Hide)Audio
(Show/Hide)
Stored
Messages Screen Setup
3
22_WD_OM_EN_USC_t.book Page 87
Page 109 of 332
STARTING AND OPERATING107
When exiting the vehicle, always:
Apply the parking brake.
Shift the transmission into PARK.
Turn the ignition OFF.
Remove the key fob from the vehicle.
The following indicators should be used to ensure
that you have properly engaged the transmission
into the PARK position:
When shifting into PARK, push the lock button
on the gear selector and firmly move the
selector all the way forward until it stops and is
fully seated.
Look at the transmission gear position display
and verify that it indicates the PARK position (P),
and is not blinking.
With brake pedal released, verify that the gear
selector will not move out of PARK.
REVERSE (R)
This range is for moving the vehicle backward.
Shift into REVERSE only after the vehicle has come
to a complete stop.
NEUTRAL (N)
Use this range when the vehicle is standing for
prolonged periods with the engine running. Apply
the parking brake and shift the transmission into
PARK (P) if you must exit the vehicle.
DRIVE (D)
This range should be used for most city and
highway driving. It provides the smoothest upshifts
and downshifts, and the best fuel economy. The
transmission automatically upshifts through all
forward gears.
When frequent transmission shifting occurs (such
as when operating the vehicle under heavy loading
conditions, in hilly terrain, traveling into strong
head winds, or while towing a heavy trailer), use
the AutoStick shift control to select a lower gear
Ú page 108. Under these conditions, using a lower
gear will improve performance and extend
transmission life by reducing excessive shifting
and heat buildup.
During cold temperatures, transmission operation
may be modified depending on engine and
transmission temperature as well as vehicle
speed. This feature improves warm up time of the
engine and transmission to achieve maximum
efficiency. Engagement of the torque converter
clutch is inhibited until the transmission fluid is
warm. Normal operation will resume once the
transmission temperature has risen to a suitable
level.
CAUTION!
Before moving the transmission gear selector
out of PARK, you must start the engine, and
also press the brake pedal. Otherwise,
damage to the gear selector could result.
DO NOT race the engine when shifting from
PARK or NEUTRAL into another gear range, as
this can damage the drivetrain.
WARNING!
Do not coast in NEUTRAL and never turn off the
ignition to coast down a hill. These are unsafe
practices that limit your response to changing
traffic or road conditions. You might lose control
of the vehicle and have a collision.
CAUTION!
Towing the vehicle, coasting, or driving for any
other reason with the transmission in NEUTRAL
can cause severe transmission damage.
For Recreational Towing Ú page 149.
For Towing A Disabled Vehicle Ú page 253.
4
22_WD_OM_EN_USC_t.book Page 107
Page 251 of 332
IN CASE OF EMERGENCY249
NOTE:In certain cold conditions, ice may prevent the fuel
door from opening. If this occurs, lightly push on
the fuel door to break the ice buildup and
re-release the fuel door using the inside release
button. Do not pry on the door.
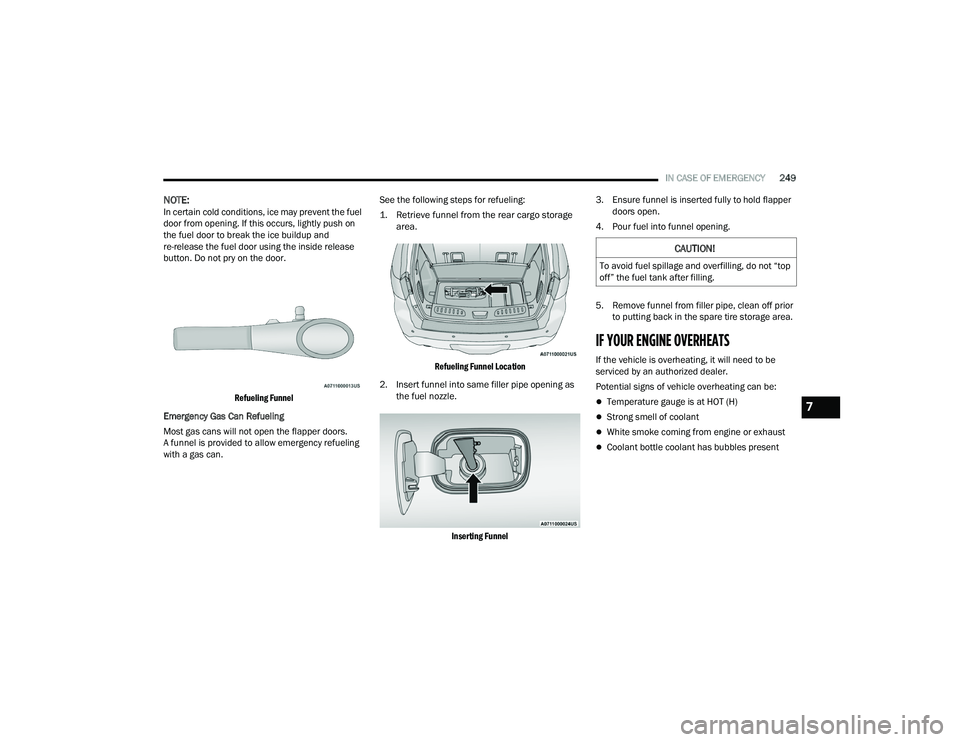
Refueling Funnel
Emergency Gas Can Refueling
Most gas cans will not open the flapper doors.
A funnel is provided to allow emergency refueling
with a gas can. See the following steps for refueling:
1. Retrieve funnel from the rear cargo storage
area.
Refueling Funnel Location
2. Insert funnel into same filler pipe opening as the fuel nozzle.
Inserting Funnel
3. Ensure funnel is inserted fully to hold flapper
doors open.
4. Pour fuel into funnel opening.
5. Remove funnel from filler pipe, clean off prior to putting back in the spare tire storage area.
IF YOUR ENGINE OVERHEATS
If the vehicle is overheating, it will need to be
serviced by an authorized dealer.
Potential signs of vehicle overheating can be:
Temperature gauge is at HOT (H)
Strong smell of coolant
White smoke coming from engine or exhaust
Coolant bottle coolant has bubbles present
CAUTION!
To avoid fuel spillage and overfilling, do not “top
off” the fuel tank after filling.
7
22_WD_OM_EN_USC_t.book Page 249
Page 322 of 332
320 Fuel
............................................................... 308Additives................................................... 309Clean Air.................................................... 309Economy Mode.......................................... 105Ethanol...................................................... 309Gasoline.................................................... 308Materials Added........................................ 309Methanol................................................... 309Octane Rating................................. 308, 309Requirements................................. 308, 311Specifications............................................ 312Tank Capacity............................................ 311Fueling........................................................... 137Fuses............................................................. 277
G
Garage Door Opener (HomeLink).................... 43Gasoline, (Fuel)............................................. 308Gasoline, Clean Air........................................ 309Gasoline, Reformulated................................. 309Gear Ranges.................................................. 106Glass Cleaning............................................... 306Gross Axle Weight Rating............................... 140Gross Vehicle Weight Rating.......................... 139GVWR............................................................ 138
H
Hazard Warning Flashers.............................. 235Head Restraints............................................... 37Headlights Automatic.................................................... 49Cleaning................................................... 304High Beam/Low Beam Select Switch.......... 48Lights On Reminder..................................... 49On With Wipers............................................ 49Passing........................................................ 49Heated Mirrors................................................. 42Heated Seats................................................... 36Heated Steering Wheel.................................... 27Hill Start Assist.............................................. 186HitchesTrailer Towing........................................... 141HomeLink (Garage Door Opener)..................... 43Hood Prop........................................................ 73Hood Release.................................................. 73
I
Ignition............................................................. 17Key Fob Battery Low Or Dead...................... 17Key Fob Not Detected................................. 17Keyless Ignition........................................... 17Keyless Push Button................................... 17Push Button Ignition.................................... 17Switch.......................................................... 17
Illuminated Entry..............................................52Immobilizer (Sentry Key)..................................17Inside Rearview Mirror........................... 41, 235Instrument Cluster....................................80, 81Display........................................... 81, 82, 85Menu Items.................................................86Instrument Cluster DisplayAudio...........................................................87Driver Assist.................................................86Messages....................................................87Screen Setup...............................................87Speedometer...............................................86Trailer Tow...................................................87Trip..............................................................87Vehicle Info..................................................86Instrument Panel Lens Cleaning................... 306Integrated Trailer Brake Control.................... 145Interior And Instrument Lights.........................50Interior Appearance Care.............................. 305Interior Lights...................................................50Intermittent Wipers (Delay Wipers)..................52InverterPower...........................................................68iPod/USB/MP3 Control....................................64
22_WD_OM_EN_USC_t.book Page 320