headlamp DODGE DURANGO 2022 Owners Manual
[x] Cancel search | Manufacturer: DODGE, Model Year: 2022, Model line: DURANGO, Model: DODGE DURANGO 2022Pages: 332, PDF Size: 19.82 MB
Page 50 of 332
48GETTING TO KNOW YOUR VEHICLE
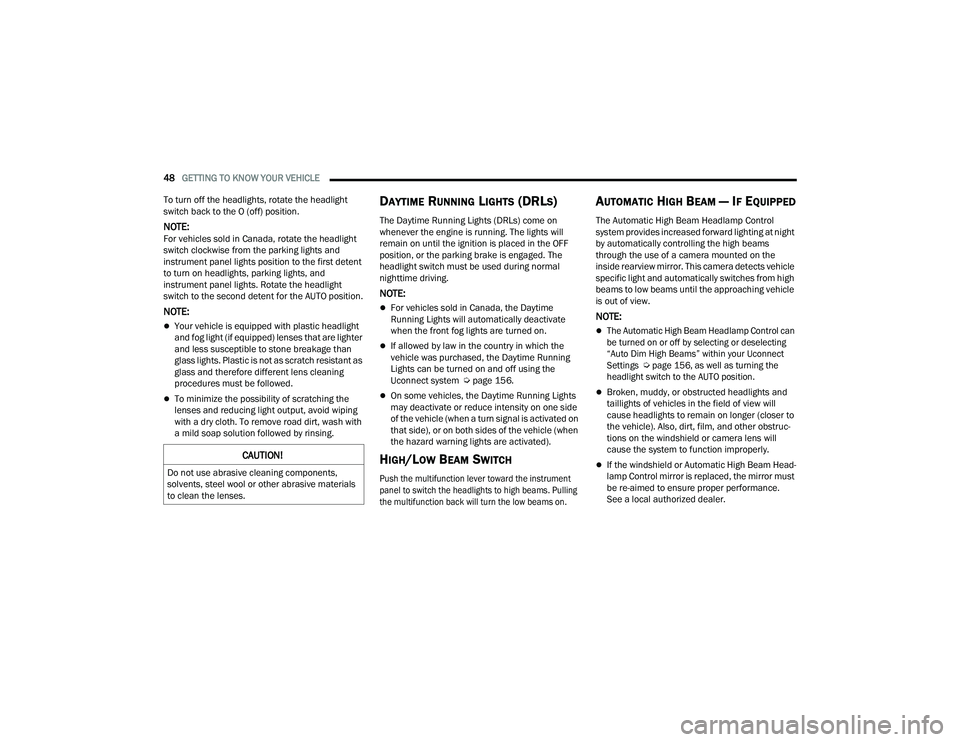
To turn off the headlights, rotate the headlight
switch back to the O (off) position.
NOTE:For vehicles sold in Canada, rotate the headlight
switch clockwise from the parking lights and
instrument panel lights position to the first detent
to turn on headlights, parking lights, and
instrument panel lights. Rotate the headlight
switch to the second detent for the AUTO position.
NOTE:
Your vehicle is equipped with plastic headlight
and fog light (if equipped) lenses that are lighter
and less susceptible to stone breakage than
glass lights. Plastic is not as scratch resistant as
glass and therefore different lens cleaning
procedures must be followed.
To minimize the possibility of scratching the
lenses and reducing light output, avoid wiping
with a dry cloth. To remove road dirt, wash with
a mild soap solution followed by rinsing.
DAYTIME RUNNING LIGHTS (DRLS)
The Daytime Running Lights (DRLs) come on
whenever the engine is running. The lights will
remain on until the ignition is placed in the OFF
position, or the parking brake is engaged. The
headlight switch must be used during normal
nighttime driving.
NOTE:
For vehicles sold in Canada, the Daytime
Running Lights will automatically deactivate
when the front fog lights are turned on.
If allowed by law in the country in which the
vehicle was purchased, the Daytime Running
Lights can be turned on and off using the
Uconnect system Ú page 156.
On some vehicles, the Daytime Running Lights
may deactivate or reduce intensity on one side
of the vehicle (when a turn signal is activated on
that side), or on both sides of the vehicle (when
the hazard warning lights are activated).
HIGH/LOW BEAM SWITCH
Push the multifunction lever toward the instrument
panel to switch the headlights to high beams. Pulling
the multifunction back will turn the low beams on.
AUTOMATIC HIGH BEAM — IF EQUIPPED
The Automatic High Beam Headlamp Control
system provides increased forward lighting at night
by automatically controlling the high beams
through the use of a camera mounted on the
inside rearview mirror. This camera detects vehicle
specific light and automatically switches from high
beams to low beams until the approaching vehicle
is out of view.
NOTE:
The Automatic High Beam Headlamp Control can
be turned on or off by selecting or deselecting
“Auto Dim High Beams” within your Uconnect
Settings
Ú
page 156, as well as turning the
headlight switch to the AUTO position.
Broken, muddy, or obstructed headlights and
taillights of vehicles in the field of view will
cause headlights to remain on longer (closer to
the vehicle). Also, dirt, film, and other obstruc -
tions on the windshield or camera lens will
cause the system to function improperly.
If the windshield or Automatic High Beam Head -
lamp Control mirror is replaced, the mirror must
be re-aimed to ensure proper performance.
See a local authorized dealer.CAUTION!
Do not use abrasive cleaning components,
solvents, steel wool or other abrasive materials
to clean the lenses.
22_WD_OM_EN_USC_t.book Page 48
Page 216 of 332
214SAFETY
As the air bags deflate, you may see some
smoke-like particles. The particles are a normal
by-product of the process that generates the
non-toxic gas used for air bag inflation. These
airborne particles may irritate the skin, eyes,
nose, or throat. If you have skin or eye irritation,
rinse the area with cool water. For nose or throat
irritation, move to fresh air. If the irritation
continues, see your doctor. If these particles
settle on your clothing, follow the garment
manufacturer’s instructions for cleaning.
Do not drive your vehicle after the air bags have
deployed. If you are involved in another collision,
the air bags will not be in place to protect you.
NOTE:
Air bag covers may not be obvious in the interior
trim, but they will open during air bag deploy -
ment.
After any collision, the vehicle should be taken
to an authorized dealer immediately.
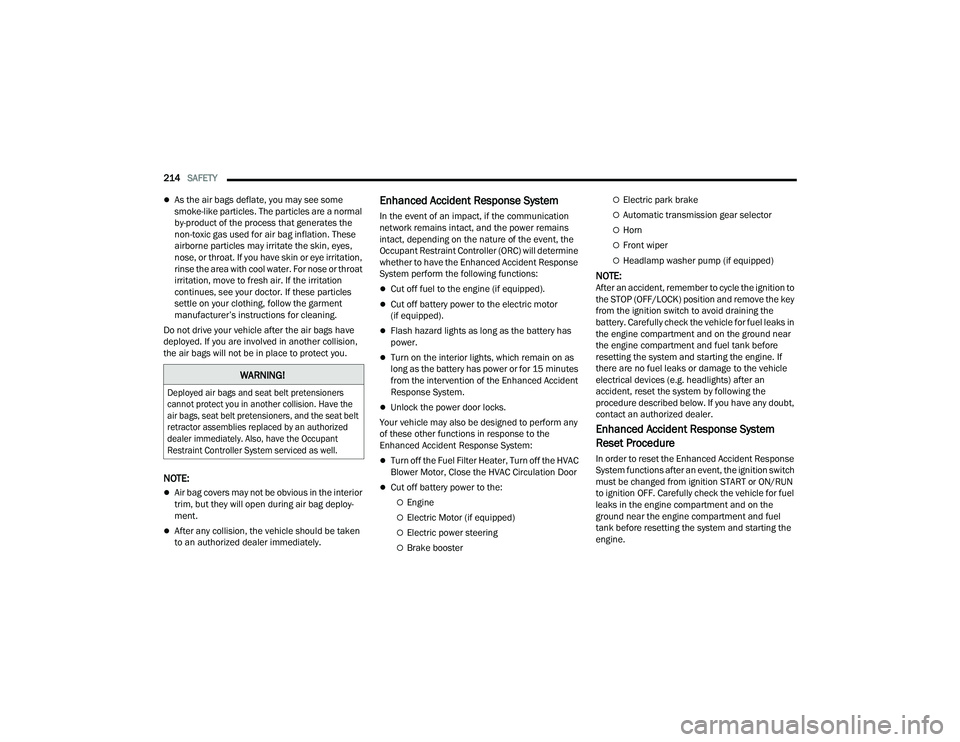
Enhanced Accident Response System
In the event of an impact, if the communication
network remains intact, and the power remains
intact, depending on the nature of the event, the
Occupant Restraint Controller (ORC) will determine
whether to have the Enhanced Accident Response
System perform the following functions:
Cut off fuel to the engine (if equipped).
Cut off battery power to the electric motor
(if equipped).
Flash hazard lights as long as the battery has
power.
Turn on the interior lights, which remain on as
long as the battery has power or for 15 minutes
from the intervention of the Enhanced Accident
Response System.
Unlock the power door locks.
Your vehicle may also be designed to perform any
of these other functions in response to the
Enhanced Accident Response System:
Turn off the Fuel Filter Heater, Turn off the HVAC
Blower Motor, Close the HVAC Circulation Door
Cut off battery power to the:
Engine
Electric Motor (if equipped)
Electric power steering
Brake booster
Electric park brake
Automatic transmission gear selector
Horn
Front wiper
Headlamp washer pump (if equipped)
NOTE:After an accident, remember to cycle the ignition to
the STOP (OFF/LOCK) position and remove the key
from the ignition switch to avoid draining the
battery. Carefully check the vehicle for fuel leaks in
the engine compartment and on the ground near
the engine compartment and fuel tank before
resetting the system and starting the engine. If
there are no fuel leaks or damage to the vehicle
electrical devices (e.g. headlights) after an
accident, reset the system by following the
procedure described below. If you have any doubt,
contact an authorized dealer.
Enhanced Accident Response System
Reset Procedure
In order to reset the Enhanced Accident Response
System functions after an event, the ignition switch
must be changed from ignition START or ON/RUN
to ignition OFF. Carefully check the vehicle for fuel
leaks in the engine compartment and on the
ground near the engine compartment and fuel
tank before resetting the system and starting the
engine.
WARNING!
Deployed air bags and seat belt pretensioners
cannot protect you in another collision. Have the
air bags, seat belt pretensioners, and the seat belt
retractor assemblies replaced by an authorized
dealer immediately. Also, have the Occupant
Restraint Controller System serviced as well.
22_WD_OM_EN_USC_t.book Page 214
Page 282 of 332
280SERVICING AND MAINTENANCE
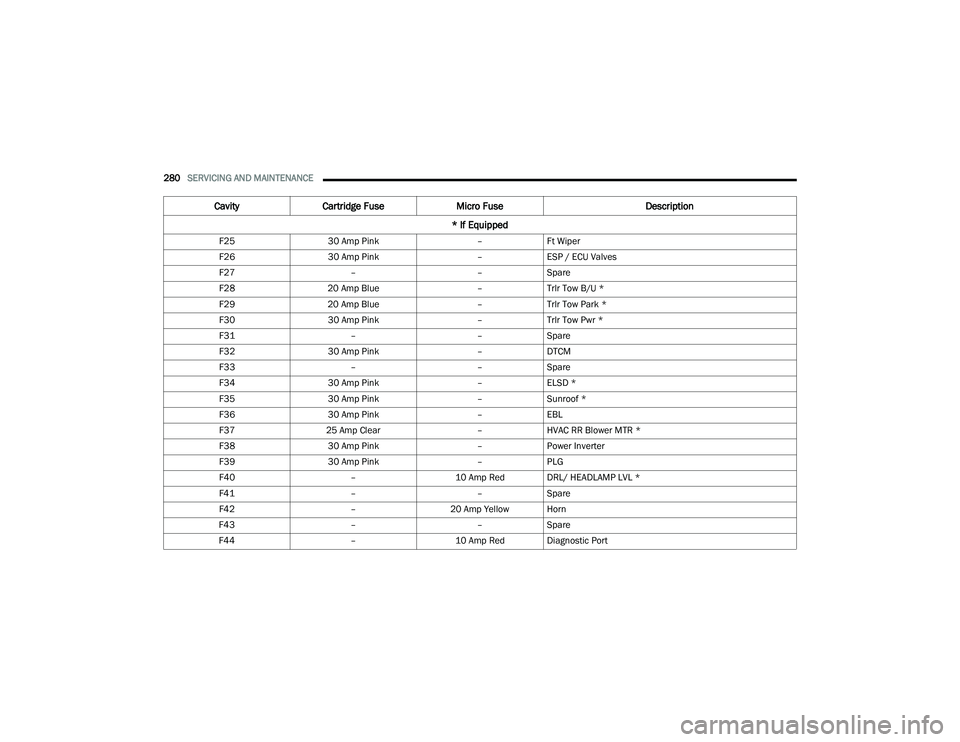
F25 30 Amp Pink –Ft Wiper
F26 30 Amp Pink –ESP / ECU Valves
F27 ––Spare
F28 20 Amp Blue –Trlr Tow B/U *
F29 20 Amp Blue –Trlr Tow Park *
F30 30 Amp Pink –Trlr Tow Pwr *
F31 ––Spare
F32 30 Amp Pink –DTCM
F33 ––Spare
F34 30 Amp Pink –ELSD *
F35 30 Amp Pink –Sunroof *
F36 30 Amp Pink –EBL
F37 25 Amp Clear –HVAC RR Blower MTR *
F38 30 Amp Pink –Power Inverter
F39 30 Amp Pink –PLG
F40 –10 Amp Red DRL/ HEADLAMP LVL *
F41 ––Spare
F42 –20 Amp Yellow Horn
F43 ––Spare
F44 –10 Amp Red Diagnostic Port
CavityCartridge Fuse Micro Fuse Description
* If Equipped
22_WD_OM_EN_USC_t.book Page 280
Page 283 of 332
SERVICING AND MAINTENANCE281
F45 –5 Amp Tan Cyber Security MOD
F46 ––Spare
F47 ––Spare
F48 ––Spare
F49 –10 Amp Red ICS / HVAC
F50 –20 Amp Yellow ELSD *
F51 –15 Amp Blue KIN / RF HUB
F52 ––Spare
F53 –20 Amp Yellow Trlr Tow LT Turn / Stop *
F54 ––Spare
F55 ––Spare
F56 ––Spare
F57 ––Spare
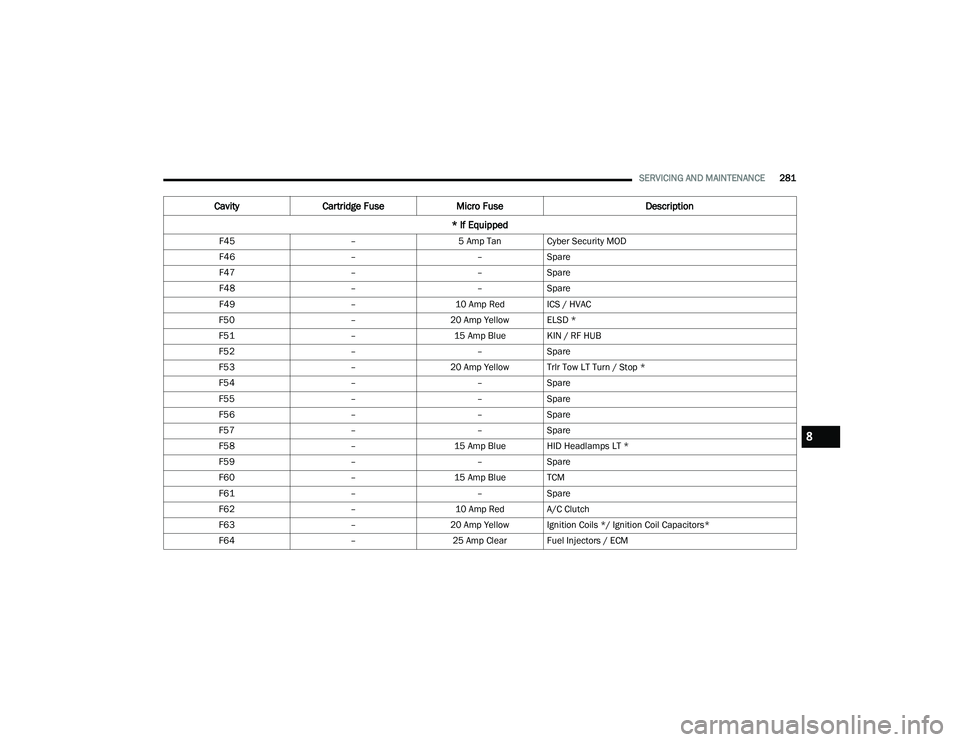
F58 –15 Amp Blue HID Headlamps LT *
F59 ––Spare
F60 –15 Amp Blue TCM
F61 ––Spare
F62 –10 Amp Red A/C Clutch
F63 –20 Amp Yellow Ignition Coils */ Ignition Coil Capacitors*
F64 –25 Amp Clear Fuel Injectors / ECM
CavityCartridge Fuse Micro Fuse Description
* If Equipped
8
22_WD_OM_EN_USC_t.book Page 281
Page 284 of 332
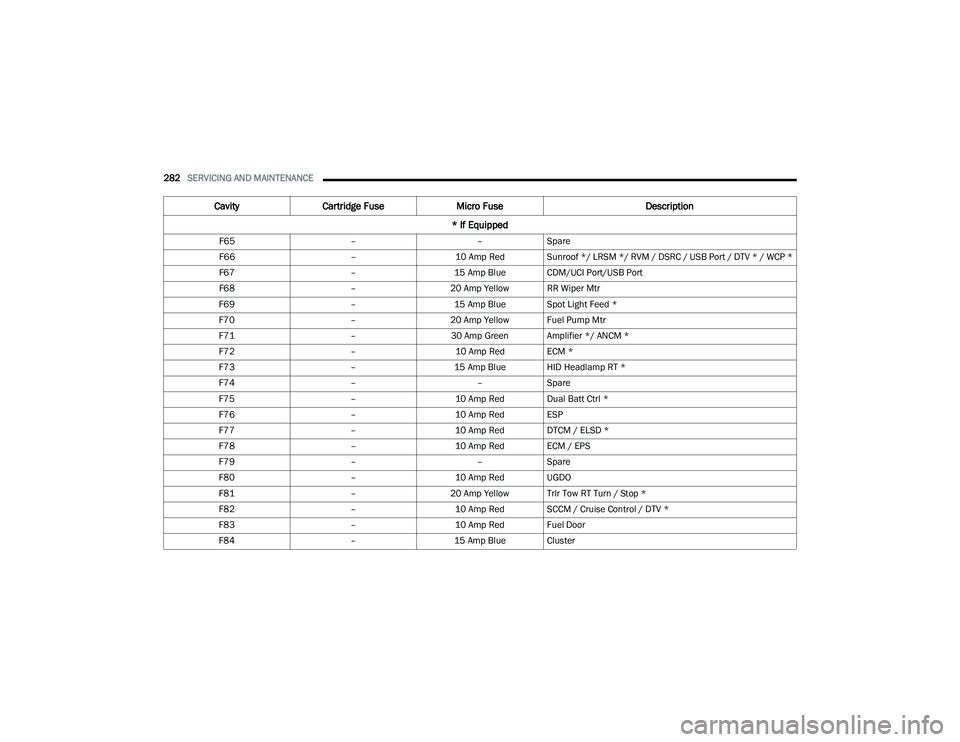
282SERVICING AND MAINTENANCE
F65 ––Spare
F66 –10 Amp Red Sunroof */ LRSM */ RVM / DSRC / USB Port / DTV * / WCP *
F67 –15 Amp Blue CDM/UCI Port/USB Port
F68 –20 Amp Yellow RR Wiper Mtr
F69 –15 Amp Blue Spot Light Feed *
F70 –20 Amp Yellow Fuel Pump Mtr
F71 –30 Amp Green Amplifier */ ANCM *
F72 –10 Amp Red ECM *
F73 –15 Amp Blue HID Headlamp RT *
F74 ––Spare
F75 –10 Amp Red Dual Batt Ctrl *
F76 –10 Amp Red ESP
F77 –10 Amp Red DTCM / ELSD *
F78 –10 Amp Red ECM / EPS
F79 ––Spare
F80 –10 Amp Red UGDO
F81 –20 Amp Yellow Trlr Tow RT Turn / Stop *
F82 –10 Amp Red SCCM / Cruise Control / DTV *
F83 –10 Amp Red Fuel Door
F84 –15 Amp Blue Cluster
CavityCartridge Fuse Micro Fuse Description
* If Equipped
22_WD_OM_EN_USC_t.book Page 282
Page 286 of 332
284SERVICING AND MAINTENANCE
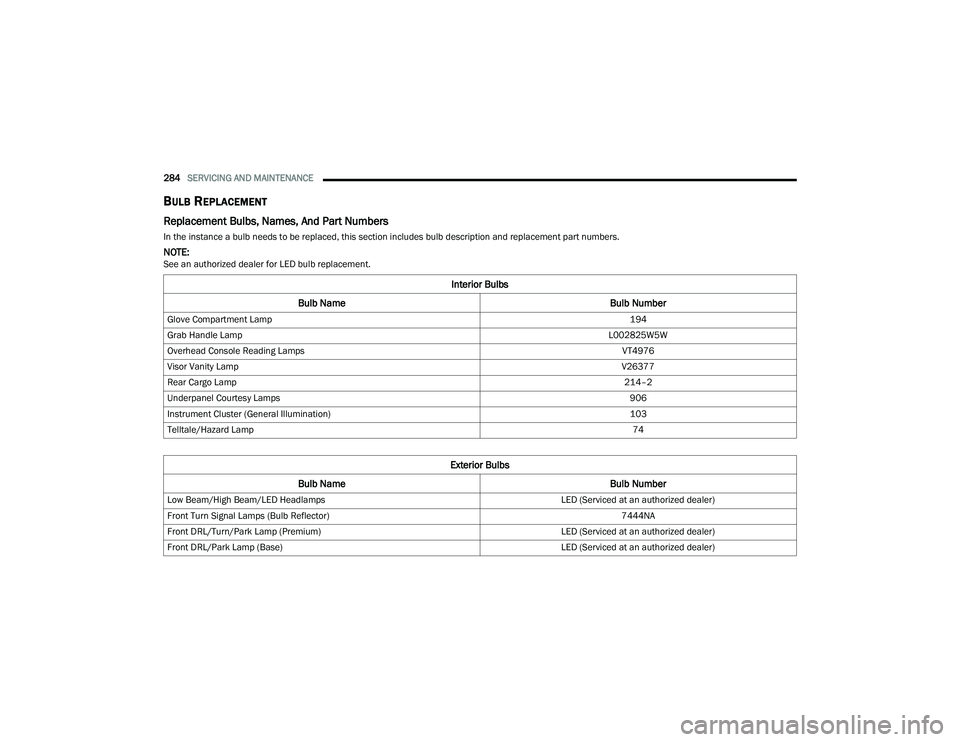
BULB REPLACEMENT
Replacement Bulbs, Names, And Part Numbers
In the instance a bulb needs to be replaced, this section includes bulb description and replacement part numbers.
NOTE:See an authorized dealer for LED bulb replacement.
Interior Bulbs
Bulb Name Bulb Number
Glove Compartment Lamp 194
Grab Handle Lamp L002825W5W
Overhead Console Reading Lamps VT4976
Visor Vanity Lamp V26377
Rear Cargo Lamp 214–2
Underpanel Courtesy Lamps 906
Instrument Cluster (General Illumination) 103
Telltale/Hazard Lamp 74
Exterior Bulbs
Bulb Name Bulb Number
Low Beam/High Beam/LED Headlamps LED (Serviced at an authorized dealer)
Front Turn Signal Lamps (Bulb Reflector) 7444NA
Front DRL/Turn/Park Lamp (Premium) LED (Serviced at an authorized dealer)
Front DRL/Park Lamp (Base) LED (Serviced at an authorized dealer)
22_WD_OM_EN_USC_t.book Page 284