torque DODGE DURANGO 2022 Owners Manual
[x] Cancel search | Manufacturer: DODGE, Model Year: 2022, Model line: DURANGO, Model: DODGE DURANGO 2022Pages: 332, PDF Size: 19.82 MB
Page 9 of 332
7
DEPARTMENT OF TRANSPORTATION
UNIFORM TIRE QUALITY GRADES .................... 303 Treadwear ...................................................... 303Traction Grades ............................................. 303
Temperature Grades ..................................... 303
STORING THE VEHICLE ....................................... 304
BODYWORK .......................................................... 304
Protection From Atmospheric Agents ........ 304
Body And Underbody Maintenance.............. 304
Preserving The Bodywork ............................. 304
INTERIORS ........................................................... 305
Seats And Fabric Parts.................................. 305
Plastic And Coated Parts .............................. 306Leather Surfaces ........................................... 306Glass Surfaces .............................................. 306
TECHNICAL SPECIFICATIONS
VEHICLE IDENTIFICATION NUMBER (VIN) ........ 307
BRAKE SYSTEM ................................................... 307
WHEEL AND TIRE TORQUE
SPECIFICATIONS ................................................ 307
Torque Specifications ................................... 307
FUEL REQUIREMENTS ....................................... 308
3.6L Engine ................................................ 3085.7L Engine ................................................... 309
Reformulated Gasoline ............................ 309
Materials Added To Fuel ............................. 309
Gasoline/Oxygenate Blends ....................... 309
Do Not Use E-85 In Non-Flex
Fuel Vehicles ................................................. 310
CNG And LP Fuel System Modifications ...... 310Methylcyclopentadienyl Manganese
Tricarbonyl (MMT) In Gasoline...................... 310Fuel System Cautions ................................... 310
FLUID CAPACITIES .............................................. 311
ENGINE FLUIDS AND LUBRICANTS .................. 312
CHASSIS FLUIDS AND LUBRICANTS ................ 312
CUSTOMER ASSISTANCE
SUGGESTIONS FOR OBTAINING SERVICE
FOR YOUR VEHICLE ............................................ 313
Prepare For The Appointment ...................... 313
Prepare A List ................................................ 313
Be Reasonable With Requests..................... 313
IF YOU NEED ASSISTANCE ................................ 313
FCA US LLC Customer Center....................... 313
FCA Canada Inc. Customer Center .............. 313
Mexico............................................................ 314
Puerto Rico And US Virgin Islands ............... 314
Customer Assistance For The Hearing
Or Speech Impaired (TDD/TTY) .................... 314
Service Contract ........................................... 314
WARRANTY INFORMATION ................................ 315
MOPAR® PARTS ................................................. 315
REPORTING SAFETY DEFECTS .......................... 315
In The 50 United States And
Washington, D.C............................................ 315
In Canada ...................................................... 315
PUBLICATION ORDER FORMS ........................... 315
GENERAL INFORMATION.................................... 316
22_WD_OM_EN_USC_t.book Page 7
Page 98 of 332
96GETTING TO KNOW YOUR INSTRUMENT PANEL
Cruise Control Set Indicator Light —
If Equipped
This indicator light will illuminate when
the cruise control is set to the desired
speed Úpage 116.
Front Fog Indicator Light — If Equipped
This indicator light will illuminate when
the front fog lights are on Ú page 47.
LaneSense Indicator Light —
If Equipped
The LaneSense indicator light illuminates
solid green when both lane markings
have been detected and the system is
“armed” and ready to provide visual and
torque warnings if an unintentional lane departure
occurs Ú page 133.
Parking/Headlights On Indicator Light
This indicator light will illuminate when
the parking lights or headlights are
turned on Ú page 47.
Sport Mode Indicator Light
This light will turn on when Sport Mode is
active Úpage 109.
Stop/Start Active Indicator Light —
If Equipped
This indicator light will illuminate when
the Stop/Start function is in “Autostop”
mode Úpage 114.
Turn Signal Indicator Lights
When the left or right turn signal is
activated, the turn signal indicator
will flash independently and the
corresponding exterior turn signal lamps
will flash. Turn signals can be activated when the
multifunction lever is moved down (left) or
up (right).
NOTE:
A continuous chime will sound if the vehicle is
driven more than 1 mile (1.6 km) with either
turn signal on.
Check for an inoperative outside light bulb if
either indicator flashes at a rapid rate.
WHITE INDICATOR LIGHTS
Adaptive Cruise Control (ACC) Ready
Light — If Equipped
This light will turn on when ACC has been
turned on, but is not set Ú page 118.
Cruise Control Ready Indicator Light
This indicator light will illuminate when
the cruise control is ready, but not set
Úpage 116.
LaneSense Indicator Light — If Equipped
When the LaneSense system is ON, but
not armed, the LaneSense indicator light
illuminates solid white. This occurs when
only left, right, or neither lane line has
been detected. If a single lane line is detected, the
system is ready to provide only visual warnings if
an unintentional lane departure occurs on the
detected lane line Ú page 133.
BLUE INDICATOR LIGHTS
High Beam Indicator Light
This indicator light will illuminate to
indicate that the high beam headlights
are on. With the low beams activated,
push the multifunction lever forward
(toward the front of the vehicle) to turn on the high
beams. Pull the multifunction lever rearward
(toward the rear of the vehicle) to turn off the high
beams. If the high beams are off, pull the lever
toward you for a temporary high beam on, “flash to
pass” scenario.
22_WD_OM_EN_USC_t.book Page 96
Page 102 of 332
100STARTING AND OPERATING
To Turn Off The Engine Using The ENGINE START/
STOP Button
1. Place the gear selector in PARK, then push and release the ENGINE START/STOP button.
The ignition will return to the OFF position.
2. If the gear selector is not in PARK, the ENGINE START/STOP button must be held for two
seconds or three short pushes in a row with
the vehicle speed above 5 mph (8 km/h) before the engine will shut off. The ignition will
remain in the ACC position until the gear
selector is in PARK and the button is pushed
twice to the OFF position.
3. If the gear selector is not in PARK and the ENGINE START/STOP button is pushed once
with the vehicle speed above 5 mph (8 km/h), the instrument cluster will display a “ Vehicle
Not In Park ” message and the engine will
remain running. Never leave a vehicle out of
the PARK position, or it could roll.
NOTE:If the gear selector is not in PARK, and the ENGINE
START/STOP button is pushed once with the
vehicle speed below 5 mph (8 km/h), the engine
will shut off and the ignition will remain in the ACC
position. If vehicle speed drops below 1.2 mph
(1.9 km/h), the vehicle may AutoPark. See
AutoPark section for further details. ENGINE START/STOP Button Functions — With
Driver’s Foot OFF The Brake Pedal (In PARK Or
NEUTRAL Position)
The ENGINE START/STOP button operates similar
to an ignition switch. It has three positions: OFF,
ACC, and ON/RUN. To change the ignition positions
without starting the vehicle and use the
accessories, follow these directions:
1. Start with the ignition in the OFF position.
2. Push the ENGINE START/STOP button once to
place the ignition to the ACC position.
3. Push the ENGINE START/STOP button a second time to place the ignition to the ON/
RUN position.
4. Push the ENGINE START/STOP button a third time to return the ignition to the OFF position.
NOTE:Only press one pedal at a time while driving the
vehicle. Torque performance of the vehicle could
be reduced if both pedals are pressed at the same
time. If pressure is detected on both pedals simul -
taneously, a warning message will display in the
instrument cluster Ú page 81.
AUTOPARK
AutoPark is a supplemental feature to assist with
placing the vehicle in PARK (P) under certain
situations. It is a back-up system and should not be
relied upon as the primary method by which the
driver shifts the vehicle into PARK.
The conditions under which AutoPark will engage
are outlined on the following pages.
WARNING!
Driver inattention could lead to failure to place
the vehicle in PARK. ALWAYS DO A VISUAL
CHECK that your vehicle is in PARK by verifying
that a solid (not blinking) “P” is indicated in
the instrument cluster display and on the gear
selector. If the "P" indicator is blinking, your
vehicle is not in PARK. As an added precau -
tion, always apply the parking brake when
exiting the vehicle.
AutoPark is a supplemental feature. It is not
designed to replace the need to shift your
vehicle into PARK. It is a back-up system and
should not be relied upon as the primary
method by which the driver shifts the vehicle
into PARK.
22_WD_OM_EN_USC_t.book Page 100
Page 109 of 332
STARTING AND OPERATING107
When exiting the vehicle, always:
Apply the parking brake.
Shift the transmission into PARK.
Turn the ignition OFF.
Remove the key fob from the vehicle.
The following indicators should be used to ensure
that you have properly engaged the transmission
into the PARK position:
When shifting into PARK, push the lock button
on the gear selector and firmly move the
selector all the way forward until it stops and is
fully seated.
Look at the transmission gear position display
and verify that it indicates the PARK position (P),
and is not blinking.
With brake pedal released, verify that the gear
selector will not move out of PARK.
REVERSE (R)
This range is for moving the vehicle backward.
Shift into REVERSE only after the vehicle has come
to a complete stop.
NEUTRAL (N)
Use this range when the vehicle is standing for
prolonged periods with the engine running. Apply
the parking brake and shift the transmission into
PARK (P) if you must exit the vehicle.
DRIVE (D)
This range should be used for most city and
highway driving. It provides the smoothest upshifts
and downshifts, and the best fuel economy. The
transmission automatically upshifts through all
forward gears.
When frequent transmission shifting occurs (such
as when operating the vehicle under heavy loading
conditions, in hilly terrain, traveling into strong
head winds, or while towing a heavy trailer), use
the AutoStick shift control to select a lower gear
Ú page 108. Under these conditions, using a lower
gear will improve performance and extend
transmission life by reducing excessive shifting
and heat buildup.
During cold temperatures, transmission operation
may be modified depending on engine and
transmission temperature as well as vehicle
speed. This feature improves warm up time of the
engine and transmission to achieve maximum
efficiency. Engagement of the torque converter
clutch is inhibited until the transmission fluid is
warm. Normal operation will resume once the
transmission temperature has risen to a suitable
level.
CAUTION!
Before moving the transmission gear selector
out of PARK, you must start the engine, and
also press the brake pedal. Otherwise,
damage to the gear selector could result.
DO NOT race the engine when shifting from
PARK or NEUTRAL into another gear range, as
this can damage the drivetrain.
WARNING!
Do not coast in NEUTRAL and never turn off the
ignition to coast down a hill. These are unsafe
practices that limit your response to changing
traffic or road conditions. You might lose control
of the vehicle and have a collision.
CAUTION!
Towing the vehicle, coasting, or driving for any
other reason with the transmission in NEUTRAL
can cause severe transmission damage.
For Recreational Towing Ú page 149.
For Towing A Disabled Vehicle Ú page 253.
4
22_WD_OM_EN_USC_t.book Page 107
Page 111 of 332
STARTING AND OPERATING109
AutoStick mode has the following operational
benefits:
The transmission will automatically downshift
as the vehicle slows (to prevent engine lugging)
and will display the current gear.
The transmission will automatically downshift to
FIRST gear when coming to a stop. After a stop,
the driver should manually upshift (+) the trans -
mission as the vehicle is accelerated.
You can start out, from a stop, in FIRST or
SECOND gear. Tapping (+) at a stop will allow
starting in SECOND gear. Starting out in
SECOND gear can be helpful in snowy or icy
conditions.
If a requested downshift would cause the
engine to over-speed, that shift will not occur.
The system will ignore attempts to upshift at too
low of a vehicle speed.
Holding the (-) paddle pressed, or holding the
gear selector in the (-) position, will downshift
the transmission to the lowest gear possible at
the current speed.
Transmission shifting will be more noticeable
when AutoStick is enabled.
The system may revert to automatic shift mode
if a fault or overheat condition is detected. To disengage AutoStick mode, return the gear
selector to the DRIVE (D) position, or press and
hold the (+) paddle shifter until "D" is indicated in
the instrument cluster. You can shift in or out of
AutoStick mode at any time without taking your
foot off the accelerator pedal.
SPORT MODE — IF EQUIPPED
Your vehicle is equipped with a SPORT Mode
feature. The engine, transmission, and steering
systems are all set to their SPORT settings. SPORT
Mode will provide improved throttle response and
modified transmission shift points for an enhanced
driving experience, as well as greater amount of
steering feel. This mode may be activated and
deactivated by pushing the SPORT button on the
instrument panel switch bank.
ALL-WHEEL DRIVE OPERATION
SINGLE-SPEED OPERATING
I
NSTRUCTIONS/PRECAUTIONS —
I
F EQUIPPED
This system contains a single-speed (HI range only)
transfer case, which provides convenient full-time
All-Wheel Drive (AWD). No driver interaction is
required. The Brake Traction Control (BTC) System,
which combines standard ABS and Traction
Control, provides resistance to any wheel that is
slipping to allow additional torque transfer to
wheels with traction.
NOTE:This system is not appropriate for conditions where
AWD LOW is recommended Ú page 153.
ELECTRONICALLY SHIFTED TRANSFER
C
ASE — IF EQUIPPED
This is an electronically shifted transfer case and it
is operated by the AWD control switch, which is
located on the center console.
WARNING!
Do not downshift for additional engine braking
on a slippery surface. The drive wheels could
lose their grip and the vehicle could skid,
causing a collision or personal injury.
4
22_WD_OM_EN_USC_t.book Page 109
Page 136 of 332
134STARTING AND OPERATING
When both lane markings are detected and the
driver drifts out of the lane (no turn signal applied),
the LaneSense system provides a haptic warning
in the form of torque applied to the steering wheel
to prompt the driver to remain within the lane
boundaries. If the driver continues to drift out of
the lane, the LaneSense system provides a visual
warning through the instrument cluster display to
prompt the driver to remain within the lane
boundaries.
The driver may manually override the haptic
warning by applying force to the steering wheel at
any time.
When only a single lane marking is detected and
the driver drifts across the lane marking (no turn
signal applied), the LaneSense system provides
visual warnings through the instrument cluster
display to prompt the driver to remain within the
lane. When only a single lane marking is detected,
a haptic or a torque warning will not be provided.
NOTE:When operating conditions have been met, the
LaneSense system will monitor if the driver’s
hands are on the steering wheel and provide an
audible warning to the driver if removed. The
system will cancel if the driver does not return their
hands to the wheel.
TURNING LANESENSE ON OR OFF
The LaneSense button is located on the
switch panel below the Uconnect display.
To turn the LaneSense system on, push the
LaneSense button (LED turns off). A “LaneSense
On” message is shown in the instrument cluster
display.
To turn the LaneSense system off, push the
LaneSense button once (LED turns on).
NOTE:The LaneSense system will retain the last system
state on or off from the last ignition cycle when the
ignition is placed in the ON/RUN position.
LANESENSE WARNING MESSAGE
The LaneSense system will indicate the current
lane drift condition through the instrument cluster
display.
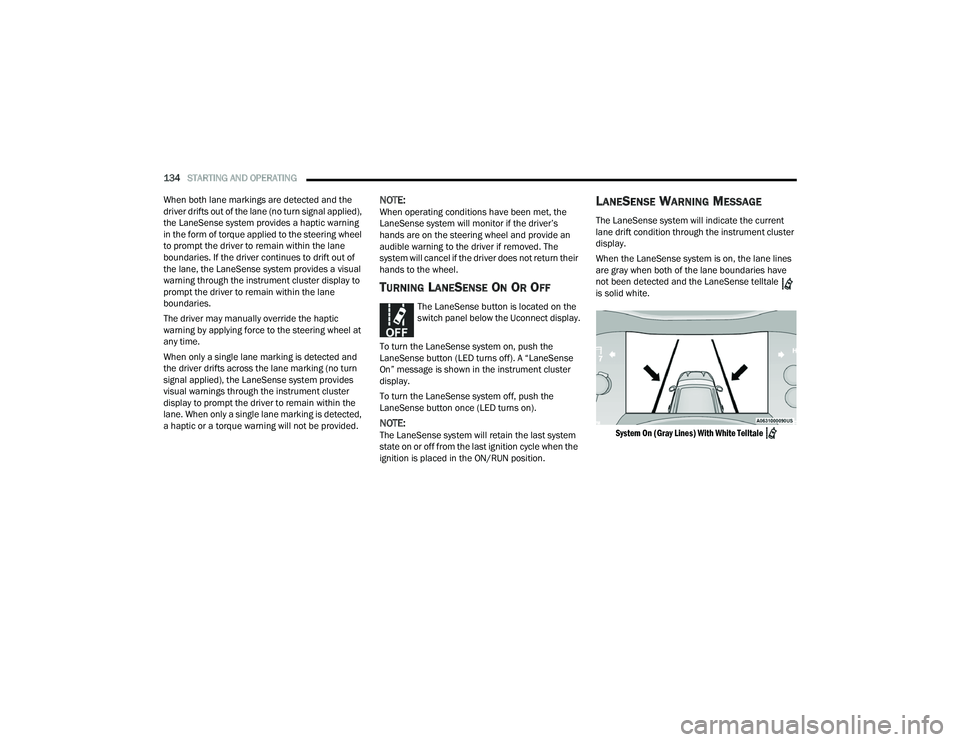
When the LaneSense system is on, the lane lines
are gray when both of the lane boundaries have
not been detected and the LaneSense telltale
is solid white.
System On (Gray Lines) With White Telltale
22_WD_OM_EN_USC_t.book Page 134
Page 137 of 332
STARTING AND OPERATING135
Left Lane Departure — Only Left Lane Detected
When the LaneSense system is on, the Lane-
Sense telltale is solid white when only the
left lane marking has been detected and the
system is ready to provide visual warnings in the
instrument cluster display if an unintentional
lane departure occurs.
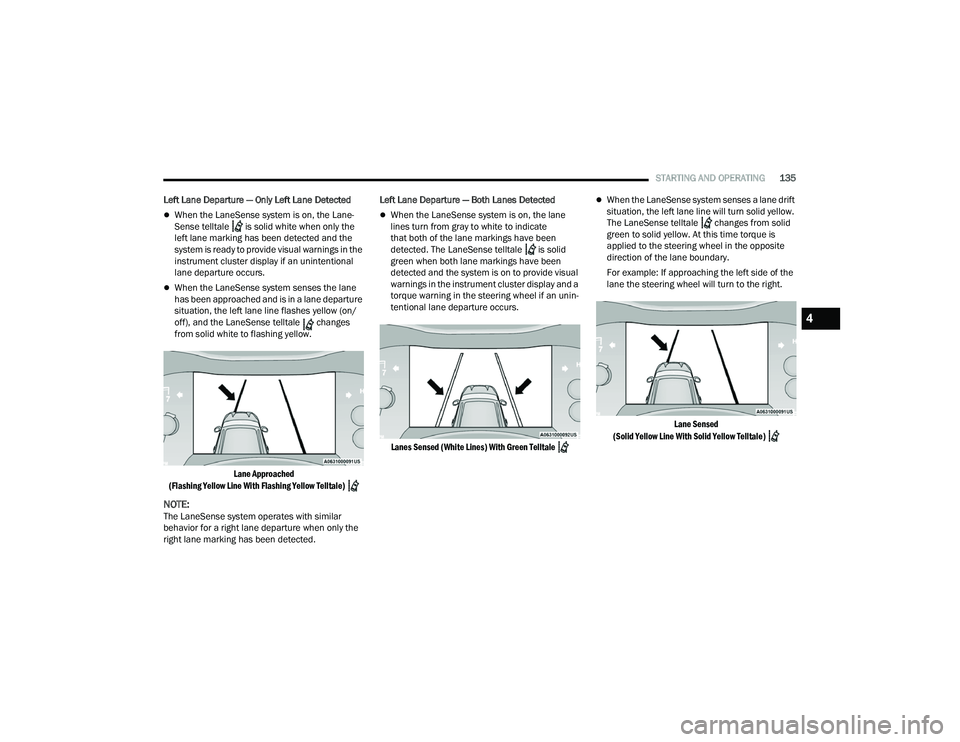
When the LaneSense system senses the lane
has been approached and is in a lane departure
situation, the left lane line flashes yellow (on/
off), and the LaneSense telltale changes
from solid white to flashing yellow.
Lane Approached
(Flashing Yellow Line With Flashing Yellow Telltale)
NOTE:The LaneSense system operates with similar
behavior for a right lane departure when only the
right lane marking has been detected. Left Lane Departure — Both Lanes Detected
When the LaneSense system is on, the lane
lines turn from gray to white to indicate
that both of the lane markings have been
detected. The LaneSense telltale is solid
green when both lane markings have been
detected and the system is on to provide visual
warnings in the instrument cluster display and a
torque warning in the steering wheel if an unin -
tentional lane departure occurs.
Lanes Sensed (White Lines) With Green Telltale
When the LaneSense system senses a lane drift
situation, the left lane line will turn solid yellow.
The LaneSense telltale changes from solid
green to solid yellow. At this time torque is
applied to the steering wheel in the opposite
direction of the lane boundary.
For example: If approaching the left side of the
lane the steering wheel will turn to the right.
Lane Sensed
(Solid Yellow Line With Solid Yellow Telltale)
4
22_WD_OM_EN_USC_t.book Page 135
Page 138 of 332
136STARTING AND OPERATING
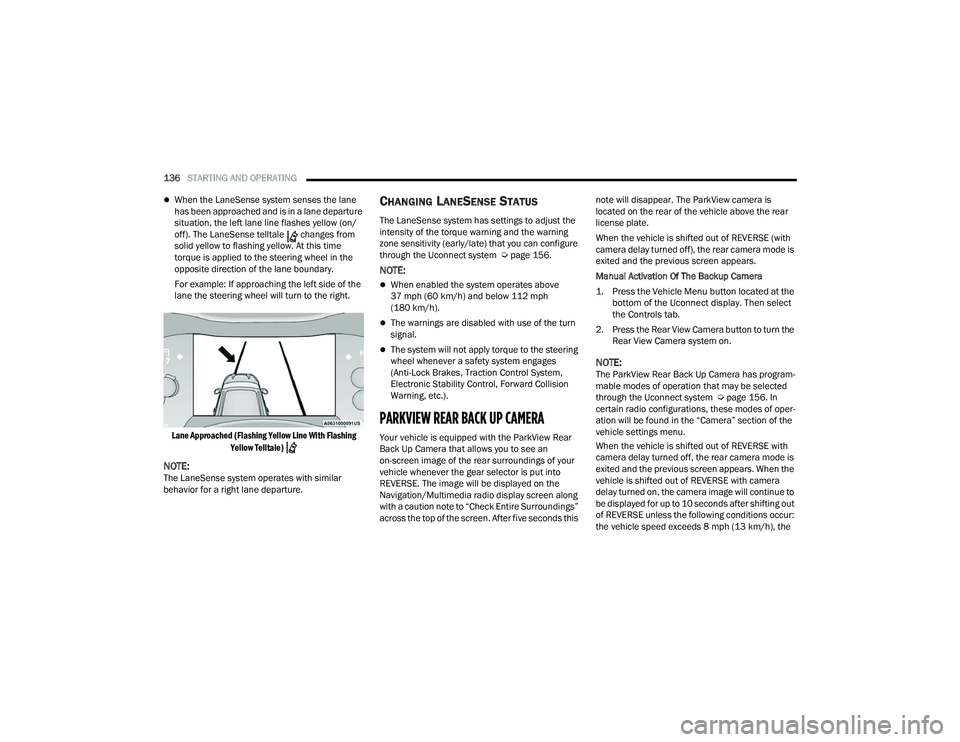
When the LaneSense system senses the lane
has been approached and is in a lane departure
situation, the left lane line flashes yellow (on/
off). The LaneSense telltale changes from
solid yellow to flashing yellow. At this time
torque is applied to the steering wheel in the
opposite direction of the lane boundary.
For example: If approaching the left side of the
lane the steering wheel will turn to the right.
Lane Approached (Flashing Yellow Line With Flashing Yellow Telltale)
NOTE:The LaneSense system operates with similar
behavior for a right lane departure.
CHANGING LANESENSE STATUS
The LaneSense system has settings to adjust the
intensity of the torque warning and the warning
zone sensitivity (early/late) that you can configure
through the Uconnect system Ú page 156.
NOTE:
When enabled the system operates above
37 mph (60 km/h) and below 112 mph
(180 km/h).
The warnings are disabled with use of the turn
signal.
The system will not apply torque to the steering
wheel whenever a safety system engages
(Anti-Lock Brakes, Traction Control System,
Electronic Stability Control, Forward Collision
Warning, etc.).
PARKVIEW REAR BACK UP CAMERA
Your vehicle is equipped with the ParkView Rear
Back Up Camera that allows you to see an
on-screen image of the rear surroundings of your
vehicle whenever the gear selector is put into
REVERSE. The image will be displayed on the
Navigation/Multimedia radio display screen along
with a caution note to “Check Entire Surroundings”
across the top of the screen. After five seconds this note will disappear. The ParkView camera is
located on the rear of the vehicle above the rear
license plate.
When the vehicle is shifted out of REVERSE (with
camera delay turned off), the rear camera mode is
exited and the previous screen appears.
Manual Activation Of The Backup Camera
1. Press the Vehicle Menu button located at the
bottom of the Uconnect display. Then select
the Controls tab.
2. Press the Rear View Camera button to turn the Rear View Camera system on.
NOTE:The ParkView Rear Back Up Camera has program -
mable modes of operation that may be selected
through the Uconnect system Ú page 156. In
certain radio configurations, these modes of oper -
ation will be found in the “Camera” section of the
vehicle settings menu.
When the vehicle is shifted out of REVERSE with
camera delay turned off, the rear camera mode is
exited and the previous screen appears. When the
vehicle is shifted out of REVERSE with camera
delay turned on, the camera image will continue to
be displayed for up to 10 seconds after shifting out
of REVERSE unless the following conditions occur:
the vehicle speed exceeds 8 mph (13 km/h), the
22_WD_OM_EN_USC_t.book Page 136
Page 157 of 332
STARTING AND OPERATING155
After Driving Off-Road
Off-road operation puts more stress on your
vehicle than does most on-road driving. After going
off-road, it is always a good idea to check for
damage. That way you can get any problems taken
care of right away and have your vehicle ready
when you need it.
Completely inspect the underbody of your
vehicle. Check tires, body structure, steering,
suspension, and exhaust system for damage.
Inspect the radiator for mud and debris and
clean as required.
Check threaded fasteners for looseness, partic -
ularly on the chassis, drivetrain components,
steering, and suspension. Retighten them, if
required, and torque to the values specified in
the Service Manual.
Check for accumulations of plants or brush.
These things could be a fire hazard. They might
hide damage to fuel lines, brake hoses, axle
pinion seals, and propeller shafts.
After extended operation in mud, sand, water, or
similar dirty conditions, have the radiator, fan,
brake rotors, wheels, brake linings, and axle
yokes inspected and cleaned as soon as
possible.If you experience unusual vibration after driving
in mud, slush or similar conditions, check the
wheels for impacted material. Impacted mate -
rial can cause a wheel imbalance and freeing
the wheels of it will correct the situation.
WARNING!
Abrasive material in any part of the brakes may
cause excessive wear or unpredictable braking.
You might not have full braking power when you
need it to prevent a collision. If you have been
operating your vehicle in dirty conditions, get
your brakes checked and cleaned as necessary.
4
22_WD_OM_EN_USC_t.book Page 155
Page 185 of 332
SAFETY183
If the ABS Warning Light is on, the brake system
should be serviced as soon as possible to restore
the benefits of Anti-Lock Brakes. If the ABS
Warning Light does not come on when the ignition
is placed in the ON/RUN mode, have the light
repaired as soon as possible.
REAR SEAT REMINDER ALERT (RSRA)
RSRA will consider the presence of an object in the
rear seat when a rear entry/exit door is opened at
the beginning of each key cycle. To activate, the
rear door must be open for more than one second
and the vehicle must be placed in the ON/RUN
position within 10 minutes. When the potential
presence of an object is determined and/or
otherwise inferred, a message will appear in the
instrument cluster display reminding driver to
check the rear seat(s) immediately after key off
accompanied by an alert upon exiting the vehicle.
To enable or disable RSRA, see Ú page 156.
ELECTRONIC BRAKE CONTROL (EBC)
S
YSTEM
Your vehicle is equipped with an advanced
Electronic Brake Control (EBC) system. This system
includes Anti-Lock Brake System (ABS), Brake
Assist System (BAS), Electronic Brake Force
Distribution (EBD), Electronic Roll Mitigation
(ERM), Electronic Stability Control (ESC), Hill Start
Assist (HSA), and Traction Control System (TCS). These systems work together to enhance both
vehicle stability and control in various driving
conditions.
Your vehicle may also be equipped with Dynamic
Steering Torque (DST), Rain Brake Support (RBS),
Ready Alert Braking (RAB), and Trailer Sway
Control (TSC).
Brake Assist System (BAS)
The BAS is designed to optimize the vehicle’s
braking capability during emergency braking
maneuvers. The system detects an emergency
braking situation by sensing the rate and amount
of brake application and then applies optimum
pressure to the brakes. This can help reduce
braking distances. The BAS complements the
Anti-Lock Brake System (ABS). Applying the brakes
very quickly results in the best BAS assistance. To
receive the benefit of the system, you must apply
continuous braking pressure during the stopping
sequence (do not “pump” the brakes). Do not
reduce brake pedal pressure unless braking is no
longer desired. Once the brake pedal is released,
the BAS is deactivated.
Brake System Warning Light
The red Brake System Warning Light will turn on
when the ignition is placed in the ON/RUN mode
and may stay on for as long as four seconds.
If the Brake System Warning Light remains on or
comes on while driving, it indicates that the brake
system is not functioning properly and that
immediate service is required. If the Brake System
Warning Light does not come on when the ignition
is placed in the ON/RUN mode, have the light
repaired as soon as possible.
WARNING!
The Brake Assist System (BAS) cannot prevent
the natural laws of physics from acting on the
vehicle, nor can it increase the traction afforded
by prevailing road conditions. BAS cannot
prevent collisions, including those resulting from
excessive speed in turns, driving on very slippery
surfaces, or hydroplaning. The capabilities of a
BAS-equipped vehicle must never be exploited in
a reckless or dangerous manner, which could
jeopardize the user's safety or the safety of
others.
6
22_WD_OM_EN_USC_t.book Page 183