display DODGE DURANGO 2023 Manual PDF
[x] Cancel search | Manufacturer: DODGE, Model Year: 2023, Model line: DURANGO, Model: DODGE DURANGO 2023Pages: 328, PDF Size: 13.82 MB
Page 169 of 328

MULTIMEDIA167
Mirrors & Wipers
Lights
When the Mirrors & Wipers button is pressed on the touchscreen, the system displays the options related to the vehicle’s mirrors and wipers.
NOTE:Depending on the vehicle’s options, feature settings may vary.
Setting Name Description
Tilt Side Mirrors In ReverseThis setting will tilt the outside side-view mirrors when the ignition is in the
ON/RUN position and the transmission gear selector is in the REVERSE
position. The mirrors will move back to their previous position when the
transmission is shifted out of REVERSE. The available settings are “On” and
“Off”.
Rain Sensing Auto Wipers This setting will turn the Rain Sensing Auto Wipers on or off.
Headlights With Wipers This setting will turn the headlights on when the wipers are activated.
When the Lights button is pressed on the touchscreen, the system displays the options related to the vehicle’s exterior and interior lights.
NOTE:
When the “Daytime Running Lights” feature is selected, the daytime running lights can be turned on or off. This feature is only allowed by law in the country
of the vehicle purchase.
Depending on the vehicle’s options, feature settings may vary.
Setting Name Description
Headlight Off DelayThis setting will allow you to set the amount of time it takes for the headlights
to shut off after the vehicle is turned off. The available settings are “0 sec”,
“30 sec”, “60 sec”, and “90 sec”.
5
23_WD_OM_EN_USC_t.book Page 167
Page 170 of 328

168MULTIMEDIA
Doors & Locks
Headlight Illumination On Approach This setting will allow you to set the amount of time it takes for the headlights
to shut off after the vehicle is unlocked. The available settings are “0 sec”,
“30 sec”, “60 sec”, and “90 sec”.
Headlights with Wipers This setting will turn the headlights on when the wipers are activated.
Auto Dim High Beams This setting will allow you to turn the Auto Dim High Beams on or off.
Daytime Running Lights This setting will allow you to turn the Daytime Running Lights on or off.
Flash Lights With Lock This setting will allow you to turn the flashing of the lights when the Lock
button is pushed on the key fob on or off.
Setting Name
Description
When the Doors & Locks button is pressed on the touchscreen, the system displays the options related to locking and unlocking the vehicle’s doors.
NOTE:Depending on the vehicle’s options, feature settings may vary.
Setting NameDescription
Auto Unlock On Exit
This setting will unlock the doors when any of the doors are opened from the inside.
Flash Lights With Lock This setting will allow you to turn the flashing of the lights when the Lock
button is pushed on the key fob on or off.
Sound Horn With Lock
This setting will sound the horn when the Lock button is pushed on the key fob.
The “Off” setting will not sound the horn when the Lock button is pushed. The “1st
Press” setting will sound the horn when the Lock button is pushed once. The “2nd
Press” setting will sound the horn when the Lock button is pushed twice.
Sound Horn With Remote Start
This setting will sound the horn when the remote start is activated from the key fob.
23_WD_OM_EN_USC_t.book Page 168
Page 171 of 328

MULTIMEDIA169
Seats & Comfort/Auto-On Comfort — If Equipped
Remote Door Unlock This setting will change how many pushes of the Unlock button on the key fob
are needed to unlock all the doors. The “Driver Door” setting will only unlock
the driver door on the first push on the Unlock button. The “All Doors” setting
will unlock all doors with only one push of the Unlock button.
Passive Entry This setting will allow you to turn the Passive Entry feature
(Keyless Enter ‘n Go™) on or off.
Personal Settings Linked to Key Fob This setting will recall preset radio stations and driver seat position that have
been linked to the key fob.
Power Liftgate Alert This setting will chime an audible alert when the power liftgate is raising or
lowering. Selectable settings are “On” and “Off”.
When Seats & Comfort/Auto-On Comfort button is pressed on the touchscreen, the system displays the options related to the vehicle’s comfort systems when
remote start has been activated or the vehicle has been started.
NOTE:Depending on the vehicle’s options, feature settings may vary.
Setting Name Description
Easy Exit SeatsThis setting will automatically move the driver seat rearward when the engine
is shut off. The available settings are “On” and “Off”.
Auto-On Driver Heated/Ventilated Seat & Heated Steering Wheel With Vehicle Start This setting will activate the vehicle’s comfort systems and heated seats or
heated steering wheel when the vehicle is remote started or ignition is
started. The “Off” setting will not activate the comfort systems. The “Remote
Start” setting will only activate the comfort systems when using Remote Start.
The “All Start” setting will activate the comfort systems whenever the vehicle
is started. If equipped, the only selectable option will be “With Vehicle Start”.
Setting Name
Description
5
23_WD_OM_EN_USC_t.book Page 169
Page 172 of 328

170MULTIMEDIA
Key Off/Engine Off Options
Audio
When the Key Off /Engine Off Options button is pressed on the touchscreen, the system displays the options related to vehicle shutoff. These settings will only
activate when the ignition is set to OFF.
NOTE:Depending on the vehicle’s options, feature settings may vary.
Setting Name Description
Easy Exit SeatsThis setting will automatically move the driver seat rearward when the engine
is shut off. The available settings are “On” and “Off”.
Key Off Power Delay/Engine Off Power Delay This setting will keep certain electrical features running after the engine is
turned off. When any door is opened, the electronics will deactivate. The
available settings are “0 sec”, “45 sec”, “5 min”, and “10 min”.
Headlight Off Delay This setting will allow you to set the amount of time it takes for the headlights
to shut off after the vehicle is turned off. The available settings are “0 sec”,
“30 sec”, “60 sec”, and “90 sec”.
When the Audio button is pressed on the touchscreen, the system displays options related to the vehicle’s sound system. These settings can change the audio
location within the vehicle, adjust the bass or treble levels, and auto-play settings from an audio device or smartphone.
NOTE:Depending on the vehicle’s options, feature settings may vary.
Setting Name
Description
Balance/Fade
This setting will adjust audio levels from specific speakers in the front/back and
left/right of the vehicle. The Speaker icon can be moved to set audio location.
Equalizer This setting will adjust the “Bass”, “Mid”, and “Treble” ranges of the audio.
23_WD_OM_EN_USC_t.book Page 170
Page 173 of 328

MULTIMEDIA171
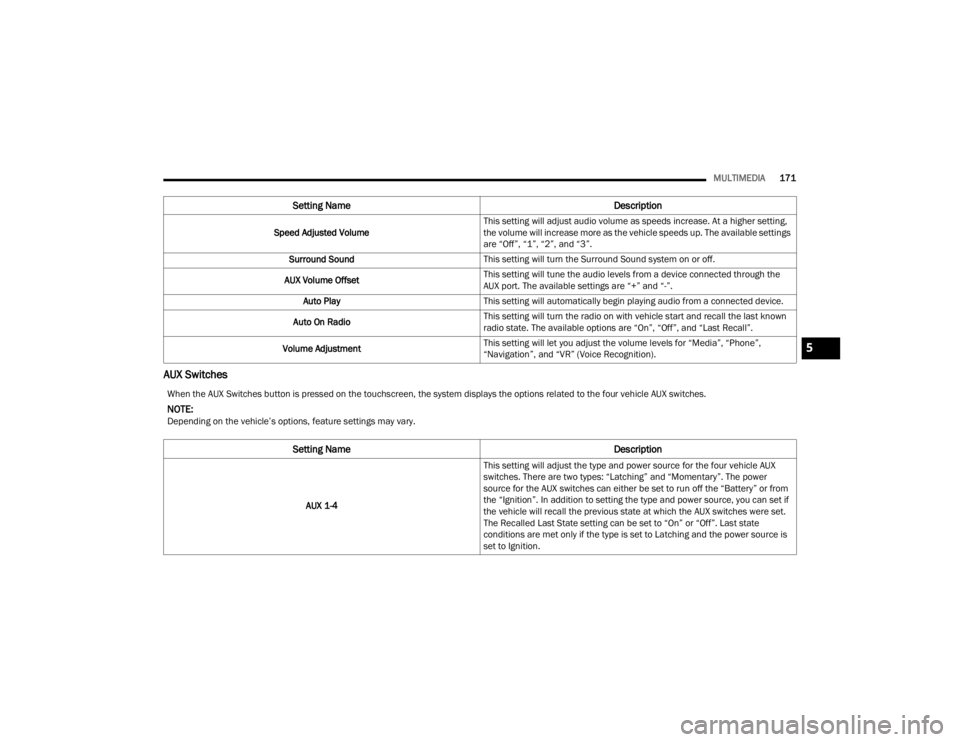
AUX Switches
Speed Adjusted Volume This setting will adjust audio volume as speeds increase. At a higher setting,
the volume will increase more as the vehicle speeds up. The available settings
are “Off”, “1”, “2”, and “3”.
Surround Sound This setting will turn the Surround Sound system on or off.
AUX Volume Offset This setting will tune the audio levels from a device connected through the
AUX port. The available settings are “+” and “-”.
Auto Play This setting will automatically begin playing audio from a connected device.
Auto On Radio This setting will turn the radio on with vehicle start and recall the last known
radio state. The available options are “On”, “Off”, and “Last Recall”.
Volume Adjustment This setting will let you adjust the volume levels for “Media”, “Phone”,
“Navigation”, and “VR” (Voice Recognition).
Setting Name
Description
When the AUX Switches button is pressed on the touchscreen, the system displays the options related to the four vehicle AUX switches.
NOTE:Depending on the vehicle’s options, feature settings may vary.
Setting NameDescription
AUX 1-4This setting will adjust the type and power source for the four vehicle AUX
switches. There are two types: “Latching” and “Momentary”. The power
source for the AUX switches can either be set to run off the “Battery” or from
the “Ignition”. In addition to setting the type and power source, you can set if
the vehicle will recall the previous state at which the AUX switches were set.
The Recalled Last State setting can be set to “On” or “Off”. Last state
conditions are met only if the type is set to Latching and the power source is
set to Ignition.
5
23_WD_OM_EN_USC_t.book Page 171
Page 174 of 328

172MULTIMEDIA
Notifications
SiriusXM® Setup
When the Notifications button is pressed on the touchscreen, the system displays the options related to Notifications for the system.
NOTE:Depending on the vehicle’s options, feature settings may vary.
Setting Name Description
App Drawer Favoriting Pop-UpsThis setting turns the “App Favorited” pop-up on or off.
App Drawer Unfavoriting Pop-Ups This setting turns the “App Unfavorited” pop-up on or off.
New Text Message Pop-Ups This setting turns receiving/storing a pop-up for new text messages of any
connected phone on or off.
Missed Calls Message This setting turns receiving/storing a pop-up for missed calls of any connected
phone on or off.
Navigation Pop-ups This setting turns receiving/storing predictive Navigation Pop-ups on or off.
When the SiriusXM® Setup button is pressed on the touchscreen, the system displays options related to SiriusXM® satellite radio. These settings can be used
to skip specific radio channels and restart favorite songs from the beginning.
NOTE:
A subscription to SiriusXM® satellite radio is required for these settings to be functional.
Depending on the vehicle’s options, feature settings may vary.
Setting Name Description
SiriusXM® Account, Profiles, & SettingsThis setting will direct you to the SiriusXM® profile settings.
23_WD_OM_EN_USC_t.book Page 172
Page 175 of 328

MULTIMEDIA173
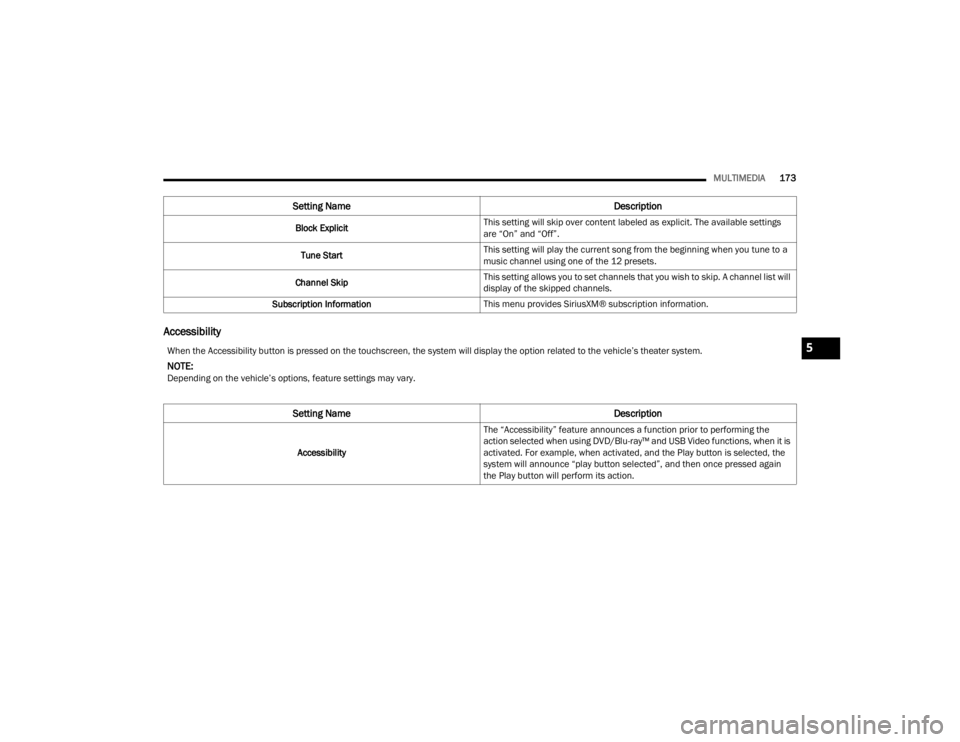
Accessibility
Block Explicit This setting will skip over content labeled as explicit. The available settings
are “On” and “Off”.
Tune Start This setting will play the current song from the beginning when you tune to a
music channel using one of the 12 presets.
Channel Skip This setting allows you to set channels that you wish to skip. A channel list will
display of the skipped channels.
Subscription Information This menu provides SiriusXM® subscription information.
Setting Name Description
When the Accessibility button is pressed on the touchscreen, the system will display the option related to the vehicle’s theater system.
NOTE:Depending on the vehicle’s options, feature settings may vary.
Setting NameDescription
AccessibilityThe “Accessibility” feature announces a function prior to performing the
action selected when using DVD/Blu-ray™ and USB Video functions, when it is
activated. For example, when activated, and the Play button is selected, the
system will announce “play button selected”, and then once pressed again
the Play button will perform its action.
5
23_WD_OM_EN_USC_t.book Page 173
Page 176 of 328

174MULTIMEDIA
Software Update
System Information — If Equipped
When the Software Update button is selected, the system will display a menu with possible Wi-Fi connections. From this page, you can select and connect to
one of the available Wi-Fi networks to begin system software updates. To begin, make sure the system is set to allow for Wi-Fi updates.
1. Select the desired Wi-Fi network from the available list.
2. Enter the Wi-Fi password. If the password is entered incorrectly, the system will display a notification that the connection failed.
3. Once connected, the system will begin scanning for any system updates. Press the Stop Scan button to end this process.
NOTE:Depending on the vehicle’s options, feature settings may vary.
When the System Information button is pressed on the touchscreen, the system displays the radio system information.
NOTE:Depending on the vehicle’s options, feature settings may vary.
Setting Name Description
Version InformationWhen this feature is selected, the radio version build will be displayed.
License Information When this feature is selected, a software license screen will appear,
displaying the system software version.
23_WD_OM_EN_USC_t.book Page 174
Page 177 of 328

MULTIMEDIA175
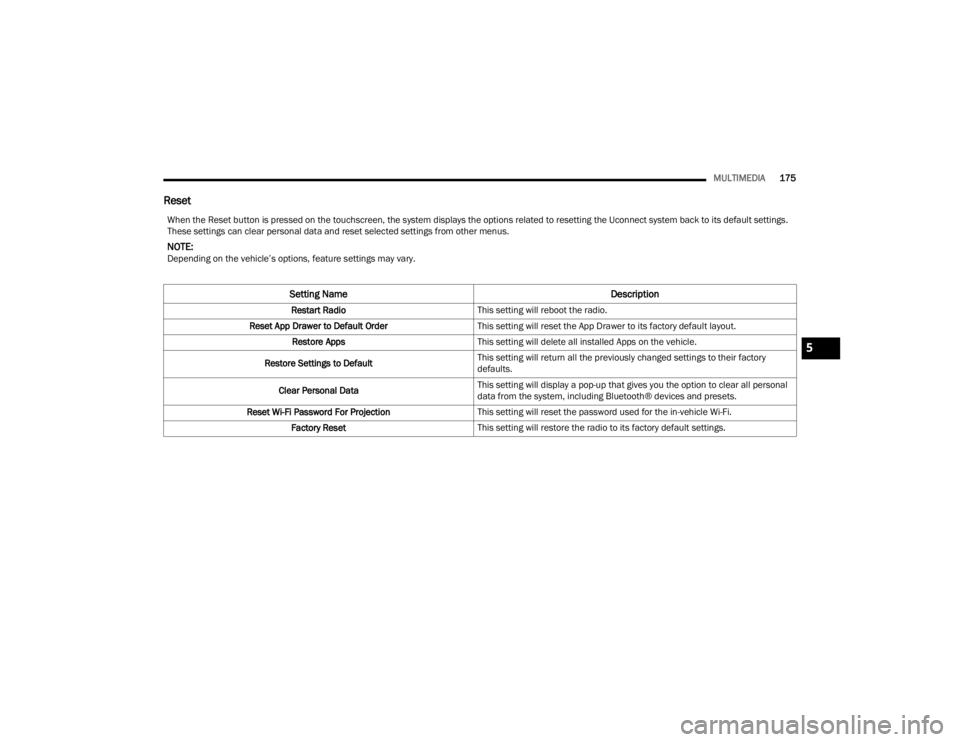
Reset
When the Reset button is pressed on the touchscreen, the system displays the options related to resetting the Uconnect system back to its default settings.
These settings can clear personal data and reset selected settings from other menus.
NOTE:Depending on the vehicle’s options, feature settings may vary.
Setting Name Description
Restart RadioThis setting will reboot the radio.
Reset App Drawer to Default Order This setting will reset the App Drawer to its factory default layout.
Restore Apps This setting will delete all installed Apps on the vehicle.
Restore Settings to Default This setting will return all the previously changed settings to their factory
defaults.
Clear Personal Data This setting will display a pop-up that gives you the option to clear all personal
data from the system, including Bluetooth® devices and presets.
Reset Wi-Fi Password For Projection This setting will reset the password used for the in-vehicle Wi-Fi.
Factory Reset This setting will restore the radio to its factory default settings.
5
23_WD_OM_EN_USC_t.book Page 175
Page 180 of 328

178SAFETY
(Continued)
If the ABS Warning Light is on, the brake system
should be serviced as soon as possible to restore
the benefits of Anti-Lock Brakes. If the ABS
Warning Light does not come on when the ignition
is placed in the ON/RUN mode, have the light
repaired as soon as possible.
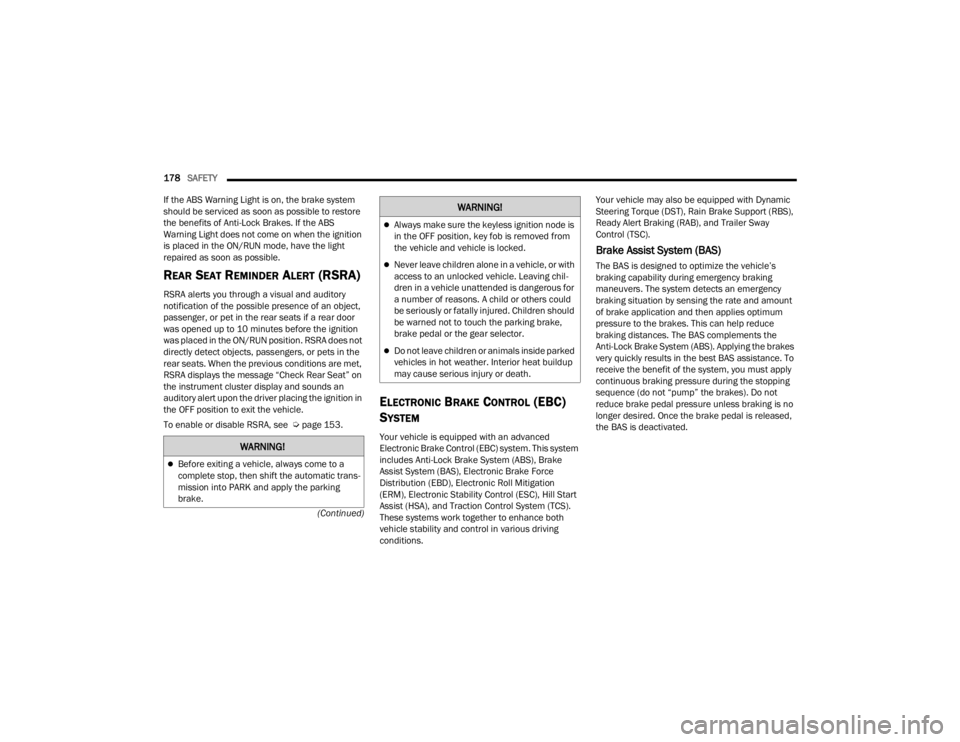
REAR SEAT REMINDER ALERT (RSRA)
RSRA alerts you through a visual and auditory
notification of the possible presence of an object,
passenger, or pet in the rear seats if a rear door
was opened up to 10 minutes before the ignition
was placed in the ON/RUN position. RSRA does not
directly detect objects, passengers, or pets in the
rear seats. When the previous conditions are met,
RSRA displays the message “Check Rear Seat” on
the instrument cluster display and sounds an
auditory alert upon the driver placing the ignition in
the OFF position to exit the vehicle.
To enable or disable RSRA, see Ú
page 153.
ELECTRONIC BRAKE CONTROL (EBC)
S
YSTEM
Your vehicle is equipped with an advanced
Electronic Brake Control (EBC) system. This system
includes Anti-Lock Brake System (ABS), Brake
Assist System (BAS), Electronic Brake Force
Distribution (EBD), Electronic Roll Mitigation
(ERM), Electronic Stability Control (ESC), Hill Start
Assist (HSA), and Traction Control System (TCS).
These systems work together to enhance both
vehicle stability and control in various driving
conditions. Your vehicle may also be equipped with Dynamic
Steering Torque (DST), Rain Brake Support (RBS),
Ready Alert Braking (RAB), and Trailer Sway
Control (TSC).
Brake Assist System (BAS)
The BAS is designed to optimize the vehicle’s
braking capability during emergency braking
maneuvers. The system detects an emergency
braking situation by sensing the rate and amount
of brake application and then applies optimum
pressure to the brakes. This can help reduce
braking distances. The BAS complements the
Anti-Lock Brake System (ABS). Applying the brakes
very quickly results in the best BAS assistance. To
receive the benefit of the system, you must apply
continuous braking pressure during the stopping
sequence (do not “pump” the brakes). Do not
reduce brake pedal pressure unless braking is no
longer desired. Once the brake pedal is released,
the BAS is deactivated.
WARNING!
Before exiting a vehicle, always come to a
complete stop, then shift the automatic trans
-
mission into PARK and apply the parking
brake.
Always make sure the keyless ignition node is
in the OFF position, key fob is removed from
the vehicle and vehicle is locked.
Never leave children alone in a vehicle, or with
access to an unlocked vehicle. Leaving chil -
dren in a vehicle unattended is dangerous for
a number of reasons. A child or others could
be seriously or fatally injured. Children should
be warned not to touch the parking brake,
brake pedal or the gear selector.
Do not leave children or animals inside parked
vehicles in hot weather. Interior heat buildup
may cause serious injury or death.
WARNING!
23_WD_OM_EN_USC_t.book Page 178