suspension DODGE DURANGO SRT 2018 Owners Manual
[x] Cancel search | Manufacturer: DODGE, Model Year: 2018, Model line: DURANGO SRT, Model: DODGE DURANGO SRT 2018Pages: 568, PDF Size: 6.54 MB
Page 176 of 568
WARNING!(Continued)
turns, driving on very slippery surfaces, or hydro-
planing. ESC also cannot prevent accidents resulting
from loss of vehicle control due to inappropriate
driver input for the conditions. Only a safe, attentive,
and skillful driver can prevent accidents. The capa-
bilities of an ESC equipped vehicle must never be
exploited in a reckless or dangerous manner which
could jeopardize the user ’s safety or the safety of
others.
• Vehicle modifications, or failure to properly main-
tain your vehicle, may change the handling charac-
teristics of your vehicle, and may negatively affect
the performance of the ESC system. Changes to the
steering system, suspension, braking system, tire
type and size or wheel size may adversely affect ESC
performance. Improperly inflated and unevenly
worn tires may also degrade ESC performance. Any
vehicle modification or poor vehicle maintenance
that reduces the effectiveness of the ESC system can
increase the risk of loss of vehicle control, vehicle
rollover, personal injury and death.
ESC Operating Modes
NOTE: Depending upon model and mode of operation, the
ESC system may have multiple operating modes.
ESC On
This is the normal operating mode for the ESC. Whenever
the vehicle is started, the ESC system will be in this mode.
This mode should be used for most driving conditions.
Alternate ESC modes should only be used for specific
reasons as noted in the following paragraphs.
Partial Off
The “Partial Off” mode is intended for times when a more
spirited driving experience is desired. This mode may
modify TCS and ESC thresholds for activation, which
allows for more wheel spin than normally allowed. This
mode may be useful if the vehicle becomes stuck.
To enter the “Partial Off” mode, momentarily push the
“ESC Off” switch and the “ESC Off Indicator Light” will
illuminate. To turn the ESC on again, momentarily push
the “ESC Off” switch and the “ESC Off Indicator Light”
will turn off.
174 SAFETY
Page 281 of 568
•It is recommended that each track outing should end
with a minimum of one cool down lap using minimal
braking.
• If equipped with a removable lower front fascia grille, it
is recommended to remove it for track use during
warm/hot weather to improve cooling airflow to critical
powertrain and cooling system components.
• All SRT vehicles are track tested for 24 hours of endur-
ance. However, it is recommended that suspension
system, brake system, prop shaft, and ½ shaft boots
should be checked for wear or damage after every track
event.
• Track usage results in increased operating temperatures
of the engine, transmission, clutch – if equipped, drive-
line and brake system. This may affect noise (NVH)
countermeasures designed into your vehicle. New com-
ponents may need to be installed to return the system to
the original NVH performance.
• Tire pressure:
• 40psi (276kpa) hot, recommended 32psi (221kpa) front,
30psi (207 kpa) rear cold NOTE:
It is recommended that you target 40psi (276kpa)
Hot Tire Pressure at the conclusion of each track session.
Starting at 32psi (221kpa) Front and 30psi (207 kpa) Rear
Cold and adjusting based on ambient & track conditions is
recommended. Tire pressure can be monitored via the
instrument cluster display and can assist with adjustments.
Track burnishing your brakes:
To avoid “green lining fade” during track use, the brake
pads and rotors must have a thermal burnish for factory
installed components or when new brake friction compo-
nents are installed:
1. Use one track session to burnish brakes by driving at 75% speed. Brake at approximately 0.60-0.80g max with-
out ABS intervention.
2. Lap the track in this manner until you start smelling the brakes. Continue for another half lap at speed, then do
a two lap cool down with minimal brake applies. Make
sure the brakes are not smoking. If they are, do another
cool down lap.
3. Do not continue for more than one full burnishing lap after you start smelling the brakes. Do not get them
smoking heavily. This will get them too hot and affect
their life negatively in future track use.
6
STARTING AND OPERATING 279
Page 289 of 568
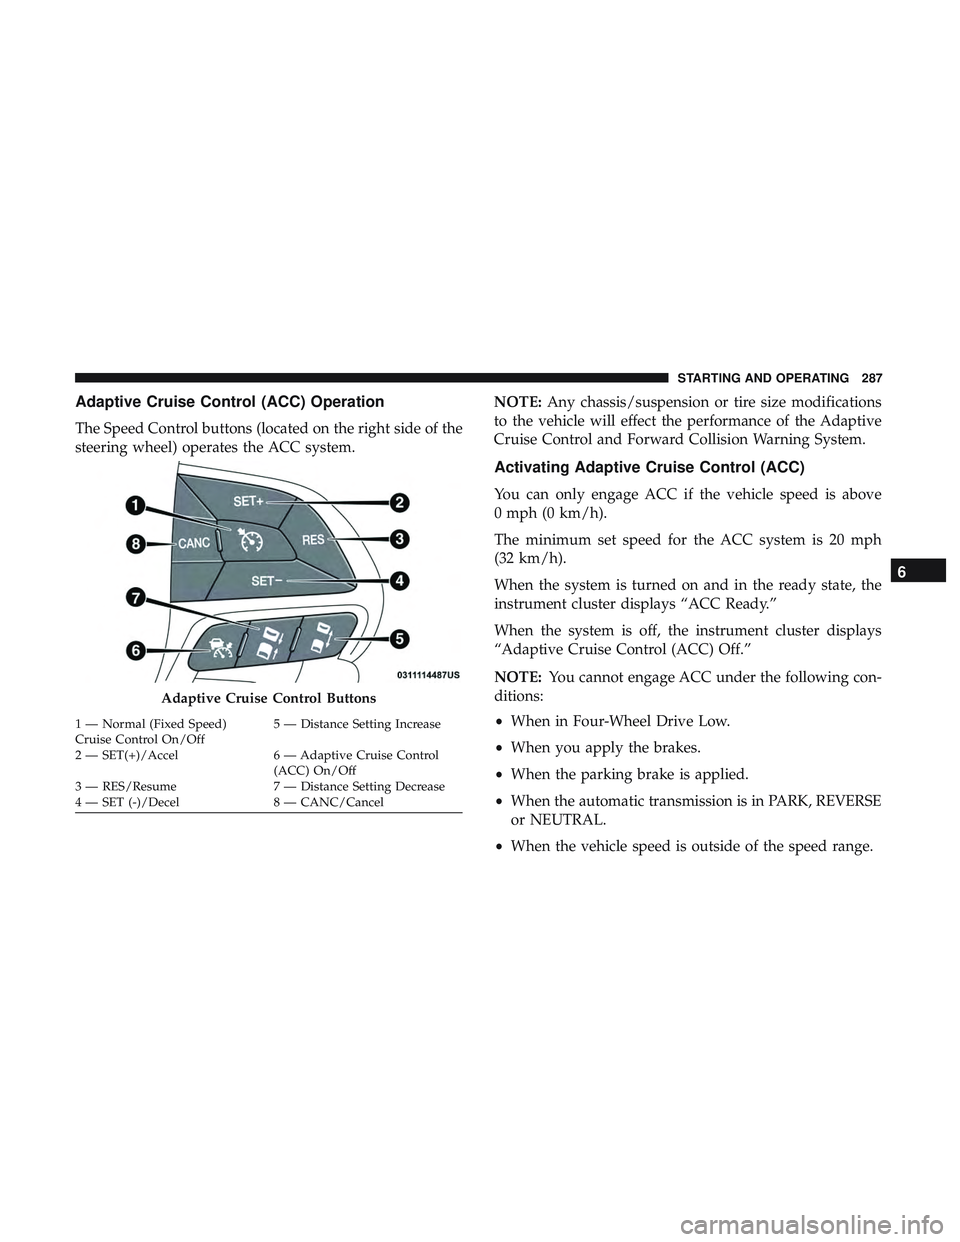
Adaptive Cruise Control (ACC) Operation
The Speed Control buttons (located on the right side of the
steering wheel) operates the ACC system.NOTE:
Any chassis/suspension or tire size modifications
to the vehicle will effect the performance of the Adaptive
Cruise Control and Forward Collision Warning System.
Activating Adaptive Cruise Control (ACC)
You can only engage ACC if the vehicle speed is above
0 mph (0 km/h).
The minimum set speed for the ACC system is 20 mph
(32 km/h).
When the system is turned on and in the ready state, the
instrument cluster displays “ACC Ready.”
When the system is off, the instrument cluster displays
“Adaptive Cruise Control (ACC) Off.”
NOTE: You cannot engage ACC under the following con-
ditions:
• When in Four-Wheel Drive Low.
• When you apply the brakes.
• When the parking brake is applied.
• When the automatic transmission is in PARK, REVERSE
or NEUTRAL.
• When the vehicle speed is outside of the speed range.
Adaptive Cruise Control Buttons
1 — Normal (Fixed Speed)
Cruise Control On/Off 5 — Distance Setting Increase
2 — SET(+)/Accel 6 — Adaptive Cruise Control (ACC) On/Off
3 — RES/Resume 7 — Distance Setting Decrease
4 — SET (-)/Decel 8 — CANC/Cancel
6
STARTING AND OPERATING 287
Page 337 of 568
VEHICLE LOADING
Gross Vehicle Weight Rating (GVWR)
The GVWR is the total permissible weight of your vehicle
including driver, passengers, vehicle, options and cargo.
The label also specifies maximum capacities of front and
rear axle systems (GAWR). Total load must be limited so
GVWR and front and rear GAWR are not exceeded.
Payload
The payload of a vehicle is defined as the allowable load
weight a truck can carry, including the weight of the driver,
all passengers, options and cargo.
Gross Axle Weight Rating (GAWR)
The GAWR is the maximum permissible load on the front
and rear axles. The load must be distributed in the cargo
area so that the GAWR of each axle is not exceeded.
Each axle GAWR is determined by the components in the
system with the lowest load carrying capacity (axle,
springs, tires or wheels). Heavier axles or suspension
components sometimes specified by purchasers for in-
creased durability does not necessarily increase the vehi-
cle’s GVWR.
Tire Size
The tire size on the Vehicle Certification Label represents
the actual tire size on your vehicle. Replacement tires must
be equal to the load capacity of this tire size.
Rim Size
This is the rim size that is appropriate for the tire size
listed.
Inflation Pressure
This is the cold tire inflation pressure for your vehicle for
all loading conditions up to full GAWR.
Curb Weight
The curb weight of a vehicle is defined as the total weight
of the vehicle with all fluids, including vehicle fuel, at full
capacity conditions, and with no occupants or cargo loaded
into the vehicle. The front and rear curb weight values are
determined by weighing your vehicle on a commercial
scale before any occupants or cargo are added.
Loading
The actual total weight and the weight of the front and rear
of your vehicle at the ground can best be determined by
weighing it when it is loaded and ready for operation.
6
STARTING AND OPERATING 335
Page 366 of 568
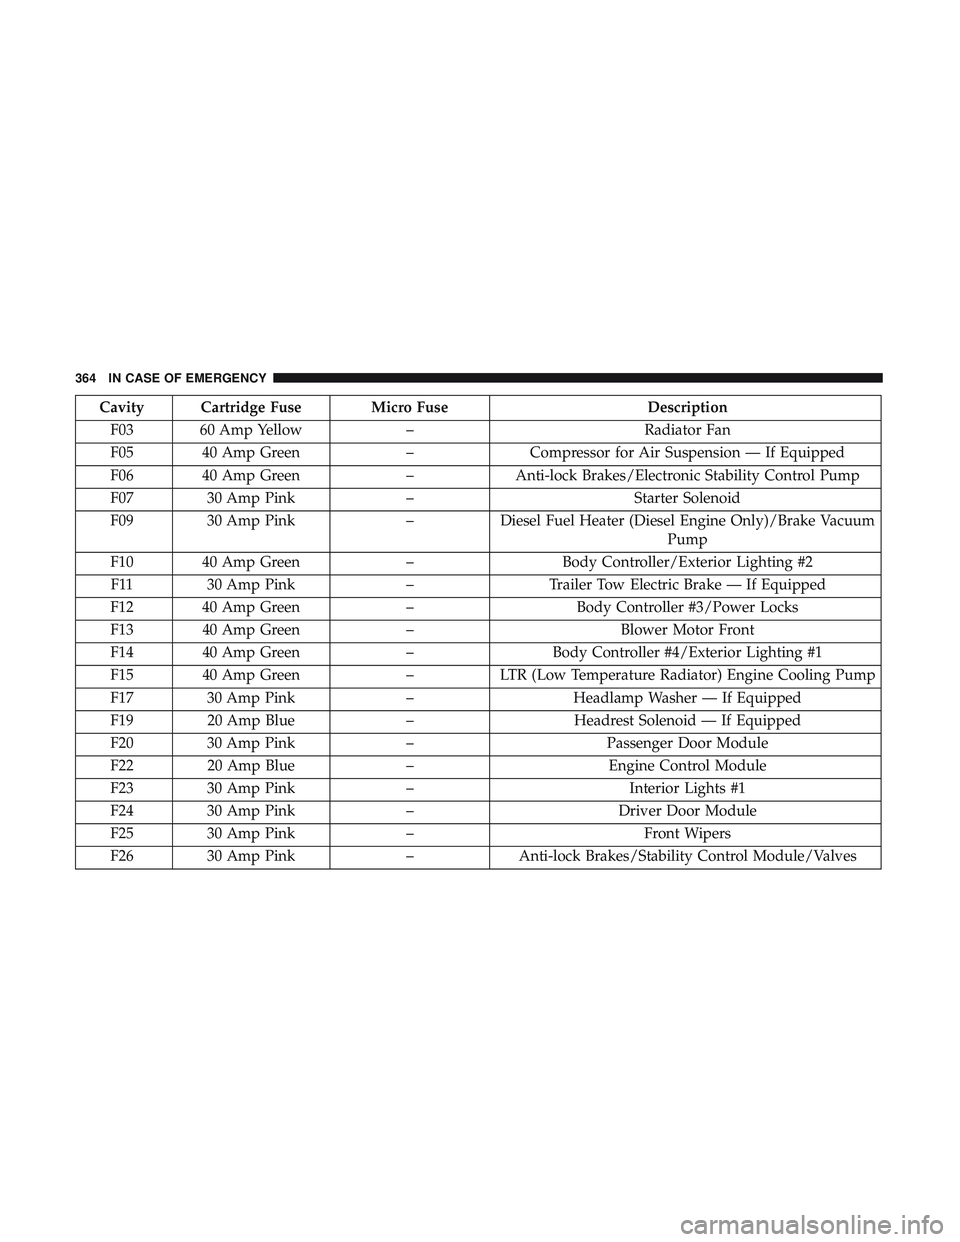
Cavity Cartridge Fuse Micro FuseDescription
F03 60 Amp Yellow –Radiator Fan
F05 40 Amp Green –Compressor for Air Suspension — If Equipped
F06 40 Amp Green –Anti-lock Brakes/Electronic Stability Control Pump
F07 30 Amp Pink –Starter Solenoid
F09 30 Amp Pink –Diesel Fuel Heater (Diesel Engine Only)/Brake Vacuum
Pump
F10 40 Amp Green –Body Controller/Exterior Lighting #2
F11 30 Amp Pink –Trailer Tow Electric Brake — If Equipped
F12 40 Amp Green –Body Controller #3/Power Locks
F13 40 Amp Green –Blower Motor Front
F14 40 Amp Green –Body Controller #4/Exterior Lighting #1
F15 40 Amp Green –LTR (Low Temperature Radiator) Engine Cooling Pump
F17 30 Amp Pink –Headlamp Washer — If Equipped
F19 20 Amp Blue –Headrest Solenoid — If Equipped
F20 30 Amp Pink –Passenger Door Module
F22 20 Amp Blue –Engine Control Module
F23 30 Amp Pink –Interior Lights #1
F24 30 Amp Pink –Driver Door Module
F25 30 Amp Pink –Front Wipers
F26 30 Amp Pink –Anti-lock Brakes/Stability Control Module/Valves
364 IN CASE OF EMERGENCY
Page 367 of 568
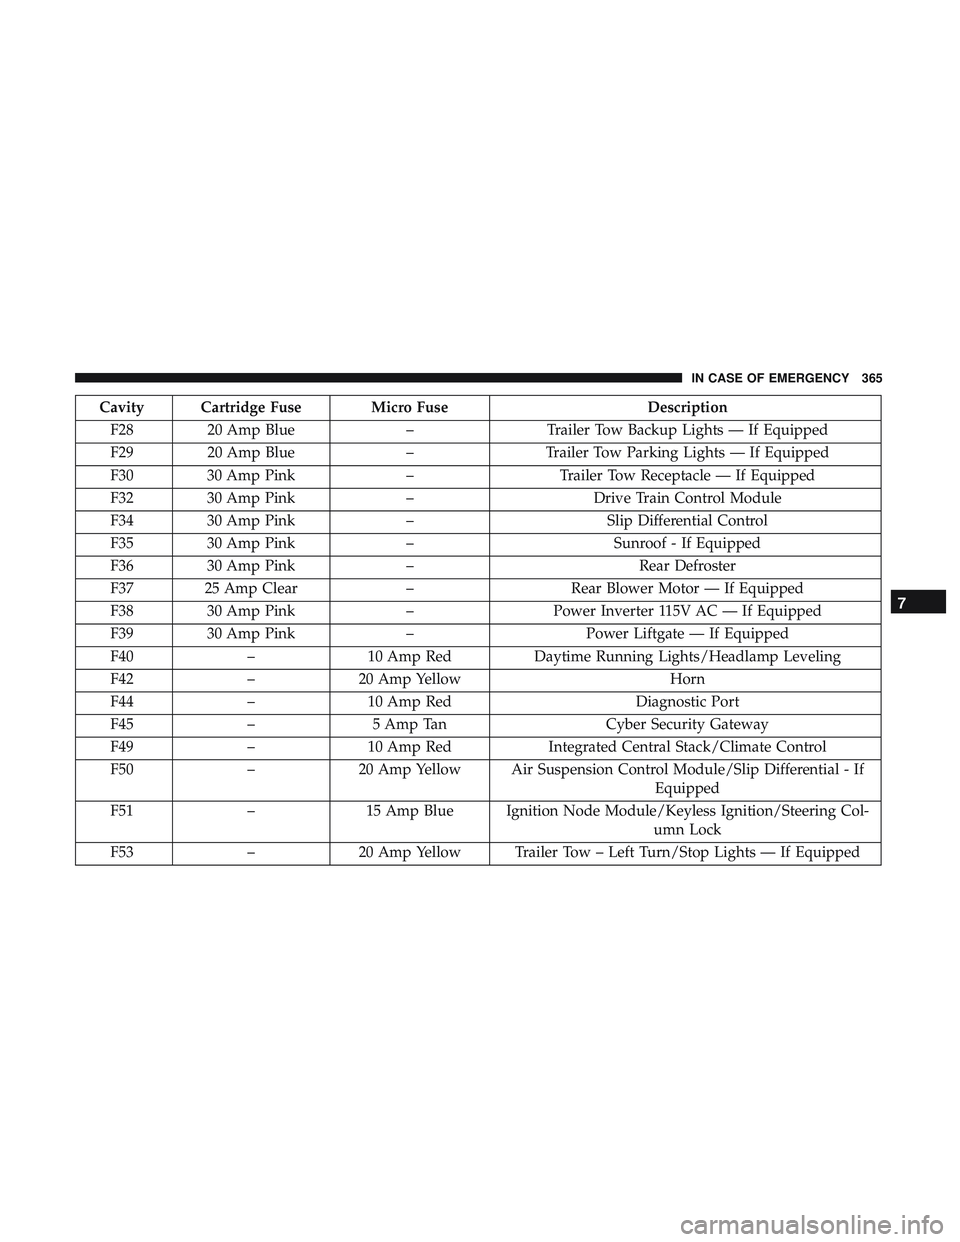
Cavity Cartridge Fuse Micro FuseDescription
F28 20 Amp Blue –Trailer Tow Backup Lights — If Equipped
F29 20 Amp Blue –Trailer Tow Parking Lights — If Equipped
F30 30 Amp Pink –Trailer Tow Receptacle — If Equipped
F32 30 Amp Pink –Drive Train Control Module
F34 30 Amp Pink –Slip Differential Control
F35 30 Amp Pink –Sunroof - If Equipped
F36 30 Amp Pink –Rear Defroster
F37 25 Amp Clear –Rear Blower Motor — If Equipped
F38 30 Amp Pink –Power Inverter 115V AC — If Equipped
F39 30 Amp Pink –Power Liftgate — If Equipped
F40 –10 Amp Red Daytime Running Lights/Headlamp Leveling
F42 –20 Amp Yellow Horn
F44 –10 Amp Red Diagnostic Port
F45 –5 Amp Tan Cyber Security Gateway
F49 –10 Amp Red Integrated Central Stack/Climate Control
F50 –20 Amp Yellow Air Suspension Control Module/Slip Differential - If
Equipped
F51 –15 Amp Blue Ignition Node Module/Keyless Ignition/Steering Col-
umn Lock
F53 –20 Amp Yellow Trailer Tow – Left Turn/Stop Lights — If Equipped
7
IN CASE OF EMERGENCY 365
Page 369 of 568
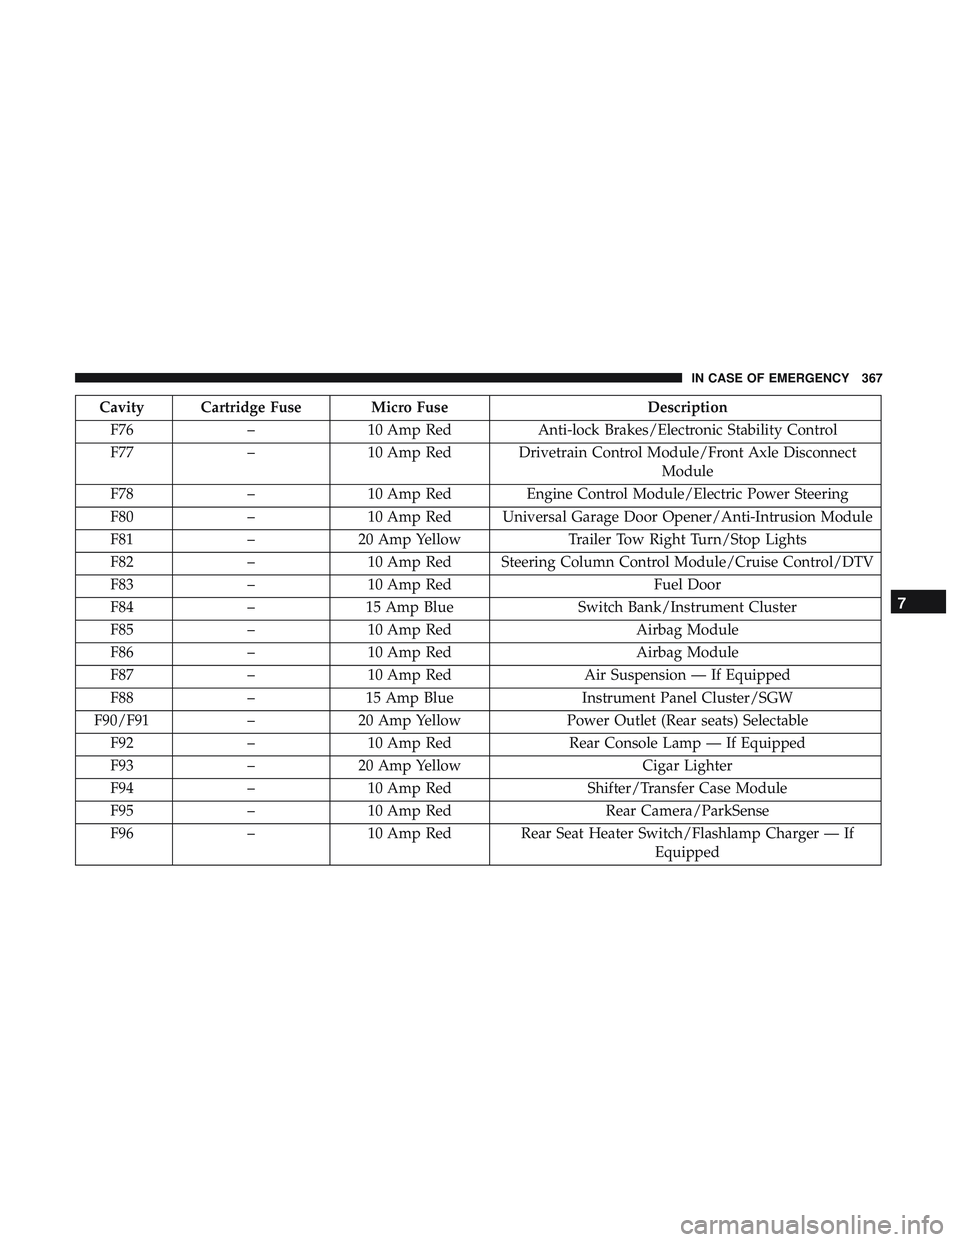
Cavity Cartridge Fuse Micro FuseDescription
F76 –10 Amp Red Anti-lock Brakes/Electronic Stability Control
F77 –10 Amp Red Drivetrain Control Module/Front Axle Disconnect
Module
F78 –10 Amp Red Engine Control Module/Electric Power Steering
F80 –10 Amp Red Universal Garage Door Opener/Anti-Intrusion Module
F81 –20 Amp Yellow Trailer Tow Right Turn/Stop Lights
F82 –10 Amp Red Steering Column Control Module/Cruise Control/DTV
F83 –10 Amp Red Fuel Door
F84 –15 Amp Blue Switch Bank/Instrument Cluster
F85 –10 Amp Red Airbag Module
F86 –10 Amp Red Airbag Module
F87 –10 Amp Red Air Suspension — If Equipped
F88 –15 Amp Blue Instrument Panel Cluster/SGW
F90/F91 –20 Amp Yellow Power Outlet (Rear seats) Selectable
F92 –10 Amp Red Rear Console Lamp — If Equipped
F93 –20 Amp Yellow Cigar Lighter
F94 –10 Amp Red Shifter/Transfer Case Module
F95 –10 Amp Red Rear Camera/ParkSense
F96 –10 Amp Red Rear Seat Heater Switch/Flashlamp Charger — If
Equipped
7
IN CASE OF EMERGENCY 367
Page 395 of 568
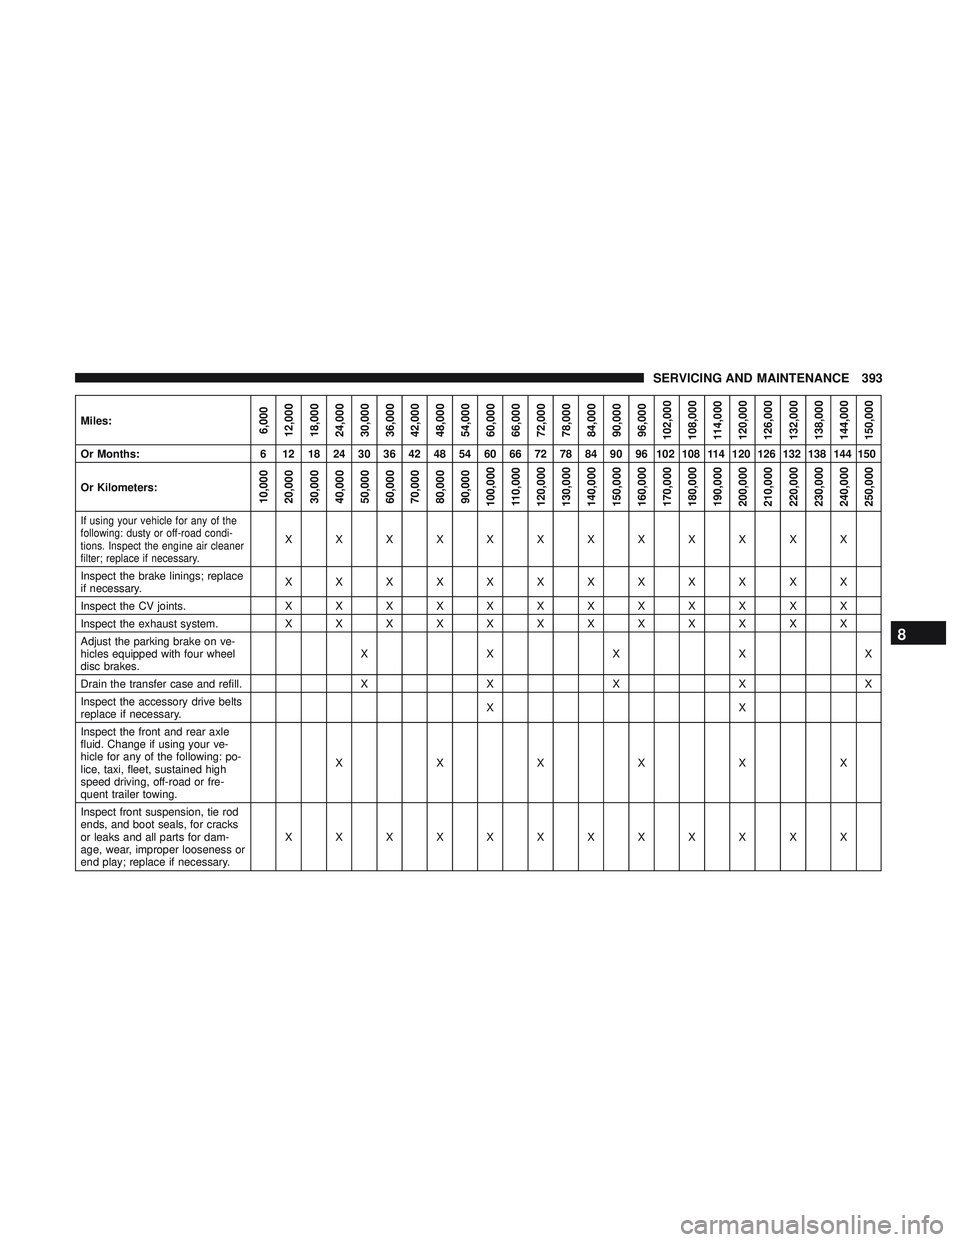
Miles:6,000
12,000
18,000
24,000
30,000
36,000
42,000
48,000
54,000
60,000
66,000
72,000
78,000
84,000
90,000
96,000
102,000
108,000 114,000
120,000
126,000
132,000
138,000
144,000
150,000
Or Months: 6 12 18 24 30 36 42 48 54 60 66 72 78 84 90 96 102 108 114 120 126 132 138 144 150
Or Kilometers:
10,000
20,000
30,000
40,000
50,000
60,000
70,000
80,000
90,000
100,000
110,000
120,000
130,000
140,000
150,000
160,000
170,000
180,000
190,000
200,000
210,000
220,000
230,000
240,000
250,000
If using your vehicle for any of the
following: dusty or off-road condi-
tions. Inspect the engine air cleaner
filter; replace if necessary.
XXXXXXXXXXXX
Inspect the brake linings; replace
if necessary. XXXXXXXXXXXX
Inspect the CV joints. X X X X X X X X X X X X
Inspect the exhaust system. X X X X X X X X X X X X
Adjust the parking brake on ve-
hicles equipped with four wheel
disc brakes. XXXXX
Drain the transfer case and refill. X X X X X
Inspect the accessory drive belts
replace if necessary. XX
Inspect the front and rear axle
fluid. Change if using your ve-
hicle for any of the following: po-
lice, taxi, fleet, sustained high
speed driving, off-road or fre-
quent trailer towing. XXXXXX
Inspect front suspension, tie rod
ends, and boot seals, for cracks
or leaks and all parts for dam-
age, wear, improper looseness or
end play; replace if necessary. XXXXXXXXXXXX
8
SERVICING AND MAINTENANCE 393
Page 437 of 568
Keep dismounted tires in a cool, dry place with as little
exposure to light as possible. Protect tires from contact with
oil, grease, and gasoline.
Replacement Tires
The tires on your new vehicle provide a balance of many
characteristics. They should be inspected regularly for
wear and correct cold tire inflation pressures. The manu-
facturer strongly recommends that you use tires equivalent
to the originals in size, quality and performance when
replacement is needed. Refer to the paragraph on “Tread
Wear Indicators” in this section. Refer to the Tire and
Loading Information placard or the Vehicle Certification
Label for the size designation of your tire. The Load Index
and Speed Symbol for your tire will be found on the
original equipment tire sidewall.
See the Tire Sizing Chart example found in the “Tire Safety
Information” section of this manual for more information
relating to the Load Index and Speed Symbol of a tire.
It is recommended to replace the two front tires or two rear
tires as a pair. Replacing just one tire can seriously affect
your vehicle’s handling. If you ever replace a wheel, make
sure that the wheel’s specifications match those of the
original wheels.It is recommended you contact an authorized tire dealer or
original equipment dealer with any questions you may
have on tire specifications or capability. Failure to use
equivalent replacement tires may adversely affect the
safety, handling, and ride of your vehicle.
WARNING!
•
Do not use a tire, wheel size, load rating, or speed
rating other than that specified for your vehicle.
Some combinations of unapproved tires and wheels
may change suspension dimensions and perfor-
mance characteristics, resulting in changes to steer-
ing, handling, and braking of your vehicle. This can
cause unpredictable handling and stress to steering
and suspension components. You could lose control
and have a collision resulting in serious injury or
death. Use only the tire and wheel sizes with load
ratings approved for your vehicle.
• Never use a tire with a smaller load index or capacity,
other than what was originally equipped on your
vehicle. Using a tire with a smaller load index could
result in tire overloading and failure. You could lose
control and have a collision.
(Continued)
8
SERVICING AND MAINTENANCE 435
Page 498 of 568
NOTE:Electronic Stability Control (ESC) Full-Off can be
activated by pushing and holding the ESC Off button on
the instrument panel switch bank for five seconds.
Sport Mode
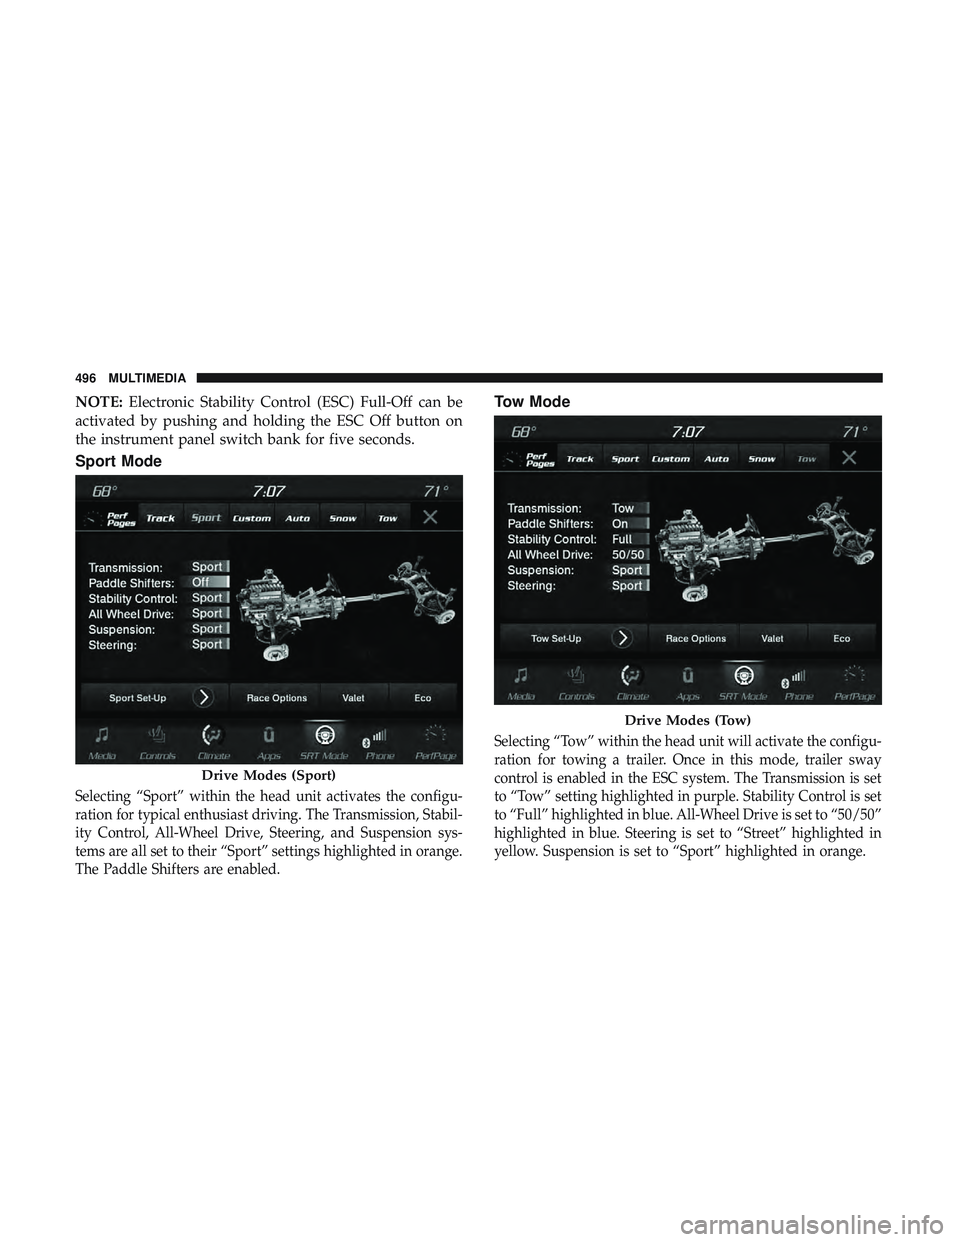
Selecting “Sport” within the head unit activates the configu-
ration for typical enthusiast driving. The Transmission, Stabil-
ity Control, All-Wheel Drive, Steering, and Suspension sys-
tems are all set to their “Sport” settings highlighted in orange.
The Paddle Shifters are enabled.
Tow Mode
Selecting “Tow” within the head unit will activate the configu-
ration for towing a trailer. Once in this mode, trailer sway
control is enabled in the ESC system. The Transmission is set
to “Tow” setting highlighted in purple. Stability Control is set
to “Full” highlighted in blue. All-Wheel Drive is set to “50/50”
highlighted in blue. Steering is set to “Street” highlighted in
yellow. Suspension is set to “Sport” highlighted in orange.
Drive Modes (Sport)
Drive Modes (Tow)
496 MULTIMEDIA