sunroof DODGE GRAND CARAVAN 2008 5.G Owners Manual
[x] Cancel search | Manufacturer: DODGE, Model Year: 2008, Model line: GRAND CARAVAN, Model: DODGE GRAND CARAVAN 2008 5.GPages: 531, PDF Size: 7.72 MB
Page 31 of 531
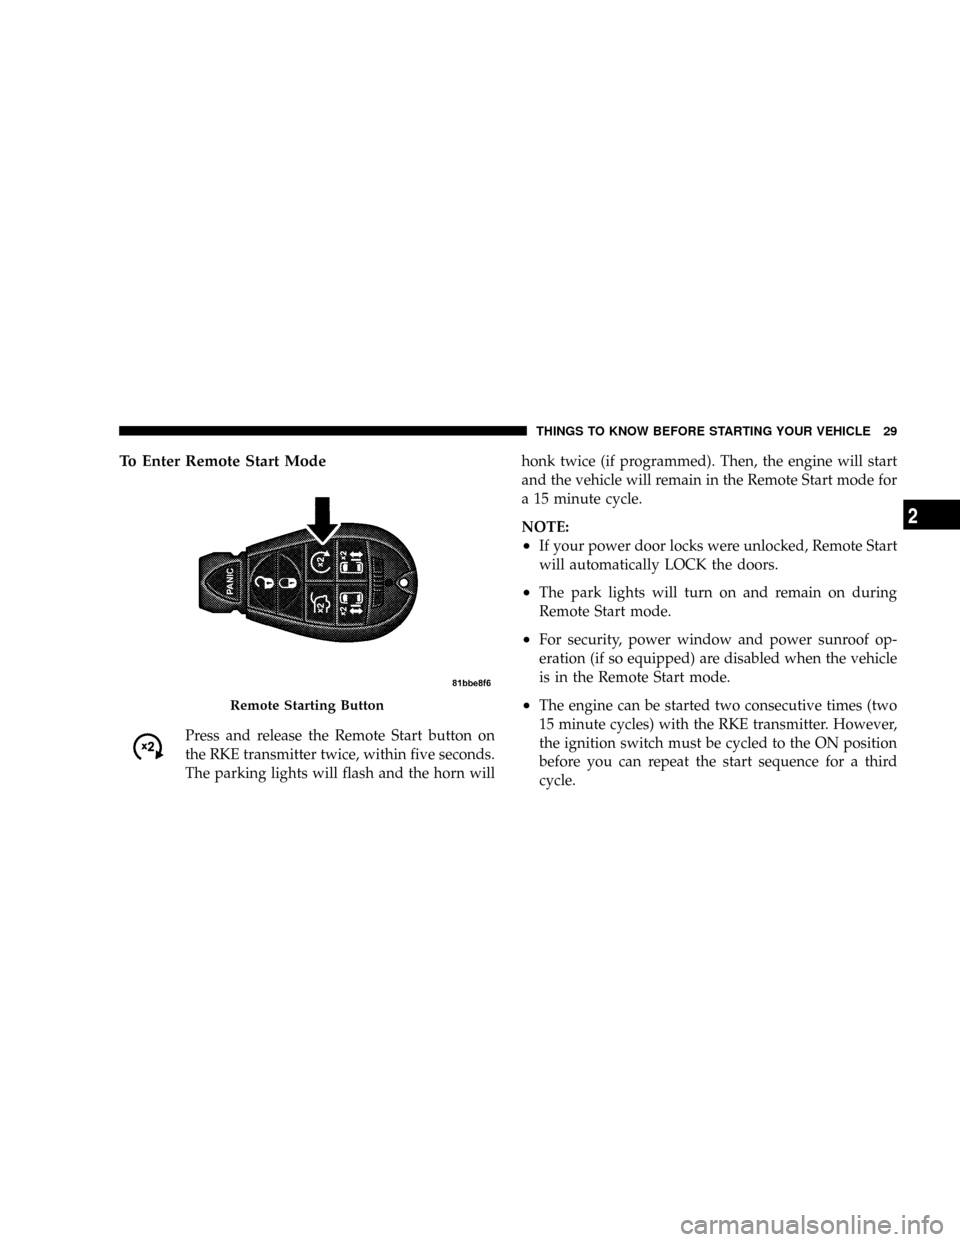
To Enter Remote Start Mode
Press and release the Remote Start button on
the RKE transmitter twice, within five seconds.
The parking lights will flash and the horn willhonk twice (if programmed). Then, the engine will start
and the vehicle will remain in the Remote Start mode for
a 15 minute cycle.
NOTE:
²If your power door locks were unlocked, Remote Start
will automatically LOCK the doors.
²The park lights will turn on and remain on during
Remote Start mode.
²For security, power window and power sunroof op-
eration (if so equipped) are disabled when the vehicle
is in the Remote Start mode.
²The engine can be started two consecutive times (two
15 minute cycles) with the RKE transmitter. However,
the ignition switch must be cycled to the ON position
before you can repeat the start sequence for a third
cycle.Remote Starting Button
THINGS TO KNOW BEFORE STARTING YOUR VEHICLE 29
2
Page 43 of 531
2. Push the window switch down firmly to the second
detent to open the window completely and continue to
hold the switch down for an additional two seconds after
the window is fully open.
Wind Buffeting
Wind buffeting can be described as the perception of
pressure on the ears or a helicopter-type sound in the
ears. Your vehicle may exhibit wind buffeting with the
windows down, or the sunroof (if equipped) in certain
open or partially open positions. This is a normal occur-
rence and can be minimized. If the buffeting occurs with
the rear windows open, open the front and rear windows
together to minimize the buffeting. If the buffeting occurs
with the sunroof open, adjust the sunroof opening to
minimize the buffeting.
SLIDING SIDE DOOR
The sliding door may be opened from the inside or the
outside. Pull outward on exterior handle to open the
sliding door. The sliding door inside handle functions by
rocking forward and back. Rocking the handle back-
wards opens the door and rocking forward releases the
hold open latch in order to close the door.
To keep your door operating properly, observe the fol-
lowing guidelines:
²Always open the door smoothly.
²Avoid high impacts against the door stop when open-
ing the door. This is very important when your vehicle
is parked on an incline as the door will slide faster in
the downhill direction.
THINGS TO KNOW BEFORE STARTING YOUR VEHICLE 41
2
Page 100 of 531
NSetting Memory Positions And Linking RKE
Transmitter To Memory.................156
mTo Open And Close The Hood.............158
NHood Safety Switch Ð If Equipped........159
mLights...............................160
NInterior Lighting......................160
NExterior Lights.......................162
mMultifunction Lever.....................166
NTurn Signals.........................166
mTilt Steering Column Ð If Equipped.........171
mRear Park Assist System Ð If Equipped.......171
NRear Park Assist Sensors................172
mAdjustable Pedals Ð If Equipped...........177mElectronic Speed Control Ð If Equipped......179
NActivating Electronic Speed Control........179
mOverhead Consoles.....................182
NFront Overhead Console Ð If Equipped.....182
mGarage Door Opener Ð If Equipped.........185
NProgramming HomeLinkt...............187
NGate Operator/Canadian Programming.....190
NSecurity............................191
NTroubleshooting Tips...................191
NGeneral Information...................191
mPower Sunroof Ð If Equipped.............192
NPower Sunroof Operation...............192
mElectrical Power Outlets Ð If Equipped.......195
98 UNDERSTANDING THE FEATURES OF YOUR VEHICLE
Page 185 of 531
Courtesy/Interior Lighting
At the forward end of the console are two courtesy lights
(standard dome light has two buttons). The lights turn on
when a front door, a sliding door or the liftgate is opened.
If your vehicle is equipped with Remote Keyless Entry,
the lights will also turn on when the unlock button on the
transmitter is pressed.
The courtesy lights also function as reading lights. Press
in on each lens to turn these lights on while inside the
vehicle. Press a second time to turn the each light off. You
may adjust the direction of these lights by pressing the
outside ring which is identified with four directional
arrows.The area around the instrument panel cupholders is also
illuminated from a light in the overhead console. This
light is turned on when the headlight switch is on and
will adjust in brightness when the dimmer control is
rotated up or down.
Sunglass Storage
At the rear of the front overhead console, a compartment
is provided for the storage of two pairs of sunglasses.
Press the door latch to open the compartment. The door
will slowly rotate to an open position.
NOTE:The front overhead console used with factory
sunroof incorporates a sunroof switch.
UNDERSTANDING THE FEATURES OF YOUR VEHICLE 183
3
Page 186 of 531
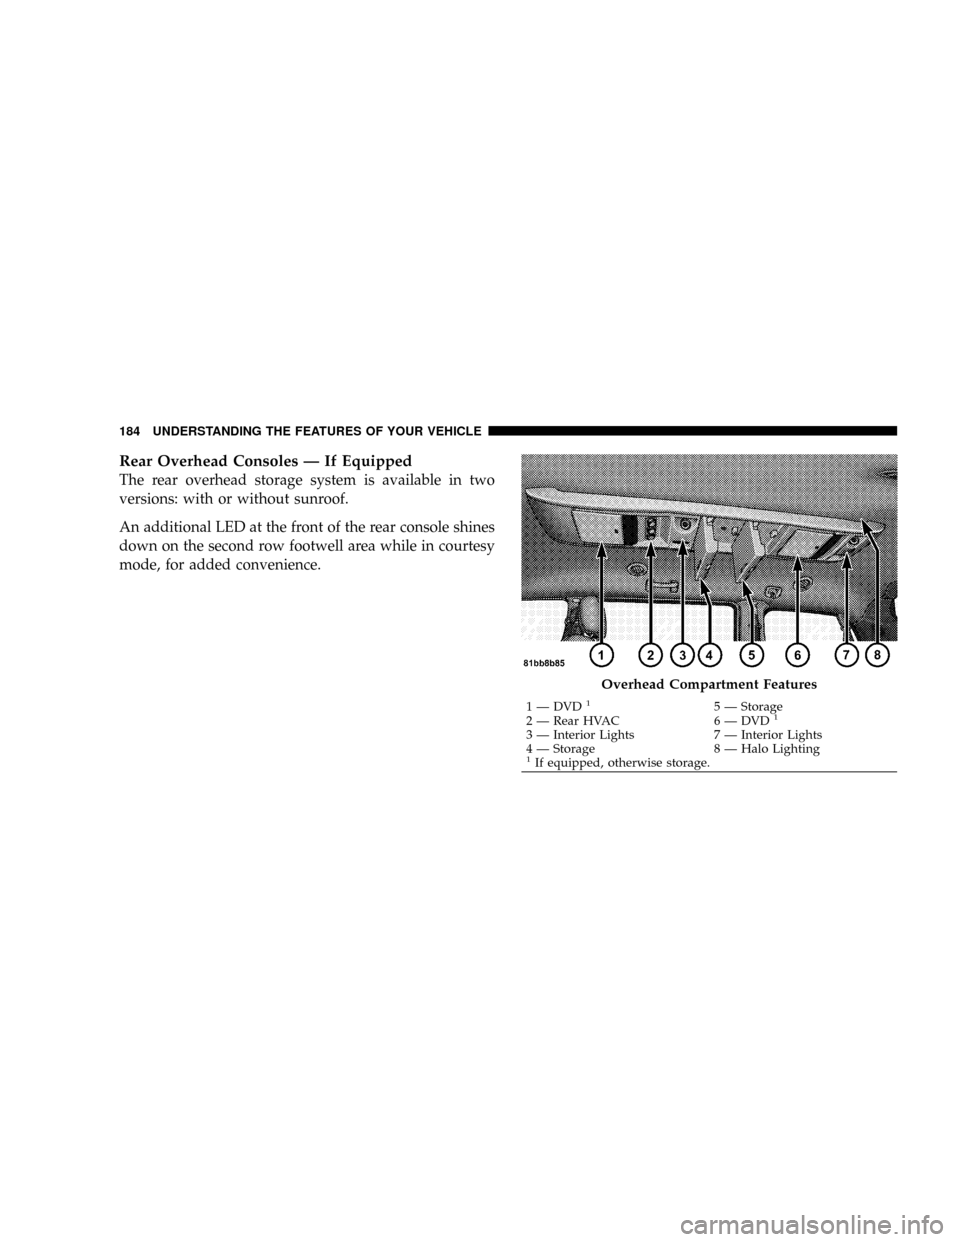
Rear Overhead Consoles Ð If Equipped
The rear overhead storage system is available in two
versions: with or without sunroof.
An additional LED at the front of the rear console shines
down on the second row footwell area while in courtesy
mode, for added convenience.
Overhead Compartment Features
1 Ð DVD15 Ð Storage
2 Ð Rear HVAC 6 Ð DVD1
3 Ð Interior Lights 7 Ð Interior Lights
4 Ð Storage 8 Ð Halo Lighting
1If equipped, otherwise storage. 184 UNDERSTANDING THE FEATURES OF YOUR VEHICLE
Page 194 of 531
2. This device must accept any interference that may be
received including interference that may cause undesired
operation.
NOTE:The transmitter has been tested and it complies
with FCC and IC rules. Changes or modifications not
expressly approved by the party responsible for compli-
ance could void the user 's authority to operate the
device.
The term IC before the certification/registration number
only signifies that Industry Canada technical specifica-
tions were met.
POWER SUNROOF Ð IF EQUIPPED
The power sunroof control switch is located in the front
overhead console.
The sunroof panel tilts upward at the rear for ventilation
or slides rearward under the roof.
Power Sunroof Operation
Opening the Sunroof Manually
Press the switch rearward and hold, and the sunroof will
open automatically from any position. The sunroof will
open fully, then stop automatically. During this opera-
tion, any release of the sunroof switch will stop the
sunroof.
WARNING!
In an accident, there is greater risk of being thrown
from a vehicle with an open sunroof. You could also
be seriously injured or killed. Always fasten your
seat belt properly and make sure all passengers are
properly secured too.
192 UNDERSTANDING THE FEATURES OF YOUR VEHICLE
Page 195 of 531
Closing the Sunroof Manually
To close the sunroof from an open or vent position, press
and hold the switch forward. The sunroof will close fully
and stop automatically. Release the switch to stop sun-
roof travel at any point.
Sunroof Sunshade Operation
The sunroof sunshade can be opened manually. How-
ever, the sunshade will open automatically as the sunroof
opens.
NOTE:The sunshade cannot be closed if the sunroof is
open.
WARNING!
Never leave children in a vehicle, with the keys in
the ignition switch. Occupants, particularly unat-
tended children, can become entrapped by the power
sunroof while operating the power sunroof switch.
Such entrapment may result in serious injury or
death.
Express-Open
Press the switch rearward and release, and the sunroof
will open automatically from any position. The sunroof
will open fully, then stop automatically. This is called
Express-Open. During Express-Open operation, any
movement of the sunroof switch will stop the sunroof.
UNDERSTANDING THE FEATURES OF YOUR VEHICLE 193
3
Page 196 of 531
Express-Vent
Press and release the9V9button, and the sunroof will
automatically open to the vent position. This is called
Express-Vent.
Express-Close
Press the switch forward and release, and the sunroof
will close automatically from any position. The sunroof
will close fully, then stop automatically. This is called
Express-Close. During Express-Close operation, any
movement of the sunroof switch will stop the sunroof.
WARNING!
Do not allow small children to operate the sunroof.
Never allow fingers or other body parts, or any object
to project through the sunroof opening. Injury may
result.
Ignition OFF Operation
The power sunroof switch will remain active for 10
minutes after the ignition switch is turned OFF. Opening
either front door will cancel this feature.
Auto-Express with Anti±Pinch Protection
During express closing, anytime an obstacle that restricts
glass movement is detected, the motor will stop and
reverse travel to avoid pinching the object.
Auto Express will stop and reverse travel up to three
times in succession. After the third time, Auto Express
will enter a manual operation mode. This allows the
operator to manually control the power switch in order to
close or open the sunroof in case of a malfunction.
Wind Buffeting
Wind buffeting can be described as the perception of
pressure on the ears or a helicopter type sound in the
ears. Your vehicle may exhibit wind buffeting with the
windows down, or the sunroof (if equipped) in certain
194 UNDERSTANDING THE FEATURES OF YOUR VEHICLE
Page 197 of 531
open or partially open positions. This is a normal occur-
rence and can be minimized. If the buffeting occurs with
the rear windows open, open the front and rear windows
together to minimize the buffeting. If the buffeting occurs
with the sunroof open, adjust the sunroof opening to
minimize the buffeting or open any window.
Sunroof Maintenance
Use only a non-abrasive cleaner and a soft cloth to clean
the glass panel.
ELECTRICAL POWER OUTLETS Ð IF EQUIPPED
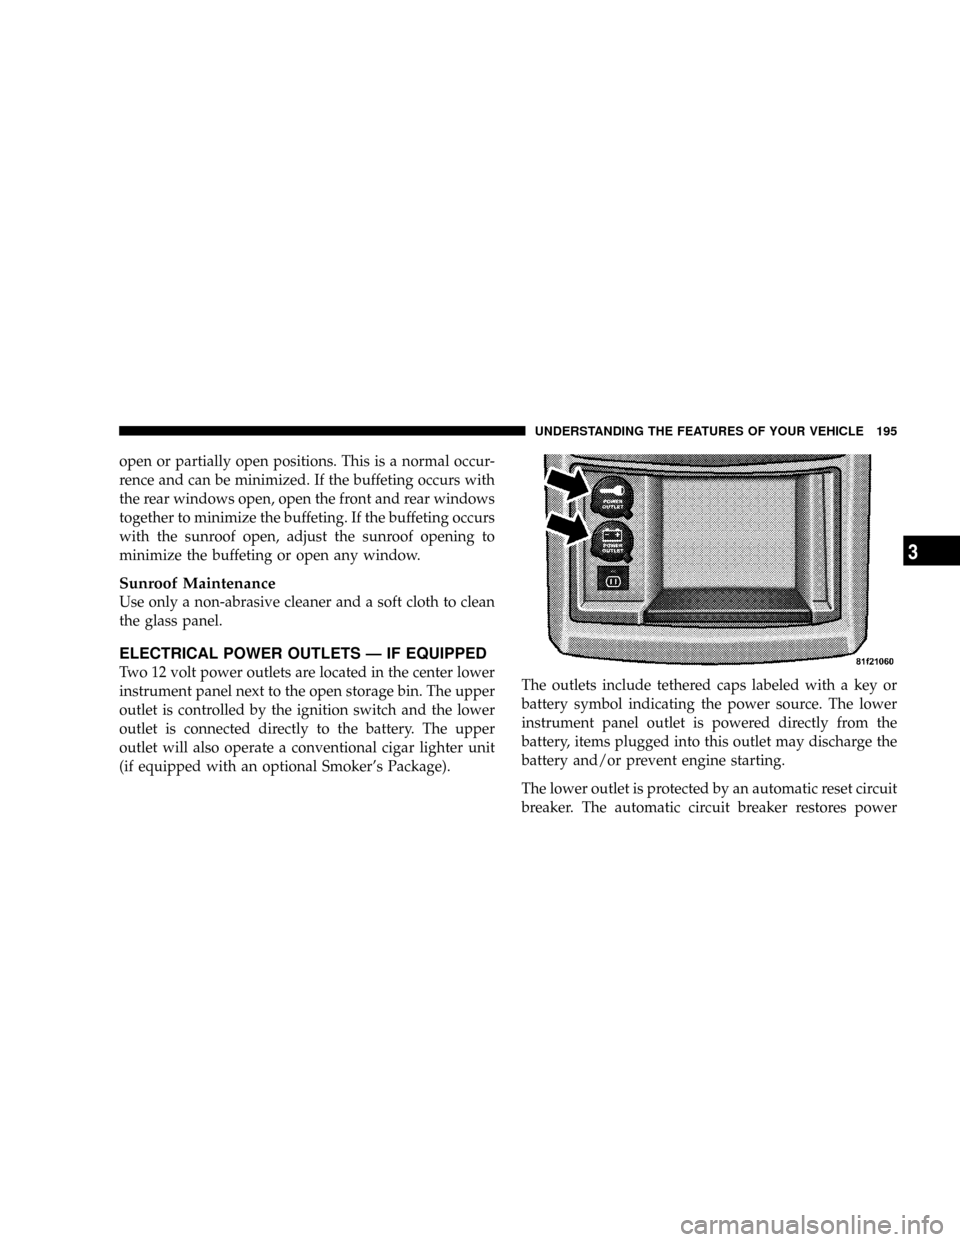
Two 12 volt power outlets are located in the center lower
instrument panel next to the open storage bin. The upper
outlet is controlled by the ignition switch and the lower
outlet is connected directly to the battery. The upper
outlet will also operate a conventional cigar lighter unit
(if equipped with an optional Smoker's Package).The outlets include tethered caps labeled with a key or
battery symbol indicating the power source. The lower
instrument panel outlet is powered directly from the
battery, items plugged into this outlet may discharge the
battery and/or prevent engine starting.
The lower outlet is protected by an automatic reset circuit
breaker. The automatic circuit breaker restores power
UNDERSTANDING THE FEATURES OF YOUR VEHICLE 195
3
Page 252 of 531
SELECT button until YES (Y) or NO (N) appears. Refer to
ªLights/SmartBeams Ð If Equippedº in Section 3 of this
manual for more information.
Headlights On with Wipers (Available with Auto
Headlights Only)
When YES (Y) is selected, and the headlight switch is in
the AUTO position, the headlights will turn on approxi-
mately 10 seconds after the wipers are turned on. The
headlights will also turn off when the wipers are turned
off if they were turned on by this feature. To make your
selection, press and release the FUNCTION SELECT
button until YES (Y) or NO (N) appears.
NOTE:Turning the headlights on during the daytime
causes the instrument panel lights to dim. To increase the
brightness, refer to ªLightsº in Section 3 of this manual.
Delay Turning Headlights Off
When this feature is selected, the driver can choose to
have the headlights remain on for 0, 30, 60, or 90 secondswhen exiting the vehicle. To make your selection, press
and release the RESET button until 0, 30, 60, or 90
appears.
Turn Headlights On with Remote Key Unlock
When this feature is selected, the headlights will activate
and remain on for up to 90 seconds when the doors are
unlocked with the remote keyless entry transmitter. To
make your selection, press and release the RESET button
until OFF, 30 sec., 60 sec., or 90 sec. appears.
Delay Power Off to Accessories Until Exit
When this feature is selected, the power window
switches, radio, hands±free system (if equipped), DVD
video system (if equipped), power sunroof (if equipped),
and power outlets will remain active for up to 10 minutes
after the ignition switch is turned off. Opening a vehicle
door will cancel this feature. To make your selection,
press and release the RESET button until Off, 45 sec., 5
min., or 10 min. appears.
250 UNDERSTANDING YOUR INSTRUMENT PANEL