ENGINE DODGE GRAND CARAVAN 2010 5.G Owner's Manual
[x] Cancel search | Manufacturer: DODGE, Model Year: 2010, Model line: GRAND CARAVAN, Model: DODGE GRAND CARAVAN 2010 5.GPages: 88, PDF Size: 13.56 MB
Page 58 of 88
CAUTION!
Driving with a hot cooling system could damage your vehicle. If the temperature gauge
reads HOT (H), pull over and stop the vehicle. Idle the vehicle with the air conditioner
turned off until the pointer drops back into the normal range. If the pointer remains on
HOT (H), and you hear continuous chimes, t urn the engine off immediately and call for
service.
WARNING!
You or others can be badly burned by hot engine coolant (antifreeze) or steam from
your radiator. If you see or hear steam coming from under the hood, do not open the
hood until the radiator has had time to co ol. Never try to open a cooling system
pressure cap when the radiator or coolant bottle is hot.
JACKING AND TIRE CHANGING
WARNING!
• Do not attempt to change a tire on the side of the vehicle close to moving traffic. Pull far enough off the road to avoid being hit when operating the jack or changing
the wheel.
• Getting under a jacked-up vehicle is dangerous. The vehicle could slip off the jack and fall on you. You could be crushed. Never get any part of your body under a
vehicle that is on a jack. If you need to get under a raised vehicle, take it to a
service center where it can be raised on a lift.
• The jack is designed to use as a tool for changing tires only. The jack should not be used to lift the vehicle for service purposes. The vehicle should be jacked on a firm,
level surface only. Avoid ice or slippery areas.
• If it is necessary to retrieve the spare tire from under the vehicle on the side of the vehicle close to moving traffic, pull far enough off the road to avoid the danger of
being hit.
WARNING!
• The compact spare tire is for emergency use only. Installation of this compact sparetire affects vehicle handling.
• Do not drive more than 50 mph (80 km/h) with a compact spare tire.
• Keep the compact spare tire inflated to the cold tire inflation pressure, listed on either your tire placard or limited use spare tire and wheel assembly.
• Replace (or repair) the original tire at the first opportunity and reinstall it on your vehicle. Failure to do so could result in loss of vehicle control.
WHAT TO DO IN EMERGENCIES
56
Page 64 of 88
Preparations for Jump-Start
• The battery in your vehicle is locatedon the left side of the engine compartment.
WARNING!
• Take care to avoid the radiator cooling fan whenever the hood is raised. It can start
anytime the ignition switch is on. You can be injured by moving fan blades.
• Remove any metal jewelry, such as watch bands or bracelets, that might make an inadvertent electrical contact. You could be severely injured.
• Batteries contain sulfuric acid that can burn your skin or eyes and generate hydrogen gas which is flammable and explosive. Keep open flames or sparks away
from the battery.
• Set the parking brake, shift the autom atic transmission into PARK and turn the ignition
to LOCK.
• Turn off the heater, radio, and all unnecessary electrical accessories.
• If using another vehicle to jump-start the battery, park the vehicle within the jumper cables reach, set the parking brake and make sure the ignition is OFF.
WARNING!
Do not allow vehicles to touch each other as this could establish a ground connection
and personal injury could result.
Jump-Starting Procedure
WARNING!
Failure to follow this procedure could result in personal injury or property damage due
to battery explosion.
CAUTION!
Failure to follow these procedures could result in damage to the charging system of
the booster vehicle or the discharged vehicle.
• Connect the positive (+)end of the jumper cable to the positive (+)post of the
discharged vehicle.
• Connect the opposite end of the positive (+)jumper cable to the positive (+)post of
the booster battery.
• Connect the negative end (-)of the jumper cable to the negative (-)post of the booster
battery.
WHAT TO DO IN EMERGENCIES
62
Page 65 of 88
• Connect the opposite end of the negative(-)jumper cable to a good engine ground
(exposed metal part of the discharged vehicle's engine) away from the battery and
fuel injection system.
WARNING!
Do not connect the cable to the negative post (-)of the discharged battery. The
resulting electrical spark could cause the battery to explode and could result in
personal injury.
• Start the engine in the vehicle that has the booster battery, let the engine idle a few minutes, and then start the engine in the vehicle with the discharged battery.
Once the engine is started, remove the jumper cables in the reverse sequence:
• Disconnect the negative (-)jumper cable from the negative (-)post of the vehicle with
the discharged battery.
• Disconnect the negative end (-)of the jumper cable from the negative (-)post of the
booster battery.
• Disconnect the opposite end of the positive (+)jumper cable from the positive (+)
post of the booster battery.
• Disconnect the positive (+)end of the jumper cable from the positive (+)post of the
discharged vehicle.
• If frequent jump-starting is required to start your vehicle you should have the battery and charging system inspected at your authorized dealer.
CAUTION!
Accessories that can be plugged into the vehicle power outlets draw power from the
vehicle’s battery, even when not in use (i.e., cellular phones, etc.). Eventually, if
plugged in long enough, the vehi cle’s battery will discharge sufficiently to degrade
battery life and/or prevent the engine from starting.
63
WHAT TO DO IN EMERGENCIES
Page 67 of 88
FREEING A STUCK VEHICLE
• If your vehicle becomes stuck in mud, sand or snow, it can often be moved by arocking motion. Turn your steering wheel right and left to clear the area around the
front wheels. Then, move the shift lever back and forth between REVERSE and 1st gear.
Using minimal accelerator pedal pressure to maintain the rocking motion, without
spinning the wheels, is most effective.
NOTE: If your vehicle is equipped with Electronic Stability Program (ESP) or Traction
Control
, turn the system off before attempting to “rock” the vehicle.
WARNING!
Fast spinning tires can be dangerous. Forces generated by excessive wheel speeds
may cause tire damage or failure. A tire could explode and injure someone. Do not
spin your vehicle's wheels faster than 30 mph (48 km/h) when you are stuck. Do not
let anyone near a spinning wheel, no matter what the speed.
CAUTION!
• When “rocking” a stuck vehicle by moving between 1st and REVERSE, do not spin the wheels faster than 15 mph (24 km/h), or drivetrain damage may result.
• Revving the engine or s pinning the wheels too fast ma y lead to transmission
overheating and failure. It can also damage the tires. Do not spin the wheels above
30 mph (48 km/h) while in gear (no transmission shifting occurring).
EVENT DATA RECORDER (EDR)
• This vehicle is equipped with an event data recorder (EDR). The main purpose of an
EDR is to record, in certain crash or near crash-like situations, such as an air bag
deployment or hitting a road obst acle, data that willassist in understanding how a
vehicle’s systems performed. The EDR is designed to record data related to vehicle
dynamics and safety systems for a short period of time, typically 30 seconds or less.
The EDR in this vehicle is designed to record such data as:
• How various systems in your vehicle were operating;
• Whether or not the driver and passenger s afety belts were buckled/fastened;
• How far (if at all) the driver was depressing the accelerator and/or brake pedal; and,
• How fast the vehicle was traveling.
• These data can help provide a better u nderstanding of the circumstances in which
crashes and injuries occur.
65
WHAT TO DO IN EMERGENCIES
Page 70 of 88
WARNING!
• Never have any smoking materials litin or near the vehicle when the gas cap is
removed or the tank filled.
• Never add fuel when the engine is running. This is in violation of most state and
federal fire regulations and will cause the MIL to turn on.
• A fire may result if gasoline is pumped into a portable container that is inside of a
vehicle. You could be burned. Always place gas containers on the ground while filling.
MAINTAINING YOUR VEHICLE
68
Page 71 of 88
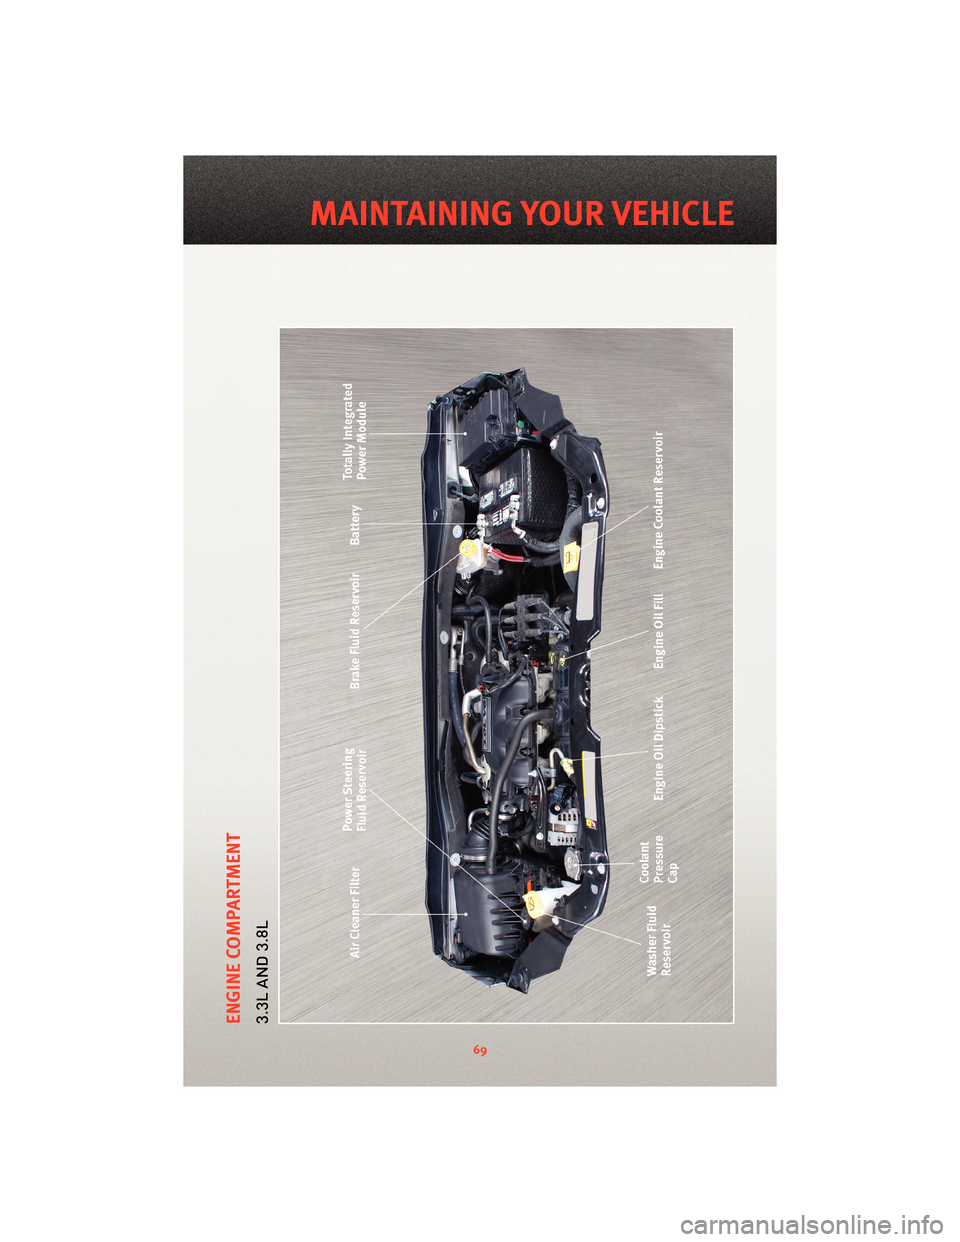
ENGINE COMPARTMENT3.3L AND 3.8L
69
MAINTAINING YOUR VEHICLE
Page 73 of 88
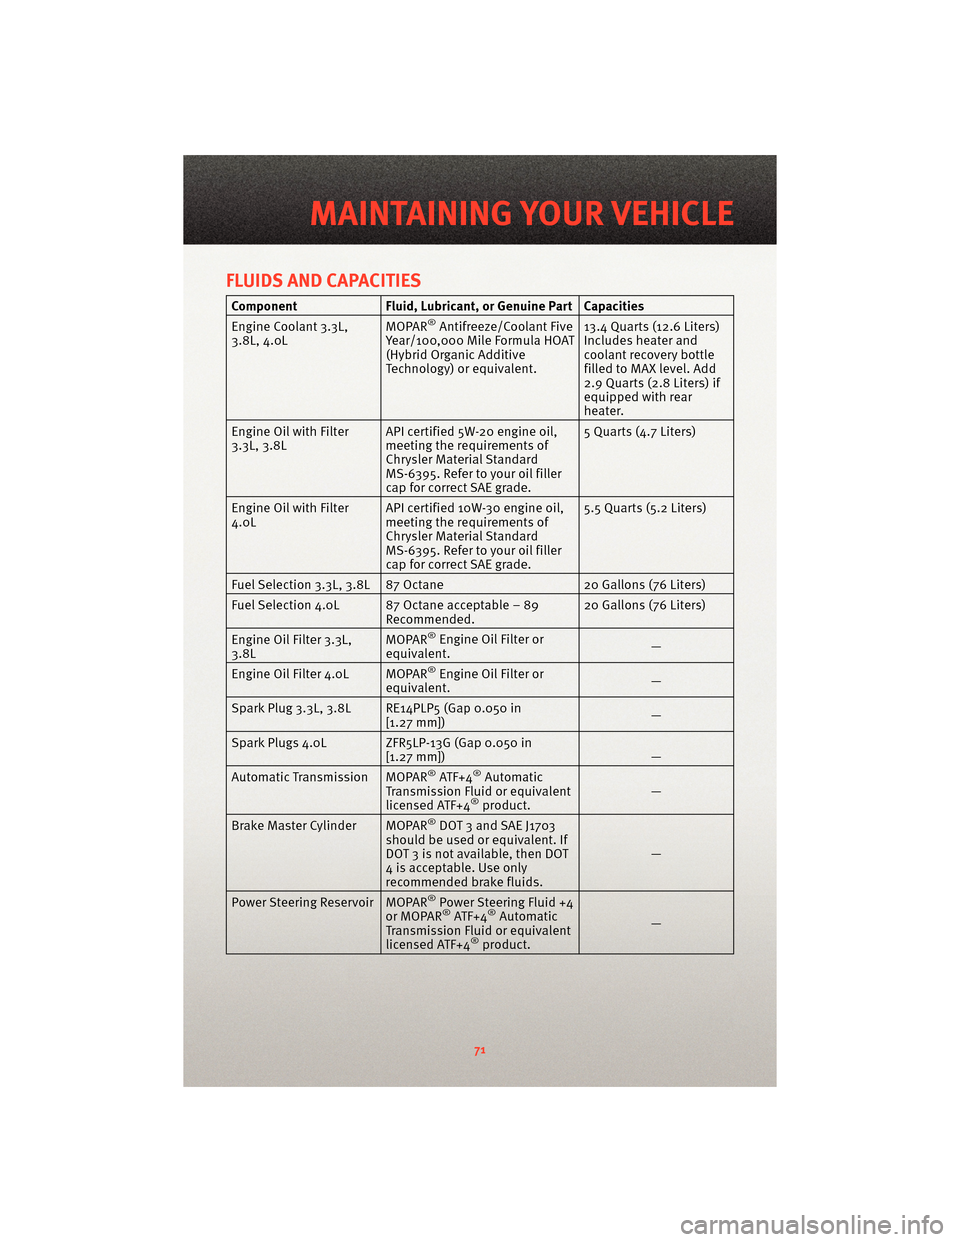
FLUIDS AND CAPACITIES
ComponentFluid, Lubricant, or Genuine Part Capacities
Engine Coolant 3.3L,
3.8L, 4.0L MOPAR®Antifreeze/Coolant Five
Year/100,000 Mile Formula HOAT
(Hybrid Organic Additive
Technology) or equivalent. 13.4 Quarts (12.6 Liters)
Includes heater and
coolant recovery bottle
filled to MAX level. Add
2.9 Quarts (2.8 Liters) if
equipped with rear
heater.
Engine Oil with Filter
3.3L, 3.8L API certified 5W-20 engine oil,
meeting the requirements of
Chrysler Material Standard
MS-6395. Refer to your oil filler
cap for correct SAE grade. 5 Quarts (4.7 Liters)
Engine Oil with Filter
4.0L API certified 10W-30 engine oil,
meeting the requirements of
Chrysler Material Standard
MS-6395. Refer to your oil filler
cap for correct SAE grade. 5.5 Quarts (5.2 Liters)
Fuel Selection 3.3L, 3.8L 87 Octane 20 Gallons (76 Liters)
Fuel Selection 4.0L 87 Octane acceptable – 89 Recommended. 20 Gallons (76 Liters)
Engine Oil Filter 3.3L,
3.8L MOPAR
®Engine Oil Filter or
equivalent. —
Engine Oil Filter 4.0L MOPAR
®Engine Oil Filter or
equivalent. —
Spark Plug 3.3L, 3.8L RE14PLP5 (Gap 0.050 in [1.27 mm]) —
Spark Plugs 4.0L ZFR5LP-13G (Gap 0.050 in [1.27 mm]) —
Automatic Tran smissionMOPAR
®ATF+4®Automatic
Transmission Fluid or equivalent
licensed ATF+4
®product. —
Brake Master Cylinder MOPAR®DOT 3 and SAE J1703
should be used or equivalent. If
DOT 3 is not available, then DOT
4 is acceptable. Use only
recommended brake fluids. —
Power Steering Reservoir MOPAR
®Power Steering Fluid +4
or MOPAR®ATF+4®Automatic
Transmission Fluid or equivalent
licensed ATF+4
®product. —
71
MAINTAINING YOUR VEHICLE
Page 74 of 88
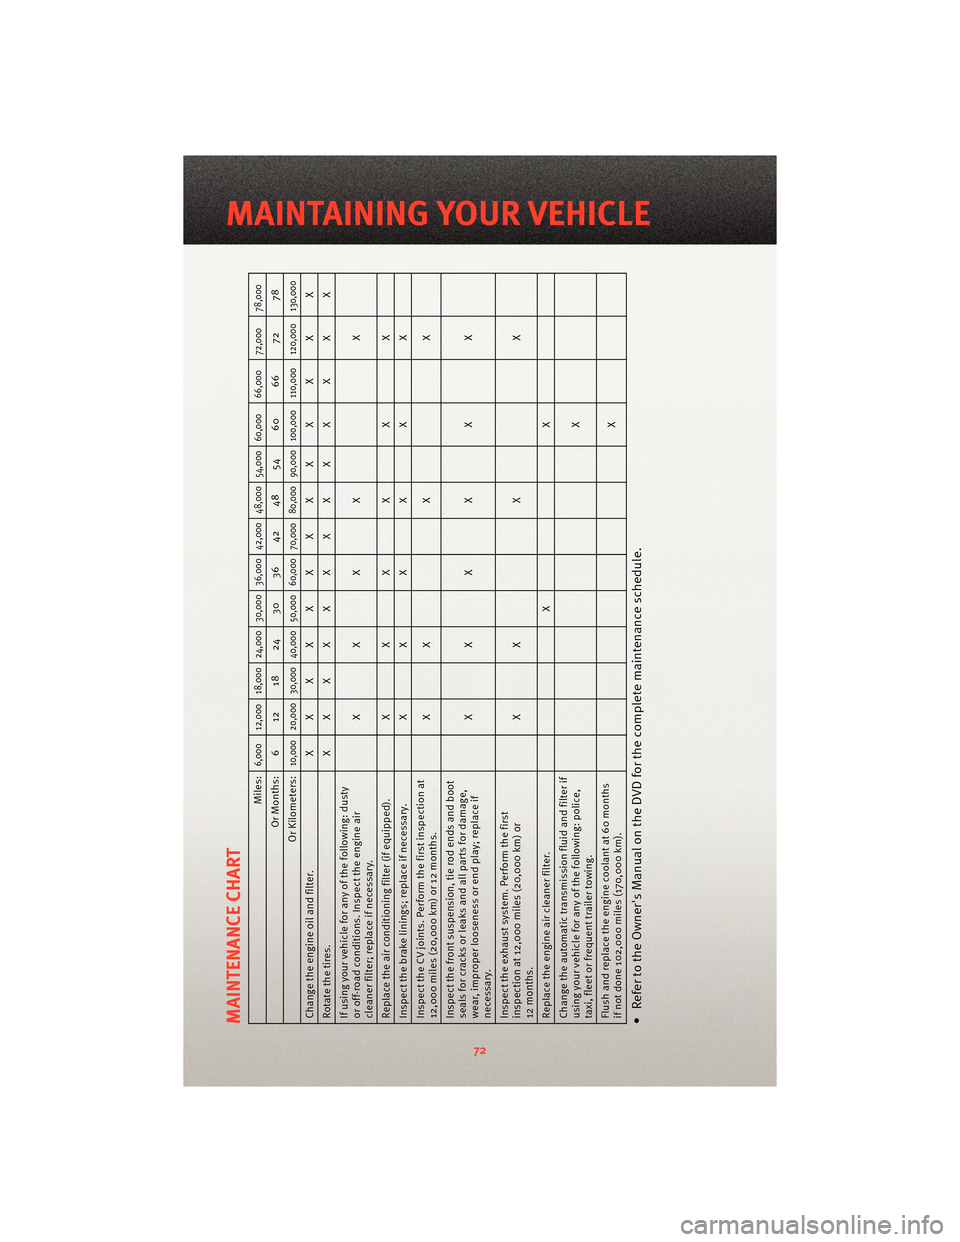
MAINTENANCE CHART
Miles:
6,000 12,000 18,000 24,000 30,000 36,000 42,000 48,000 54,000 60,000 66,000 72,000 78,000
Or Months: 6 12 18 24 30 36 42 48 54 60 66 72 78
Or Kilometers:
10,000 20,000 30,000 40,000 50,000 60,000 70,000 80,000 90,000 100,000 110,000 120,000 130,000
Change the engine oil and filter. XXXXXXXXX X X X X
Rotatethetires. XXXXXXXXX X X X X
If using your vehicle for any of the following: dusty
or off-road conditions. Inspect the engine air
cleaner filter; replace if necessary. XXXX X
Replace the air conditioning filter (if equipped). X X X X X X
Inspect the brake linings; replace if necessary. X X X X X X
Inspect the CV joints. Perform the first inspection at
12,000 miles (20,000 km) or 12 months. XX X X
Inspect the front suspe nsion, tie rod ends and boot
seals for cracks or leaks and all parts for damage,
wear, improper looseness or end play; replace if
necessary. XXXX X X
Inspect the exhaust system. Perform the first
inspection at 12,000 miles (20,000 km) or
12 months. XX X X
Replace the engine air cleaner filter. X X
Change the autom atic transmissionfluid and filter if
using your vehicle for any of the following: police,
taxi, fleet or frequent trailer towing. X
Flush and replace the engine coolant at 60 months
if not done 102,000 miles (170,000 km). X• Refer to the Owner's Manual on the DVD for the complete maintenance schedule.
72
MAINTAINING YOUR VEHICLE
Page 77 of 88
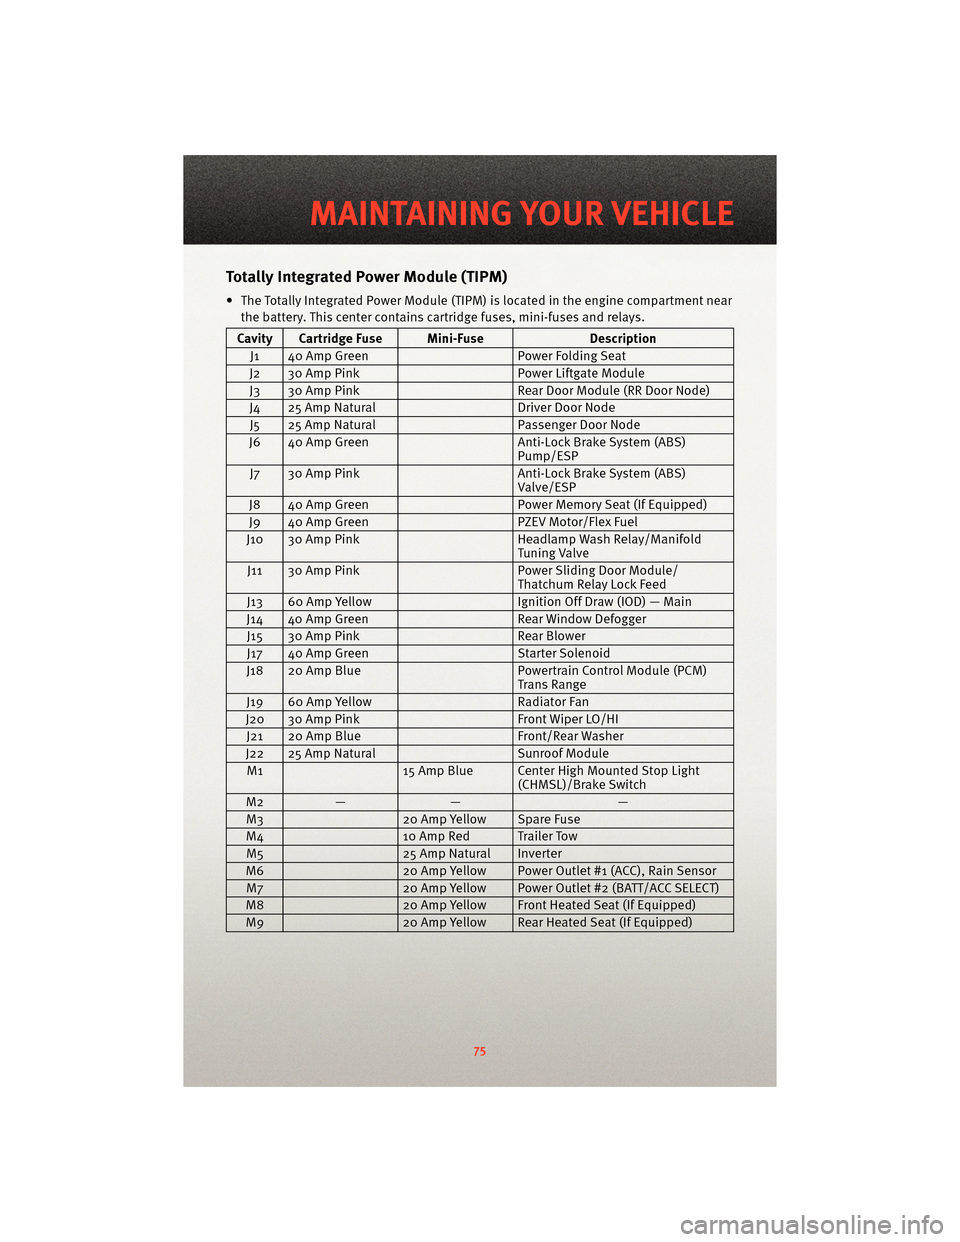
TotallyIntegrated Power Module (TIPM)
• The Totally Integrated Power Module (TIPM) is located in the engine compartment near
the battery. This center contains cartridge fuses, mini-fuses and relays.
Cavity Cartridge Fuse Mini-Fuse Description
J1 40 Amp Green Power Folding Seat
J2 30 Amp Pink Power Liftgate Module
J3 30 Amp Pink Rear Door Module (RR Door Node)
J4 25 Amp Natural Driver Door Node
J5 25 Amp Natural Passenger Door Node
J6 40 Amp Green Anti-Lock Brake System (ABS)
Pump/ESP
J7 30 Amp Pink Anti-Lock Brake System (ABS)
Valve/ESP
J8 40 Amp Green Power Memory Seat (If Equipped)
J9 40 Amp Green PZEV Motor/Flex Fuel
J10 30 Amp Pink Headlamp Wash Relay/Manifold
Tuning Valve
J11 30 Amp Pink Power Sliding Door Module/
Thatchum Relay Lock Feed
J13 60 Amp Yellow Ignition Off Draw (IOD) — Main
J14 40 Amp Green Rear Window Defogger
J15 30 Amp Pink Rear Blower
J17 40 Amp Green Starter Solenoid
J18 20 Amp Blue Powertrain Control Module (PCM)
Trans Range
J19 60 Amp Yellow Radiator Fan
J20 30 Amp Pink Front Wiper LO/HI
J21 20 Amp Blue Front/Rear Washer
J22 25 Amp Natural Sunroof Module
M1 15 Amp Blue Center High Mounted Stop Light
(CHMSL)/Brake Switch
M2 — — —
M3 20 Amp Yellow Spare Fuse
M4 10 Amp Red Trailer Tow
M5 25 Amp Natural Inverter
M6 20 Amp Yellow Power Outlet #1 (ACC), Rain Sensor
M7 20 Amp Yellow Power Outlet #2 (BATT/ACC SELECT)
M8 20 Amp Yellow Front Heated Seat (If Equipped)
M9 20 Amp Yellow Rear Heated Seat (If Equipped)
75
MAINTAINING YOUR VEHICLE
Page 79 of 88
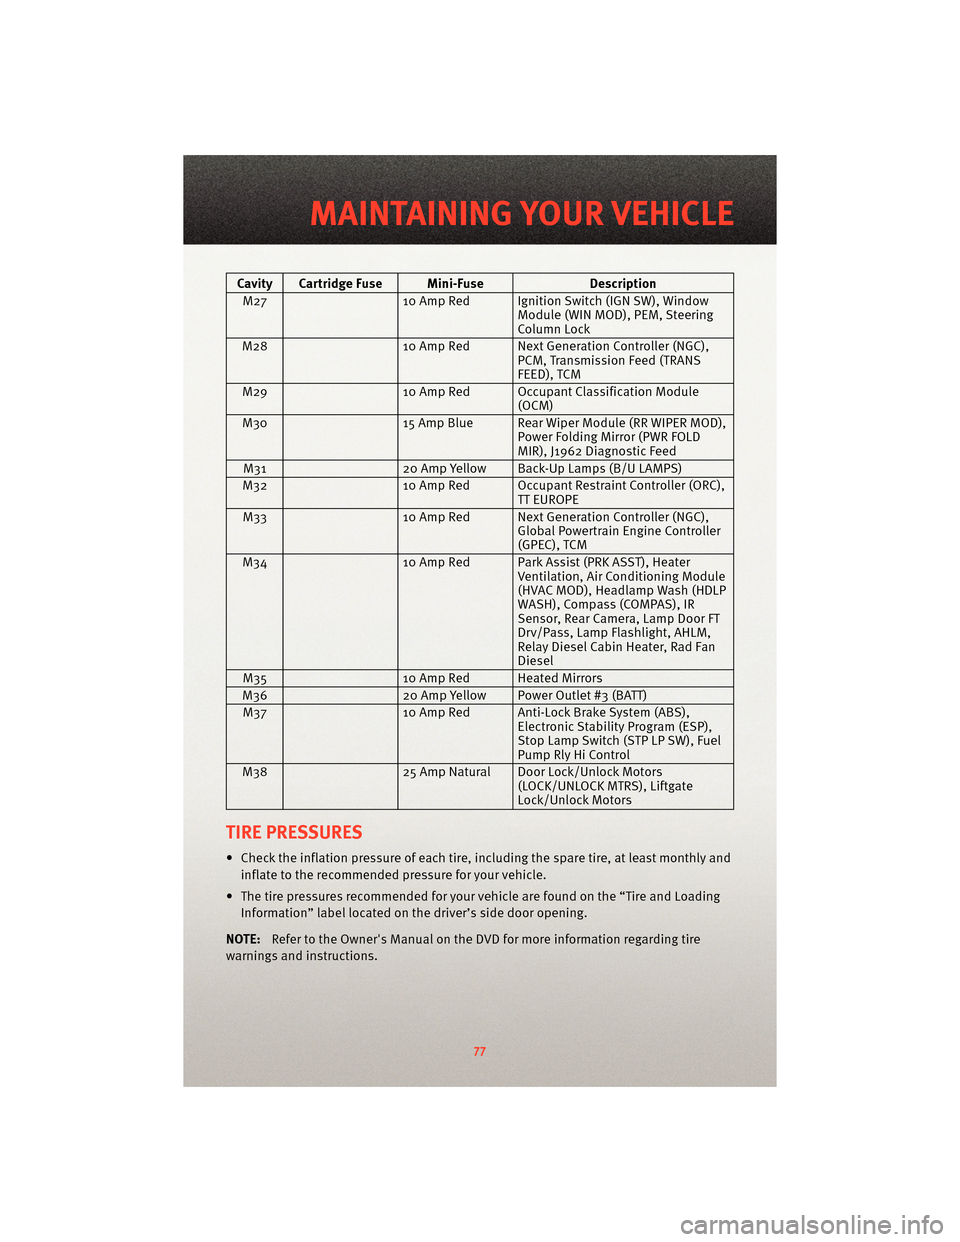
Cavity Cartridge Fuse Mini-FuseDescription
M27 10 Amp Red Ignition Switch (IGN SW), Window
Module (WIN MOD), PEM, Steering
Column Lock
M28 10 Amp Red Next Generation Controller (NGC),
PCM, Transmission Feed (TRANS
FEED), TCM
M29 10 Amp Red Occupant Classification Module
(OCM)
M30 15 Amp Blue Rear Wiper Module (RR WIPER MOD),
Power Folding Mirror (PWR FOLD
MIR), J1962 Diagnostic Feed
M31 20 Amp Yellow Back-Up Lamps (B/U LAMPS)
M32 10 Amp Red Occupant Restraint Controller (ORC),
TT EUROPE
M33 10 Amp Red Next Generation Controller (NGC),
Global Powertrain Engine Controller
(GPEC), TCM
M34 10 Amp Red ParkAssist(PRK ASST), Heater
Ventilation, Air Conditioning Module
(HVAC MOD), Headlamp Wash (HDLP
WASH), Compass (COMPAS), IR
Sensor, Rear Camera, Lamp Door FT
Drv/Pass , Lamp Flas hlight, AHLM,
Relay Diesel Cabin Heater, Rad Fan
Diesel
M35 10 Amp Red Heated Mirrors
M36 20 Amp Yellow Power Outlet #3 (BATT)
M37 10 Amp Red Anti-Lock Brake System (ABS),
Electronic Stability Program (ESP),
Stop Lamp Switch (STP LP SW), Fuel
Pump Rly Hi Control
M38 25 Amp Natural Door Lock/Unlock Motors
(LOCK/UNLOCK MTRS), Liftgate
Lock/Unlock Motors
TIRE PRESSURES
• Check the inflation pressure of each tire, including the spare tire, at least monthly and
inflate to the recommended pressure for your vehicle.
• The tire pressures recommended for your vehicle are found on the “Tire and Loading Information” label located on the driver’s side door opening.
NOTE: Refer to the Owner's Manual on the DVD f or more information regarding tire
warnings and instructions.
77
MAINTAINING YOUR VEHICLE