clock DODGE GRAND CARAVAN 2011 5.G User Guide
[x] Cancel search | Manufacturer: DODGE, Model Year: 2011, Model line: GRAND CARAVAN, Model: DODGE GRAND CARAVAN 2011 5.GPages: 100, PDF Size: 4.02 MB
Page 37 of 100
NOTE:Your radio may not be equipped with the Uconnect™ Voice Command and
Uconnect™ Phone features. To determine if your radio has these features, press the
Voice Command button on the radio. You will hear a voice prompt if you have the
feature, or see a message on the radio stating “Uconnect Phone not available” if you do
not.
• Your radio has many features that add to the comfort and convenience of you andyour passengers. Some of these radio features should not be used when driving
because they take your eyes from the road or your attention from driving.
• The radio sales code is located on the lower right side of the radio faceplate.
Seek Up/Down Buttons
• Press to seek through radio stations in AM, FM, or SAT bands. Seek through tracks in CD mode.
• Hold either button to bypass stations without stopping.
Audio Settings
• Press the TUNE/SCROLL control knob and BASS, MID, TREBLE, BALANCE and FADE will display. Rotate the TUNE/SCROLL control knob to select the desired
setting.
Audio Jack
• The Audio Jack allows a portable device, such as an MP3 player or a cassetteplayer, to be plugged into the radio and utilize the vehicle’s audio system, using a
3.5 mm audio cable to amplify the source and play through the vehicle speakers.
• Pressing the AUX button will change the mode to auxiliary device if the Audio Jack is connected, allowing the music from your portable device to play through the
vehicle's speakers.
• The functions of the portable device are controlled using the device buttons. The volume may be controlled using the radio or portable device.
Clock Setting
• Press and hold the TIME button until the hours blink; turn the TUNE/SCROLLcontrol knob to set the hours.
• Press the TUNE/SCROLL control knob until the minutes begin to blink; turn the TUNE/SCROLL control knob to set the minutes.
• Press the TUNE/SCROLL control knob to save the time change.
• To exit, press any button/knob or wait five seconds.
Store Radio Presets
• Press the SET/RND button once and SET 1 will show in the display. Then select button (1–6).
• A second station may be added to each push button. Press the SET/RND button twice and SET 2 will show in the display, then select button (1–6).
ELECTRONICS
35
Page 39 of 100
NOTE:Your radio may not be equipped with the Uconnect™ Voice Command and
Uconnect™ Phone features. To determine if your radio has these features, press the
Voice Command button on the radio. You will hear a voice prompt if you have the
feature, or see a message on the radio stating “Uconnect Phone not available” if you do
not.
• Your radio has many features that add to the comfort and convenience of you andyour passengers. Some of these radio features should not be used when driving
because they take your eyes from the road or your attention from driving.
• The radio sales code is located on the lower right side of the radio faceplate.
Seek Up/Down
• Media Center 730N: Press the SEEK hard-key to seek through radio stations in AM, FM, or SAT bands. Seek through tracks in CD or iPod®modes or through
songs in the HDD playlist.
• Media Center 430/430N: Press the SEEK up/down arrow soft-keys to change the currently playing station in AM, FM or SAT bands. Seek through tracks in CD or
iPod
®modes or through songs in the HDD playlist.
Audio Jack
• The Audio Jack allows a portable device, such as an MP3 player or a cassetteplayer, to be plugged into the radio and utilize the vehicle’s audio system, using a
3.5 mm audio cable, to amplify the source and play through the vehicle speakers.
• Pressing the AUX button will change the mode to auxiliary device if the Audio Jack is connected, allowing the music from your portable device to be heard through the
vehicle's speakers.
• The functions of the portable device are controlled using the device buttons. The volume may be controlled using the radio or portable device.
Clock Setting
• Turn the radio on, then touch the screen where the time is displayed.
• Touch the USER CLOCK soft-key (Navigation radio only).
• To adjust the hours, touch either the HOUR FORWARD or HOUR BACKWARDsoft-key.
• To adjust the minutes, touch either the MINUTE FORWARD or MINUTE BACKWARD soft-key.
• To save the new time setting, touch the screen where the word “Save” is displayed.
Store Radio Presets
• Media Center 730N: Press the RADIO/MEDIA hard-key until AM FM SAT is displayed in the upper left corner of the screen.
• Media Center 430/430N: Press the RADIO hard-key to display AM FM SAT in the upper left corner of the screen.
• Select the radio band by touching either the AM, FM, or SAT soft-key.
• Find the station to store by either pressing the SEEK UP/DOWN hard-keys (Media Center 730N), touching the right and left arrow soft-keys (Media Center
430/430N), touching the SCAN soft-key, or by using the DIRECT TUNE soft-key.
ELECTRONICS
37
Page 70 of 100
11. Stow the cable and wheel spacer before driving the vehicle. Reassemble thewinch handle extensions to form a “T” and fit the winch T-handle over the drive
nut. Rotate the nut to the right until the winch mechanism clicks at least three
times.
12. Stow the jack, jack handle and winch handle tools back in the stowage compartment.
13. Check the compact spare tire pressure as soon as possible. Correct the tire pressure, as required.
Securing The Spare Tire
1. Assemble the winch handle extensions to form a T-handle and fit the winchT-handle over the drive nut. Rotate the nut to the left until the winch mechanism
stops turning freely. This will allow enough slack in the cable to allow you to pull
the wheel spacer out from under the vehicle.
2. Assemble the winch handle extensions to form the spare tire hook, and pull the wheel spacer from under the vehicle.
3. Turn the compact spare tire so that the valve stem is down, and place the tire into the spare tire/cover assembly. Slide the wheel spacer through the center of the
wheel and spare tire/cover assembly, so that the two retainer tabs snap out and
engage the spare tire cover on the opposite side.
4. Using the winch T-handle, rotate the drive nut to the right until the compact spare tire/cover assembly is drawn into place against the underside of the vehicle.
5. Continue to rotate the nut to the right until you hear the winch mechanism click three times. It cannot be overtightened. Check under the vehicle to ensure the
compact spare tire/cover assembly is positioned correctly against the underside of
the vehicle.
Road Tire Installation
Vehicles Equipped With Wheel Covers
1. Mount the road tire on the axle.
2. To ease the installation process for steel wheels with wheel covers, install two lug nuts on the mounting studs which are on each side of the valve stem. Install the
lug nuts with the cone shaped end of the nut toward the wheel. Lightly tighten
the lug nuts.
3. Align the valve notch in the wheel cover with the valve stem on the wheel. Install the cover by hand, snapping the cover over the two lug nuts. Do not use a hammer
or excessive force to install the cover.
4. Install the remaining lug nuts with the cone shaped end of the nut toward the wheel. Lightly tighten the lug nuts. To avoid the risk of forcing the vehicle off the
jack, do not tighten the lug nuts fully until the vehicle is lowered to the ground.
5. Lower the vehicle to the ground by turning the jack handle counterclockwise.
6. Finish tightening the lug nuts. Push down on the wrench while at the end of the handle for increased leverage. Tighten the lug nuts in a star pattern until each nut
has been tightened twice. The correct tightness of each lug nut is 102 ft/lbs
(138 N·m). If in doubt about the correct tightness, have them checked with a
torque wrench by your authorized dealer or service station.
WHAT TO DO IN EMERGENCIES
68
Page 71 of 100
7. After 25 miles (40 km) check the lug nut torque with a torque wrench to ensurethat all lug nuts are properly seated against the wheel.
Vehicles Without Wheel Covers 1. Mount the road tire on the axle.
2. Install the remaining lug nuts with the cone shaped end of the nut toward the wheel. Lightly tighten the lug nuts.
3. Lower the vehicle to the ground by turning the jack handle counterclockwise.
4. Finish tightening the lug nuts. Push down on the wrench while at the end of the handle for increased leverage. Tightening the lug nuts in a star pattern until each
nut has been tightened twice. The correct tightness of each lug nut is 102 ft/lbs
(138 N·m). If in doubt about the correct tightness, have them checked with a
torque wrench by your authorized dealer or service station.
5. After 25 miles (40 km) check the lug nut torque with a torque wrench to ensure that all lug nuts are properly seated against the wheel.
CAUTION!
• The winch mechanism is designed for use with the winch T-handle only. Useof an air wrench or other power tools is not recommended and can damage
the winch.
• Do not attempt to raise the vehicle by jacking on locations other than those indicated in the Jacking Instructions for this vehicle.
• Do not attempt to raise the vehicle by jacking on locations other than those indicated.
• Be sure to mount the spare tire with the valve stem facing outward. The vehicle could be damaged if the spare tire is mounted incorrectly.
• The winch mechanism is designed for use with the winch T-handle only. Use of an air wrench or other power tools is not recommended and can damage
the winch.
• The compact spare tire/cover assembly must be used when the compact spare tire is stored. Failure to use this cover could drastically reduce the life
of the compact spare tire.
• The winch mechanism is designed specifically to stow a compact spare tire only. Do not attempt to use the winch to stow the full size flat tire, or any
other full-size tire. Vehicle damage may result.
WHAT TO DO IN EMERGENCIES
69
Page 88 of 100
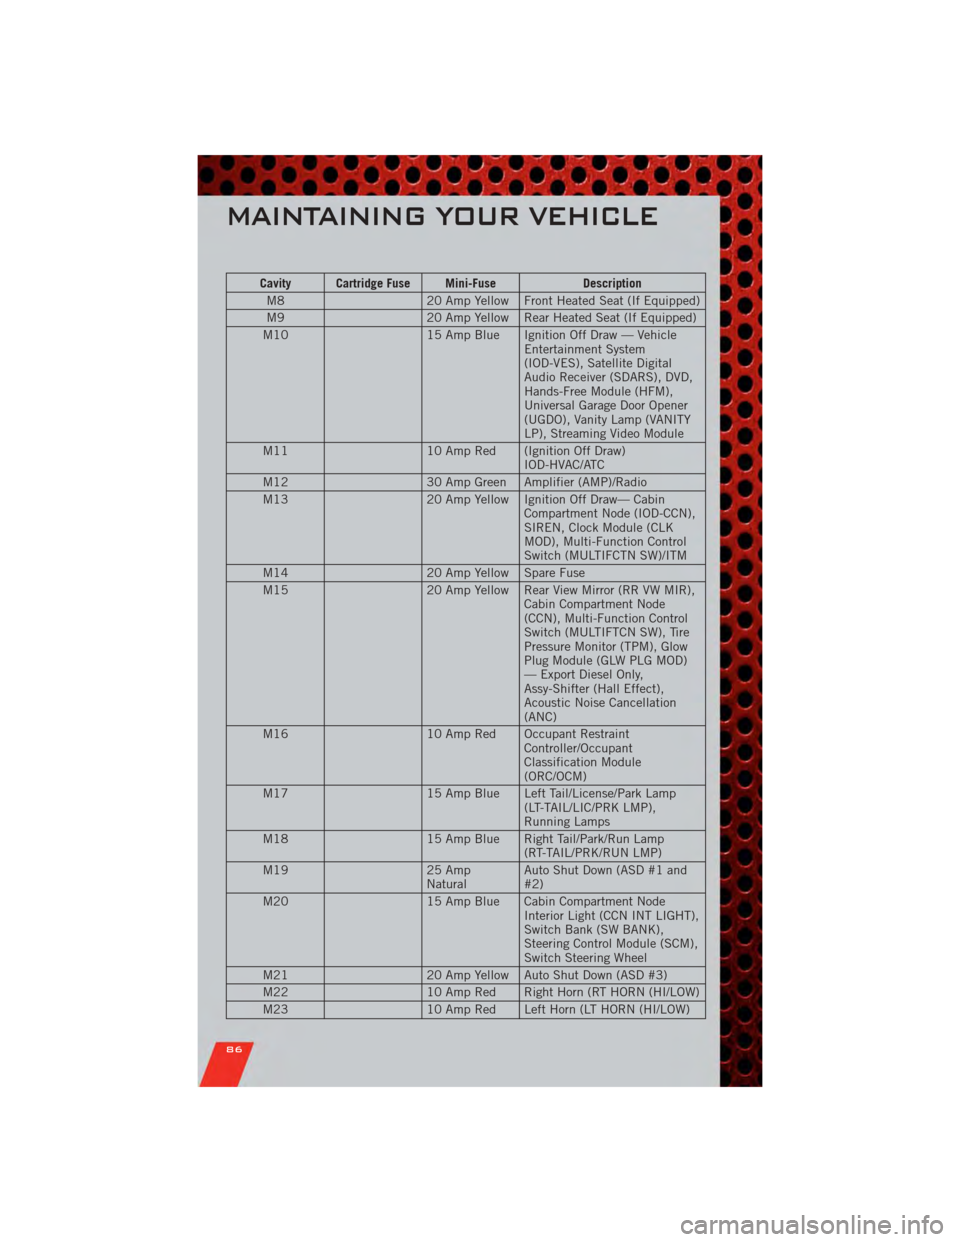
Cavity Cartridge Fuse Mini-FuseDescription
M8 20 Amp Yellow Front Heated Seat (If Equipped)
M9 20 Amp Yellow Rear Heated Seat (If Equipped)
M10 15 Amp Blue Ignition Off Draw — Vehicle
Entertainment System
(IOD-VES), Satellite Digital
Audio Receiver (SDARS), DVD,
Hands-Free Module (HFM),
Universal Garage Door Opener
(UGDO), Vanity Lamp (VANITY
LP), Streaming Video Module
M11 10 Amp Red (Ignition Off Draw)
IOD-HVAC/ATC
M12 30 Amp Green Amplifier (AMP)/Radio
M13 20 Amp Yellow Ignition Off Draw— Cabin
Compartment Node (IOD-CCN),
SIREN, Clock Module (CLK
MOD), Multi-Function Control
Switch (MULTIFCTN SW)/ITM
M14 20 Amp Yellow Spare Fuse
M15 20 Amp Yellow Rear View Mirror (RR VW MIR),
Cabin Compartment Node
(CCN), Multi-Function Control
Switch (MULTIFTCN SW), Tire
Pressure Monitor (TPM), Glow
Plug Module (GLW PLG MOD)
— Export Diesel Only,
Assy-Shifter (Hall Effect),
Acoustic Noise Cancellation
(ANC)
M16 10 Amp Red Occupant Restraint
Controller/Occupant
Classification Module
(ORC/OCM)
M17 15 Amp Blue Left Tail/License/Park Lamp
(LT-TAIL/LIC/PRK LMP),
Running Lamps
M18 15 Amp Blue Right Tail/Park/Run Lamp
(RT-TAIL/PRK/RUN LMP)
M19 25 Amp
NaturalAuto Shut Down (ASD #1 and
#2)
M20 15 Amp Blue Cabin Compartment Node
Interior Light (CCN INT LIGHT),
Switch Bank (SW BANK),
Steering Control Module (SCM),
Switch Steering Wheel
M21 20 Amp Yellow Auto Shut Down (ASD #3)
M22 10 Amp Red Right Horn (RT HORN (HI/LOW)
M23 10 Amp Red Left Horn (LT HORN (HI/LOW)
MAINTAINING YOUR VEHICLE
86
Page 95 of 100
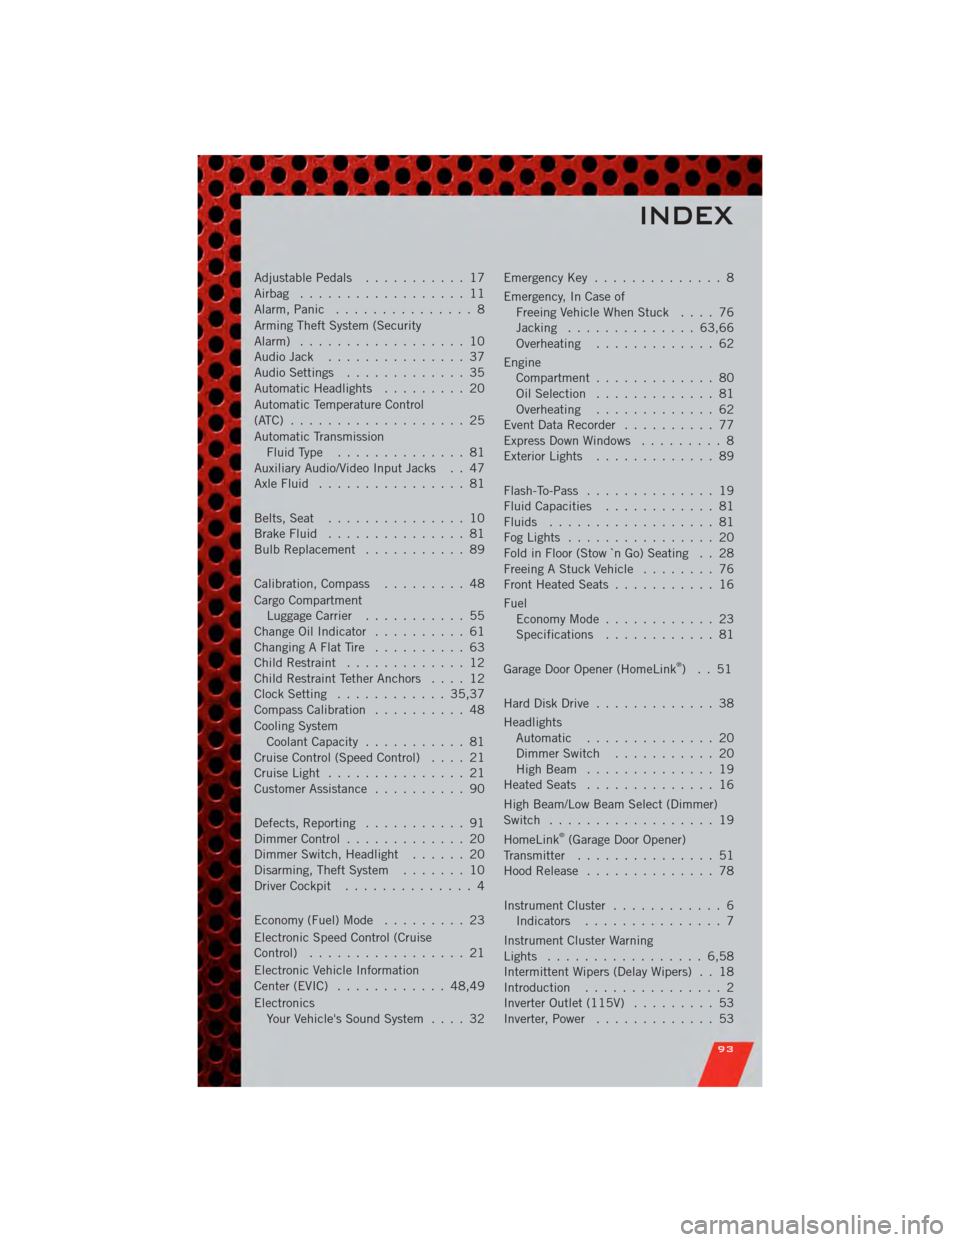
AdjustablePedals ........... 17
Airbag .................. 11
Alarm,Panic ............... 8
Arming Theft System (Security
Alarm) .................. 10
Audio Jack............... 37
Audio Settings ............. 35
Automatic Headlights ......... 20
Automatic Temperature Control
(ATC) ................... 25
Automatic Transmission FluidType .............. 81
Auxiliary Audio/Video Input Jacks . . 47
AxleFluid ................ 81
Belts, Seat ............... 10
Brake Fluid ............... 81
BulbReplacement ........... 89
Calibration,Compass ......... 48
Cargo Compartment Luggage Carrier ........... 55
ChangeOilIndicator .......... 61
ChangingAFlatTire .......... 63
Child Restraint ............. 12
Child Restraint Tether Anchors .... 12
Clock Setting ............ 35,37
Compass Calibration .......... 48
Cooling System Coolant Capacity ........... 81
Cruise Control (Speed Control) .... 21
CruiseLight ............... 21
Customer Assistance .......... 90
Defects, Reporting ........... 91
Dimmer Control ............. 20
Dimmer Switch, Headlight ...... 20
Disarming, Theft System ....... 10
Driver Cockpit .............. 4
Economy(Fuel)Mode ......... 23
Electronic Speed Control (Cruise
Control) ................. 21
Electronic Vehicle Information
Center (EVIC) ............ 48,49
Electronics Your Vehicle's Sound System .... 32Emergency Key
.............. 8
Emergency, In Case of Freeing Vehicle When Stuck .... 76
Jacking .............. 63,66
Overheating ............. 62
Engine Compartment ............. 80
Oil Selection ............. 81
Overheating ............. 62
Event Data Recorder .......... 77
Express Down Windows ......... 8
Exterior Lights ............. 89
Flash-To-Pass .............. 19
Fluid Capacities ............ 81
Fluids .................. 81
FogLights ................ 20
Fold in Floor (Stow `n Go) Seating . . 28
Freeing A Stuck Vehicle ........ 76
Front Heated Seats ........... 16
Fuel EconomyMode ............ 23
Specifications ............ 81
Garage Door Opener (HomeLink
®)..51
Hard Disk Drive ............. 38
Headlights Automatic .............. 20
Dimmer Switch ........... 20
HighBeam .............. 19
Heated Seats .............. 16
High Beam/Low Beam Select (Dimmer)
Switch .................. 19
HomeLink
®(Garage Door Opener)
Transmitter ............... 51
Hood Release .............. 78
Instrument Cluster ............ 6
Indicators ............... 7
Instrument Cluster Warning
Lights ................. 6,58
Intermittent Wipers (Delay Wipers) . . 18
Introduction ............... 2
Inverter Outlet (115V) ......... 53
Inverter, Power ............. 53
INDEX
93
Page 96 of 100
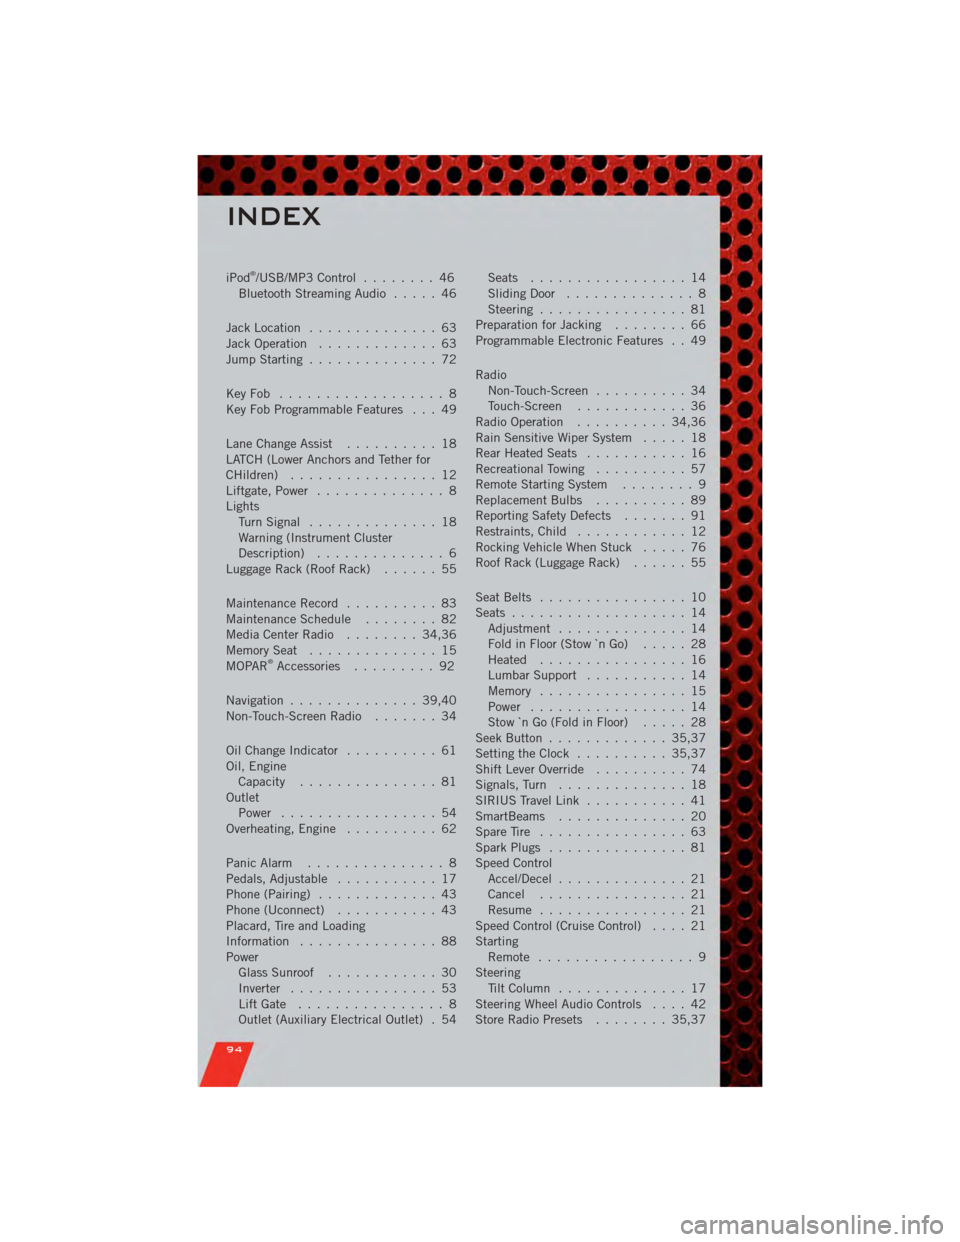
iPod®/USB/MP3 Control........ 46
Bluetooth Streaming Audio ..... 46
Jack Location .............. 63
Jack Operation ............. 63
Jump Starting .............. 72
KeyFob .................. 8
Key Fob Programmable Features . . . 49
Lane Change Assist .......... 18
LATCH (Lower Anchors and Tether for
CHildren) ................ 12
Liftgate, Power .............. 8
Lights TurnSignal .............. 18
Warning (Instrument Cluster
Description) .............. 6
Luggage Rack (Roof Rack) ...... 55
Maintenance Record .......... 83
MaintenanceSchedule ........ 82
Media Center Radio ........ 34,36
MemorySeat .............. 15
MOPAR
®Accessories ......... 92
Navigation .............. 39,40
Non-Touch-Screen Radio ....... 34
Oil Change Indicator .......... 61
Oil, Engine Capacity ............... 81
Outlet Power ................. 54
Overheating, Engine .......... 62
Panic Alarm ............... 8
Pedals, Adjustable ........... 17
Phone (Pairing) ............. 43
Phone (Uconnect) ........... 43
Placard, Tire and Loading
Information ............... 88
Power Glass Sunroof ............ 30
Inverter ................ 53
LiftGate ................ 8
Outlet (Auxiliary Electrical Outlet) . 54 Seats
................. 14
SlidingDoor .............. 8
Steering ................ 81
Preparation for Jacking ........ 66
Programmable Electronic Features . . 49
Radio Non-Touch-Screen .......... 34
Touch-Screen ............ 36
Radio Operation .......... 34,36
Rain Sensitive Wiper System ..... 18
Rear Heated Seats ........... 16
Recreational Towing .......... 57
Remote Starting System ........ 9
Replacement Bulbs .......... 89
Reporting Safety Defects ....... 91
Restraints, Child ............ 12
Rocking Vehicle When Stuck ..... 76
Roof Rack (Luggage Rack) ...... 55
Seat Belts ................ 10
Seats ................... 14
Adjustment .............. 14
Fold in Floor (Stow `n Go) ..... 28
Heated ................ 16
Lumbar Support ........... 14
Memory ................ 15
Power ................. 14
Stow `n Go (Fold in Floor) ..... 28
Seek Button ............. 35,37
Setting the Clock .......... 35,37
Shift Lever Override .......... 74
Signals, Turn .............. 18
SIRIUS Travel Link ........... 41
SmartBeams .............. 20
SpareTire ................ 63
Spark Plugs ............... 81
Speed Control Accel/Decel .............. 21
Cancel ................ 21
Resume ................ 21
Speed Control (Cruise Control) .... 21
Starting Remote ................. 9
Steering Tilt Column .............. 17
Steering Wheel Audio Controls ....4
2
Store Radio Presets ........ 35,37
INDEX
94