warning DODGE GRAND CARAVAN 2013 5.G Owner's Guide
[x] Cancel search | Manufacturer: DODGE, Model Year: 2013, Model line: GRAND CARAVAN, Model: DODGE GRAND CARAVAN 2013 5.GPages: 132, PDF Size: 4.51 MB
Page 100 of 132
FREEING A STUCK VEHICLE
• If your vehicle becomes stuck in mud, sand or snow, it can often be moved using arocking motion. Turn your steering wheel right and left to clear the area around the front
wheels. Then shift back and forth between DRIVE and REVERSE while gently pressing the
accelerator. Use the least amount of accelerator pedal pressure that will maintain the
rocking motion, without spinning the wheels or racing the engine.
NOTE:
Press the "ESC Off" switch, to place the Electronic Stability Control (ESC) system in "Partial
Off" mode before rocking the vehicle. Once the vehicle has been freed, press the "ESC Off"
switch again to restore "ESC On" mode.
CAUTION!
• When “rocking” a stuck vehicle by moving between REVERSE and DRIVE, do not spin the wheels faster than 15 mph (24 km/h), or drivetrain damage may result.
• Revving the engine or spinning the wheels too fast may lead to transmission over-
heating and failure. It can also damage the tires. Do not spin the wheels above
30 mph (48 km/h) while in gear (no transmission shifting occurring).
WARNING!
Fast spinning tires can be dangerous. Forces generated by excessive wheel speeds may
cause tire damage or failure. A tire could explode and injure someone. Do not spin your
vehicle's wheels faster than 30 mph (48 km/h) when you are stuck. Do not let anyone
near a spinning wheel, no matter what the speed.
WHAT TO DO IN EMERGENCIES
98
Page 102 of 132
OPENING THE HOOD
• Pull the hood release lever located onthe instrument panel, below the steering
column.
•
Raise the hood and locate the safety catch
lever, in the middle of the hood opening.
• Move the safety latch while lifting the hood at the same time.
• Insert the support rod into the slot on the hood.
• To close the hood, remove the support rod and place it in the retaining clip, then
lower the hood slowly.
WARNING!
Be sure the hood is fully latched before driving your vehicle. If the hood is not fully
latched, it could open when the vehicle is in motion and block your vision. Failure to
follow this warning could result in serious injury or death.
MAINTAINING YOUR VEHICLE
100
Page 103 of 132
ADDING FUEL
Fuel Filler Cap (Gas Cap)
• The gas cap is located behind the fuelfiller door on the left side of the vehicle.
If the gas cap is lost or damaged, be sure
the replacement cap is for use with this
vehicle.
• When the fuel nozzle “clicks” or shuts off, the fuel tank is full.
• Tighten the gas cap until you hear a “clicking” sound. This is an indication that
the gas cap is properly tightened. If not
properly tightened, the MIL (Malfunction
Indicator Light) may come on.
NOTE:
The driver’s side sliding door cannot be
opened while the fuel door is open.
CAUTION!
• Damage to the fuel system or emissions control system could result from using an improper gas cap. A poorly fitting cap could let impurities into the fuel system and
may cause the MIL to turn on, due to fuel vapors escaping from the system.
• To avoid fuel spillage and overfilling, do not “top off” the fuel tank after filling.
WARNING!
• Never have any smoking materials lit in or near the vehicle when the gas cap is
removed or the tank filled.
• Never add fuel when the engine is running. This is in violation of most state and
federal fire regulations and/or local bylaws, and will cause the MIL to turn on.
• A fire may result if gasoline is pumped into a portable container that is inside of a
vehicle. You could be burned. Always place gas containers on the ground while filling.
MAINTAINING YOUR VEHICLE
101
Page 109 of 132
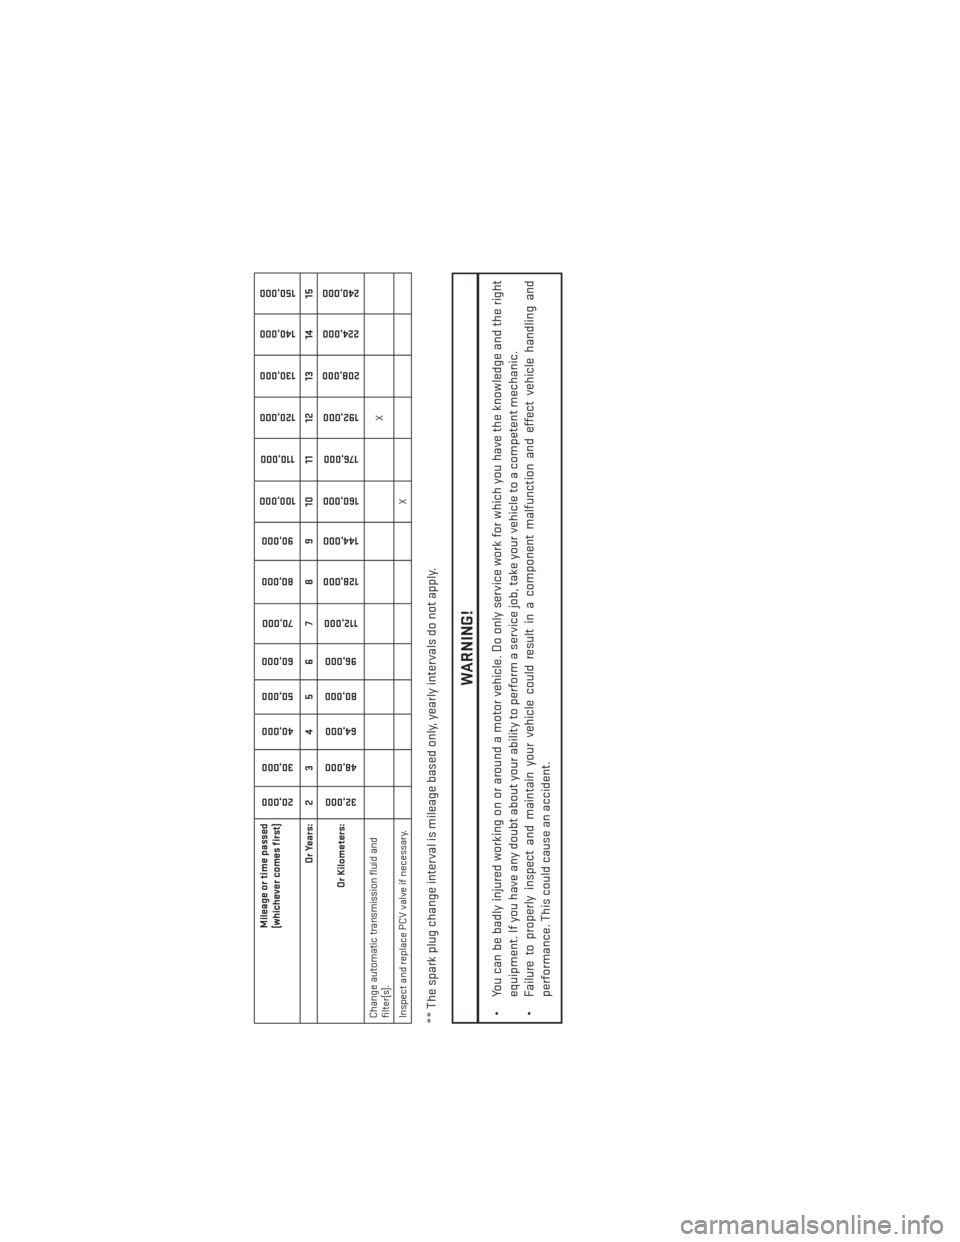
Mileage or time passed
(whichever comes first)
20,000
30,000
40,000
50,000
60,000
70,000
80,000 90,000
100,000
110,000
120,000 130,000
140,000
150,000
Or Years: 2 3 4 5 6 7 8 9 10 11 12 13 14 15
Or Kilometers:
32,000
48,000
64,000
80,000
96,000
112,000
128,000 144,000
160,000
176,000
192,000
208,000 224,000
240,000
Change automatic transmission fluid and
filter(s). X
Inspect and replace PCV valve if necessary. X** The spark plug change interval is mileage based only, yearly intervals do not apply.
WARNING!
• You can be badly injured working on or around a motor vehicle. Do only service work for which you have the knowledge and the right equipment. If you have any doubt about your ability to perform a service job, take your vehicle to a competent mechanic.
• Failure to properly inspect and maintain your vehicle could result in a component malfunction and effect vehicle handling and
performance. This could cause an accident.
MAINTAINING YOUR VEHICLE
107
Page 114 of 132
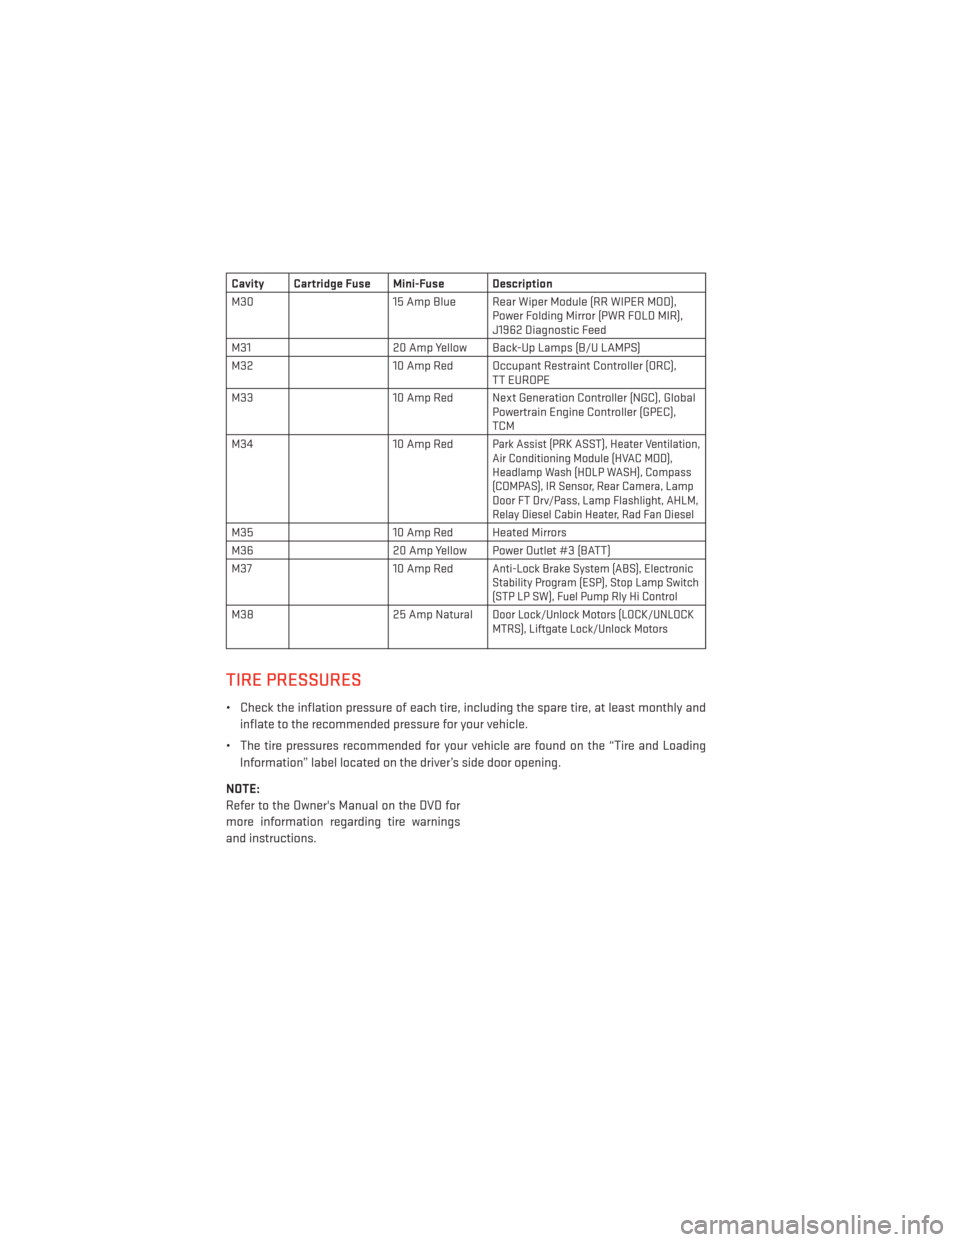
Cavity Cartridge Fuse Mini-Fuse Description
M3015 Amp Blue Rear Wiper Module (RR WIPER MOD),
Power Folding Mirror (PWR FOLD MIR),
J1962 Diagnostic Feed
M31 20 Amp Yellow Back-Up Lamps (B/U LAMPS)
M32 10 Amp Red Occupant Restraint Controller (ORC),
TT EUROPE
M33 10 Amp Red Next Generation Controller (NGC), Global
Powertrain Engine Controller (GPEC),
TCM
M34 10 Amp Red
Park Assist (PRK ASST), Heater Ventilation,
Air Conditioning Module (HVAC MOD),
Headlamp Wash (HDLP WASH), Compass
(COMPAS), IR Sensor, Rear Camera, Lamp
Door FT Drv/Pass, Lamp Flashlight, AHLM,
Relay Diesel Cabin Heater, Rad Fan Diesel
M3510 Amp Red Heated Mirrors
M36 20 Amp Yellow Power Outlet #3 (BATT)
M37 10 Amp Red
Anti-Lock Brake System (ABS), Electronic
Stability Program (ESP), Stop Lamp Switch
(STP LP SW), Fuel Pump Rly Hi Control
M3825 Amp NaturalDoor Lock/Unlock Motors (LOCK/UNLOCK
MTRS), Liftgate Lock/Unlock Motors
TIRE PRESSURES
• Check the inflation pressure of each tire, including the spare tire, at least monthly and
inflate to the recommended pressure for your vehicle.
• The tire pressures recommended for your vehicle are found on the “Tire and Loading Information” label located on the driver’s side door opening.
NOTE:
Refer to the Owner's Manual on the DVD for
more information regarding tire warnings
and instructions.
MAINTAINING YOUR VEHICLE
112
Page 115 of 132

WARNING!
• Overloading of your tires is dangerous. Overloading can cause tire failure, affectvehicle handling, and increase your stopping distance. Use tires of the recom-
mended load capacity for your vehicle. Never overload them.
• Improperly inflated tires are dangerous and can cause collisions. Under-inflation is the leading cause of tire failure and may result in severe cracking, component
separation, or “blow out”. Over-inflation reduces a tire’s ability to cushion shock.
Objects on the road and chuck holes can cause damage that results in tire failure.
Unequal tire pressures can cause steering problems. You could lose control of your
vehicle. Over-inflated or under-inflated tires can affect vehicle handling and can fail
suddenly, resulting in loss of vehicle control.
WHEEL AND WHEEL TRIM CARE
• All wheels and wheel trim, especially aluminum and chrome plated wheels, should becleaned regularly with a mild soap and water to prevent corrosion.
• To remove heavy soil and/or excessive brake dust, use MOPAR® Wheel Cleaner or equivalent or select a non-abrasive, non-acidic cleaner.
CAUTION!
Do not use scouring pads, steel wool, a bristle brush, or metal polishes. Do not use oven
cleaner. These products may damage the wheel's protective finish. Avoid automatic car
washes that use acidic solutions or harsh brushes that may damage the wheel's protec-
tive finish. Only MOPAR® Wheel Cleaner or equivalent is recommended.
EXTERIOR BULBS
LIGHT BULBS – Exterior Bulb Number
Backup Lamp 3157
Rear Tail/Stop/Side Marker Lamp LED (Serviced at Authorized Dealer)
Center High-Mounted Stop Lamp LED (*)
Fog Lamp – If Equipped H11
Front Side Marker W5W
Front Park/Turn Signal Lamp PY27/7W or 3757A
Rear Turn Signal Lamp 3757A
Headlamp – (Low and High Beam Halogen) H11
Headlamp – (HID-If Equipped) Low Beam) D1S
License Lamp 168
* CHMSL is not serviceable. It is a LED lamp. To replace the LED, the entire CHMSL assembly
must be replaced.
MAINTAINING YOUR VEHICLE
113
Page 116 of 132
CHRYSLER GROUP LLC CUSTOMER CENTER
P.O. Box 21–8004 Auburn Hills, MI 48321–8004 Phone: 1–800–423–6343
CHRYSLER CANADA INC. CUSTOMER CENTER
P.O. Box 1621 Windsor, Ontario N9A 4H6 Phone: 1–800–465–2001 (English)
Phone: 1–800–387–9983 (French)
PUBLICATIONS ORDERING
• Replacement English User Guide kits or DVDs may be purchased by visiting www.tech-authority.com or by calling 1–800–890–4038 (U.S.) or 1–800–387–1143 (Canada). Visa,
Master Card, American Express and Discover orders are accepted. If you prefer mailing
your order, please call the above numbers for an order form.
• For a copy of this User Guide/DVD kit in Spanish, please contact your authorized dealer.
NOTE:
• A street address is required when ordering manuals (no P.O. Boxes).
• The Owner's Manual and User Guide electronic files are also available on the Chrysler, Jeep, Ram Truck and Dodge websites.
• Click on the “For Owners” tab, select "Owner/Service Manuals”, then select your desired model year and vehicle from the drop down lists.
ASSISTANCE FOR THE HEARING IMPAIRED
•To assist customers who have hearing difficulties, the manufacturer has installed special
TDD (Telecommunication Devices for the Deaf) equipment at its customer center. Any
hearing or speech impaired customer, who has access to a TDD or a conventional teletype-
writer (TTY) in the United States, can communicate with the manufacturer by dialing
1–800–380–CHRY. Canadian residents with hearing difficulties that require assistance can
use the special needs relay service offered by Bell Canada. For TTY teletypewriter users,
dial 711 and for Voice callers, dial 1–800–855–0511 to connect with a Bell Relay Service
operator.
WARNING!
Engine exhaust, some of its constituents, and certain vehicle components contain, or
emit, chemicals known to the State of California to cause cancer and birth defects, or
other reproductive harm. In addition, certain fluids contained in vehicles and certain
products of component wear contain, or emit, chemicals known to the State of California
to cause cancer and birth defects, or other reproductive harm.
CONSUMER ASSISTANCE
114
Page 119 of 132
Adjustable Pedals.............21
Airbag...................10
Arming Theft System (Security Alarm)...9
Automatic Headlights ..........24
Automatic Temperature Control (ATC)...29
Automatic Transmission Fluid Type ..............103
Auxiliary Audio/Video Input Jacks ....70
AxleFluid ................103
Back-UpCamera.............30
Belts, Seat .................10
Blind Spot Monitoring ...........31
BrakeFluid................103
Break-In Recommendations, New Vehicle ..............22
BulbReplacement............113
Calibration, Compass ...........71
Cargo Compartment Luggage Carrier ...........78
Change Oil Indicator ...........83
Changing A Flat Tire ...........85
Child Restraint ...............11
Child Restraint Tether Anchors ......12
Compass Calibration ...........71
Cooling System Coolant Capacity ..........103
Cruise Control (Speed Control) ......25
Cruise Light ................25
Customer Assistance ..........114
Defects, Reporting ............115
Dimmer Control ..............24
Dimmer Switch, Headlight ........24
Disarming, Theft System ..........9
Economy(Fuel)Mode...........26
Electronics Your Vehicle's Sound System ....34
Electronic Speed Control (Cruise Control) ............25
Electronic Vehicle Information Center (EVIC) ............71,72 Emergency, In Case of
Brake Warning Light .........82
Freeing Vehicle When Stuck .....98
Jacking ..............85,89
Overheating .............84
Engine Break-In Recommendations .....22
Compartment ........... .102
Oil Selection .............103
Overheating .............84
EventDataRecorder...........99
Exterior Lights ..............113
Flash-To-Pass ...............23
Fluid Capacities .............103
Fluids ..................103
FogLights.................24
Fold in Floor (Stow `n Go) Seating ....15
Freeing A Stuck Vehicle .........98
Front Heated Seats ............19
Fuel Economy Mode ............26
Filler Cap (Gas Cap) .........83
Specification s............
103
Garage Door Opener (HomeLink®) ....73
Gas Cap (Fuel Filler Cap) .........83
Headlights Automatic ..............24
Dimmer Switch ............24
HighBeam ..............23
HeatedMirrors ..........27,28,29
Heated Seats ...............19
Heated Steering Wheel ..........20
High Beam/Low Beam Select (Dimmer) Switch ............23
HomeLink® (Garage Door Opener) ....73
Hood Release ..............100
Instrument Cluster Indicators ...............7
Instrument Cluster Warning Lights ....6
Intermittent Wipers (Delay Wipers) ....23
INDEX
117
Page 120 of 132
Introduction................2
Inverter Outlet (115V) ...........75
Inverter,Power ..............75
iPod®/USB/MP3 Control .........63
BluetoothStreamingAudio .....69
Jack Location ..............85
Jack Operation ..............85
Jump Starting ..............95
KeyFob...................8
Key Fob Programmable Features .....72
Lane Change Assist ...........22
LATCH (Lower Anchors and Tether for CHildren) ............11, 12
Liftgate, Power ...............8
Lights
Tire Pressure Monitoring (TPMS)...80
TurnSignal ..............22
Warning (Instrument Cluster
Description) ..............6
Locks Liftgate, Tailgate ...........8
Luggage Rack (Roof Rack) ........78
Maintenance Record ..........108
Maintenance Schedule .........104
Malfunction Indicator Light (CheckEngine) ............82
MemorySeat...............14
Mirrors Heated ............27,28,29
MOPAR® Accessories ..........116
Navigation Voice Prompt Volume . . .47, 56
New Vehicle Break-In Period .......22
Oil Change Indicator ...........83
Oil, Engine Capacity...............103
Outlet Power .................76
Overheating, Engine ...........84 Park Sense System, Rear
.........30
Pedals,Adjustable ............21
Placard, Tire and Loading Information. .112
Power Glass Sunroof ............32
Inverter ................75
Lift Gate ................8
Outlet (Auxiliary Electrical Outlet)...76
Seats .................14
Steering ...............103
Preparation for Jacking .........89
Programmable Electronic Features ....72
Rain Sensitive Wiper System .......23
RearCamera...............30
RearCrossPath..............31
Rear Heated Seats ............19
Rear Park Sense System .........30
Recreational Towing ...........79
Remote Starting System ..........9
Replacement Bulbs ...........113
Reporting Safety Defects ........115
Rocking Vehicle When Stuck .......98
RoofRack(LuggageRack)........78
Schedule, Maintenance .........104
Seat Belts .................10
Seats ...................14
Adjustment ..............14
Fold in Floor (Stow `n Go) .......15
Heated ................19
Lumbar Support ...........14
Memory ................14
Power .................14
Stow `n Go (Fold in Floor) .......15
Shift Lever Override ............97
Signals, Turn ...............22
SmartBeams ...............24
SpareTire.................85
SparkPlugs...............103
Speed Control Accel/Decel .............25
Cancel ................25
Distance Setting (ACC Only) .....25
INDEX
118
Page 123 of 132
UTILITY
• How do I know how much I can tow with my Dodge Grand Caravan? pg. 79
WHAT TO DO IN EMERGENCIES
• What do I do if my TPMS warning light is blinking? pg. 80
• How do I change a flat tire? pg. 85
• How do I Jump-Start my vehicle? pg. 95
MAINTAINING YOUR VEHICLE
• Where is my Fuse Block located? pg. 110
• What type of oil do I use? pg. 103
• How often should I change my engine’s oil? pg. 104
• What should my tire pressure be set at? pg. 112
FAQ (How To?)
121