clock DODGE GRAND CARAVAN 2014 5.G User Guide
[x] Cancel search | Manufacturer: DODGE, Model Year: 2014, Model line: GRAND CARAVAN, Model: DODGE GRAND CARAVAN 2014 5.GPages: 156, PDF Size: 3.83 MB
Page 48 of 156
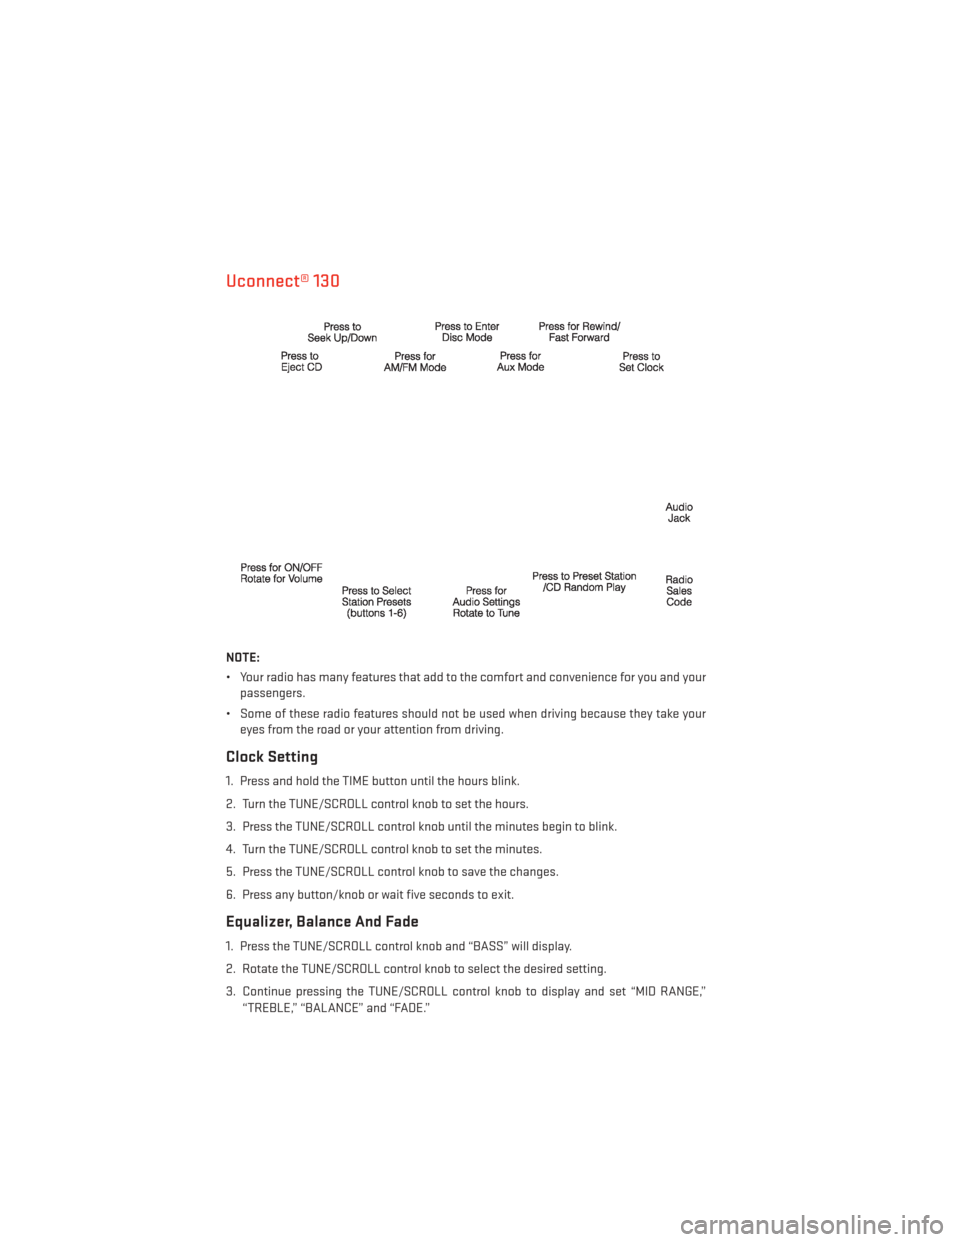
Uconnect® 130
NOTE:
• Your radio has many features that add to the comfort and convenience for you and yourpassengers.
• Some of these radio features should not be used when driving because they take your eyes from the road or your attention from driving.
Clock Setting
1. Press and hold the TIME button until the hours blink.
2. Turn the TUNE/SCROLL control knob to set the hours.
3. Press the TUNE/SCROLL control knob until the minutes begin to blink.
4. Turn the TUNE/SCROLL control knob to set the minutes.
5. Press the TUNE/SCROLL control knob to save the changes.
6. Press any button/knob or wait five seconds to exit.
Equalizer, Balance And Fade
1. Press the TUNE/SCROLL control knob and “BASS” will display.
2. Rotate the TUNE/SCROLL control knob to select the desired setting.
3. Continue pressing the TUNE/SCROLL control knob to display and set “MID RANGE,”
“TREBLE,” “BALANCE” and “FADE.”
ELECTRONICS
46
Page 50 of 156
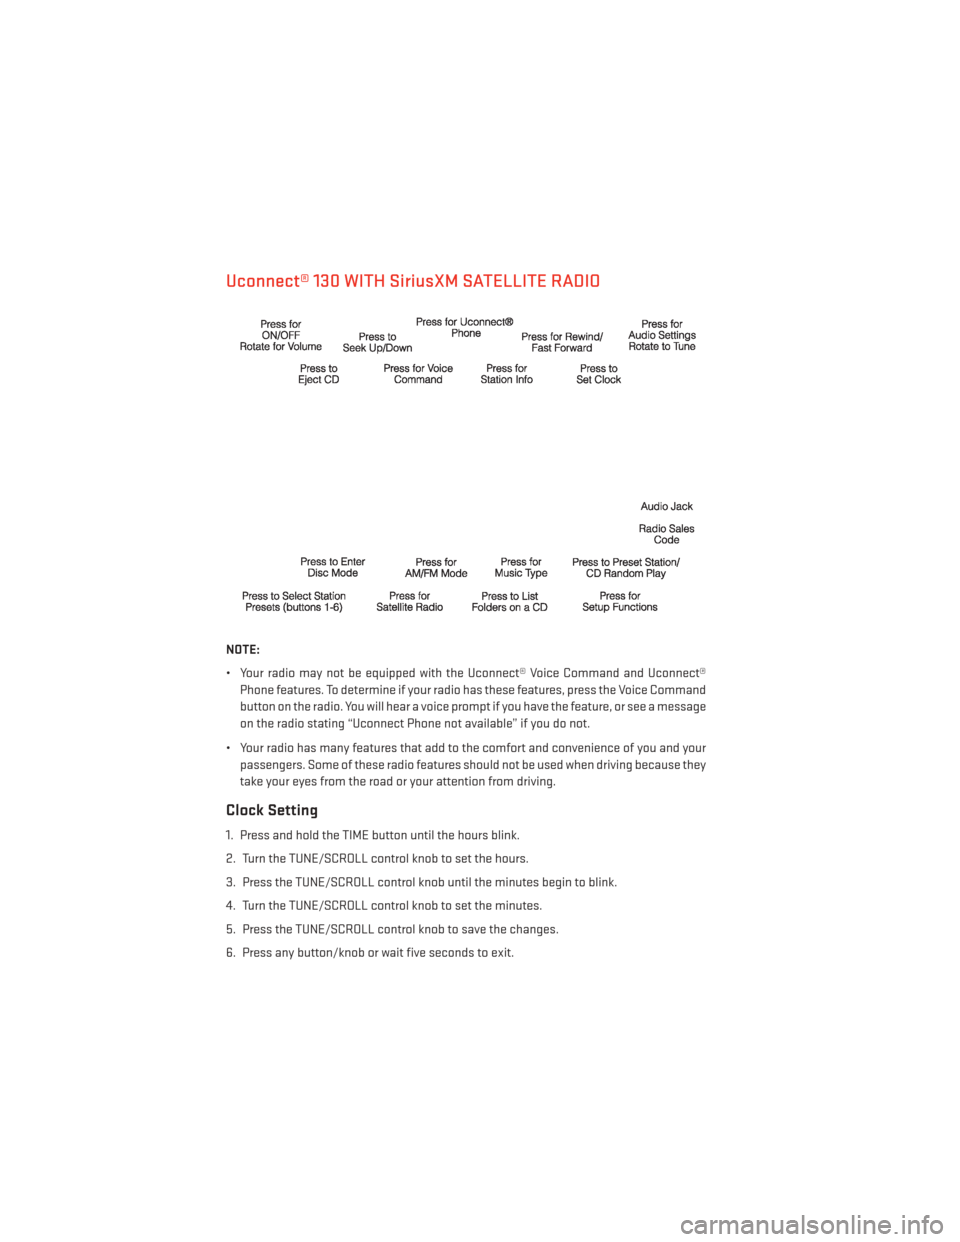
Uconnect® 130 WITH SiriusXM SATELLITE RADIO
NOTE:
• Your radio may not be equipped with the Uconnect® Voice Command and Uconnect®Phone features. To determine if your radio has these features, press the Voice Command
button on the radio. You will hear a voice prompt if you have the feature, or see a message
on the radio stating “Uconnect Phone not available” if you do not.
• Your radio has many features that add to the comfort and convenience of you and your passengers. Some of these radio features should not be used when driving because they
take your eyes from the road or your attention from driving.
Clock Setting
1. Press and hold the TIME button until the hours blink.
2. Turn the TUNE/SCROLL control knob to set the hours.
3. Press the TUNE/SCROLL control knob until the minutes begin to blink.
4. Turn the TUNE/SCROLL control knob to set the minutes.
5. Press the TUNE/SCROLL control knob to save the changes.
6. Press any button/knob or wait five seconds to exit.
ELECTRONICS
48
Page 53 of 156
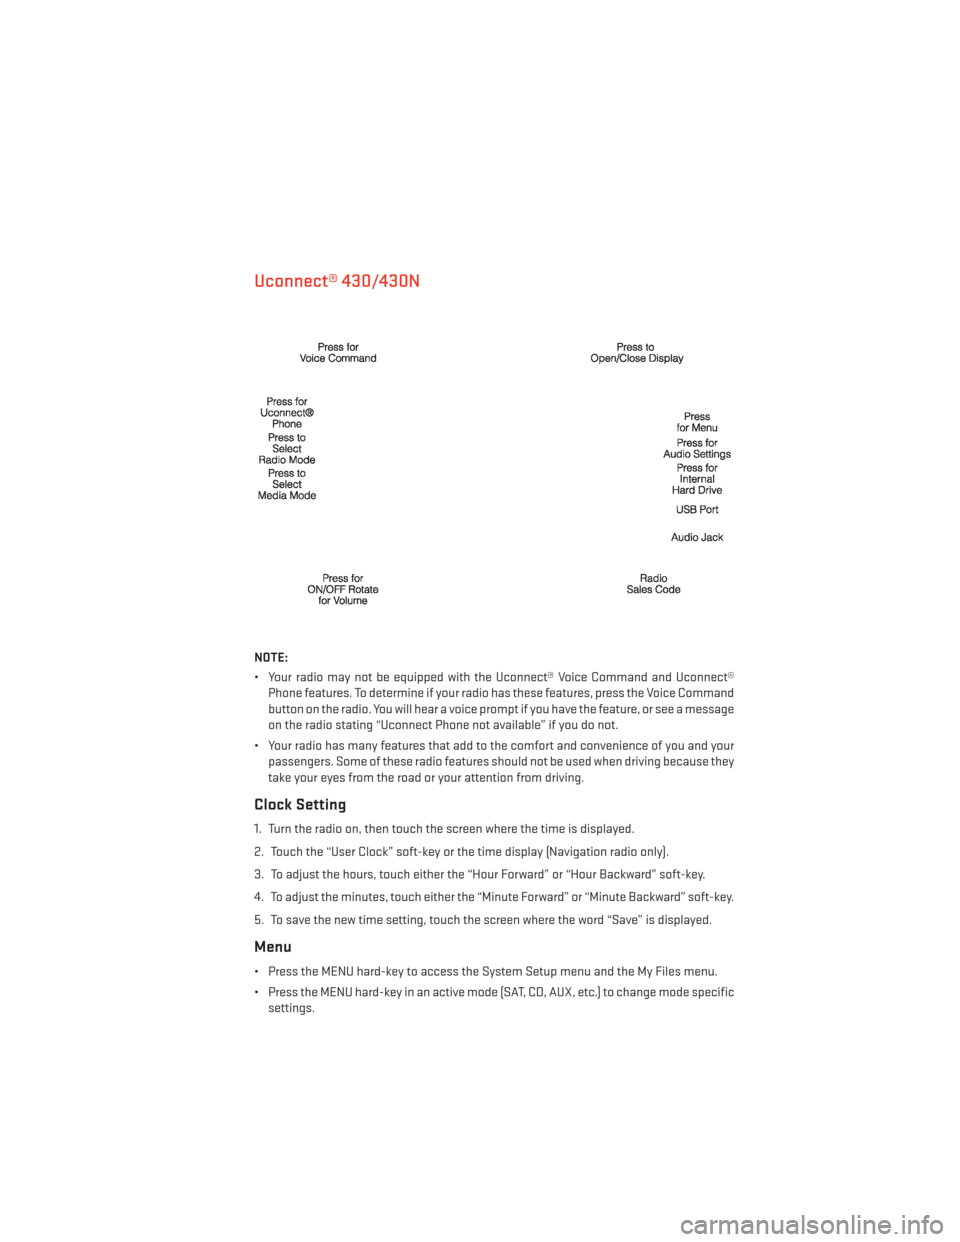
Uconnect® 430/430N
NOTE:
• Your radio may not be equipped with the Uconnect® Voice Command and Uconnect®Phone features. To determine if your radio has these features, press the Voice Command
button on the radio. You will hear a voice prompt if you have the feature, or see a message
on the radio stating “Uconnect Phone not available” if you do not.
• Your radio has many features that add to the comfort and convenience of you and your passengers. Some of these radio features should not be used when driving because they
take your eyes from the road or your attention from driving.
Clock Setting
1. Turn the radio on, then touch the screen where the time is displayed.
2. Touch the “User Clock” soft-key or the time display (Navigation radio only).
3. To adjust the hours, touch either the “Hour Forward” or “Hour Backward” soft-key.
4. To adjust the minutes, touch either the “Minute Forward” or “Minute Backward” soft-key.
5. To save the new time setting, touch the screen where the word “Save” is displayed.
Menu
• Press the MENU hard-key to access the System Setup menu and the My Files menu.
• Press the MENU hard-key in an active mode (SAT, CD, AUX, etc.) to change mode specificsettings.
ELECTRONICS
51
Page 62 of 156
Acquiring Satellites
• The GPS Satellite strength bars indicate the strength of your satellite reception.
• Acquiring satellite signals can take a few minutes. When at least one of the bars is green,your device has acquired satellite signals.
• You may experience delays receiving satellite signals when in areas with an obstructed view to the sky, such as garages, tunnels, or large cities with tall buildings.
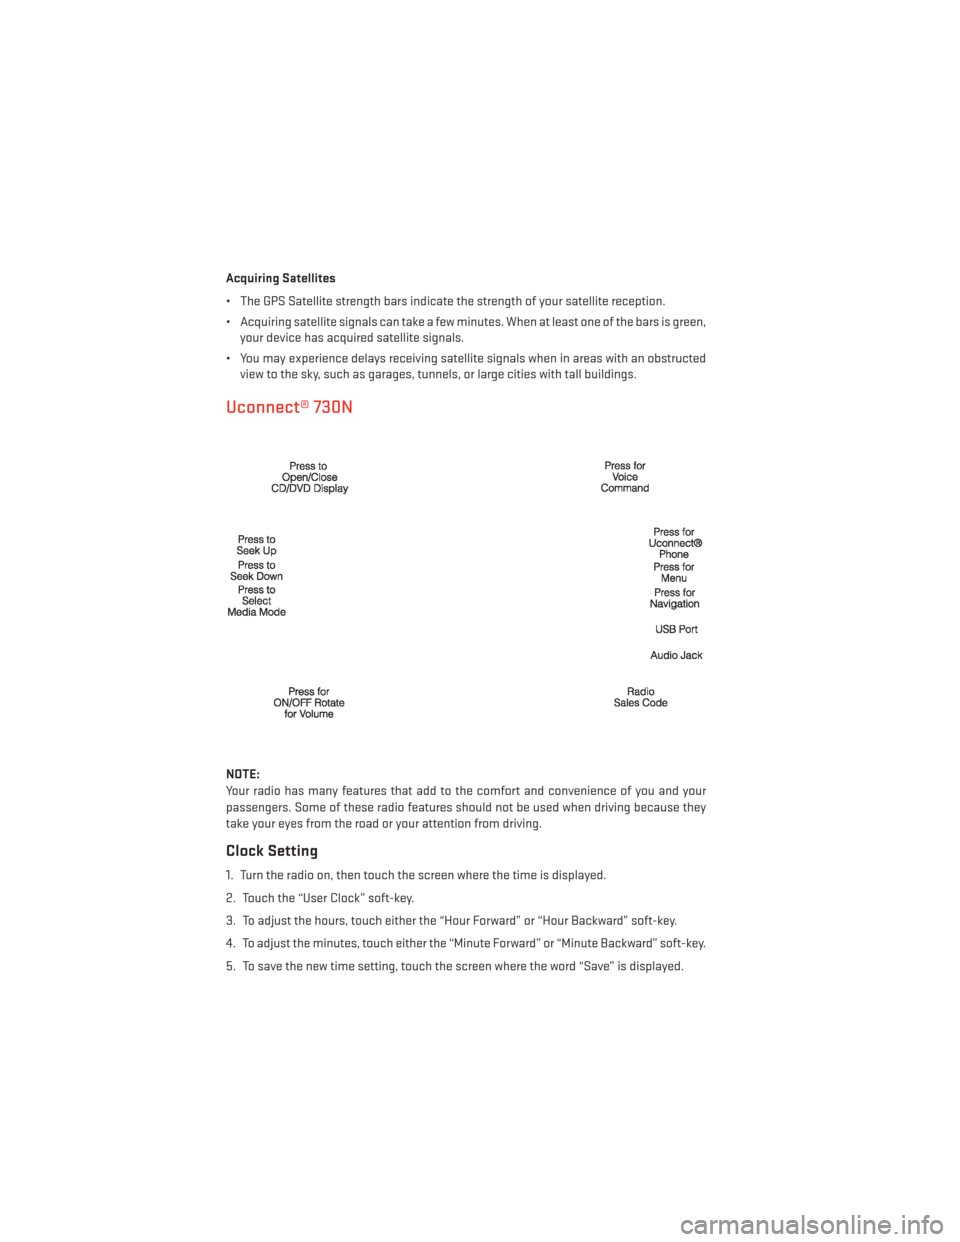
Uconnect® 730N
NOTE:
Your radio has many features that add to the comfort and convenience of you and your
passengers. Some of these radio features should not be used when driving because they
take your eyes from the road or your attention from driving.
Clock Setting
1. Turn the radio on, then touch the screen where the time is displayed.
2. Touch the “User Clock” soft-key.
3. To adjust the hours, touch either the “Hour Forward” or “Hour Backward” soft-key.
4. To adjust the minutes, touch either the “Minute Forward” or “Minute Backward” soft-key.
5. To save the new time setting, touch the screen where the word “Save” is displayed.
ELECTRONICS
60
Page 118 of 156
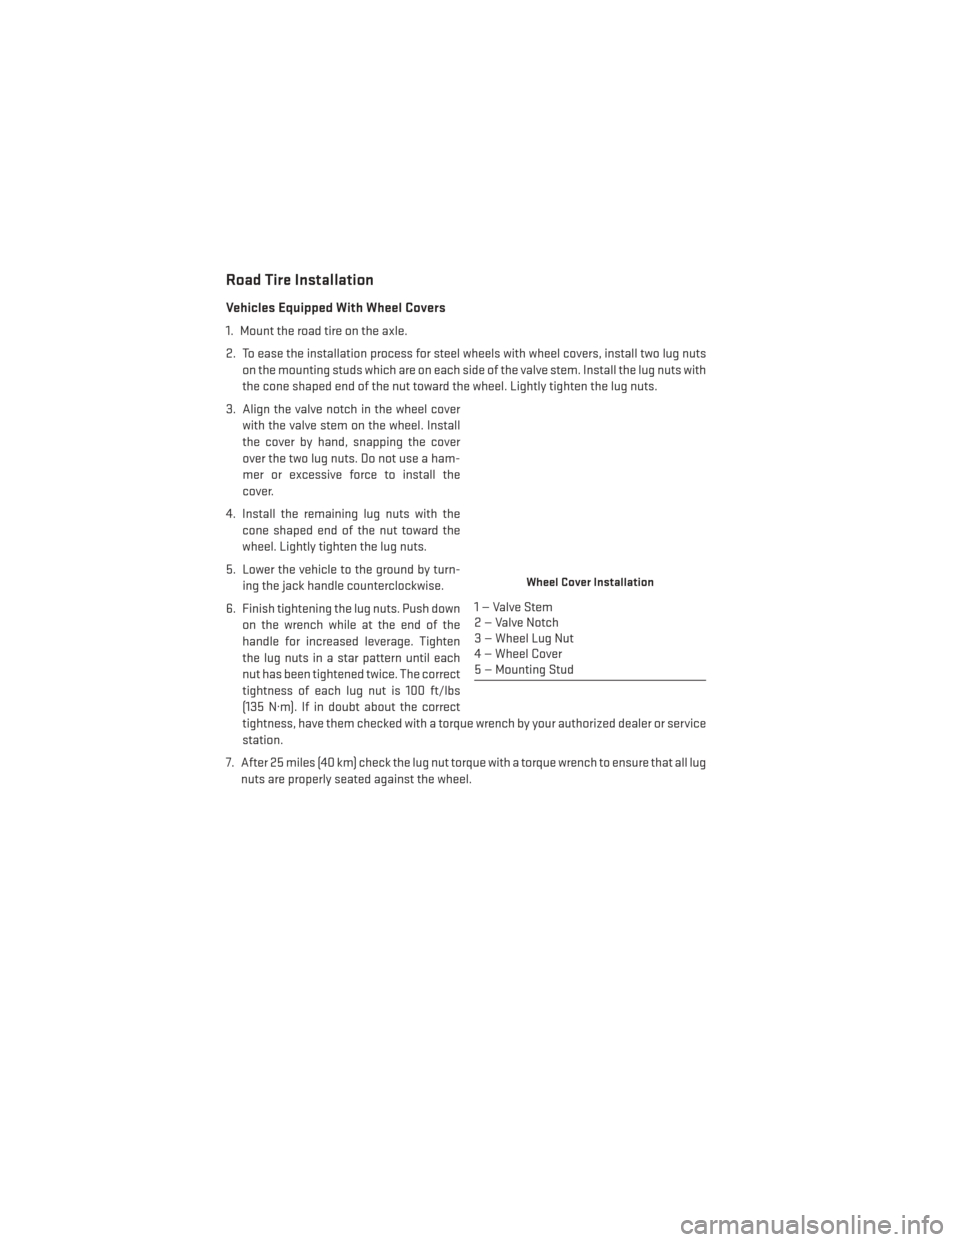
Road Tire Installation
Vehicles Equipped With Wheel Covers
1. Mount the road tire on the axle.
2. To ease the installation process for steel wheels with wheel covers, install two lug nutson the mounting studs which are on each side of the valve stem. Install the lug nuts with
the cone shaped end of the nut toward the wheel. Lightly tighten the lug nuts.
3. Align the valve notch in the wheel cover with the valve stem on the wheel. Install
the cover by hand, snapping the cover
over the two lug nuts. Do not use a ham-
mer or excessive force to install the
cover.
4. Install the remaining lug nuts with the cone shaped end of the nut toward the
wheel. Lightly tighten the lug nuts.
5. Lower the vehicle to the ground by turn- ing the jack handle counterclockwise.
6. Finish tightening the lug nuts. Push down on the wrench while at the end of the
handle for increased leverage. Tighten
the lug nuts in a star pattern until each
nut has been tightened twice. The correct
tightness of each lug nut is 100 ft/lbs
(135 N·m). If in doubt about the correct
tightness, have them checked with a torque wrench by your authorized dealer or service
station.
7. After 25 miles (40 km) check the lug nut torque with a torque wrench to ensure that all lug nuts are properly seated against the wheel.
Wheel Cover Installation
1 — Valve Stem
2 — Valve Notch
3 — Wheel Lug Nut
4 — Wheel Cover
5 — Mounting Stud
WHAT TO DO IN EMERGENCIES
116
Page 119 of 156
Vehicles Without Wheel Covers
1. Mount the road tire on the axle.
2. Install the remaining lug nuts with the cone shaped end of the nut toward the wheel.Lightly tighten the lug nuts.
3. Lower the vehicle to the ground by turning the jack handle counterclockwise.
4. Finish tightening the lug nuts. Push down on the wrench while at the end of the handle for increased leverage. Tighten the lug nuts in a star pattern until each nut has been
tightened twice. The correct tightness of each lug nut is 100 ft/lbs (135 N·m). If in doubt
about the correct tightness, have them checked with a torque wrench by your authorized
dealer or service station.
5. After 25 miles (40 km) check the lug nut torque with a torque wrench to ensure that all lug nuts are properly seated against the wheel.
CAUTION!
• The winch mechanism is designed for use with the winch T-handle only. Use of air wrench or other power tools is not recommended and can damage the winch.
• Do not attempt to raise the vehicle by jacking on locations other than those indicated
in the Jacking Instructions for this vehicle.
• Be sure to mount the spare tire with the valve stem facing outward. The vehicle could
be damaged if the spare tire is mounted incorrectly.
• The compact spare tire/cover assembly must be used when the compact spare tire is
stored. Failure to use this cover could drastically reduce the life of the compact spare
tire.
• The winch mechanism is designed specifically to stow a compact spare tire only. Do
not attempt to use the winch to stow the full size flat tire, or any other full-size tire.
Vehicle damage may result.
WHAT TO DO IN EMERGENCIES
117
Page 137 of 156
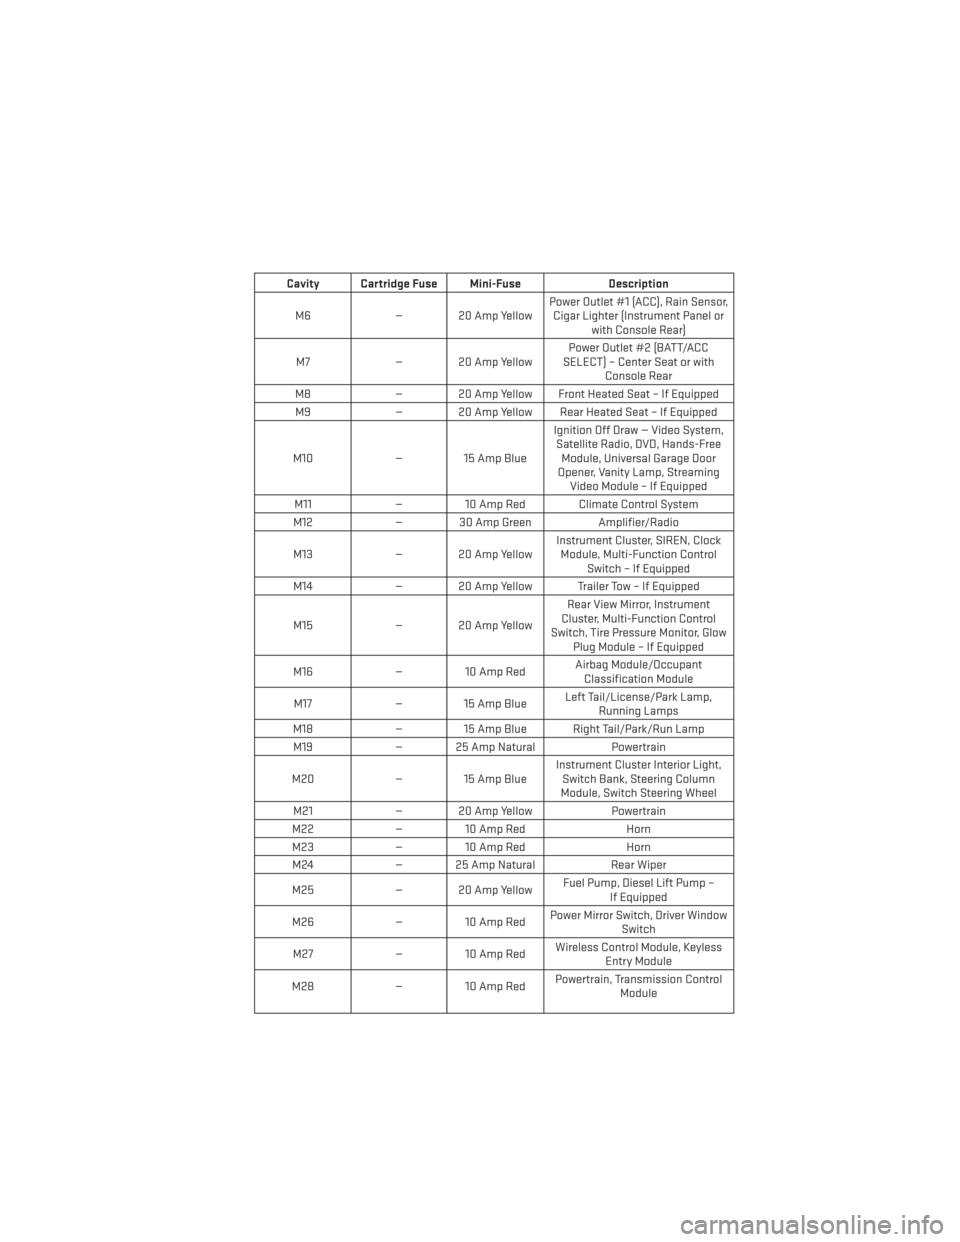
Cavity Cartridge Fuse Mini-FuseDescription
M6 — 20 Amp Yellow Power Outlet #1 (ACC), Rain Sensor,
Cigar Lighter (Instrument Panel or with Console Rear)
M7 — 20 Amp Yellow Power Outlet #2 (BATT/ACC
SELECT) – Center Seat or with Console Rear
M8 — 20 Amp Yellow Front Heated Seat – If Equipped
M9 — 20 Amp Yellow Rear Heated Seat – If Equipped
M10 — 15 Amp Blue Ignition Off Draw — Video System,
Satellite Radio, DVD, Hands-Free Module, Universal Garage Door
Opener, Vanity Lamp, Streaming Video Module – If Equipped
M11 — 10 Amp Red Climate Control System
M12 — 30 Amp Green Amplifier/Radio
M13 — 20 Amp Yellow Instrument Cluster, SIREN, Clock
Module, Multi-Function Control Switch – If Equipped
M14 — 20 Amp Yellow Trailer Tow – If Equipped
M15 — 20 Amp Yellow Rear View Mirror, Instrument
Cluster, Multi-Function Control
Switch, Tire Pressure Monitor, Glow Plug Module – If Equipped
M16 — 10 Amp Red Airbag Module/Occupant
Classification Module
M17 — 15 Amp Blue Left Tail/License/Park Lamp,
Running Lamps
M18 — 15 Amp Blue Right Tail/Park/Run Lamp
M19 — 25 Amp Natural Powertrain
M20 — 15 Amp Blue Instrument Cluster Interior Light,
Switch Bank, Steering Column
Module, Switch Steering Wheel
M21 — 20 Amp Yellow Powertrain
M22 — 10 Amp Red Horn
M23 — 10 Amp Red Horn
M24 — 25 Amp Natural Rear Wiper
M25 — 20 Amp Yellow Fuel Pump, Diesel Lift Pump –
If Equipped
M26 — 10 Amp Red Power Mirror Switch, Driver Window
Switch
M27 — 10 Amp Red Wireless Control Module, Keyless
Entry Module
M28 — 10 Amp Red Powertrain, Transmission Control
Module
MAINTAINING YOUR VEHICLE
135
Page 143 of 156
FREQUENTLY ASKED QUESTIONS
GETTING STARTED
• How do I install my LATCH Equipped Child Seat? pg. 12
• How do I program my Front Seat Memory? pg. 17
OPERATING YOUR VEHICLE
• How does the Electronic Range Select (ERS) operate? pg. 34
ELECTRONICS
• Which radio is in my vehicle?• Uconnect® 130 pg. 46
• Uconnect® 130 WITH SiriusXM pg. 48
• Uconnect® 430/430N pg. 51
• Uconnect® 730N pg. 60
• How do I activate the Audio Jack?
• Uconnect® 130 pg. 50
• Uconnect® 130 WITH SiriusXM pg. 50
• Uconnect® 430/430N pg. 55
• Uconnect® 730N pg. 64
• How do I set the clock on my radio?
• Uconnect® 130 pg. 46
• Uconnect® 130 WITH SiriusXM pg. 46
• Uconnect® 430/430N pg. 51
• Uconnect® 730N pg. 60
• How do I use the Navigation feature?
• Uconnect® 430/430N pg. 57
• Uconnect® 730N pg. 67
• How do I pair my cell phone via Bluetooth® with the Uconnect® Hands-Free Voice Activation System? pg. 77
• How do I use my USB port to listen to audio through my touch-screen radio? pg. 75
• How do I configure my Universal Garage Door Opener (HomeLink®) ? pg. 86
FAQ’s
141
Page 145 of 156
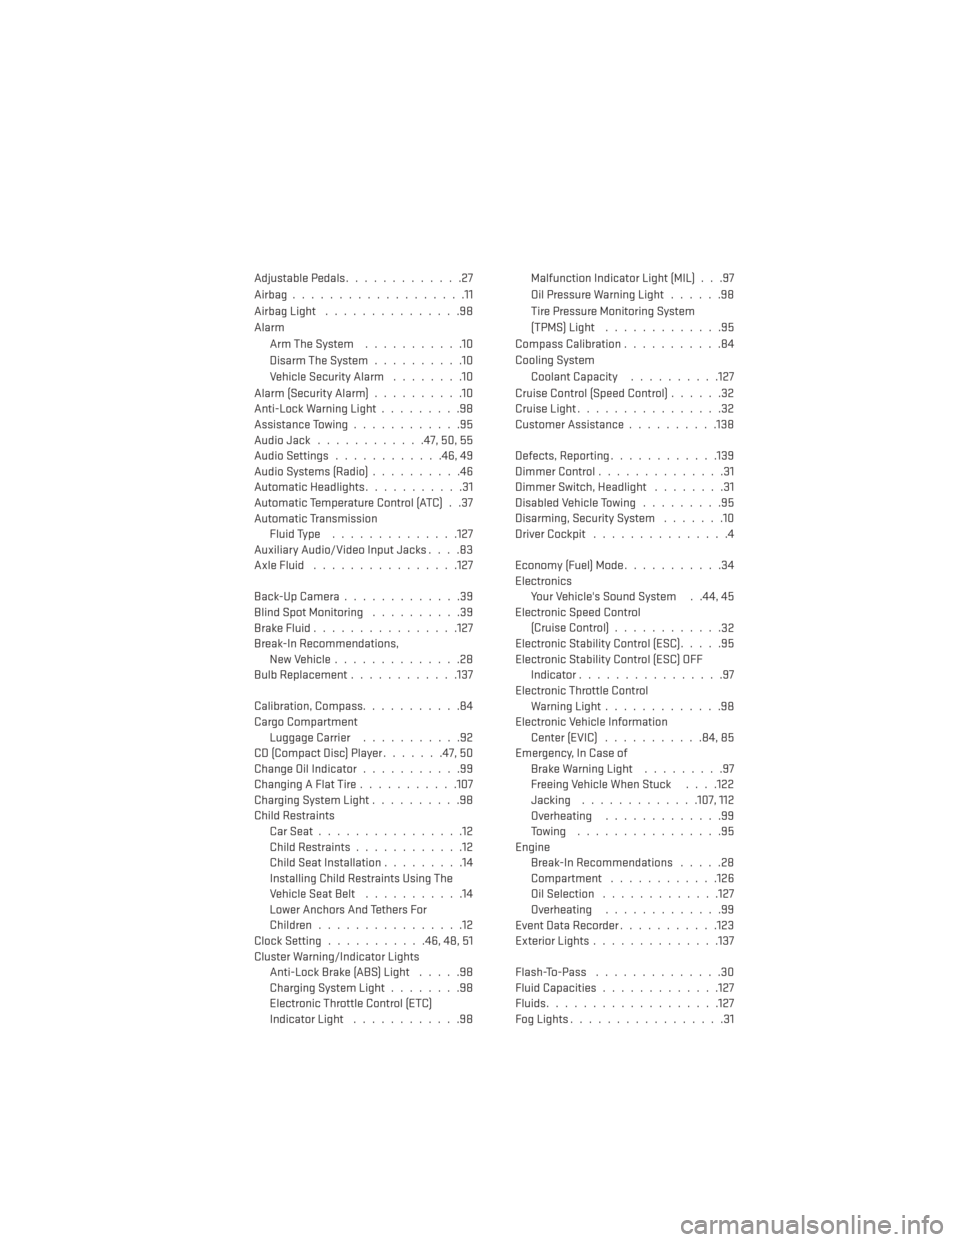
Adjustable Pedals.............27
Airbag...................11
Airbag Light ...............98
Alarm Arm The System ...........10
Disarm The System ..........10
Vehicle Security Alarm ........10
Alarm (Security Alarm) ..........10
Anti-Lock Warning Light .........98
Assistance Towing ............95
Audio Jack ............47, 50, 55
Audio Settings ............46,49
Audio Systems (Radio) ..........46
Automatic Headlights ...........31
Automatic Temperature Control (ATC) . .37
Automatic Transmission Fluid Type ..............127
Auxiliary Audio/Video Input Jacks ....83
AxleFluid ................127
Back-UpCamera.............39
Blind Spot Monitoring ..........39
BrakeFluid................127
Break-In Recommendations, New Vehicle ..............28
BulbReplacement............137
Calibration, Compass...........84
Cargo Compartment Luggage Carrier ...........92
CD (Compact Disc) Player .......47, 50
Change Oil Indicator ...........99
Changing A Flat Tire ...........107
Charging System Light ..........98
Child Restraints CarSeat................12
Child Restraints ............12
Child Seat Installation .........14
Installing Child Restraints Using The
Vehicle Seat Belt ...........14
Lower Anchors And Tethers For
Children................12
Clock Setting ...........46,48,51
Cluster Warning/Indicator Lights Anti-Lock Brake (ABS) Light .....98
Charging System Light ........98
Electronic Throttle Control (ETC)
Indicator Light ............98 Malfunction Indicator Light (MIL) . . .97
Oil Pressure Warning Light
......98
Tire Pressure Monitoring System
(TPMS) Light .............95
Compass Calibration ...........84
Cooling System Coolant Capacity ..........127
Cruise Control (Speed Control) ......32
Cruise Light ................32
Customer Assistance ..........138
Defects, Reporting ............139
DimmerControl..............31
Dimmer Switch, Headlight ........31
Disabled Vehicle Towing .........95
Disarming, Security System .......10
Driver Cockpit ...............4
Economy (Fuel) Mode ...........34
Electronics Your Vehicle's Sound System . .44, 45
Electronic Speed Control (Cruise Control) ............
32
Electronic Stability Control (ESC) .....95
Electronic Stability Control (ESC) OFF Indicator ................97
Electronic Throttle Control Warning Light .............98
Electronic Vehicle Information Center (EVIC) ...........84,85
Emergency, In Case of Brake Warning Light .........97
Freeing Vehicle When Stuck . . . .122
Jacking .............107,112
Overheating .............99
Towing ................95
Engine Break-In Recommendations .....28
Compartment ............126
Oil Selection .............127
Overheating .............99
EventDataRecorder.......... .123
Exterior Lights ..............137
Flash-To-Pass ..............30
Fluid Capacities .............127
Fluids ...................127
FogLights.................31
INDEX
143