keyless DODGE GRAND CARAVAN 2015 5.G User Guide
[x] Cancel search | Manufacturer: DODGE, Model Year: 2015, Model line: GRAND CARAVAN, Model: DODGE GRAND CARAVAN 2015 5.GPages: 703, PDF Size: 19.83 MB
Page 55 of 703
Power Liftgate — If Equipped
The power liftgate may be opened manually or by using
the button on the Remote Keyless Entry (RKE) transmit-
ter. Push the button on the transmitter twice within five
seconds, to open the power liftgate. When the liftgate is
fully open, pushing the button twice within five seconds,
a second time, will close the liftgate.
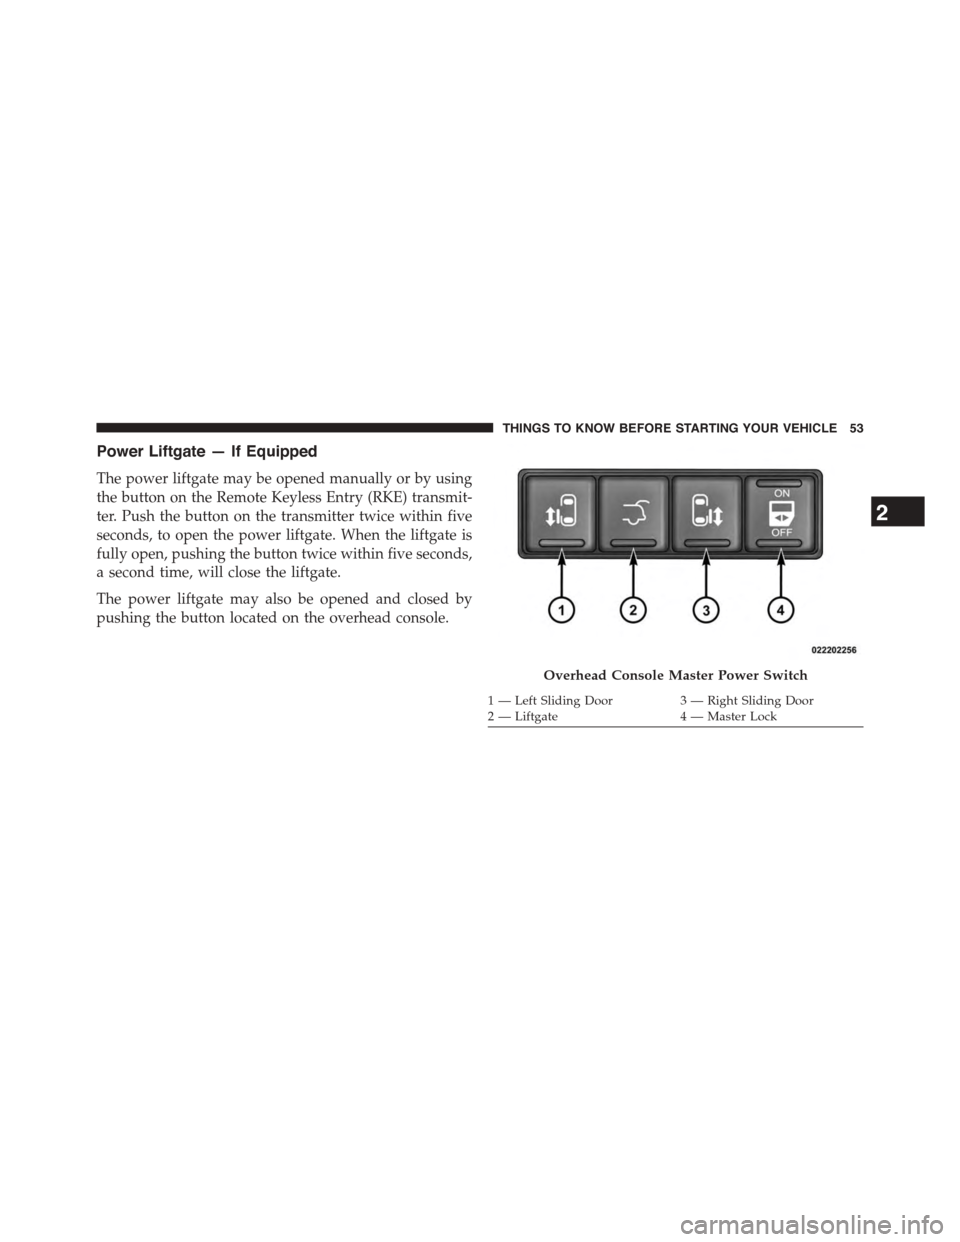
The power liftgate may also be opened and closed by
pushing the button located on the overhead console.
Overhead Console Master Power Switch
1—LeftSlidingDoor3—RightSlidingDoor2 — Liftgate4 — Master Lock
2
THINGS TO KNOW BEFORE STARTING YOUR VEHICLE 53
Page 130 of 703

▫Advanced Phone Connectivity............165
▫Things You Should Know About Your Uconnect®
Phone..............................167
▫General Information...................178
!VOICE COMMAND — IF EQUIPPED........178
▫Voice Command System Operation.........178
▫Commands.........................180
▫Voice Training.......................184
!SEATS . . . . . . . . . . . . . . . . . . . . . . . . . . . . ..184
▫Power Seats — If Equipped..............185
▫Power Lumbar — If Equipped............188
▫Heated Seats — If Equipped..............188
▫Manual Front/Second Row Seat Adjuster . . . .191
▫Manual Reclining Seats — If Equipped......192
▫Head Restraints......................193
▫Stow ’n Go® Seating — If Equipped........198
▫Quad Seats — If Equipped...............204
▫Second Row Bench Seat — If Equipped......208
▫Third Row Power Recline — If Equipped.....209
▫Third Row Power Folding Seat — If Equipped . .209
▫Manually Folding Third Row Seats — If
Equipped...........................212
▫Plastic Grocery Bag Retainer Hooks.........215
!DRIVER MEMORY SEAT — IF EQUIPPED . . . .215
▫Programming The Memory Feature.........216
▫Linking And Unlinking The Remote Keyless Entry
Transmitter To Memory.................217
128 UNDERSTANDING THE FEATURES OF YOUR VEHICLE
Page 218 of 703
equipped), and radio station preset settings. Your Remote
Keyless Entry (RKE) transmitters can also be pro-
grammed to recall the same positions when the UN-
LOCK button is pressed.
Your vehicle may have been delivered with two RKE
transmitters, one RKE transmitter can be linked to each of
the memory positions.
Programming The Memory Feature
NOTE:To create a new memory profile, perform the
following:
1. Cycle the vehicles ignition to the ON/RUN position
(Do not start the engine).
2. Adjust all memory profile settings to desired prefer-
ences (i.e., driver ’s seat, outside mirrors, adjustable
pedals [if equipped] and radio station presets).
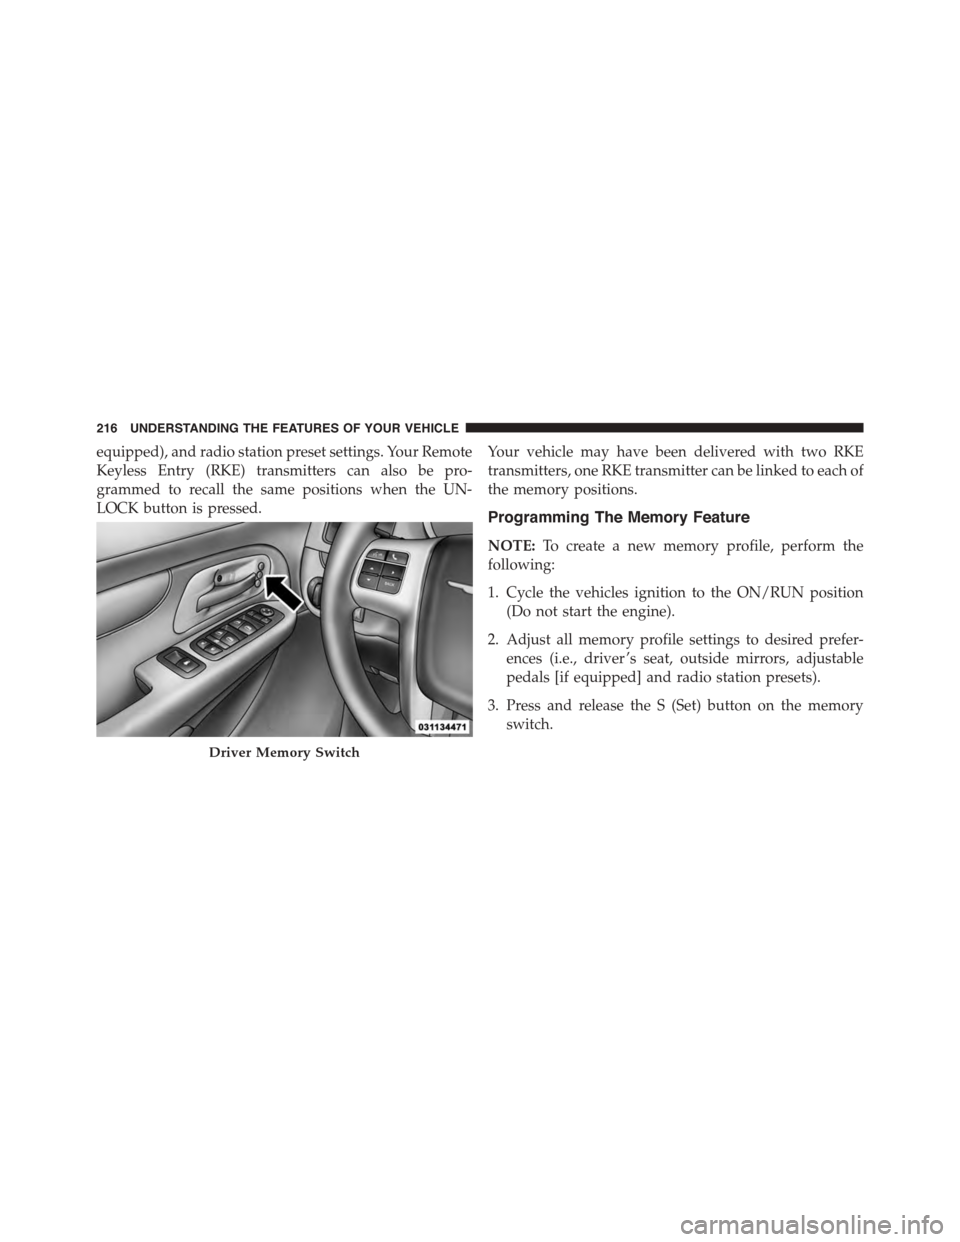
3. Press and release the S (Set) button on the memory
switch.
Driver Memory Switch
216 UNDERSTANDING THE FEATURES OF YOUR VEHICLE
Page 219 of 703

4. Within five seconds, press and release either of the
memory buttons (1) or (2). The Electronic Vehicle
Information Center (EVIC) will display which
memory position has been set.
NOTE:
•Memory profiles can be set without the vehicle in
PARK, but the vehicle must be in PARK to recall a
memory profile.
•To set a memory profile to your RKE transmitter, refer
to “Linking And Unlinking The Remote Keyless Entry
Transmitter To Memory” in this section.
Linking And Unlinking The Remote Keyless Entry
Transmitter To Memory
Your RKE transmitters can be programmed to recall one
of two pre-programmed memory profiles by pressing the
UNLOCK button on the RKE transmitter.
NOTE:Before programming your RKE transmitters you
must select the “RKE Linked To Memory” feature
through the Electronic Vehicle Information Center
(EVIC). Refer to “Electronic Vehicle Information Center
(EVIC) ” in “Understanding Your Instrument Panel” for
further information.
To program your RKE transmitters, perform the follow-
ing:
1. Cycle the vehicles ignition to the OFF position.
2. Select a desired memory profile (1) or (2).
NOTE:If a memory profile has not already been set,
refer to#Programming The Memory Feature#in this
section for instructions on how to set a memory profile.
3. Once the profile has been recalled, press and release
the SET (S) button on the memory switch.
3
UNDERSTANDING THE FEATURES OF YOUR VEHICLE 217
Page 228 of 703
Interior Lighting On
Rotate the left dimmer control completely upward to the
second detent (extreme top position) to turn on the
interior lights. The interior lights will remain on when the
dimmer control is in this position.
Interior lights are also turned on when a door or liftgate
is opened, the Remote Keyless Entry (RKE) transmitter is
activated, or when the dimmer control is moved to the
extreme top.
The interior lights will automatically turn off in approxi-
mately 10 minutes for the first activation and 90 seconds
every activation thereafter until the engine is started, if
one of the following occur:
•A door, sliding door or the liftgate is left open.
•Any overhead reading light is left on.
NOTE:The ignition must be cycled to the OFF position
for this feature to operate.
Interior Lighting Off
Rotate the left dimmer control to the off position (extreme
bottom). The interior lights will remain off when the
doors or liftgate are open.
Parade Mode (Daytime Brightness Feature)
Rotate the left dimmer control to the first detent. This
feature brightens the odometer, radio and overhead
displays when the parking lights or headlights are on.
Halo Lights — If Equipped
Halo lights are strategically placed soft lighting that help
to illuminate specific areas to aid the occupants in
locating specific features while driving at night.
The Halo control switch is located to the right of the
dimmer switch.
226 UNDERSTANDING THE FEATURES OF YOUR VEHICLE
Page 255 of 703
Courtesy/Interior Lighting
At the forward end of the console are two courtesy lights
(standard dome light has two buttons). The lights turn on
when a front door, a sliding door or the liftgate is opened.
If your vehicle is equipped with Remote Keyless Entry
(RKE) the lights will also turn on when the UNLOCK
button on the RKE transmitter is pressed.
The courtesy lights also function as reading lights. Press
in on each lens to turn these lights on while inside the
vehicle. Press a second time to turn each light off. You
may adjust the direction of these lights by pressing the
outside ring, which is identified with four directional
arrows (LED lamps only).
The area around the instrument panel cupholders is also
illuminated from a light in the overhead console (pre-
mium console only). This light is turned on when the
headlight switch is on, and will adjust in brightness when
the dimmer control is rotated up or down.
Sunglass Storage (Non-Sunroof Only)
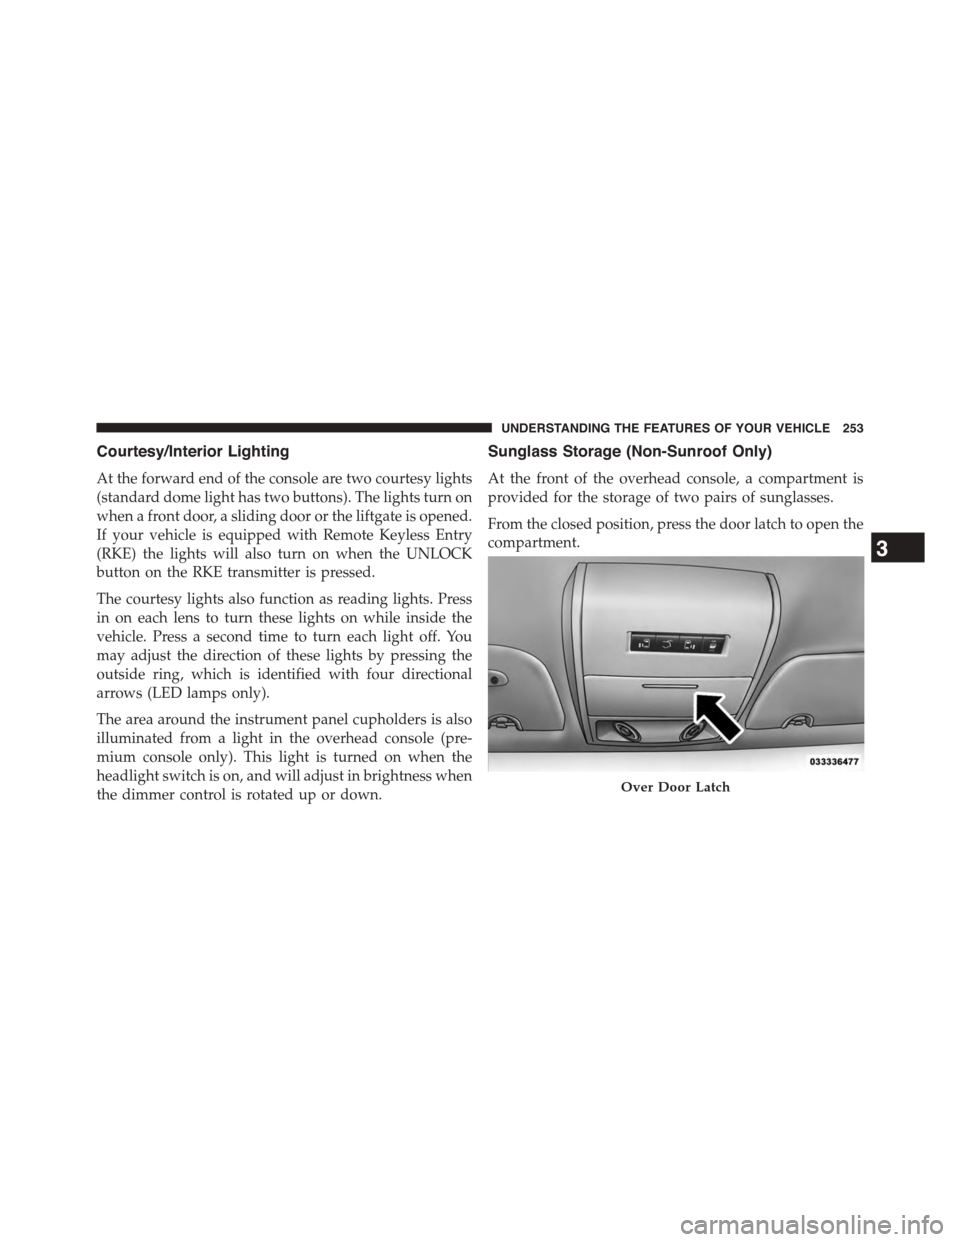
At the front of the overhead console, a compartment is
provided for the storage of two pairs of sunglasses.
From the closed position, press the door latch to open the
compartment.
Over Door Latch
3
UNDERSTANDING THE FEATURES OF YOUR VEHICLE 253
Page 257 of 703
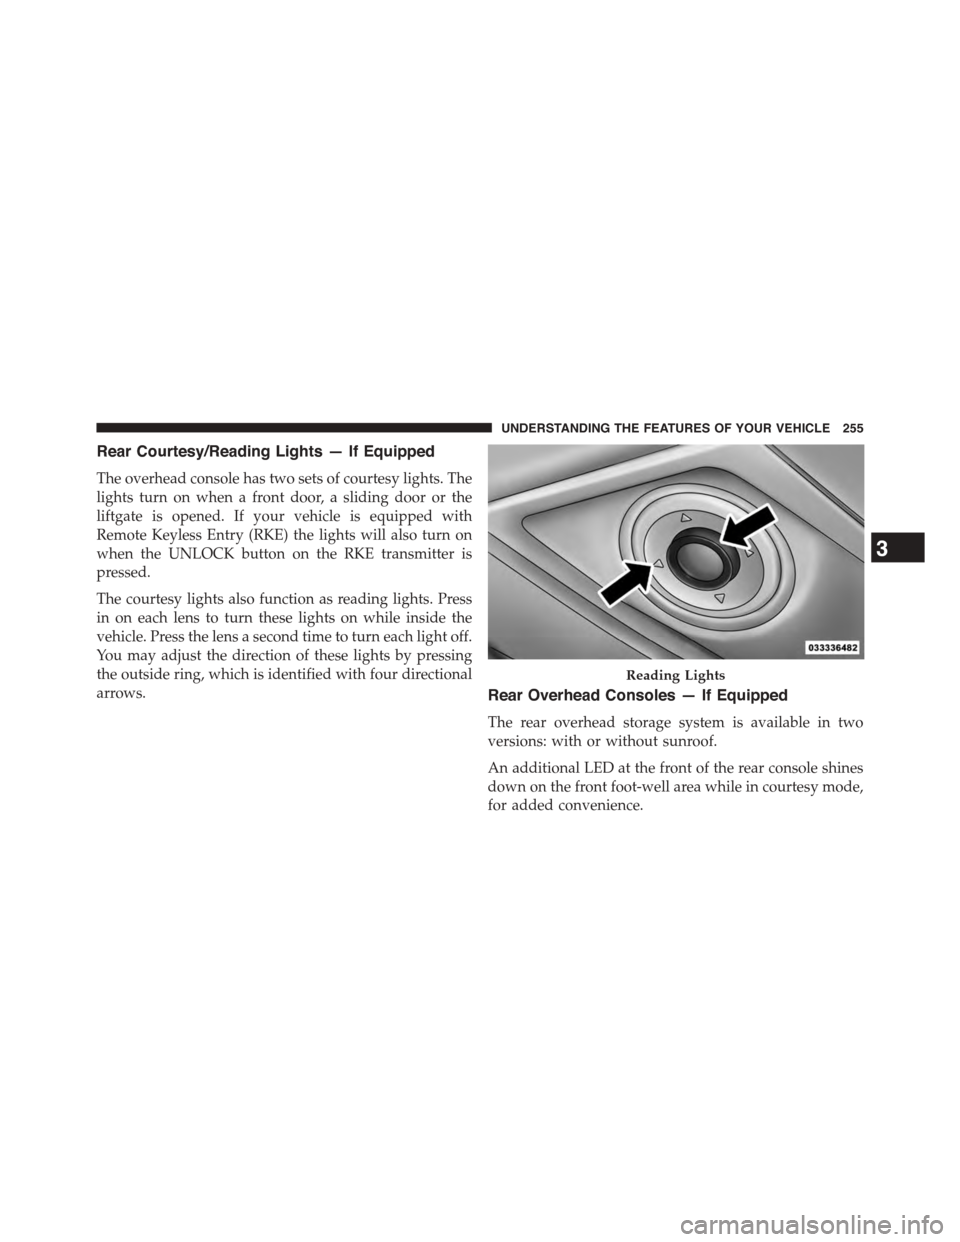
Rear Courtesy/Reading Lights — If Equipped
The overhead console has two sets of courtesy lights. The
lights turn on when a front door, a sliding door or the
liftgate is opened. If your vehicle is equipped with
Remote Keyless Entry (RKE) the lights will also turn on
when the UNLOCK button on the RKE transmitter is
pressed.
The courtesy lights also function as reading lights. Press
in on each lens to turn these lights on while inside the
vehicle. Press the lens a second time to turn each light off.
You may adjust the direction of these lights by pressing
the outside ring, which is identified with four directional
arrows.Rear Overhead Consoles — If Equipped
The rear overhead storage system is available in two
versions: with or without sunroof.
An additional LED at the front of the rear console shines
down on the front foot-well area while in courtesy mode,
for added convenience.
Reading Lights
3
UNDERSTANDING THE FEATURES OF YOUR VEHICLE 255
Page 306 of 703
▫Units..............................338
▫Vehicle Info (Customer Information Features) . .338
▫Messages #..........................339
▫Keyless Enter-N-Go™ Display — If Equipped . .339
▫Compass / Temperature Display..........340
▫Compass Variance.....................342
▫Turn Menu Off.......................342
▫Customer-Programmable Features
(System Setup).......................342
!Uconnect® 430/430N CD/DVD/HDD/NAV — IF
EQUIPPED...........................350
▫Operating Instructions (Voice Command System)
— If Equipped.......................350
▫Operating Instructions (Uconnect® Phone) — If
Equipped...........................350
!Uconnect® 130........................350
▫Operating Instructions — Radio Mode......350
▫Operation Instructions — CD MODE For CD And
MP3 Audio Play......................354
▫Notes On Playing MP3 Files.............356
▫Operation Instructions — Auxiliary Mode . . . .359
!Uconnect® 130 WITH SATELLITE RADIO.....360
▫Operating Instructions — Radio Mode.......360
▫Operation Instructions — CD MODE For CD And
MP3 Audio Play......................366
▫Notes On Playing MP3 Files.............368
▫LIST Button — CD Mode For MP3 Play......371
304 UNDERSTANDING YOUR INSTRUMENT PANEL
Page 332 of 703
•Turn Signal On
•RKE Battery Low
•Service Keyless System
•Low Washer Fluid
•Oil Change Required
•Check Gascap
•Left Front Turn Signal Light Out
•Left Rear Turn Signal Light Out
•Right Front Turn Signal Light Out
•Right Rear Turn Signal Light Out
•Park Assist Disabled
•Service Park Assist System
•Personal Settings Not Available — Vehicle Not in Park
•Blind Spot System Off — This message is displayed
when the ignition is turned to ON to indicate the Blind
Spot System has been turned off.
•Blind Spot System Not Available — This message is
displayed to indicate the Blind Spot Monitor (BSM)
system is temporarily unavailable due to sensor block-
age, electronic interference, or other#temporary#con-
ditions. When this message is displayed both outside
rear view icons will be illuminated. If electronic inter-
ference is present, the BSM system will illuminate the
icon only on the side of interference as long as inter-
ference is present.
•Service Blind Spot System — This message is dis-
played to indicate the Blind Spot Monitor (BSM)
system is permanently unavailable. The driver will
receive an EVIC message and the BSM display warn-
ing in both mirrors will be permanently illuminated. If
this message is present see an authorized dealer.
330 UNDERSTANDING YOUR INSTRUMENT PANEL
Page 337 of 703
display in the EVIC display for approximately 10 sec-
onds, after a single chime has sounded, to indicate the
next scheduled oil change interval. The engine oil change
indicator system is duty-cycle based, which means the
engine oil change interval may fluctuate dependent upon
your personal driving style.
Unless reset, this message will continue to display each
time you turn the ignition switch to the ON/RUN
position or cycle the ignition to the ON/RUN position if
equipped with Keyless Enter-N-Go™. To turn off the
message temporarily, push and release the MENU but-
ton. To reset the oil change indicator system (after
performing the scheduled maintenance) refer to the fol-
lowing procedure.
Vehicles Equipped With Keyless Enter-N-Go™
1. Without pushing the brake pedal, push the ENGINE
START/STOP button and cycle the ignition to the
ON/RUN position (do not start the engine.)
2. Fully depress the accelerator pedal, slowly, three times
within 10 seconds.
3. Without pushing the brake pedal, push the ENGINE
START/STOP button once to return the ignition to the
OFF/LOCK position.
Vehicles Not Equipped With Keyless Enter-N-Go™
1. Turn the ignition switch to the ON/RUN position (do
not start the engine.)
2. Fully depress the accelerator pedal, slowly, three times
within 10 seconds.
3. Turn the ignition switch to the OFF/LOCK position.
NOTE:If the indicator message illuminates when you
start the engine, the oil change indicator system did not
reset. If necessary, repeat these steps.
4
UNDERSTANDING YOUR INSTRUMENT PANEL 335