display DODGE GRAND CARAVAN 2015 5.G Owner's Manual
[x] Cancel search | Manufacturer: DODGE, Model Year: 2015, Model line: GRAND CARAVAN, Model: DODGE GRAND CARAVAN 2015 5.GPages: 164, PDF Size: 22.27 MB
Page 68 of 164
•Findthestationtostorebyeitherpressingthe“SEEKUP”or“SEEKDOWN”buttonson the touchscreen, pressing the “Scan” button on the touchscreen, or by using the“Direct Tune” button on the touchscreen.
•Oncethestationisfound,pressandholdoneofthe“PRESETS”buttonsonthetouchscreen in the list to the right, until the preset key flashes and the station text onthe button on the touchscreen changes.
NOTE:
If the Presets are not visible on the right side of the screen, press the “PRESETS” button
on the touchscreen.
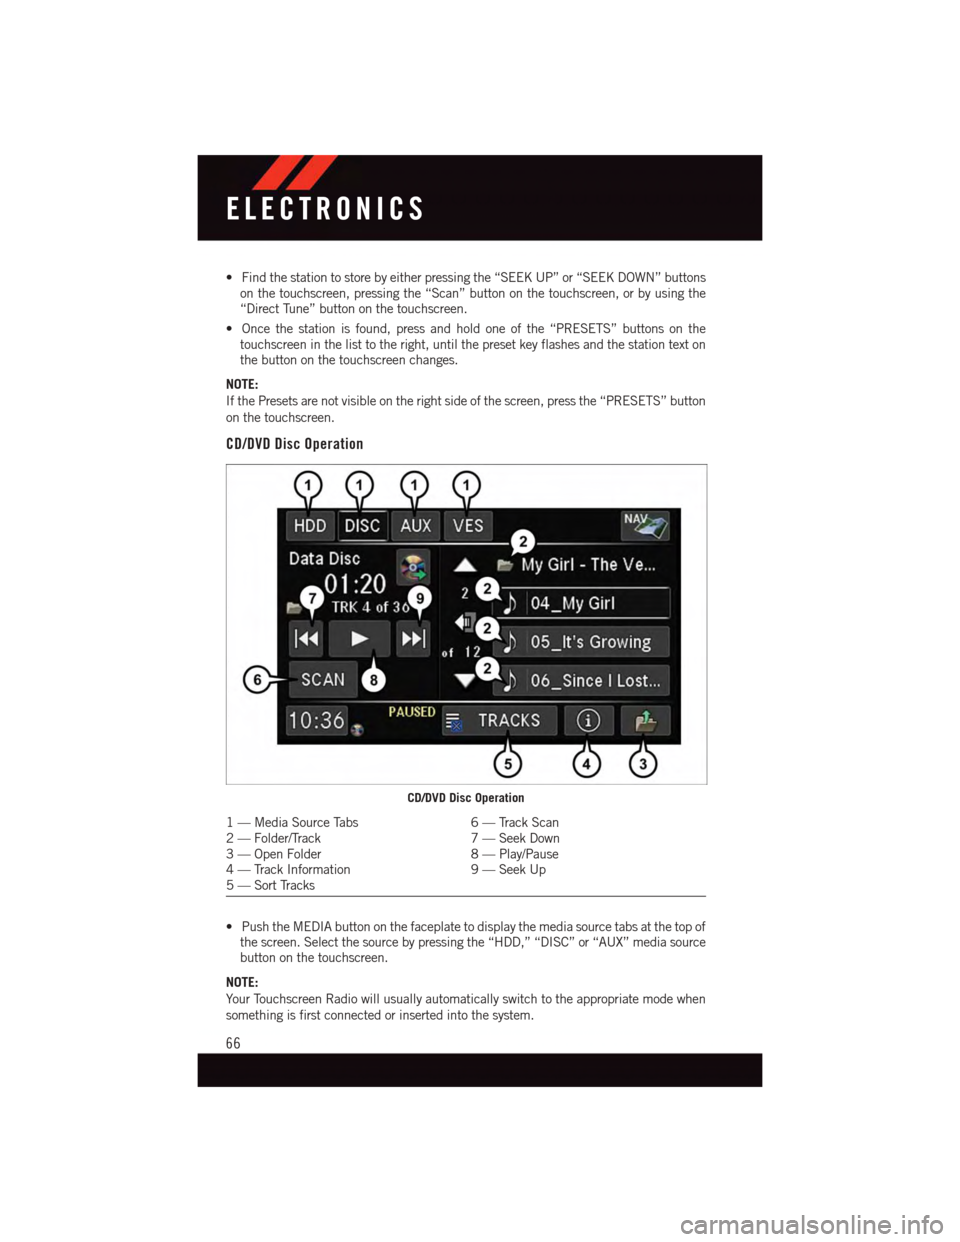
CD/DVD Disc Operation
•PushtheMEDIAbuttononthefaceplatetodisplaythemediasourcetabsatthetopofthe screen. Select the source by pressing the “HDD,” “DISC” or “AUX” media sourcebutton on the touchscreen.
NOTE:
Yo u r To u c h s c r e e n R a d i o w i l l u s u a l l y a u t o m a t i c a l l y s w i t c h t o t h e a p p r o p r i a t e m o d e w h e n
something is first connected or inserted into the system.
CD/DVD Disc Operation
1—MediaSourceTabs6—TrackScan2—Folder/Track7—SeekDown3—OpenFolder8—Play/Pause4—TrackInformation9—SeekUp5—SortTracks
ELECTRONICS
66
Page 69 of 164
Insert A CD/DVD Disc
•Toinsertadisc,pushtheLOADbuttononthefaceplate.
•Withtheprintedsideupwards,insertthediscintothediscslotoftheradio.Theradio
pulls the disc in automatically and closes the flip screen. The radio selects the
appropriate mode after the disc is recognized, and starts playing the first track. The
display shows “Reading...” during this process.
Seek Up/Seek Down
•PushtheSEEKUPorSEEKDOWNbuttonsonthefaceplatetoseekthroughtracksin
Disc Mode. Holding the SEEK UP button on the touchscreen will fast forward through
the track until the beginning of the track is reached; if still held it will fast-forward
through the next sequential track(s) (if random play node is not active) until released.
Holding the SEEK DOWN button on the touchscreen will fast-reverse through the track
until the beginning of the track is reached; if still held it will fast-reverse through the
next sequential track(s) (if random play node is not active) until released.
Audio Jack Operation
The AUX/Audio Jack provides a means to connect a portable audio device, such as an
MP3 player or an iPod®,tothevehicle’ssoundsystem.Thisrequirestheuseofa3.5mm
stereo audio patch cable.
•PushtheMEDIAbuttononthefaceplatethenthe“AUX”buttononthetouchscreento
change the mode to auxiliary device if the Audio Jack is connected, allowing the music
from your portable device to play through the vehicle's speakers.
NOTE:
The functions of the portable device are controlled using the device itself, not the buttons
on the radio. However, the volume may be controlled using the radio or portable device.
Hard Disk Drive (HDD) Operation
•TheHardDiskDrive(HDD)modegivesyouaccesstotheaudiofilesontheinternalhard
disk drive. It functions similar to a CD player, with the exception that the internal HDD
can hold more tracks.
•Itisalsopossibletoimportdisplaypicturestotheinternalharddiskdrive.Thepictures
can be displayed on the right half of the radio screen.
•BeforeusingtheHDDmode,youwillneedtocopysongsandpicturestotheinternal
hard drive. Songs and pictures can be added to the hard drive by using a CD or USB
device (e.g. thumb drive or memory stick).
NOTE:
•HDDsupportsonly.jpg/JPEGformatsforphotos.
•WMA/MP3FilesandSelectiveSongsfromaCDcanalsobeaddedtotheHDD.Seethe
Uconnect®430/430N User's Manual for more information.
ELECTRONICS
67
Page 71 of 164
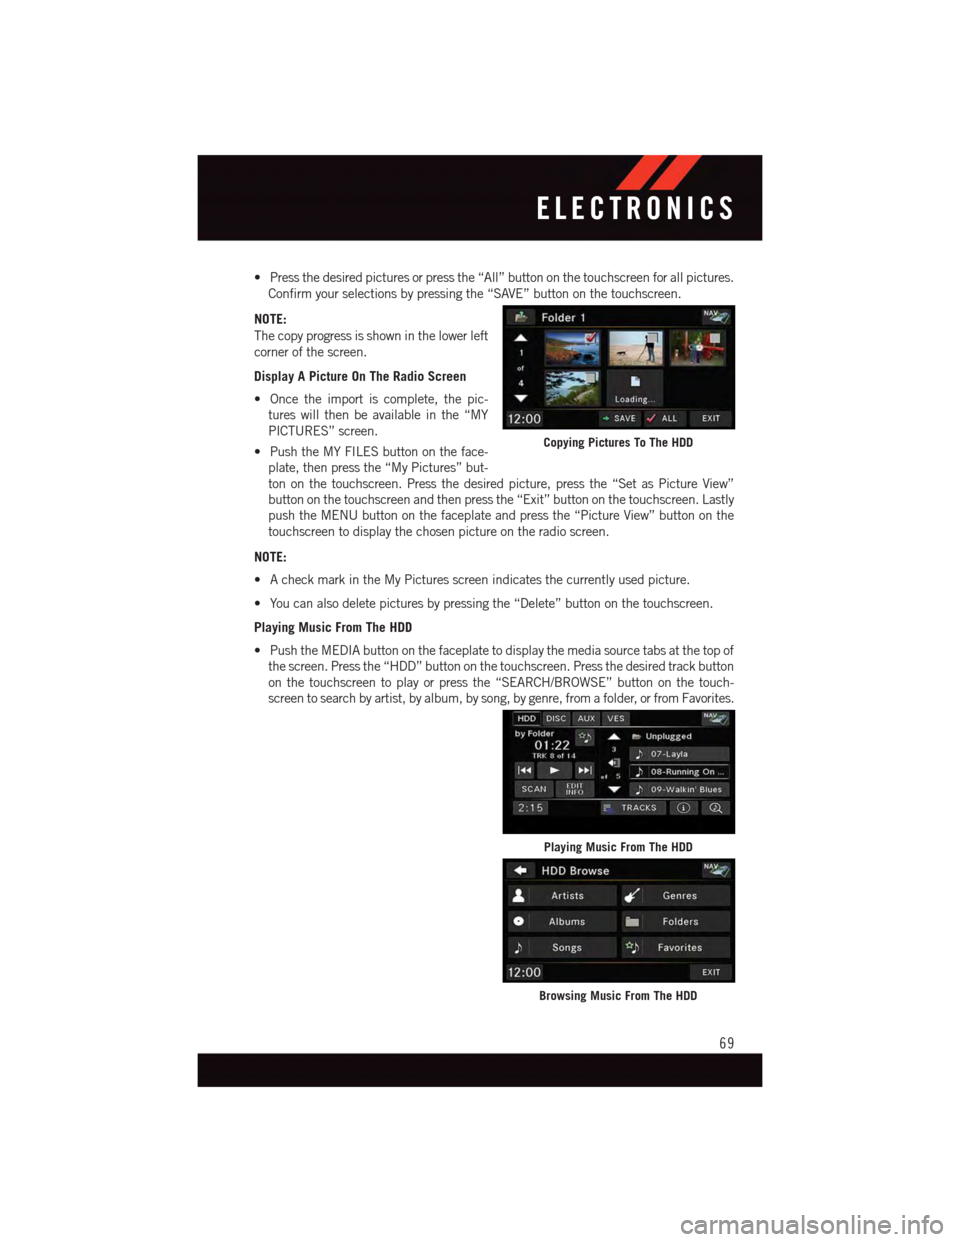
•Pressthedesiredpicturesorpressthe“All”buttononthetouchscreenforallpictures.
Confirm your selections by pressing the “SAVE” button on the touchscreen.
NOTE:
The copy progress is shown in the lower left
corner of the screen.
Display A Picture On The Radio Screen
•Oncetheimportiscomplete,thepic-
tures will then be available in the “MY
PICTURES” screen.
•PushtheMYFILESbuttonontheface-
plate, then press the “My Pictures” but-
ton on the touchscreen. Press the desired picture, press the “Set as Picture View”
button on the touchscreen and then press the “Exit” button on the touchscreen. Lastly
push the MENU button on the faceplate and press the “Picture View” button on the
touchscreen to display the chosen picture on the radio screen.
NOTE:
•AcheckmarkintheMyPicturesscreenindicatesthecurrentlyusedpicture.
•Youcanalsodeletepicturesbypressingthe“Delete”buttononthetouchscreen.
Playing Music From The HDD
•PushtheMEDIAbuttononthefaceplatetodisplaythemediasourcetabsatthetopof
the screen. Press the “HDD” button on the touchscreen. Press the desired track button
on the touchscreen to play or press the “SEARCH/BROWSE” button on the touch-
screen to search by artist, by album, by song, by genre, from a folder, or from Favorites.
Copying Pictures To The HDD
Playing Music From The HDD
Browsing Music From The HDD
ELECTRONICS
69
Page 72 of 164
Cleaning Your Touchscreen Radio
•Donotsprayanyliquidorcausticchemicalsdirectlyonthescreen.Useacleananddry
micro fiber lens cleaning cloth to clean the touchscreen.
•Ifnecessary,usealint-freeclothdampenedwithacleaningsolutionsuchasisopropyl
alcohol or an isopropyl alcohol and water solution ratio of 50:50. Always follow the
solvent manufacturer's precautions and directions.
Garmin® Navigation
•Uconnect®430N integrates Garmin’s consumer-friendly navigation into your vehicle.
Garmin®Navigation includes a database with over six million points of interest.
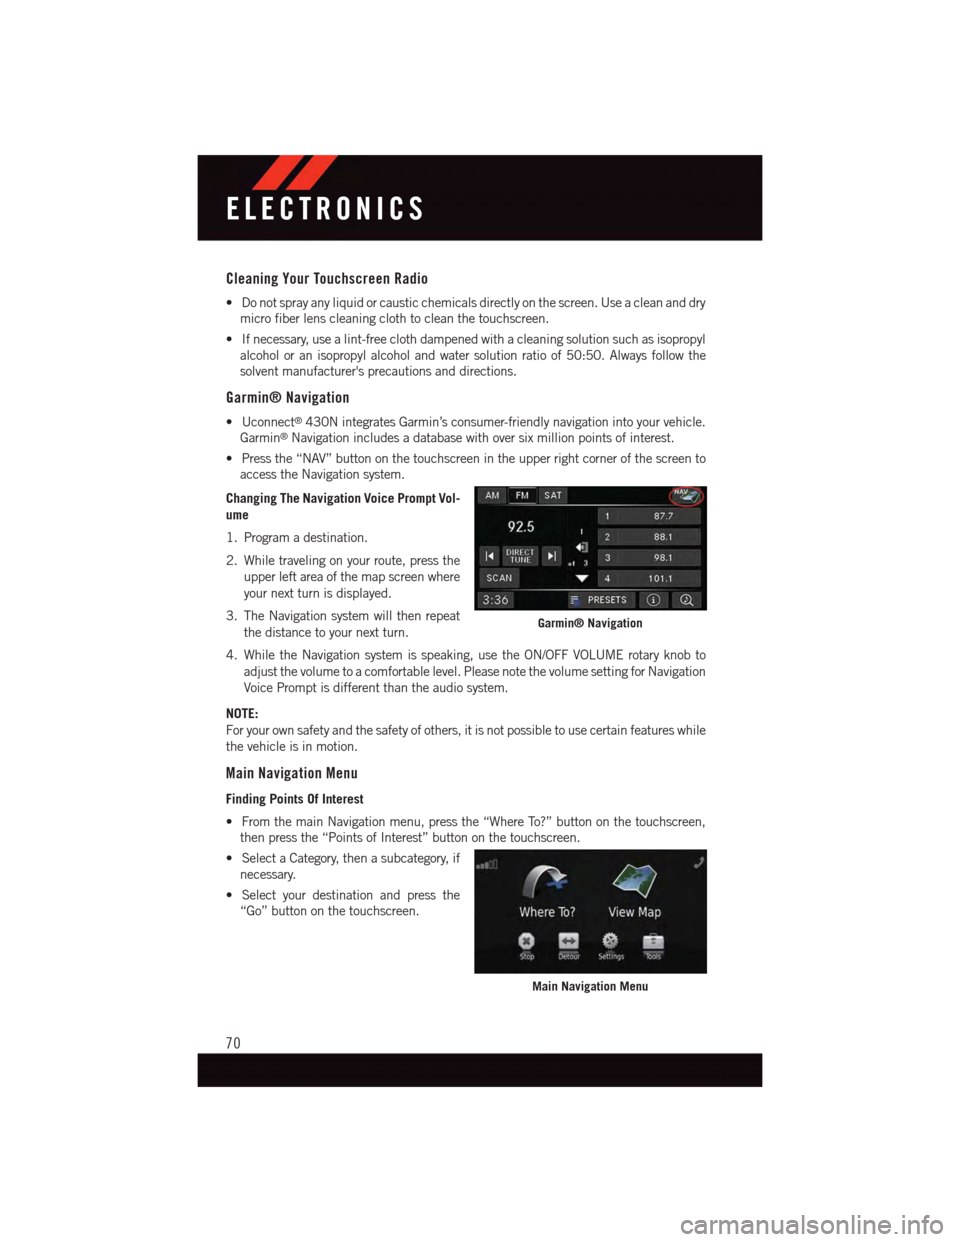
•Pressthe“NAV”buttononthetouchscreenintheupperrightcornerofthescreento
access the Navigation system.
Changing The Navigation Voice Prompt Vol-
ume
1. Program a destination.
2. While traveling on your route, press the
upper left area of the map screen where
your next turn is displayed.
3. The Navigation system will then repeat
the distance to your next turn.
4. While the Navigation system is speaking, use the ON/OFF VOLUME rotary knob to
adjust the volume to a comfortable level. Please note the volume setting for Navigation
Voice Prompt is different than the audio system.
NOTE:
For your own safety and the safety of others, it is not possible to use certain features while
the vehicle is in motion.
Main Navigation Menu
Finding Points Of Interest
•FromthemainNavigationmenu,pressthe“WhereTo?”buttononthetouchscreen,
then press the “Points of Interest” button on the touchscreen.
•SelectaCategory,thenasubcategory,if
necessary.
•Selectyourdestinationandpressthe
“Go” button on the touchscreen.
Garmin® Navigation
Main Navigation Menu
ELECTRONICS
70
Page 75 of 164
Taking A Detour
To t a k e a d e t o u r y o u m u s t b e n a v i g a t i n g a r o u t e .
•Pressthe“backarrow”iconbuttononthetouchscreenmultipletimestoreturntothe
Main Navigation menu.
•Pressthe“Detour”buttononthetouchscreen.
NOTE:
If the route you are currently taking is the only reasonable option, the device might not
calculate a detour.
Acquiring Satellites
The GPS Satellite strength bars indicate the strength of your satellite reception.
•Acquiringsatellitesignalscantakeafewminutes.Whenatleastoneofthebarsis
green, your device has acquired satellite signals.
•Youmayexperiencedelaysreceivingsatellitesignalswheninareaswithanobstructed
view to the sky, such as garages, tunnels, or large cities with tall buildings.
SiriusXM SATELLITE RADIO/TRAVEL LINK
•SiriusXMTravelLinkrequiresasubscription,soldseparatelyafterthe1yeartrial
subscription included with your vehicle purchase.
•SiriusXMTravelLinkisonlyavailableintheUnitedStates.
•ThefollowingdescribesfeaturesthatareavailablewheninSiriusXMSatelliteRadio
mode.
•ToaccessSiriusXMSatelliteRadio,pushtheRADIO/MEDIAorRADIObuttononthe
faceplate, then press the “SAT” button on the touchscreen.
Info
•Pressthe“i”buttononthetouchscreentoviewdetailedinformationaboutthecurrent
Sirius XM Satellite channel.
SiriusXM Parental Controls
•SiriusXM offers the option to permanently block selected channels. Call
1-888-539-7474 and request the Family Package.
•Uconnect® 430/430N and 730N:Push the “MENU” button on the faceplate while in
SiriusXM™ Satellite Radio Mode, then press the “Channel Lock” to enable and/or
disable desired channels. The SEEK and SCAN function will then only display channels
without Channel lock.
ELECTRONICS
73
Page 77 of 164
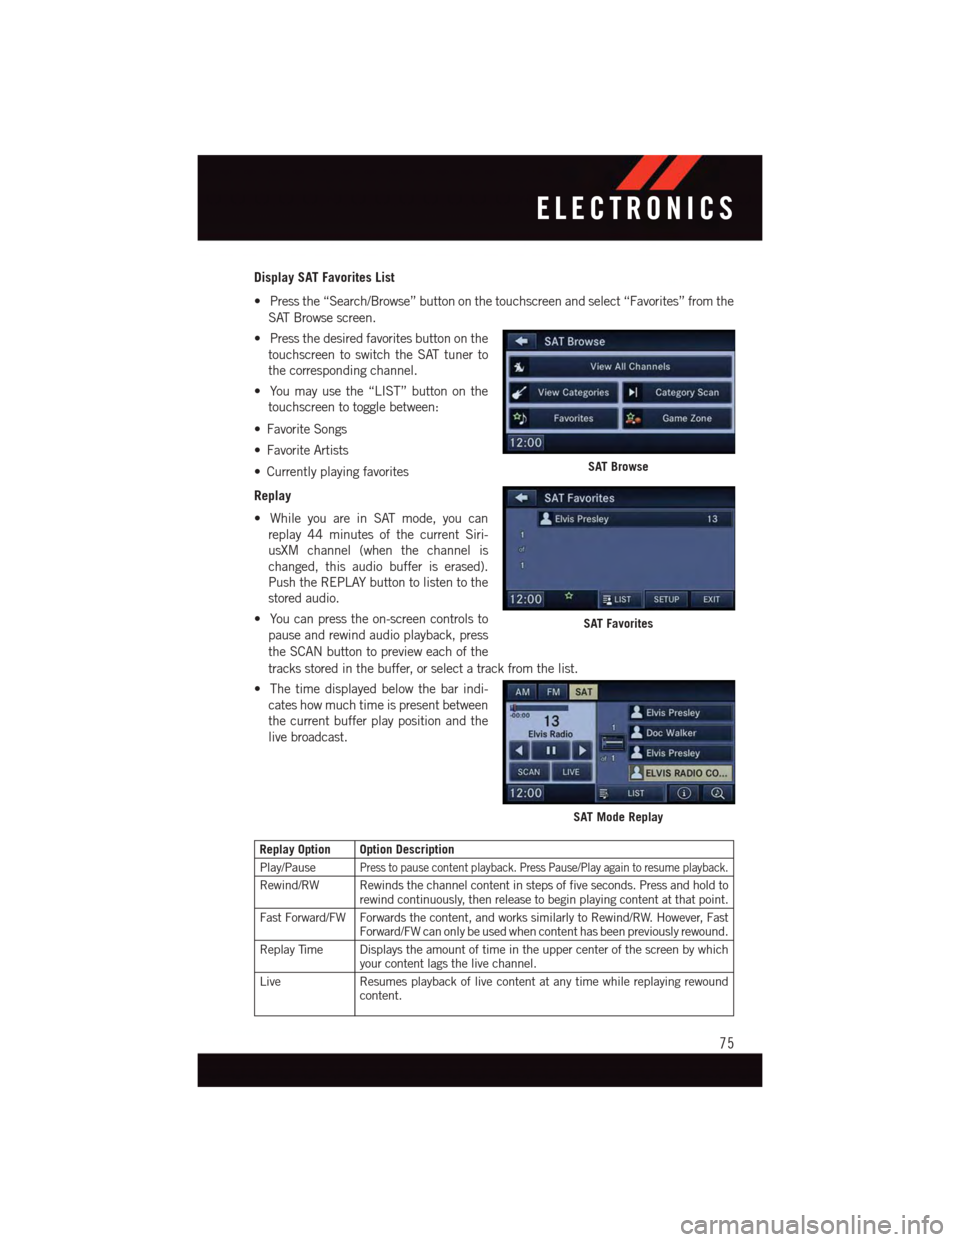
Display SAT Favorites List
•Pressthe“Search/Browse”buttononthetouchscreenandselect“Favorites”fromthe
SAT Browse screen.
•Pressthedesiredfavoritesbuttononthe
touchscreen to switch the SAT tuner to
the corresponding channel.
•Youmayusethe“LIST”buttononthe
touchscreen to toggle between:
•FavoriteSongs
•FavoriteArtists
•Currentlyplayingfavorites
Replay
•WhileyouareinSATmode,youcan
replay 44 minutes of the current Siri-
usXM channel (when the channel is
changed, this audio buffer is erased).
Push the REPLAY button to listen to the
stored audio.
•Youcanpresstheon-screencontrolsto
pause and rewind audio playback, press
the SCAN button to preview each of the
tracks stored in the buffer, or select a track from the list.
•Thetimedisplayedbelowthebarindi-
cates how much time is present between
the current buffer play position and the
live broadcast.
Replay Option Option Description
Play/PausePress to pause content playback. Press Pause/Play again to resume playback.
Rewind/RW Rewinds the channel content in steps of five seconds. Press and hold torewind continuously, then release to begin playing content at that point.
Fast Forward/FW Forwards the content, and works similarly to Rewind/RW. However, FastForward/FW can only be used when content has been previously rewound.
Replay Time Displays the amount of time in the upper center of the screen by whichyour content lags the live channel.
Live Resumes playback of live content at any time while replaying rewoundcontent.
SAT Browse
SAT Favorites
SAT Mode Replay
ELECTRONICS
75
Page 86 of 164
Bluetooth® STREAMING AUDIO
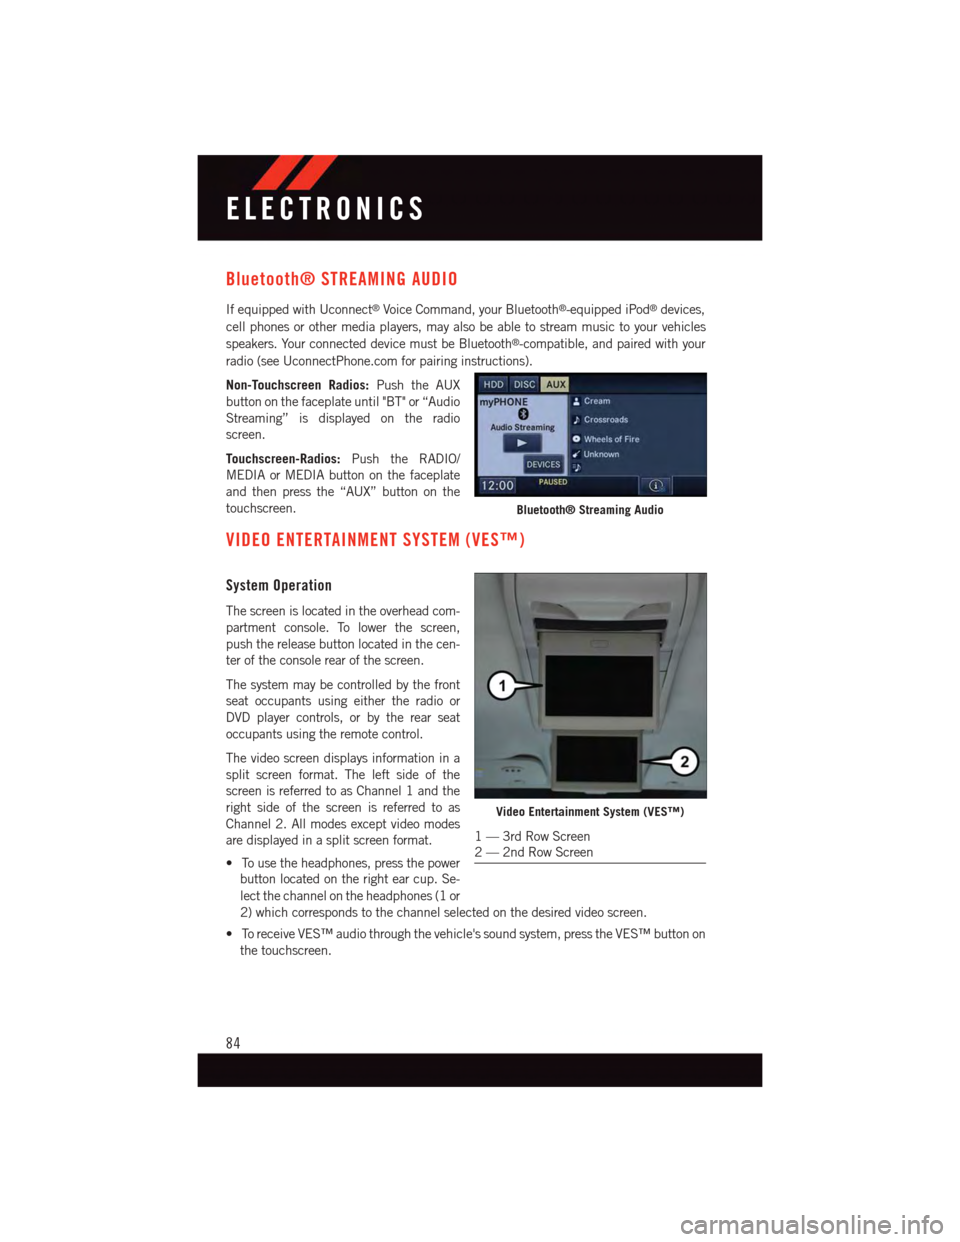
If equipped with Uconnect®Voice Command, your Bluetooth®-equipped iPod®devices,
cell phones or other media players, may also be able to stream music to your vehicles
speakers. Your connected device must be Bluetooth®-compatible, and paired with your
radio (see UconnectPhone.com for pairing instructions).
Non-Touchscreen Radios:Push the AUX
button on the faceplate until "BT" or “Audio
Streaming” is displayed on the radio
screen.
Touchscreen-Radios:Push the RADIO/
MEDIA or MEDIA button on the faceplate
and then press the “AUX” button on the
touchscreen.
VIDEO ENTERTAINMENT SYSTEM (VES™)
System Operation
The screen is located in the overhead com-
partment console. To lower the screen,
push the release button located in the cen-
ter of the console rear of the screen.
The system may be controlled by the front
seat occupants using either the radio or
DVD player controls, or by the rear seat
occupants using the remote control.
The video screen displays information in a
split screen format. The left side of the
screen is referred to as Channel 1 and the
right side of the screen is referred to as
Channel 2. All modes except video modes
are displayed in a split screen format.
•Tousetheheadphones,pressthepower
button located on the right ear cup. Se-
lect the channel on the headphones (1 or
2) which corresponds to the channel selected on the desired video screen.
•ToreceiveVES™audiothroughthevehicle'ssoundsystem,presstheVES™buttonon
the touchscreen.
Bluetooth® Streaming Audio
Video Entertainment System (VES™)
1—3rdRowScreen2—2ndRowScreen
ELECTRONICS
84
Page 87 of 164
Operation Of The Touchscreen Radio/DVD Player/Blu-Ray® Player
To v i e w a D V D / B l u - r a y, p u s h t h e O P E N / C L O S E o r L O A D b u t t o n o n t h e f a c e p l a t e a n d i n s e r t
the disc or insert the disc into the optional DVD/Blu-ray player. Playback will begin
automatically after the DVD/Blu-ray is recognized by the disc drive. If playback does not
begin automatically when the disc is inserted into the DVD/Blu-ray player push the PLAY
button. If playback does not begin automatically after the disc is inserted into the
touchscreen radio follow these steps:
•PushtheMENUbuttononthefaceplate,thenPresstheRearVES™buttononthe
touchscreen. If a chapter list appears on the right side of the screen, press the HIDE
LIST button on the touchscreen to display the Rear VES™ control screen.
•Pressthe“1“buttononthetouchscreentoselectanaudiochannel,thenpressthe
“DISC” button on the touchscreen in the MEDIA column.
Operation Of The Remote Control
The remote control operates similarly to any DVD remote you may have used before and
allows the rear seat passengers to change stations, tracks, discs and audio/video modes.
The remote control is designed to control either channel by using the selector switch
located on the right side of the remote.
Connect the video game or other external media devices to the AUX jacks following the
color coding for the VES™ jacks.
•PushingthepowerbuttonwillturntheVES™systemON/OFF.
•PushingthemodebuttoncausestheMODESELECTIONmenutoappearontheVES™
screen. Use the remote control arrow buttons to scroll through the available modes, and
then push ENTER to select the desired mode.
Auxiliary Audio/Video Input Jacks
The AUX jacks are located on the drivers side rear trim panel behind the sliding door.
Connect the video game or other external media devices to the AUX jacks following the
color coding for the VES™ jacks.
Using either the touchscreen radio or remote control, select AUX from the REAR VES™
CONTROL or the MODE SELECTION screen.
Refer to the Uconnect®Multimedia – Video Entertainment System (VES™) section in the
vehicle Owner's Manual on the DVD for further details.
ELECTRONICS
85
Page 88 of 164
ELECTRONIC VEHICLE INFORMATION CENTER (EVIC)
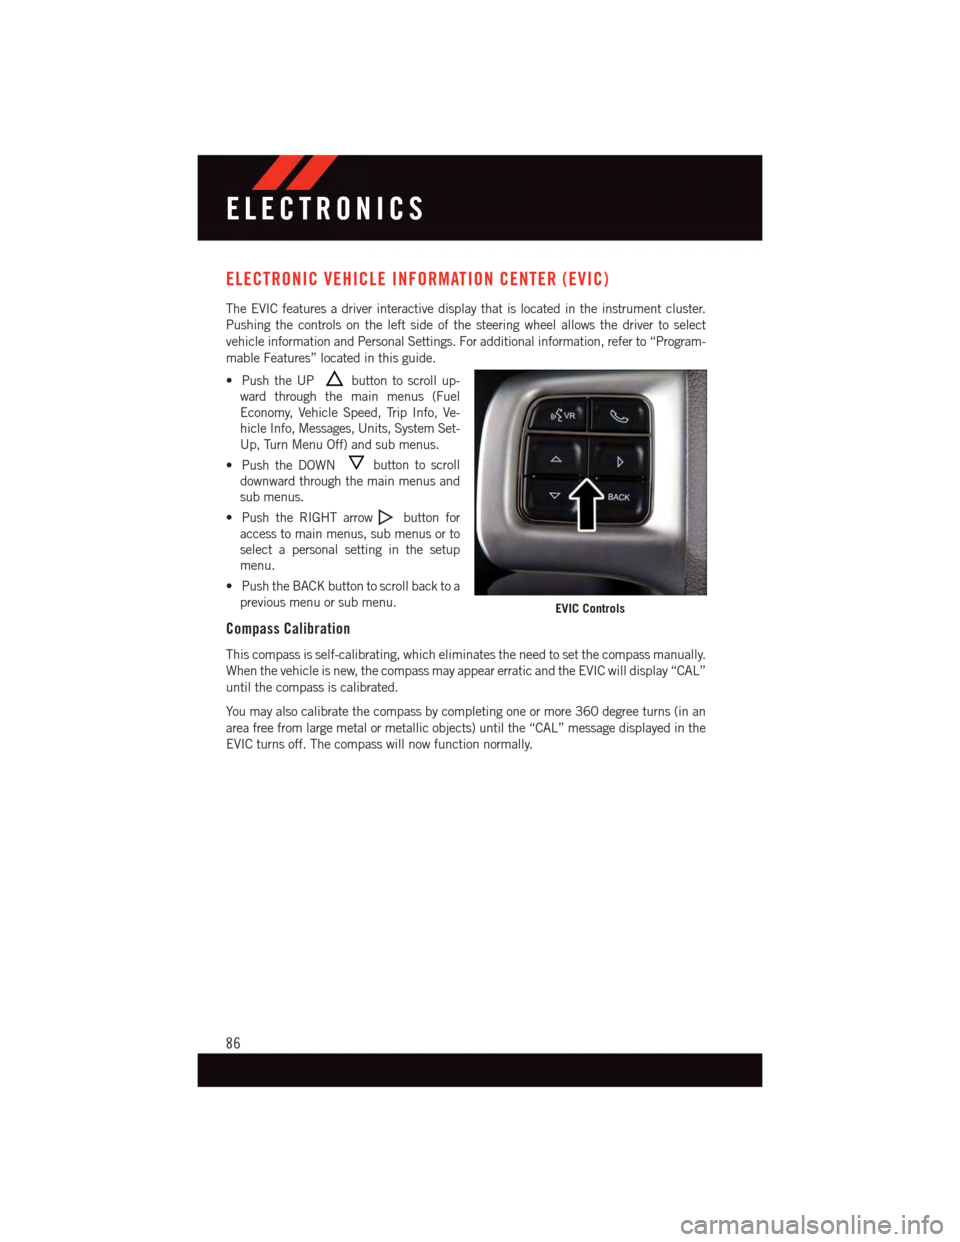
The EVIC features a driver interactive display that is located in the instrument cluster.
Pushing the controls on the left side of the steering wheel allows the driver to select
vehicle information and Personal Settings. For additional information, refer to “Program-
mable Features” located in this guide.
•PushtheUPbutton to scroll up-
ward through the main menus (Fuel
Economy, Vehicle Speed, Trip Info, Ve-
hicle Info, Messages, Units, System Set-
Up, Turn Menu Off) and sub menus.
•PushtheDOWNbutton to scroll
downward through the main menus and
sub menus.
•PushtheRIGHTarrowbutton for
access to main menus, sub menus or to
select a personal setting in the setup
menu.
•PushtheBACKbuttontoscrollbacktoa
previous menu or sub menu.
Compass Calibration
This compass is self-calibrating, which eliminates the need to set the compass manually.
When the vehicle is new, the compass may appear erratic and the EVIC will display “CAL”
until the compass is calibrated.
Yo u m a y a l s o c a l i b r a t e t h e c o m p a s s b y c o m p l e t i n g o n e o r m o r e 3 6 0 d e g r e e t u r n s ( i n a n
area free from large metal or metallic objects) until the “CAL” message displayed in the
EVIC turns off. The compass will now function normally.
EVIC Controls
ELECTRONICS
86
Page 89 of 164
PROGRAMMABLE FEATURES
Electronic Vehicle Information Center (EVIC) — If Equipped
Personal Settings allows you to set and recall features when the transmission is in PARK.
If the transmission is out of PARK or the vehicle begins moving, a warning message
SYSTEM SETUP NOT AVAILABLE VEHICLE NOT IN PARK displays when you try to select
“System Setup” from the main menu.
The EVIC can be used to program the following Personal Settings. Push the RIGHT arrow
buttonuntil Personal Settings displays, then push the DOWN buttonto scroll
through the settings. Push the RIGHT arrow buttonto change the setting.
•SelectLanguage•Key-OffPowerDelay
•Nav-TurnByTurn•IlluminatedApproach
•AutoLockDoors•HillStartAssist
•AutoUnlockDoors•FlasherswithSlidingDoor
•RemoteUnlockSequence•CalibrateCompass
•RemoteStartComfortSys.•CompassVariance
•HornwithRemoteLock•ParkAssist-IfEquipped
•FlashLampsWithLock•AutomaticHighBeams-IfEquipped
•HeadlampOffDelay•KeylessEnter-N-Go-IfEquipped
•HeadlampsWithWipers•RKELinkedToMemory-IfEquipped
Key Fob Programmable Features
The following features may also be programmed by using the Key Fob transmitter or the
ignition switch and driver's door lock switch.
NOTE:
Pushing the LOCK button while you are inside the vehicle will activate the Vehicle Security
Alarm. Opening a door with the Vehicle Security Alarm activated will cause the alarm to
sound. Push the UNLOCK button to deactivate the Vehicle Security Alarm.
Unlock On First Press
To u n l o c k e i t h e r t h e d r i v e r ' s s i d e , o r a l l d o o r s , o n t h e f i r s t p u s h o f t h e U N L O C K b u t t o n :
•PushandholdtheLOCKbuttonforatleastfourseconds,butnolongerthan10
seconds. Then, push and hold the UNLOCK button while still holding the LOCK button.
•Releasebothbuttonsatthesametime.
ELECTRONICS
87